Flutter动画

Posted flutter开发者

tags:

篇首语:本文由小常识网(cha138.com)小编为大家整理,主要介绍了Flutter动画相关的知识,希望对你有一定的参考价值。

前言

在前面的文章中我们看了下Flutter中的补间动画和Flutter Widgets,今天我们来看下页面过渡动画,也可以叫做共享元素动画,页面A的元素过渡到页面B元素的过场效果。

Hero

在Flutter中我们可以使用Hero来帮助实现这个共享元素动画的效果

hero 动画代码具有以下结构:

定义一个起始 hero widget,称为源 hero 。 hero 指定其图形表示(通常是图片)和识别标记,并且位于源路由定义的当前显示的 widget树中。

定义一个结束的 hero widget,称为目标 hero 。这位 hero 也指定了它的图形表示,以及与源 hero 相同的标记。重要的是两个 hero widget都使用相同的标签创建,通常是代表底层数据的对象。为了获得最佳效果, hero 应该有几乎相同的 widget树。

创建一个包含目标 hero 的路由。目标路由定义了动画结束时的 widget树。

通过导航器将目标路由入栈来触发动画。Navigator推送和弹出操作会为每对 hero 配对,并在源路由和目标路由中使用匹配的标签触发 hero 动画。

Flutter计算从起点到终点对 hero 界限进行动画处理的补间(生成每一帧大小和位置)

例如在第一个页面中声明Widget1

1
Hero(tag: 'hero', child:Wdiget1)

然后再第二个界面同样的声明Widget2

1
2

Hero(tag: 'hero', child:Wdiget2)

可以看到我们的Widget都被Hero包括着,并且都是 tag都是hero,只需要这样我们呢便声明了一个共享元素组建了,接下里我们只需要使用MaterialPageRoute便可以达到共享元素动画的效果。

好吧,还是来看个例子:

1
2
3
4
5
6
7
8
9
10
11
12
13
14
15
16
17
18
19
20
21
22
23
24
25
26
27
28
29
30
31
32
33
34
35
36
37
38
39
40
41
42
43
44
45
46
47
48
49
50
51
52
53
54

import 'package:flutter/material.dart';

class BasicHeroAnimation extends StatelessWidget {
 Widget build(BuildContext context) {
   return new Scaffold(
     appBar: new AppBar(
       title: const Text(' Hero Animation'),
     ),
     body: new Center(
       child: new InkWell(
         onTap: () {
           Navigator.of(context).push(
             new MaterialPageRoute<Null>(
               builder: (BuildContext context) {
                 return new Scaffold(
                   appBar: new AppBar(
                     title: const Text('Second Page'),
                   ),
                   body: new Container(
                     padding: const EdgeInsets.all(8.0),
                     alignment: Alignment.topLeft,
                     color: Colors.lightBlueAccent,
                     child: new Hero(
                       tag: 'Hero',
                       child: new SizedBox(
                         width: 100.0,
                         child: new Image.asset(
                           'images/cover.jpg',
                         ),
                       ),
                     ),
                   ),
                 );
               },
             ),
           );
         },
         // Main route
         child: new Hero(
           tag: 'Hero',
           child: new Image.asset(
             'images/cover.jpg',
           ),
         ),
       ),
     ),
   );
 }
}

void main() {
 runApp(new MaterialApp(home: new BasicHeroAnimation()));
}

我们在第一个页面使用了一张本地的图片作为image的数据源,并且让它居中显示不限制图片的宽高显示。

再第二个页面我们在页面左上角显示图片并且限制文件宽为100

让我们点击图片时就会触发vigator.of(context).push()方法到达第二个界面。

举个例子

在前面得文章中我们学习了很多的Widget比如button、TextField、ProgressIndicator等组件,今天我们就用相关的组件来做一个登陆的例子如何。

今天我们先来看下效果
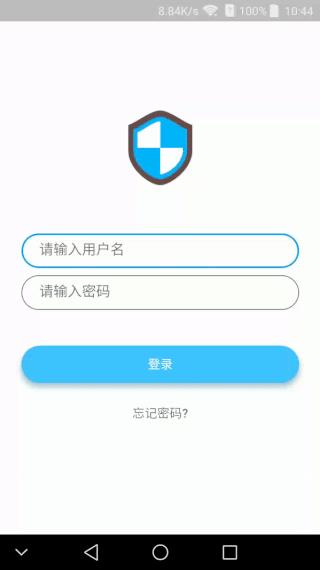
Flutter动画【3】

可以看到我们在第一个界面布局了一个登陆界面,第二个界面是一个登陆成功的界面。

在第一个界面中我们将上面的Logo使用hero包裹,同样的第二个界面我们同样使用hero包裹logo

接下来我们来看下代码是如何实现的

由于涉及到多个界面,我们就不把widget放在一个界面处理了,我们建立了三个dart文件,分别对应应用主入口、登录界面和主界面


主入口:

1
2
3
4
5
6
7
8
9
10
11
12
13
14
15
16
17
18
19
20
21
22

import 'package:flutter/material.dart';

import 'login_page.dart';

void main() => runApp(MyApp());

class MyApp extends StatelessWidget {


 @override
 Widget build(BuildContext context) {
   return MaterialApp(
     title: 'Login Demo',
     debugShowCheckedModeBanner: false,
     theme: ThemeData(
       primarySwatch: Colors.lightBlue,
     ),
     home: LoginPage(),
   );
 }
}

在主入口中我们使用 debugShowCheckedModeBanner: false参数去除debug版本中右上角的标识,使用theme属性来声明全局颜色。


登录界面:

1
2
3
4
5
6
7
8
9
10
11
12
13
14
15
16
17
18
19
20
21
22
23
24
25
26
27
28
29
30
31
32
33
34
35
36
37
38
39
40
41
42
43
44
45
46
47
48
49
50
51
52
53
54
55
56
57
58
59
60
61
62
63
64
65
66
67
68
69
70
71
72
73
74
75
76
77
78
79
80
81
82
83
84
85
86
87
88
89
90
91
92
93
94
95
96
97
98
99
100
101
102
103
104
105
106
107
108
109
110
111
112
113
114
115
116
117
118
119
120
import 'dart:async';

import 'package:flutter/material.dart';
import 'package:test1/animation/hexo/login/home_page.dart';


class LoginPage extends StatefulWidget {
 @override
 _LoginPageState createState() => new _LoginPageState();
}

class _LoginPageState extends State<LoginPage> with TickerProviderStateMixin{

 bool isLogin=false;

 onLoginClick(){
  Future.delayed(Duration(seconds: 2), () {
    Navigator.of(context).push(
        new MaterialPageRoute<Null>(
            builder: (BuildContext context) {
              return HomePage();
            }));
    isLogin=false;
   });
  setState(() {
    isLogin=true;

  });
 }
 @override
 void dispose() {
   super.dispose();
   isLogin=false;
 }
 @override
 Widget build(BuildContext context) {
   var loginButtonWidegt;
   if(isLogin) {
     AnimationController animationController=new AnimationController(vsync: this,duration: Duration(milliseconds: 2000));
     Animation<Color> animation=new Tween(begin: Colors.white,end:Colors.black).animate(animationController);
     loginButtonWidegt =CircularProgressIndicator(backgroundColor: Colors.white,valueColor: animation,);
   }else{
     loginButtonWidegt = Text(
         '登录', style: TextStyle(color: Colors.white));
   }
   final logo = Hero(
     tag: 'hero',
     child: CircleAvatar(
       backgroundColor: Colors.transparent,
       radius: 48.0,
       child: Image.asset('assets/icon.png'),
     ),
   );

   final userName = TextFormField(
     keyboardType: TextInputType.emailAddress,
     autofocus: false,
     decoration: InputDecoration(
       hintText: '请输入用户名',
       contentPadding: EdgeInsets.fromLTRB(20.0, 10.0, 20.0, 10.0),
       border: OutlineInputBorder(borderRadius: BorderRadius.circular(32.0)),
     ),
   );

   final password = TextFormField(
     autofocus: false,
     obscureText: true,
     decoration: InputDecoration(
       hintText: '请输入密码',
       contentPadding: EdgeInsets.fromLTRB(20.0, 10.0, 20.0, 10.0),
       border: OutlineInputBorder(borderRadius: BorderRadius.circular(32.0)),
     ),
   );

   final loginButton = Padding(
     padding: EdgeInsets.symmetric(vertical: 16.0),
     child: Material(
       borderRadius: BorderRadius.circular(30.0),
       shadowColor: Colors.lightBlueAccent.shade100,
       elevation: 5.0,
       child: MaterialButton(
         minWidth: 200.0,
         height: 42.0,
         onPressed: onLoginClick,
         color: Colors.lightBlueAccent,
         child:loginButtonWidegt,
       ),
     ),
   );

   final forgotLabel = FlatButton(
     child: Text(
       '忘记密码?',
       style: TextStyle(color: Colors.black54),
     ),
     onPressed: () {},
   );

   return Scaffold(
     backgroundColor: Colors.white,
     body: Center(
       child: ListView(
         shrinkWrap: true,
         padding: EdgeInsets.only(left: 24.0, right: 24.0),
         children: <Widget>[
           logo,
           SizedBox(height: 48.0),
           userName,
           SizedBox(height: 8.0),
           password,
           SizedBox(height: 24.0),
           loginButton,
           forgotLabel
         ],
       ),
     ),
   );
 }
}

我们在登录界面使用ListView包括登录所用的Widget使得界面自动上推,使用hero包裹Logo,每当用户点击登录按钮时都会触发延时2秒进入主界面的操作,同时我们将登录按钮的Text替换为原型进度指示器。


主界面:

1
2
3
4
5
6
7
8
9
10
11
12
13
14
15
16
17
18
19
20
21
22
23
24
25
26
27
28
29
30
31
32
33
34
35
36
37
38
39
40
41
42
43
44
45
46
47
48
49
50
51
52
53
import 'package:flutter/material.dart';

class HomePage extends StatelessWidget {

 @override
 Widget build(BuildContext context) {
   final logo = Hero(
     tag: 'hero',
     child: Padding(
       padding: EdgeInsets.all(16.0),
       child: CircleAvatar(
         radius: 72.0,
         backgroundColor: Colors.transparent,
         backgroundImage: AssetImage('assets/icon.png'),
       ),
     ),
   );

   final welcome = Padding(
     padding: EdgeInsets.all(8.0),
     child: Text(
       'Welcome Flutter',
       style: TextStyle(fontSize: 28.0, color: Colors.white),
     ),
   );

   final text = Padding(
     padding: EdgeInsets.all(8.0),
     child: Text(
       'Flutter is Google’s mobile app SDK for crafting high-quality native interfaces on ios and android in record time. Flutter works with existing code, is used by developers and organizations around the world, and is free and open source.',
       style: TextStyle(fontSize: 16.0, color: Colors.white),
     ),
   );

   final body = Container(
     width: MediaQuery.of(context).size.width,
     padding: EdgeInsets.all(28.0),
     decoration: BoxDecoration(
       gradient: LinearGradient(colors: [
         Colors.blue,
         Colors.lightBlueAccent,
       ]),
     ),
     child: Column(
       children: <Widget>[logo, welcome, text],
     ),
   );

   return Scaffold(
     body: body,
   );
 }
}

主界面的逻辑就比较简单,只是logo做了放大和位置变化,同样的也需用使用Hero包裹,并且使用和login界面同样的tag

当然在这里例子中我们没有对用户输入的用户名和密码做校验,一般这个过程是服务端校验的,当然大家也可以根据自己的需要来做下校验

另外:

TextFormField:输入组件类似于TextField

CircleAvatar:圆形头像组件

Material:Material基础组件

LinearGradient:线性渐变


这些组件的使用方法也非常的简单,大家可以在下面多多练习下如何使用。


小结

  • 使用Hero widget可以显示共享元素动画

  • 使用Hero的Widget两个tag必须一致


以上是关于Flutter动画的主要内容,如果未能解决你的问题,请参考以下文章

VSCode自定义代码片段7——CSS动画

错误记录Flutter 混合开发获取 BinaryMessenger 报错 ( FlutterActivityAndFragmentDelegate.getFlutterEngine() )(代码片段

使用嵌套片段和动画对象

在 webview_flutter 中启用捏合和缩放,在哪里添加代码片段 [this.webView.getSettings().setBuiltInZoomControls(true);]

Android:将“ViewPager”动画从片段更改为片段

Android 动画嵌套片段