Flutter Hero 动画
Posted Flutter 编程开发
tags:
篇首语:本文由小常识网(cha138.com)小编为大家整理,主要介绍了Flutter Hero 动画相关的知识,希望对你有一定的参考价值。
Hero 动画参考:
https://flutterchina.club/animations/hero-animations/https://book.flutterchina.club/chapter9/hero.html
01
—
基本概念
Hero 动画,也就是共享元素动画,指的是可以在路由(页面)之间“飞行”的widget,简单来说Hero动画就是在路由切换时,有一个共享的widget可以在新旧路由间切换。由于共享的widget在新旧路由页面上的位置、外观可能有所差异,所以在路由切换时会从旧路逐渐过渡到新路由中的指定位置,这样就会产生一个Hero动画。
在我们日常使用中,Hero 动画基本上分成两类:标准 hero 动画 和 Radial Hero 动画。
1、标准 hero 动画
标准的 hero 动画是将一个 hero widiget 从一个页面飞到一个新的页面,通常会以不同尺寸降落在不同位置。
标准 hero 演示效果如下
2、Radial hero 动画
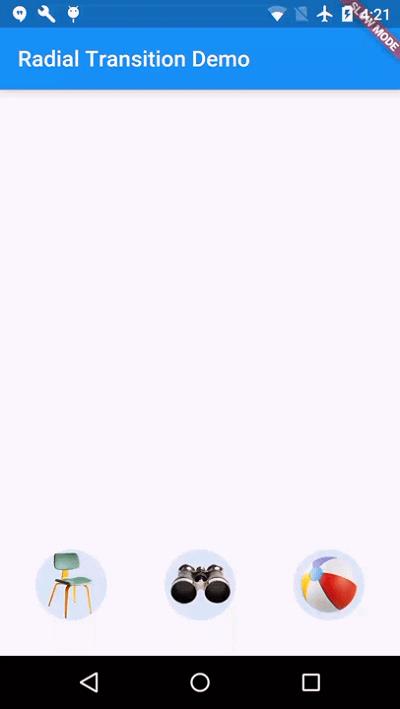
Radial hero 动画也就是带有径向变换效果的 hero 动画,其效果就是一个 hero widget 会从一个圆形变换成矩形。
Radial hero 动画效果如下
02
—
Hero 动画实践
1、标准 hero 动画
实现标准的 hero 动画非常简单,只需要在不同的页面中使用具有相同 tag 的 Hero 即可。
假设第一个页面如下:
class Heroanimpage extends StatefulWidget {
  Heroanimpage({Key key}) : super(key: key);

  @override
  _HeroanimpageState createState() => _HeroanimpageState();
}

class _HeroanimpageState extends State<Heroanimpage> {
  @override
  Widget build(BuildContext context) {
    return Container(
      alignment: Alignment.topCenter,
      child: InkWell(
        child: Hero(
          tag: "avatar", //唯一标记,前后两个路由页Hero的tag必须相同
          child:Container(

            margin: EdgeInsets.only(top: 50),
            child:  ClipOval(
              child: Image.asset("images/avatar.jpg",
                width: 50.0,
              ),
            ),
          ),
        ),
        onTap: () {
          //打开B路由
          Navigator.push(context, PageRouteBuilder(
              pageBuilder: (BuildContext context, Animation animation,
                  Animation secondaryAnimation) {
                return new FadeTransition(
                  opacity: animation,
                  child: Scaffold(
                    appBar: AppBar(
                      title: Text("原图"),
                    ),
                    body: HeroAnimationRouteB(),
                  ),
                );
              })
          );
        },
      ),
    );  }
}
第二个页面使用相应的 hero:
class HeroAnimationRouteB extends StatelessWidget {
  @override
  Widget build(BuildContext context) {
    return Center(
      child: Hero(
        tag: "avatar", //唯一标记,前后两个路由页Hero的tag必须相同
        child: Image.asset("images/avatar.jpg"),
      ),
    );
  }
}
这样就实现了一个标准的 hero 动画。通常来说,实现一个标准的 hero 动画有如下几个步骤:
1、定义一个起始 hero widget,称为*源 hero *。hero 指定其图形表示(通常是图片)和识别标记,并且位于源路由定义的当前显示的 widget树中。
2、定义一个结束的 hero widget,称为*目标 hero *。这位 hero 也指定了它的图形表示,以及与源 hero 相同的标记。重要的是两个 hero widget都使用相同的标签创建,通常是代表底层数据的对象。为了获得最佳效果, hero 应该有几乎相同的 widget树。
3、创建一个包含目标 hero 的路由。目标路由定义了动画结束时的 widget树。
4、通过导航器将目标路由入栈来触发动画。Navigator推送和弹出操作会为每对 hero 配对,并在源路由和目标路由中使用匹配的标签触发 hero 动画。
当定义好了如上步骤之后,Flutter 会计算从起点到终点对 hero 界限进行动画处理的补间(生成每一帧大小和位置),并在叠加层中执行动画。
这个动画的过程如下:
0、开始之前
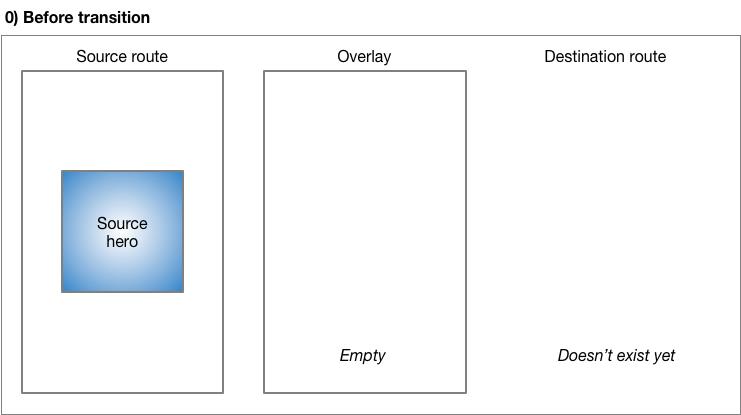
在转换之前,源 hero 会在源路由的 widget树中等待。目标路由尚不存在,叠加层为空。
1、导航开始
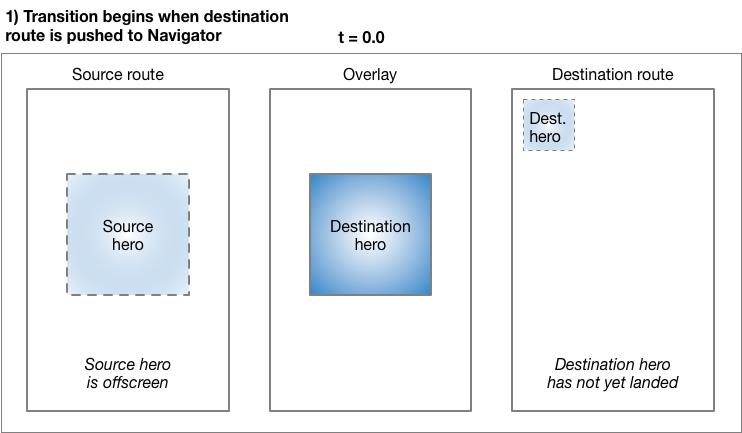
将路由push到导航器(即跳转到新页面)时会触发动画。在t = 0.0时,Flutter执行以下操作:
-
使用Material motion规范中所述的曲线运动计算目标 hero 的路径。现在Flutter知道 hero 在哪里结束。 -
将目标 hero 放置在叠加层中,与源 hero 的位置和大小相同。将 hero 添加到叠加层会更改其Z序,以使其出现在所有路由的顶部 -
将源 hero 移出路由。
2、动画进行中
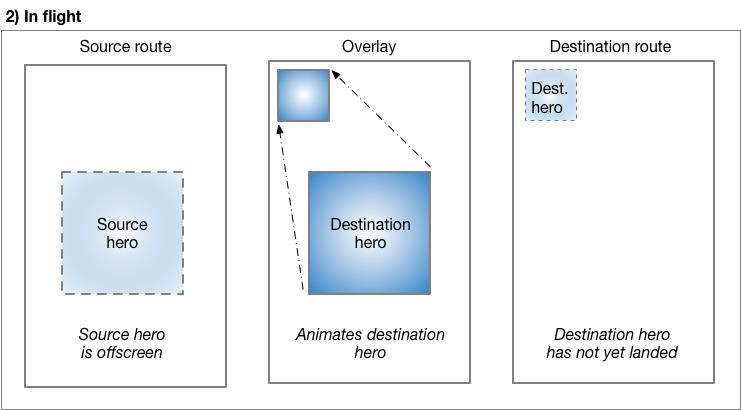
当 hero “飞行”时,其矩形边界使用 hero 的 createRectTween属性中指定的 Tween 进行动画。默认情况下,Flutter使用MaterialRectArcTween的一个实例,该实例沿曲线路径对矩形的对角进行动画处理。(有关使用不同的补间动画的示例,请参阅 径向 hero 动画。)
3、动画执行结束
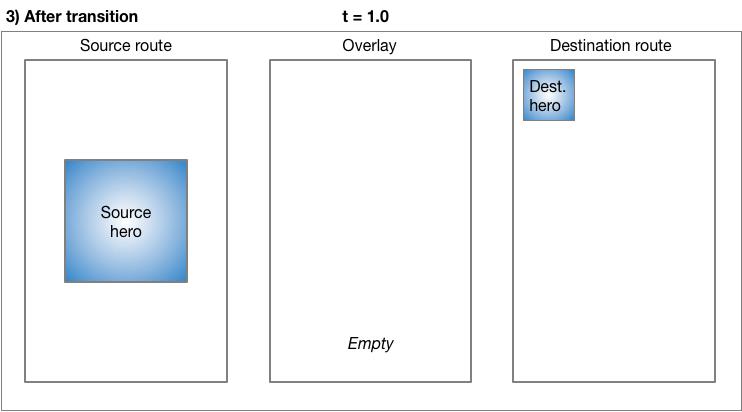
-
Flutter将 hero widget从叠加层移动到目标路由。叠加层现在是空的。 -
目标 hero 出现在目标路由的最终位置。 -
源 hero 恢复到其路由。
2、 Radial Hero
接下来实现一个径向变换的 Hero 动画。
1、首先定义一个 Photo 类为维护 hero 中的图片的大小和点击行为。
class Photo extends StatelessWidget {
  Photo({ Key key, this.photo, this.color, this.onTap }) : super(key: key);

  final String photo;
  final Color color;
  final VoidCallback onTap;

  Widget build(BuildContext context) {
    return new Material(
      // Slightly opaque color appears where the image has transparency.
      color: Theme.of(context).primaryColor.withOpacity(0.25),
      child: new InkWell(
          onTap: onTap,
          child: new Image.asset(
            photo,
            fit: BoxFit.contain,
          )
      ),
    );
  }
}
2、定义一个 RadialExpansion 类定义图片显示效果
class RadialExpansion extends StatelessWidget {
  RadialExpansion({
    Key key,
    this.maxRadius,
    this.child,
  }) : clipRectSize = 2.0 * (maxRadius / math.sqrt2),
        super(key: key);

  final double maxRadius;
  final clipRectSize;
  final Widget child;

  @override
  Widget build(BuildContext context) {
    return new ClipOval(
      child: new Center(
        child: new SizedBox(
          width: clipRectSize,
          height: clipRectSize,
          child: new ClipRect(
            child: child,  // Photo
          ),
        ),
      ),
    );
  }
}
3、定义初始页面和 Hero 过渡
class RadialExpansionDemo extends StatelessWidget {
  static const double kMinRadius = 32.0;
  static const double kMaxRadius = 128.0;
  static const opacityCurve = const Interval(0.0, 0.75, curve: Curves.fastOutSlowIn);

  static RectTween _createRectTween(Rect begin, Rect end) {
    return MaterialRectCenterArcTween(begin: begin, end: end);
  }

  static Widget _buildPage(BuildContext context, String imageName, String description) {
    return Container(
      color: Theme.of(context).canvasColor,
      child: Center(
        child: Card(
          elevation: 8.0,
          child: Column(
            mainAxisSize: MainAxisSize.min,
            children: [
              SizedBox(
                width: kMaxRadius * 2.0,
                height: kMaxRadius * 2.0,
                child: Hero(
                  createRectTween: _createRectTween,
                  tag: imageName,
                  child: RadialExpansion(
                    maxRadius: kMaxRadius,
                    child: Photo(
                      photo: imageName,
                      onTap: () {
                        Navigator.of(context).pop();
                      },
                    ),
                  ),
                ),
              ),
              Text(
                description,
                style: TextStyle(fontWeight: FontWeight.bold),
                textScaleFactor: 3.0,
              ),
              const SizedBox(height: 16.0),
            ],
          ),
        ),
      ),
    );
  }

  Widget _buildHero(BuildContext context, String imageName, String description) {
    return Container(
      width: kMinRadius * 2.0,
      height: kMinRadius * 2.0,
      child: Hero(
        createRectTween: _createRectTween,
        tag: imageName,
        child: RadialExpansion(
          maxRadius: kMaxRadius,
          child: Photo(
            photo: imageName,
            onTap: () {
              Navigator.of(context).push(
                PageRouteBuilder<void>(
                  pageBuilder: (BuildContext context, Animation<double> animation, Animation<double> secondaryAnimation) {
                    return AnimatedBuilder(
                        animation: animation,
                        builder: (BuildContext context, Widget child) {
                          return Opacity(
                            opacity: opacityCurve.transform(animation.value),
                            child: _buildPage(context, imageName, description),
                          );
                        }
                    );
                  },
                ),
              );
            },
          ),
        ),
      ),
    );
  }

  @override
  Widget build(BuildContext context) {
    var timeDilation = 5.0; // 1.0 is normal animation speed.

    return Scaffold(
      appBar: AppBar(
        title: const Text('Radial Transition Demo'),
      ),
      body: Container(
        padding: const EdgeInsets.all(32.0),
        alignment: FractionalOffset.bottomLeft,
        child: Row(
          mainAxisAlignment: MainAxisAlignment.spaceBetween,
          children: [
            _buildHero(context, 'images/aone.jpg', 'Chair'),
            _buildHero(context, 'images/atwo.jpg', 'Binoculars'),
            _buildHero(context, 'images/athree.jpg', 'Beach ball'),
          ],
        ),
      ),
    );
  }
}
以上代码就实现了一个径向变换的 hero 动画。
径向变换 hero 动画最重要的是图片如果变换。
蓝色渐变(表示图片)表示剪辑形状相交的位置。在转换开始时,相交的部分是一个圆形剪辑(ClipOval)。在转换过程中,ClipOval从minRadius过渡到maxRadius,而ClipRect 保持固定大小。在转换结束时,圆形和矩形剪辑的交集产生与 hero widget大小相同的矩形。换句话说,在过渡结束时,图片不再被剪切。
-
点击三个圆形缩略图中的一个,将图片作为新路由中间的大正方形,然后遮蔽原始路由。 -
通过点击图片或使用设备的返回键,返回到前一路由。 -
您可以使用timeDilation 属性减缓过渡。
代码示例:
https://github.com/hcc007/FlutterShare推荐阅读
以上是关于Flutter Hero 动画的主要内容,如果未能解决你的问题,请参考以下文章