Spring Boot整合Swagger2
Posted 程序员涂陌
tags:
篇首语:本文由小常识网(cha138.com)小编为大家整理,主要介绍了Spring Boot整合Swagger2相关的知识,希望对你有一定的参考价值。
Spring Boot2整合Swagger2.9.2
在学习或开发一些项目时,常会遇到前端需要一份详细的后端API说明文档,因此Swagger的诞生就是为了实现这个需求的。Swagger提供了非常好看的界面,并且提供了API测试工具,类似Postman工具的功能。
所以,这次我们就学习一下如何在SpringBoot项目中部署Swagger2
起步
依赖导入
相信你注意到了,这里我为什么特意强调Swagger的版本,截止2019-2-27,Swagger的最新版是2.9.2,而很多教程中Swagger还是老版本,就造成了很多注解报错或和图片中的不一样。
在这里,我采用了如下版本:
Spring Boot 2.1.3.RELEASE
Swagger 2.9.2
导入Swagger2依赖:
  <dependency>


   <groupId>io.springfox</groupId>


   <artifactId>springfox-swagger2</artifactId>


   <version>2.9.2</version>


  </dependency>


  <dependency>


   <groupId>io.springfox</groupId>


   <artifactId>springfox-swagger-ui</artifactId>


   <version>2.9.2</version>


  </dependency>
如果你用过Swagger2高版本就知道总会出现错误: java.lang.NumberFormatException:Forinputstring:"",说是 example设置问题,但是最有效的解决办法是添加如下依赖:
  <!-- 使用Swagger2最新版本2.9.2避免NumberFormatException错误要引入下列两个依赖 -->


  <dependency>


   <groupId>io.swagger</groupId>


   <artifactId>swagger-annotations</artifactId>


   <version>1.5.21</version>


  </dependency>


  <dependency>


   <groupId>io.swagger</groupId>


   <artifactId>swagger-models</artifactId>


   <version>1.5.21</version>


  </dependency>
配置
新建 /config/SwaggerConfig.java配置类:
  @Configuration


  @EnableSwagger2


  public class SwaggerConfig {


   @Bean


   public Docket createRestApi() {


   return new Docket(DocumentationType.SWAGGER_2)


   .apiInfo(apiInfo())


   .select()


   .apis(RequestHandlerSelectors.basePackage("cn.tycoding.controller"))


   .paths(PathSelectors.regex("/.*"))


   .build();


   }


   private ApiInfo apiInfo() {


   return new ApiInfoBuilder()


   .title("Spring Boot中使用使用Swagger2构建RESTful API")


   .termsOfServiceUrl("http://tycoding.cn/")


   .contact(new Contact("tycoding", "https://tycoding.cn", ""))


   .version("v1.0")


   .build();


   }


  }
这些都是Swagger全局配置信息,其中最需要注意的有以下几点:
看 PathSelectors类源码:
  public class PathSelectors {


   private PathSelectors() {


   throw new UnsupportedOperationException();


   }


   public static Predicate<String> any() {


   return Predicates.alwaysTrue();


   }


   public static Predicate<String> none() {


   return Predicates.alwaysFalse();


   }


   public static Predicate<String> regex(final String pathRegex) {


   return new Predicate<String>() {


   public boolean apply(String input) {


   return input.matches(pathRegex);


   }


   };


   }


   public static Predicate<String> ant(final String antPattern) {


   return new Predicate<String>() {


   public boolean apply(String input) {


   AntPathMatcher matcher = new AntPathMatcher();


   return matcher.match(antPattern, input);


   }


   };


   }


  }
发现它能支持4中方式按照路径生成API文档:1.任何路径都生成;2.任何路径都不生成;3.正则匹配路径;4.ant模式匹配。
上面我们就是配置的正则匹配路径,按照正则标准,Swagger扫描对应的API接口并生成文档。
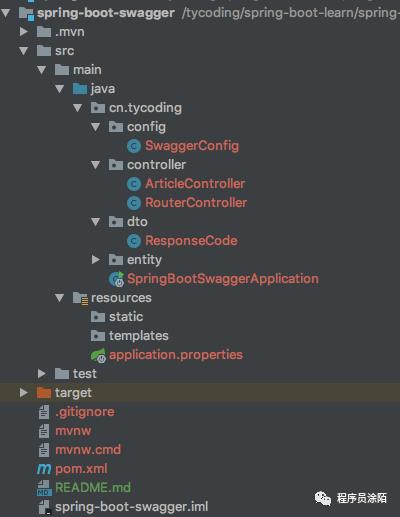
如果你还有疑惑,可以先看一下项目整体结构:

详解
既然都用到了Swagger,那就必然要遵循Restful接口规范,最基本的规范:
| 前端请求方法 | 对应后端操作 |
|---|---|
| POST | 新增 |
| PUT | 更新 |
| GET | 查询 |
| DELETE | 删除 |
更多的Restful接口规范请自行百度。
通常在前后端分离项目中,后端仅负责接收和传递JSON数据,所以,我们这样创建一个Controller:
  @RestController


  @RequestMapping("/article")


  public class ArticleController {


  }
@RestController是@ResponseBody+@Controller,其控制器类下的所有方法的返回值都将被Spring转换成JSON格式。
编写代码
Article
为了模拟实际中业务,这里创建一个实体类 Article.java
  public class Article implements Serializable {


   private Long id; //文章ID


   private String name; //文章名称


   private String title; //文章标题


   private Date createTime; //创建时间


   ...//省略getter/setter


  }
Result
通常,Controller返回的数据都应该被封装在一个结果类中,目的是保证所有请求返回结果都有固定的响应格式,比如:状态码、状态信息、返回结果。所以我们简单封装一个结果类:
  public class ResponseCode {


   private Long code;


   private String msg;


   private Object data;


   public ResponseCode() {


   }


   public ResponseCode(Long code, String msg, Object data) {


   this.code = code;


   this.msg = msg;


   this.data = data;


   }


   public static ResponseCode ok(String msg) {


   return new ResponseCode(200L, msg, null);


   }


   public static ResponseCode ok(String msg, Object data) {


   return new ResponseCode(200L, msg, data);


   }


   ...//省略getter/setter


  }
ArticleController
完善控制器类,模拟常见的CRUD业务:
  @RestController


  @RequestMapping("/article")


  public class ArticleController {


   private Logger logger = LoggerFactory.getLogger(this.getClass());


   @GetMapping(value = "/{id}", produces = "application/json")


   public ResponseCode findById(@PathVariable Long id) {


   logger.info("查询文章信息,查询的文章ID是==> {}", id);


   Article article = new Article(1L, "Swagger", "SpringBoot整合Swagger2", new Date());


   return ResponseCode.ok("查询成功", article);


   }


   @DeleteMapping(value = "/{id}", produces = "application/json")


   public ResponseCode delete(@PathVariable Long id) {


   logger.info("删除文章信息,删除的文章ID是==> {}", id);


   return ResponseCode.ok("删除成功");


   }


   @PostMapping(value = "/", produces = "application/json")


   public ResponseCode save(@RequestBody Article article) {


   logger.info("保存文章信息,文章内容==> {}", article);


   return ResponseCode.ok("保存成功");


   }


   @PutMapping(value = "/", produces = "application/json")


   public ResponseCode update(@RequestBody Article article) {


   logger.info("更新文章信息,更新内容==> {}", article);


   return ResponseCode.ok("更新成功");


   }


  }
如上,我们完成了基础操作。
测试
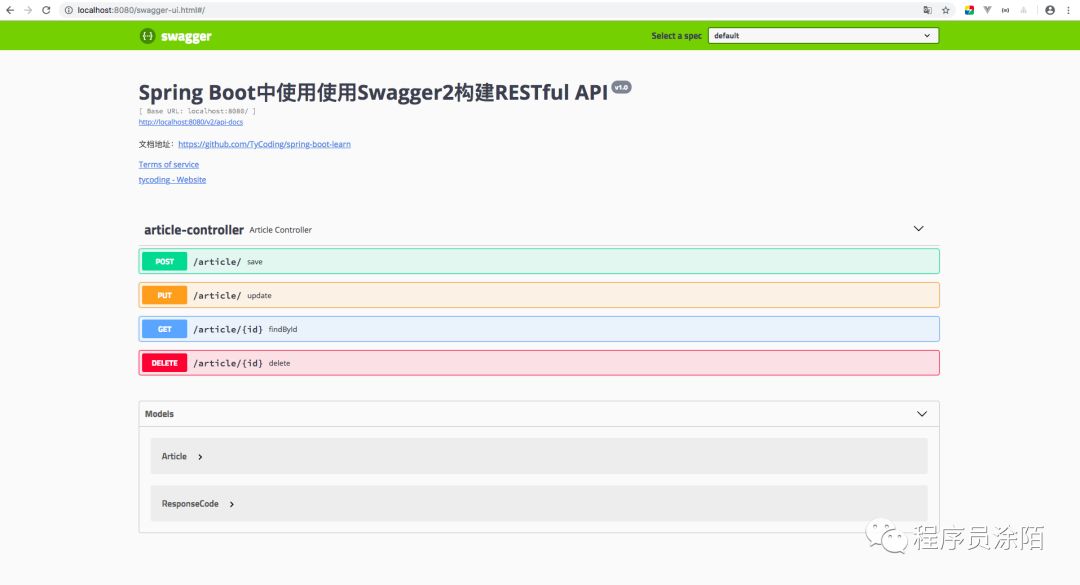
启动项目,访问 localhost:8080/swagger-ui.html:

是不是很神奇呢,这么炫酷漂亮的界面Swagger已经帮我们写好了,根据刚才配置的 .apis(RequestHandlerSelectors.basePackage("cn.tycoding.controller"))Swagger扫描到了 ArticleController这个控制器类,根据刚才配置的 .paths(PathSelectors.regex("/.*"))Swagger扫描了这个控制器的所有请求映射路径,并且生成API文档。
更神奇的在这里:
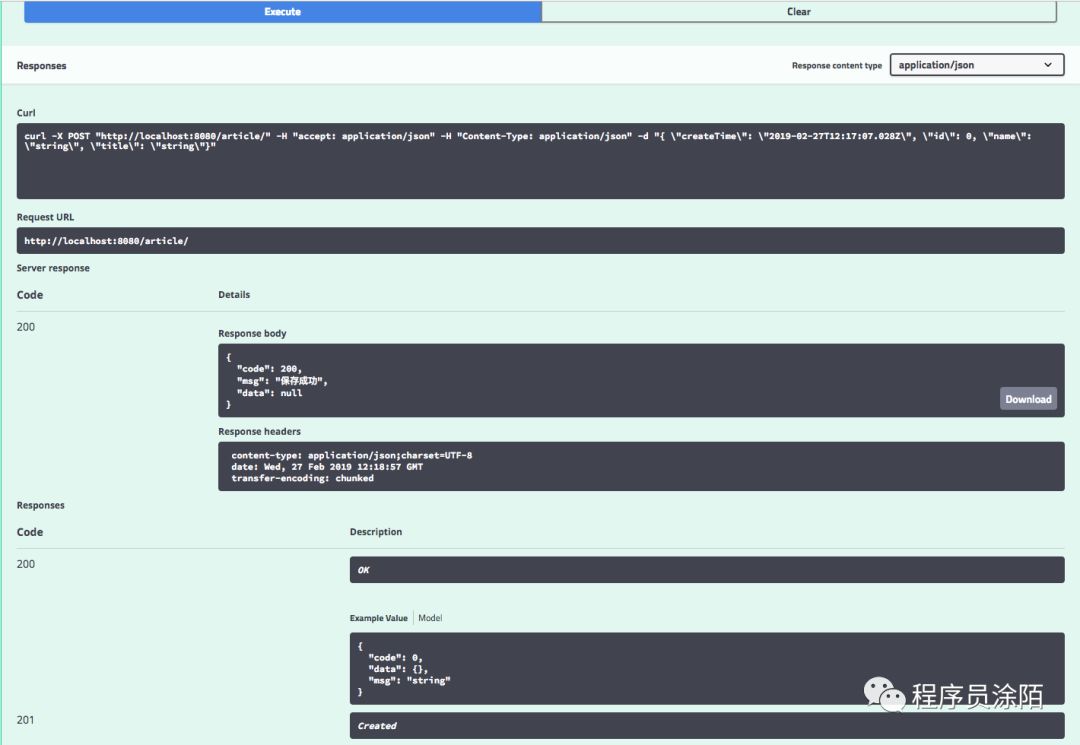
任意点开一个接口,点击左侧的Try it out,可以直接测试这个接口,就像Postman工具一样,并且旗下有丰富的接口文档信息

可以看到我们模拟的接口请求成功,并且返回了响应数据。
进阶配置
修改
ArticleController
  @RestController


  @RequestMapping("/article")


  @Api(value = "ArticleController", tags = {"文章管理接口"})


  public class ArticleController {


   private Logger logger = LoggerFactory.getLogger(this.getClass());


   @GetMapping(value = "/{id}", produces = "application/json")


   @ApiOperation(value = "查询文章详情", notes = "文章ID大于0")


   @ApiImplicitParam(name = "id", value = "文章编号", required = true, dataType = "Long")


   public ResponseCode findById(@PathVariable Long id) {


   logger.info("查询文章信息,查询的文章ID是==> {}", id);


   Article article = new Article(1L, "Swagger", "SpringBoot整合Swagger2", new Date());


   return ResponseCode.ok("查询成功", article);


   }


   @DeleteMapping(value = "/{id}", produces = "application/json")


   @ApiOperation(value = "删除文章")


   @ApiImplicitParam(name = "id", value = "文章编号", required = true, dataType = "Long")


   public ResponseCode delete(@PathVariable Long id) {


   logger.info("删除文章信息,删除的文章ID是==> {}", id);


   return ResponseCode.ok("删除成功");


   }


   @PostMapping(value = "/", produces = "application/json")


   @ApiOperation(value = "保存文章")


   @ApiImplicitParam(name = "article", value = "文章信息实体", required = true, dataType = "Article", paramType = "body")


   public ResponseCode save(@RequestBody Article article) {


   logger.info("保存文章信息,文章内容==> {}", article);


   return ResponseCode.ok("保存成功");


   }


   @PutMapping(value = "/", produces = "application/json")


   @ApiOperation(value = "更新文章")


   @ApiImplicitParam(name = "article", value = "文章信息实体", required = true, dataType = "Article", paramType = "body")


   public ResponseCode update(@RequestBody Article article) {


   logger.info("更新文章信息,更新内容==> {}", article);


   return ResponseCode.ok("更新成功");


   }


  }
修改
Article.java
  @ApiModel(value = "Article", description = "文章实体对象")


  public class Article implements Serializable {


   /**


   * @ApiModelProperty 用于描述实体字段


   * value: 字段说明


   * name: 重写字段名称


   * dataType: 重写字段类型


   * required: 字段是否必填


   * example: 举例说明


   * hidden: 是否隐藏显示


   */


   @ApiModelProperty(value = "id", example = "1", required = true)


   private Long id; //文章ID


   @ApiModelProperty(name = "name", value = "文章名称", example = "Swagger", required = true)


   private String name; //文章名称


   @ApiModelProperty(name = "title" ,value = "文章标题", example = "SpringBoot中使用Swagger", required = true)


   private String title; //文章标题


   @ApiModelProperty(name = "createTime", value = "创建时间", required = false)


   private Date createTime; //创建时间


  }
查看配置效果

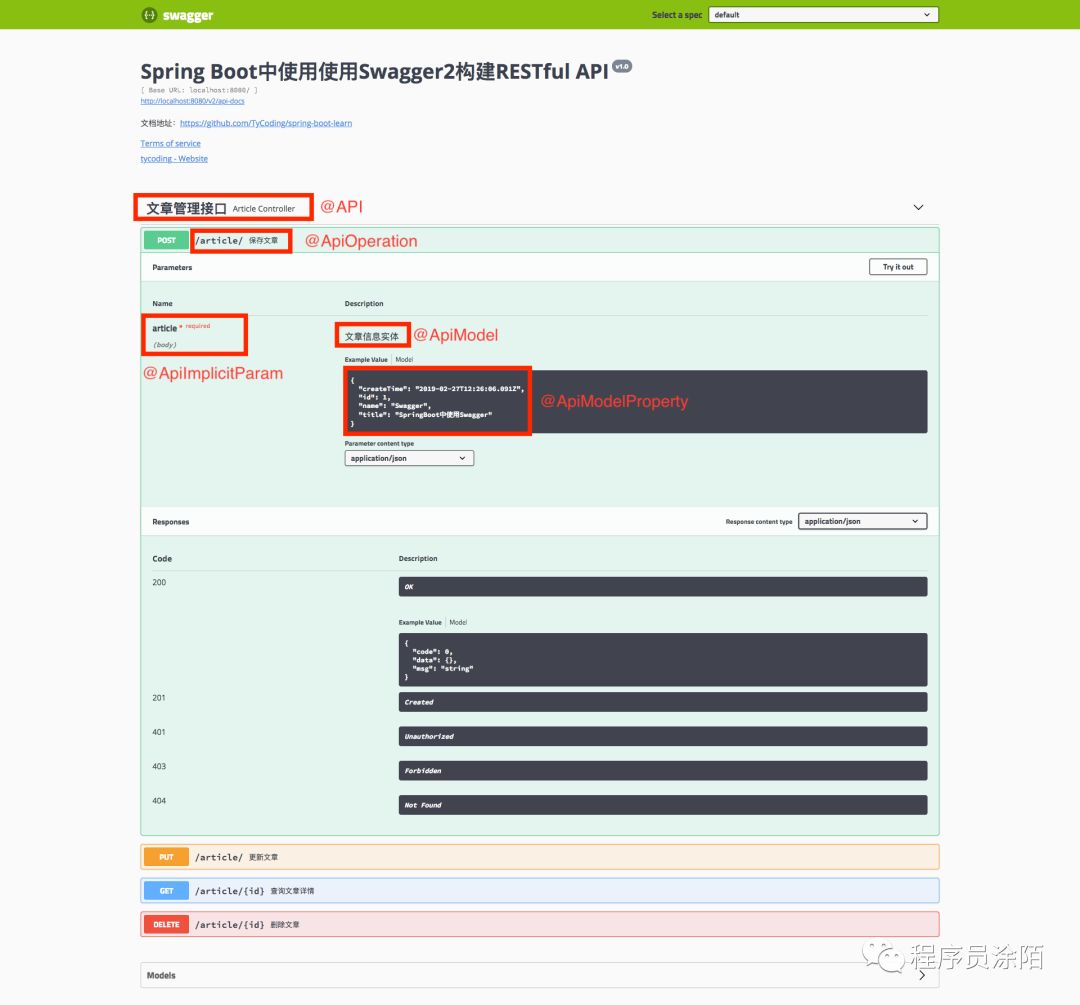
如上图所示,我在图中标记了Swagger注解对应的配置效果
解释
在控制器类
@Api: 标记在控制器类上
value: 控制器类名称
tags: 控制器类标签
@ApiOperation: 标记在映射方法上
value: 接口说明,展示在接口列表
notes:接口详细说明,展示在接口的详情页。
tags:接口的标签,相同标签的接口会在一个标签页下展示。
httpMethod:支持的HTTP的方法。
@ApiImplicitParam: 请求参数属性配置
name:参数名称
value:参数说明
required:是否必须
dataType:数据类型
注意 @ApiImplicitParams是 @ApiImplicitParam的容器,通过 @ApiImplicitParam可以配置请求参数个各自的属性,但是若请求参数是一个实体对象, @ApiImplicitParam也可以直接指向对象( dataType= @ApiModel的 value值),然后在实体对象中对字段进行限定。
在实体类上
@ApiModel是对整个类的属性的配置:
value:类的说明
description:详细描述
@ApiModelProperty是对具体每个字段的属性配置:
name:字段名称
value:字段的说明
required:是否必须
example:示例值
hidden:是否显示
/ 往期推荐 /
END
以上是关于Spring Boot整合Swagger2的主要内容,如果未能解决你的问题,请参考以下文章