刨根问底Spring Boot 启动原理
Posted Java后端技术栈
tags:
篇首语:本文由小常识网(cha138.com)小编为大家整理,主要介绍了刨根问底Spring Boot 启动原理相关的知识,希望对你有一定的参考价值。
使用过Spring Boot 的人都知道,它很大程度的简化了我们的开发各种配置,也节省了大量开发的时间,用起来确实方便不少。但是任何东西都用两面性,对于很多新手来说,如果不了解个中原理,难免会遇一些你不到的问题。
熟悉而又陌生的启动类:
import org.springframework.boot.SpringApplication;
import org.springframework.boot.autoconfigure.SpringBootApplication;
@SpringBootApplication
public class MyDemoApplication {
    public static void main(String[] args) {
        SpringApplication.run(MyDemoApplication.class, args);
    }
}
可以看到,此类中添加了注解 @SpringBootApplication,main 方法里通过 SpringApplication.run 来启动整个应用程序。因此要研究 Spring Boot 的启动原理,我们就需要从这个注解和这个run方法入手。

SpringBootApplication
首先,我们先来看看 SpringBootApplication 源码是怎么定义这个注解的:
@Target(ElementType.TYPE)
@Retention(RetentionPolicy.RUNTIME)
@Documented
@Inherited
@SpringBootConfiguration
@EnableAutoConfiguration
@ComponentScan(excludeFilters = {
        @Filter(type = FilterType.CUSTOM, classes = TypeExcludeFilter.class),
        @Filter(type = FilterType.CUSTOM, classes = AutoConfigurationExcludeFilter.class) })
public @interface SpringBootApplication {

    @AliasFor(annotation = EnableAutoConfiguration.class, attribute = "exclude")
    Class<?>[] exclude() default {};

    @AliasFor(annotation = EnableAutoConfiguration.class, attribute = "excludeName")
    String[] excludeName() default {};

    @AliasFor(annotation = ComponentScan.class, attribute = "basePackages")
    String[] scanBasePackages() default {};

    @AliasFor(annotation = ComponentScan.class, attribute = "basePackageClasses")
    Class<?>[] scanBasePackageClasses() default {};

}
可以看到,除了最基础的注解外,还增加了三个
@SpringBootConfiguration@EnableAutoConfiguration@ComponentScan
这里我们可以将 SpringBootApplication 替换成上面三个注解也是相同的效果:
import org.springframework.boot.SpringApplication;import org.springframework.boot.SpringBootConfiguration;import org.springframework.boot.autoconfigure.EnableAutoConfiguration;import org.springframework.context.annotation.ComponentScan;@SpringBootConfiguration@EnableAutoConfiguration@ComponentScan//SpringBootApplicationpublic class Application {public static void main(String[] args) {SpringApplication.run(Application.class, args);}}
但是如果咱们每次都写这三个注解那岂不是很麻烦吗?所以我们只要写一个注解 @SpringBootApplication 就ok了。
下面,我们分别来介绍这三个注解。
SpringBootConfiguration
我们先来看看SpringBootConfiguration的源码:
@Target({ElementType.TYPE})@Retention(RetentionPolicy.RUNTIME)@Documented@Configurationpublic SpringBootConfiguration {}
该注解上有个注解@Configuration ,其他三个注解这里就不在这里讨论了,参考
另外注解相关
所以可以得知@SpringBootConfiguration 就是 @Configuration ,但是Spring Boot推荐用 SpringBootConfiguration 来代替 Configuration。同时Spring Boot 社区推荐使用 JavaConfig 配置,所以要用到 @Configuration。
回到配置Spring的年代,我们来看看是如何实现的。先从 SpringMVC 中基于 xml是如何配置开始:
<?xml version="1.0" encoding="UTF-8"?>
<beans xmlns="http://www.springframework.org/schema/beans"
 xmlns:xsi="http://www.w3.org/2001/XMLSchema-instance"
 xsi:schemaLocation="http://www.springframework.org/schema/beans http://www.springframework.org/schema/beans/spring-beans-3.0.xsd"
 default-lazy-init="true">
    <!--bean定义-->
</beans>
而 MyDemoConfig 的配置是这样的:
import org.springframework.boot.SpringBootConfiguration;

@SpringBootConfiguration
public class MyDemoConfig {
    //bean定义
}
任何标注了 SpringBootConfiguration 或 Configuration 的类都是一个 MyDemoConfig.java。
我们再来看看基于 XML 的 Bean 是如何定义的:
<bean id="userService" class="UserServiceImpl"/>
而 MyDemoConfig的配置是这样的:
import org.springframework.boot.SpringBootConfiguration;

@SpringBootConfiguration
public class MyDemoConfig {
    //bean定义
    @Bean
    public UserService service(){
        return new UserServiceImpl();
    }
}
任何标注了 Bean 的方法都被定义为一个 Bean,我们可以在任何 Spring 的 IoC 容器中注入进去。
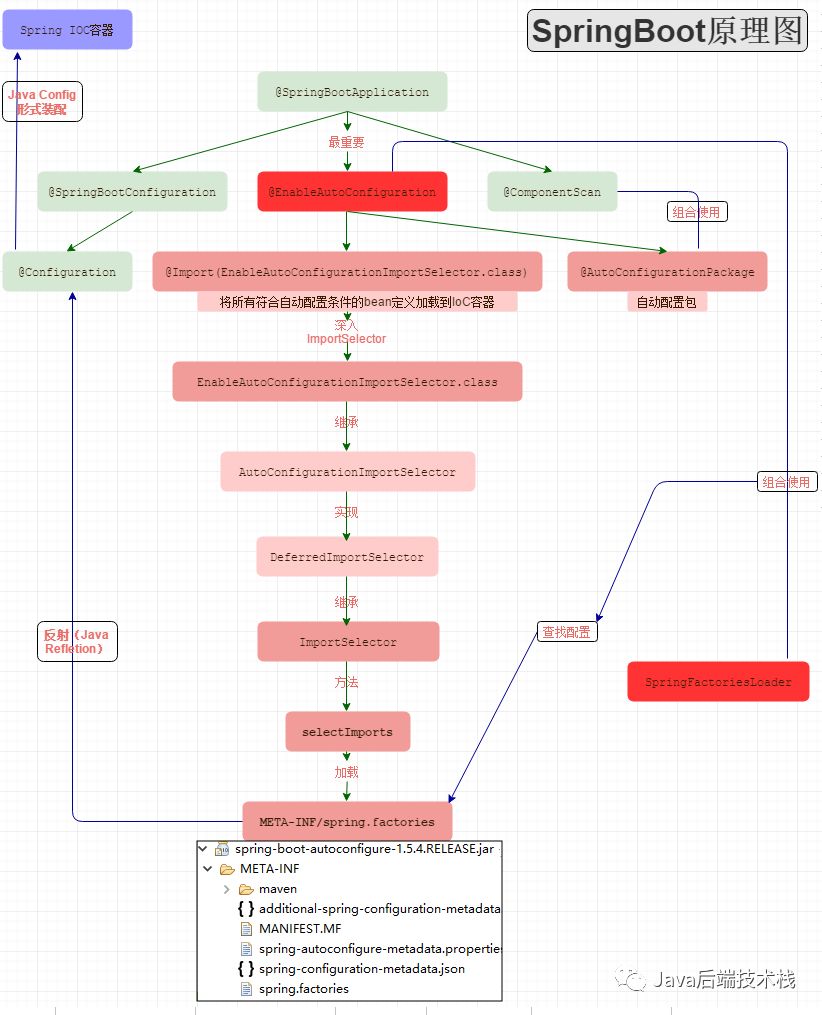
EnableAutoConfiguration
这个注解的作用就是自动将 MyDemoConfig中的 Bean 装载到 IoC 容器中。
先看看期源码:
@Target(ElementType.TYPE)
@Retention(RetentionPolicy.RUNTIME)
@Documented
@Inherited
@AutoConfigurationPackage
@Import(AutoConfigurationImportSelector.class)
public @interface EnableAutoConfiguration {
 String ENABLED_OVERRIDE_PROPERTY = "spring.boot.enableautoconfiguration";
 Class<?>[] exclude() default {};
 String[] excludeName() default {};
}
我们注意到该注解引入了 @AutoConfigurationPackage 注解,通过其字面意思,就知道它的作用是自动配置 Package,即它会默认配置启动类所在包及其子包下的所有标注了 Configuration 注解的类。
而以上注解使用 @Import 注解,该注解的作用是自动执行该注解指定的类。在上述注解中,其导入了 AutoConfigurationImportSelector 类,通过其类名就知道该类的作用是自动配置选择器,因此,我们使用了 @EnableAutoConfiguration 注解后,它就会自动执行 AutoConfigurationImportSelector 类,最终会调用哪个方法呢?请看它的源码:
@Override
public Class<? extends Group> getImportGroup() {
    return AutoConfigurationGroup.class;
}
程序启动后,只要标注了 @EnableAutoConfiguration 注解,那么最后会调用 getImportGroup 方法,它返回的是一个 Group 对象。而上述代码中 AutoConfigurationGroup 继承的是 Group 接口,通过查看 Group 源码得知,Group 接口被定义在 DeferredImportSelector 接口中,继续查看 AutoConfigurationGroup 类的代码,我们发现以下源码:
@Override
public void process(AnnotationMetadata annotationMetadata,
                DeferredImportSelector deferredImportSelector) {
            Assert.state(
                    deferredImportSelector instanceof AutoConfigurationImportSelector,
                    () -> String.format("Only %s implementations are supported, got %s",
                            AutoConfigurationImportSelector.class.getSimpleName(),
                            deferredImportSelector.getClass().getName()));
            AutoConfigurationEntry autoConfigurationEntry = ((AutoConfigurationImportSelector) deferredImportSelector)
                    .getAutoConfigurationEntry(getAutoConfigurationMetadata(),
                            annotationMetadata);
            this.autoConfigurationEntries.add(autoConfigurationEntry);
            for (String importClassName : autoConfigurationEntry.getConfigurations()) {
                this.entries.putIfAbsent(importClassName, annotationMetadata);
            }
        }

@Override
public Iterable<Entry> selectImports() {
            if (this.autoConfigurationEntries.isEmpty()) {
                return Collections.emptyList();
            }
            Set<String> allExclusions = this.autoConfigurationEntries.stream()
                    .map(AutoConfigurationEntry::getExclusions)
                    .flatMap(Collection::stream).collect(Collectors.toSet());
            Set<String> processedConfigurations = this.autoConfigurationEntries.stream()
                    .map(AutoConfigurationEntry::getConfigurations)
                    .flatMap(Collection::stream)
                    .collect(Collectors.toCollection(LinkedHashSet::new));
            processedConfigurations.removeAll(allExclusions);

            return sortAutoConfigurations(processedConfigurations,
                    getAutoConfigurationMetadata())
                            .stream()
                            .map((importClassName) -> new Entry(
                                    this.entries.get(importClassName), importClassName))
                            .collect(Collectors.toList());
        }
也就是说最终会自动执行 process 和 selectImports 方法。
可以注意到 autoConfigurationEntry.getConfigurations(),它就是获取所有标注了 @Configuration 注解的类,并加入到 Map 中。
需要注意的是,AutoConfigurationImportSelector 类实现的是 DeferredImportSelector 接口,而 process 是 DeferredImportSelector.Group 接口定义的方法。
ComponentScan
这个注解的作用是自动扫描并加载符合条件的组件(如:Component、Bean 等),我们可以通过 basePakcages 来指定其扫描的范围,如果不指定,则默认从标注了 @ComponentScan 注解的类所在包开始扫描。如下代码:
@ComponentScan(basePackages = "com.lawt")
因此,Spring Boot 的启动类最好放在 root package 下面,因为默认不指定 basePackages,这样能保证扫描到所有包。
以上只是从表面来研究 Spring Boot 的启动原理,那么,为什么通过 SpringBootApplication 和 SpringApplication.run() 就能启动一个应用程序,它的底层到底是怎么实现的呢?别急,我们马上来一探究竟。
源码解析
借用网上的一张有参考价值的图:
我们知道,启动类先调用了 SpringApplication 的静态方法 run,跟踪进去后发现,它会先实例化 SpringApplication,然后调用 run 方法。
/**
 * Static helper that can be used to run a {@link SpringApplication} from the
 * specified sources using default settings and user supplied arguments.
 * @param primarySources the primary sources to load
 * @param args the application arguments (usually passed from a Java main method)
 * @return the running {@link ApplicationContext}
 */
    public static ConfigurableApplicationContext run(Class<?>[] primarySources,
 String[] args) {
        return new SpringApplication(primarySources).run(args);
    }
所以,要分析它的启动源码,首先要分析 SpringApplicaiton 的构造过程。
SpringApplication 构造器
在 SpringApplication 构造函数内部,他会初始化一些信息:
public SpringApplication(Class<?>... primarySources) {
        this(null, primarySources);
    }

public SpringApplication(ResourceLoader resourceLoader, Class<?>... primarySources) {
        this.resourceLoader = resourceLoader;
        Assert.notNull(primarySources, "PrimarySources must not be null");
        this.primarySources = new LinkedHashSet<>(Arrays.asList(primarySources));
        this.webApplicationType = WebApplicationType.deduceFromClasspath();
        setInitializers((Collection) getSpringFactoriesInstances(
                ApplicationContextInitializer.class));
        setListeners((Collection) getSpringFactoriesInstances(ApplicationListener.class));
        this.mainApplicationClass = deduceMainApplicationClass();
    }
通过上述代码,我们分析到 SpringApplication 实例化时有以下几个步骤:
1.将所有 sources 加入到全局 sources 中,目前只有一个 Application。
2.判断是否为 Web 程序(javax.servlet.Servlet、
org.springframework.web.context.ConfigurableWebApplicationContext 这两个类必须存在于类加载器中)。
判断过程可以参看以下源码:
static WebApplicationType deduceFromClasspath() {if (ClassUtils.isPresent("org.springframework.web.reactive.DispatcherHandler", (ClassLoader)null)&& !ClassUtils.isPresent("org.springframework.web.servlet.DispatcherServlet", (ClassLoader)null)&& !ClassUtils.isPresent("org.glassfish.jersey.servlet.ServletContainer", (ClassLoader)null)) {return REACTIVE;} else {String[] var0 = SERVLET_INDICATOR_CLASSES;int var1 = var0.length;for(int var2 = 0; var2 < var1; ++var2) {String className = var0[var2];if (!ClassUtils.isPresent(className, (ClassLoader)null)) {return NONE;}}return SERVLET;}}
3.设置应用程序初始化器 ApplicationContextInitializer,做一些初始化的工作。
4.设置应用程序事件监听器 ApplicationListener。
5.找出启动类,设置到 mainApplicationClass 中。
SpringApplication 的执行流程
SpringApplication 构造完成后,就会调用 run 方法,这时才真正的开始应用程序的执行。
public ConfigurableApplicationContext run(String... args) {StopWatch stopWatch = new StopWatch();stopWatch.start();ConfigurableApplicationContext context = null;FailureAnalyzers analyzers = null;configureHeadlessProperty();SpringApplicationRunListeners listeners = getRunListeners(args);//1.获取监听器listeners.starting();// -->启动!try {ApplicationArguments applicationArguments = new DefaultApplicationArguments(args);ConfigurableEnvironment environment = prepareEnvironment(listeners,//2.准备好环境,触发ApplicationEnvironmentPreparedEvent事件applicationArguments);Banner printedBanner = printBanner(environment);//打印启动提示字符,默认spring的字符图context = createApplicationContext();//实例化一个可配置应用上下文analyzers = new FailureAnalyzers(context);prepareContext(context, environment, listeners, applicationArguments,//3.准备上下文printedBanner);refreshContext(context);//4.刷新上下文afterRefresh(context, applicationArguments);//5.刷新上下文后listeners.finished(context, null);--关闭!stopWatch.stop();if (this.logStartupInfo) {new StartupInfoLogger(this.mainApplicationClass).logStarted(getApplicationLog(), stopWatch);}return context;}catch (Throwable ex) {handleRunFailure(context, listeners, analyzers, ex);throw new IllegalStateException(ex);}}
再次借用网上大佬画好的图,我觉得很有参考价值:
以上是关于刨根问底Spring Boot 启动原理的主要内容,如果未能解决你的问题,请参考以下文章