Eureka集群
Posted
tags:
篇首语:本文由小常识网(cha138.com)小编为大家整理,主要介绍了Eureka集群相关的知识,希望对你有一定的参考价值。
参考技术A 现在已经成功的实现了一个Eureka服务器,但是现在属于单节点的服务运行过程,如果说现在单节点的Eureka出现了错误,导致无法使用,那么对于所有的微服务架构就将出现整体的瘫痪,这样就需要进行Eureka集群搭建,同时利用集群可以有效的实现HA的处理机制,如果要进行集群的搭建一定要选择两台或以上的电脑完成。1、参照 https://www.jianshu.com/p/39ab9515b1c3 ,创建多一个Eureka服务器
2、修改Eureka服务器1的配置文件 application.yml,将 Eureka Server 1 指向 Eureka Server 2
3、修改Eureka服务器2的配置文件 application.yml,Eureka Server 2 指向 Eureka Server 1
4、将服务同时注册到Eureka Server 1 和Eureka Server 2
5、先启动Eureka Server,再启动Eureka Client,然后打开Eureka Server后台管理端,可以看到Eureka Server间相互指向,并且Eureka Client也注册到两个Eureka Server中
二、Eureka Client 集群
1、只需要创建一个一模一样的服务,并且修改端口号
运行项目后可以看到服务“CLOUD-PAYMENT-SERVICE”指向两个不同的域名
2、修改服务请求地址,用Eureka显示的服务名代替
3、在配置类 ApplicationContextConfig.java 中,使用 @LoadBalanced 注解赋予 RestTemplate 负载均衡的能力
Eureka集群搭建
1、Eureka集群搭建
2、Eureka自我保护机制
Eureka集群搭建
高可用集群配置
当注册中心扛不住高并发的时候,这时候 要用集群来扛;
普通操作
我们再新建两个module microservice-eureka-server-2002 microservice-eureka-server-2003
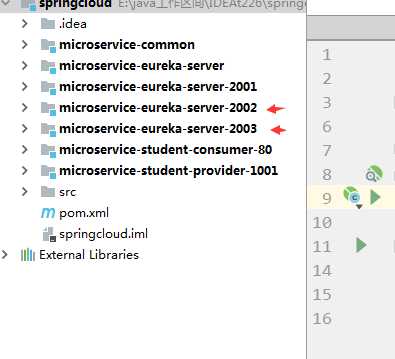
pom.xml 把依赖加下
<dependencies>
    <dependency>
        <groupId>org.springframework.cloud</groupId>
        <artifactId>spring-cloud-starter-eureka-server</artifactId>
    </dependency>
    <dependency>
        <groupId>org.springframework.boot</groupId>
        <artifactId>spring-boot-starter-test</artifactId>
        <scope>test</scope>
    </dependency>
    <!-- 修改后立即生效,热部署 -->
    <dependency>
        <groupId>org.springframework</groupId>
        <artifactId>springloaded</artifactId>
    </dependency>
    <dependency>
        <groupId>org.springframework.boot</groupId>
        <artifactId>spring-boot-devtools</artifactId>
    </dependency>
</dependencies>
2、2002 2003的主启动类EurekaServerApplication_2002,EurekaServerApplication_2003复制修改下;
package com.hmc.microserviceeurekaserver2002;

import org.springframework.boot.SpringApplication;
import org.springframework.boot.autoconfigure.SpringBootApplication;
import org.springframework.cloud.netflix.eureka.server.EnableEurekaServer;

@EnableEurekaServer
@SpringBootApplication
public class MicroserviceEurekaServer2002Application {

    public static void main(String[] args) {
        SpringApplication.run(MicroserviceEurekaServer2002Application.class, args);
    }

}
3、前面单机的时候 eureka注册中心实例名称 是localhost,现在是集群,不能三个实例都是localhost,这里复杂的办法是搞三个虚拟机,麻烦,这里有简单办法,直接配置本机hosts,来实现本机域名映射;
找到 C:WindowsSystem32driversetc 打开hosts,加配置
127.0.0.1  eureka2001.hmc.com
127.0.0.1  eureka2002.hmc.com
127.0.0.1  eureka2003.hmc.com
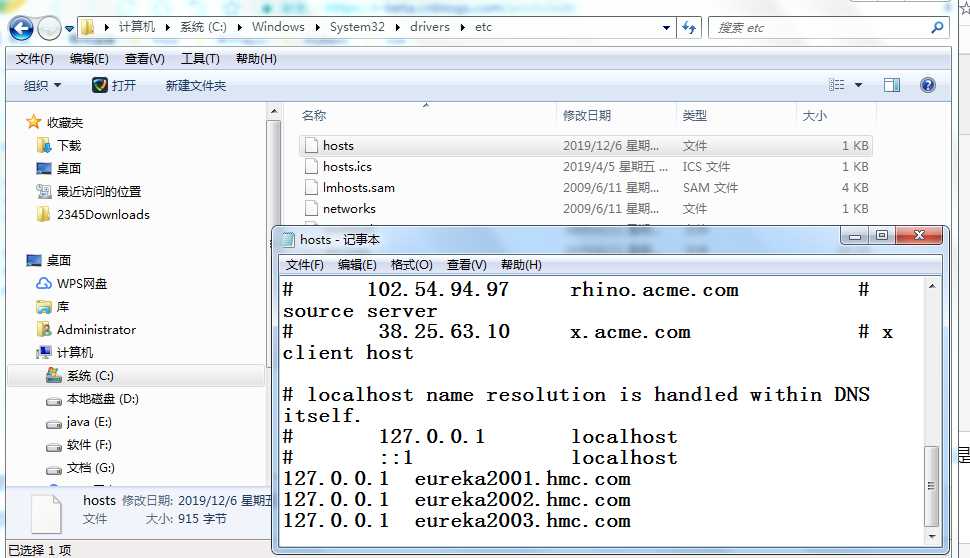
4、修改三个项目的application.yml文件,主要是修改 hostname和defaultZone,
2001修改:
server:
  port: 2001
  context-path: /
eureka:
  instance:
    # 单机 hostname: localhost #eureka注册中心实例名称
    hostname: eureka2001.hmc.com # 集群
  client:
    register-with-eureka: false     #false 由于该应用为注册中心,所以设置为false,代表不向注册中心注册自己。
    service-url:
      defaultZone: http://eureka2002.hmc.com:2002/eureka/,http://eureka2003.hmc.com:2003/eureka/ # 集群
      #单机defaultZone: http://${eureka.instance.hostname}:${server.port}/eureka/       #设置与Eureka注册中心交互的地址,查询服务和注册服务用到
2002修改:
server:
  port: 2002
  context-path: /
eureka:
  instance:
    # u5355u673A hostname: localhost #eurekau6CE8u518Cu4E2Du5FC3u5B9Eu4F8Bu540Du79F0
    hostname: eureka2002.hmc.com # u96C6u7FA4
  client:
    register-with-eureka: false     #false u7531u4E8Eu8BE5u5E94u7528u4E3Au6CE8u518Cu4E2Du5FC3uFF0Cu6240u4EE5u8BBEu7F6Eu4E3Afalse,u4EE3u8868u4E0Du5411u6CE8u518Cu4E2Du5FC3u6CE8u518Cu81EAu5DF1u3002
    service-url:
      defaultZone: http://eureka2001.hmc.com:2001/eureka/,http://eureka2003.hmc.com:2003/eureka/ # u96C6u7FA4
      #u5355u673AdefaultZone: http://${eureka.instance.hostname}:${server.port}/eureka/       #u8BBEu7F6Eu4E0EEurekau6CE8u518Cu4E2Du5FC3u4EA4u4E92u7684u5730u5740uFF0Cu67E5u8BE2u670Du52A1u548Cu6CE8u518Cu670Du52A1u7528u5230
2003修改:
server:
  port: 2003
  context-path: /
eureka:
  instance:
    # u5355u673A hostname: localhost #eurekau6CE8u518Cu4E2Du5FC3u5B9Eu4F8Bu540Du79F0
    hostname: eureka2003.hmc.com # u96C6u7FA4
  client:
    register-with-eureka: false     #false u7531u4E8Eu8BE5u5E94u7528u4E3Au6CE8u518Cu4E2Du5FC3uFF0Cu6240u4EE5u8BBEu7F6Eu4E3Afalse,u4EE3u8868u4E0Du5411u6CE8u518Cu4E2Du5FC3u6CE8u518Cu81EAu5DF1u3002
    service-url:
      defaultZone: http://eureka2001.hmc.com:2001/eureka/,http://eureka2002.hmc.com:2002/eureka/ # u96C6u7FA4
      #u5355u673AdefaultZone: http://${eureka.instance.hostname}:${server.port}/eureka/       #u8BBEu7F6Eu4E0EEurekau6CE8u518Cu4E2Du5FC3u4EA4u4E92u7684u5730u5740uFF0Cu67E5u8BE2u670Du52A1u548Cu6CE8u518Cu670Du52A1u7528u5230
5、修改服务提供者项目的application.yml,主要修改eureka.client.service-url.defaultZone
eureka:
  instance:
    hostname: localhost  #eureka客户端主机实例名称
    appname: microservice-student  #客户端服务名
    instance-id: microservice-student:1001 #客户端实例名称
    prefer-ip-address: true #显示IP
  client:
    service-url:
      defaultZone: http://localhost:2001/eureka   #把服务注册到eureka注册中心
最后我们测试下:
启动三个注册中心,以及服务提供者项目;
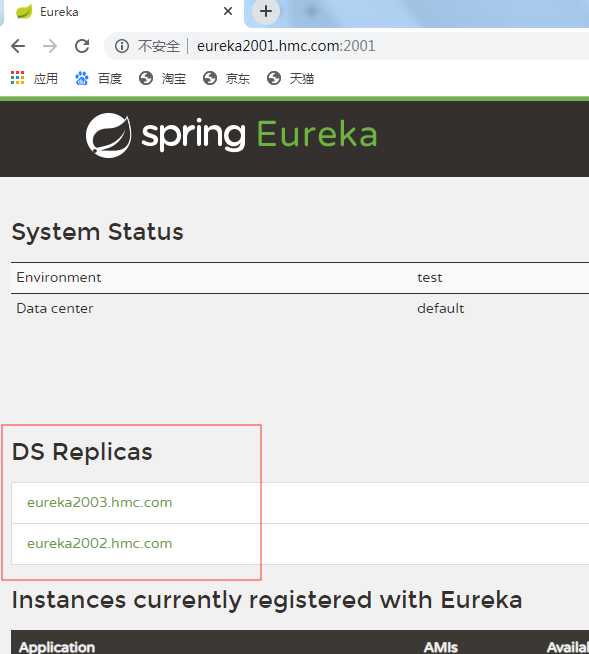
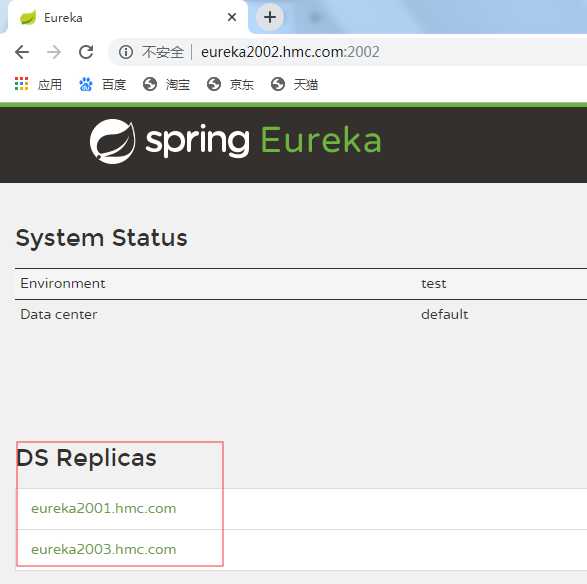
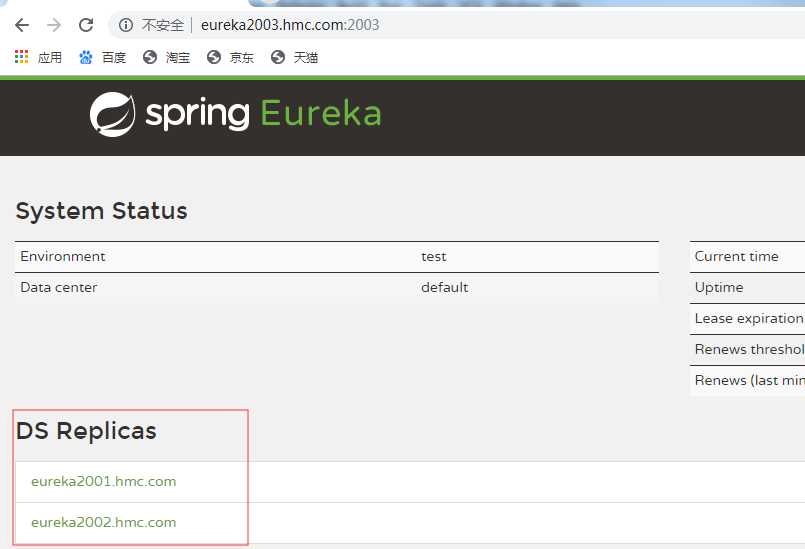
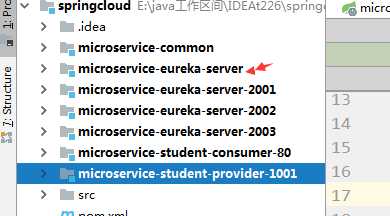
上面eureka服务搭建,除了yml文件不一样,其他文件都一样,那么我们有什么办法能够将多个eureka服务集合到一个工程中去呢?
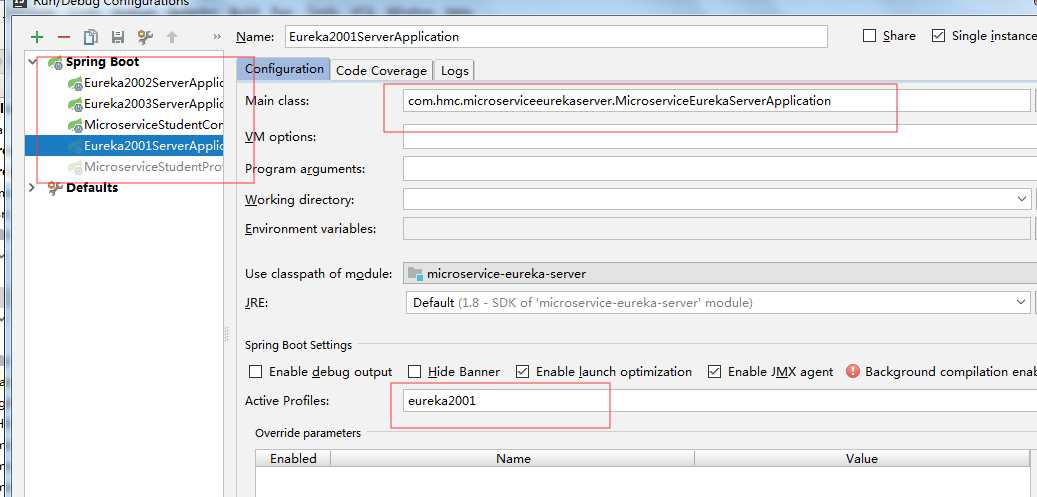
创建一个microservice-eureka-server(三合一)子工程
Pom依赖
<?xml version="1.0" encoding="UTF-8"?>
<project xmlns="http://maven.apache.org/POM/4.0.0" xmlns:xsi="http://www.w3.org/2001/XMLSchema-instance"
    xsi:schemaLocation="http://maven.apache.org/POM/4.0.0 https://maven.apache.org/xsd/maven-4.0.0.xsd">
    <modelVersion>4.0.0</modelVersion>
    <parent>
        <groupId>com.hmc</groupId>
        <artifactId>springcloud</artifactId>
        <version>1.0-SNAPSHOT</version>
    </parent>
    <artifactId>microservice-eureka-server</artifactId>

    <properties>
        <java.version>1.8</java.version>
    </properties>
    <dependencies>
        <dependency>
            <groupId>org.springframework.cloud</groupId>
            <artifactId>spring-cloud-starter-eureka-server</artifactId>
        </dependency>
        <dependency>
            <groupId>org.springframework.boot</groupId>
            <artifactId>spring-boot-starter-test</artifactId>
            <scope>test</scope>
        </dependency>
        <!--  修改后立即生效,热部署  -->
        <dependency>
            <groupId>org.springframework</groupId>
            <artifactId>springloaded</artifactId>
        </dependency>
        <dependency>
            <groupId>org.springframework.boot</groupId>
            <artifactId>spring-boot-devtools</artifactId>
        </dependency>
    </dependencies>
    <build>
        <plugins>
            <plugin>
                <groupId>org.springframework.boot</groupId>
                <artifactId>spring-boot-maven-plugin</artifactId>
            </plugin>
        </plugins>
    </build>


</project>
Yml文件
---
server:
  port: 2001
  context-path: /
eureka:
  instance:
   hostname: eureka2001.hmc.com
  client:
    register-with-eureka: false
    service-url:
      defaultZone: http://eureka2002.hmc.com:2002/eureka/,http://eureka2003.hmc.com:2003/eureka/
spring:
  profiles: eureka2001
---
server:
  port: 2002
  context-path: /
eureka:
  instance:
    hostname: eureka2002.hmc.com
  client:
    register-with-eureka: false
    service-url:
      defaultZone: http://eureka2001.hmc.com:2001/eureka/,http://eureka2003.hmc.com:2003/eureka/
spring:
  profiles: eureka2002
---
server:
  port: 2003
  context-path: /
eureka:
  instance:
    hostname: eureka2003.hmc.com
  client:
    register-with-eureka: false
    service-url:
      defaultZone: http://eureka2001.hmc.com:2001/eureka/,http://eureka2002.hmc.com:2002/eureka/
spring:
  profiles: eureka2003
启动类MicroserviceEurekaServerApplication.java
package com.hmc.microserviceeurekaserver;

import org.springframework.boot.SpringApplication;
import org.springframework.boot.autoconfigure.SpringBootApplication;
import org.springframework.cloud.netflix.eureka.server.EnableEurekaServer;

@EnableEurekaServer
@SpringBootApplication
public class MicroserviceEurekaServerApplication {

    public static void main(String[] args) {
        SpringApplication.run(MicroserviceEurekaServerApplication.class, args);
    }

}
Eureka自我保护机制
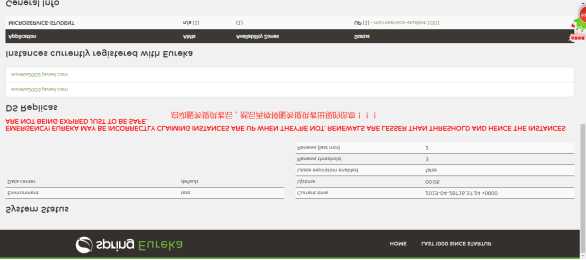
开发环境,我们经常会遇到这个红色的警告;
当我们长时间为访问服务以及变更服务实例名称的时候,就会出现这个红色警告;
默认情况,如果服务注册中心再一段时间内没有接收到某个微服务实例的心跳,服务注册中心会注销该实例(默认90秒)。
由于正式环境,经常会有网络故障,网络延迟问题发生,服务和注册中心无法正常通信,此时服务是正常的,不应该注销该服务,Eureka这时候,就通过“自我保护模式”来解决问题,当短时间和服务失去通信时,保留服务信息,当恢复网络和通信时候,退出“自我保护模式”;
通过“自我保护模式”,使Eureka集群更加的健壮和稳定;
以上是关于Eureka集群的主要内容,如果未能解决你的问题,请参考以下文章