SpringBoot项目部署到tomcat
Posted
tags:
篇首语:本文由小常识网(cha138.com)小编为大家整理,主要介绍了SpringBoot项目部署到tomcat相关的知识,希望对你有一定的参考价值。
参考技术A 一、修改maven.xml1、添加<.packaging>war</.packaging>,打包为war包
2、不使用SpringBoot内置的Tomcat,添加
二、修改application.properties文件,添加 content-path
三、修改启动文件main方法,让该方法继承自SpringBootServletInitializer,并且重写configure方法:
修改后的启动文件为:
SpringBoot项目部署到tomcat
四、打包
1、在项目的根目录下面执行命令:
mvn clean package
打包成功后,在项目的根目录下面会多出一个target目录,该目录下面有一个war包,名为:fileupload-0.0.1-SNAPSHOT.war。
2、将fileupload-0.0.1-SNAPSHOT.war改名为yml文件中context-path的名字MyProject
注:此时访问的端口以tomcat的端口为准。
http://localhost:8080/MyProject/register.html
springboot项目怎么部署到外部tomcat
spring-boot项目中,默认提供内嵌的tomcat,所以打包直接生成jar包,用Java -jar命令就可以启动。
但是也有一定的需求,会使用外部tomcat来部署项目。下面来看:
1.新建项目boot-tomcat-test
2.pom依赖:(添加spring-boot-starter-tomcat依赖,打包方式为war)

<?xml version="1.0" encoding="UTF-8"?>
<project xmlns="http://maven.apache.org/POM/4.0.0"
         xmlns:xsi="http://www.w3.org/2001/XMLSchema-instance"
         xsi:schemaLocation="http://maven.apache.org/POM/4.0.0 http://maven.apache.org/xsd/maven-4.0.0.xsd">
    <modelVersion>4.0.0</modelVersion>

    <groupId>boot-tomcat</groupId>
    <artifactId>com.boot.tomcat</artifactId>
    <version>1.0-SNAPSHOT</version>

    <!--父依赖包-->
    <parent>
        <groupId>org.springframework.boot</groupId>
        <artifactId>spring-boot-starter-parent</artifactId>
        <version>1.3.2.RELEASE</version>
        <relativePath/>
    </parent>

    <properties>
        <project.build.sourceEncoding>UTF-8</project.build.sourceEncoding>
        <java.version>1.8</java.version>
    </properties>

    <dependencies>
        <dependency>
            <groupId>org.springframework.boot</groupId>
            <artifactId>spring-boot-starter</artifactId>
        </dependency>

        <dependency>
            <groupId>org.springframework.boot</groupId>
            <artifactId>spring-boot-starter-test</artifactId>
            <scope>test</scope>
        </dependency>

        <dependency>
            <groupId>org.springframework.boot</groupId>
            <artifactId>spring-boot-starter-web</artifactId>
        </dependency>

        <dependency>
            <groupId>org.springframework.boot</groupId>
            <artifactId>spring-boot-starter-tomcat</artifactId>
        </dependency>
    </dependencies>
    <!-- tomcat 打war包 -->
    <packaging>war</packaging>
</project>
3.启动App继承SpringBootServletInitializer类,并重写configure方法

package boottest;


import org.springframework.boot.SpringApplication;
import org.springframework.boot.autoconfigure.SpringBootApplication;
import org.springframework.boot.builder.SpringApplicationBuilder;
import org.springframework.boot.context.web.SpringBootServletInitializer;

/**
 * App类描述:
 *  继承SpringBootServletInitializer,可以用tomcat部署
 * @author yangzhenlong
 * @since 2017/5/3
 */
@SpringBootApplication
public class App extends SpringBootServletInitializer{

    @Override
    protected SpringApplicationBuilder configure(SpringApplicationBuilder builder) {
        return builder.sources(App.class);
    }

    public static void main(String[] args) throws Exception {
        SpringApplication.run(App.class, args);
    }
}
4.Controller:

package boottest;


import org.springframework.web.bind.annotation.RequestMapping;
import org.springframework.web.bind.annotation.RestController;

/**
 * IndexController类描述:
 *
 * @author yangzhenlong
 * @since 2017/5/3
 */
@RestController
public class IndexController {

    @RequestMapping("/")
    public String index(){
        return "hello boot";
    }
}
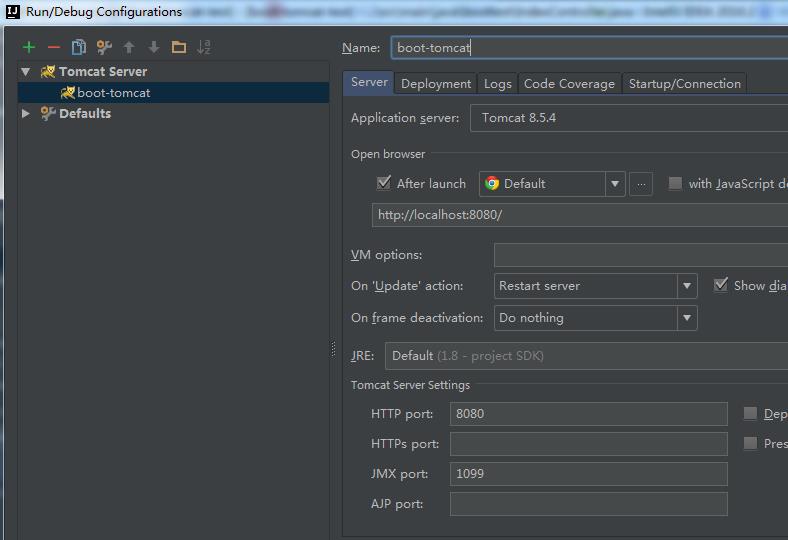
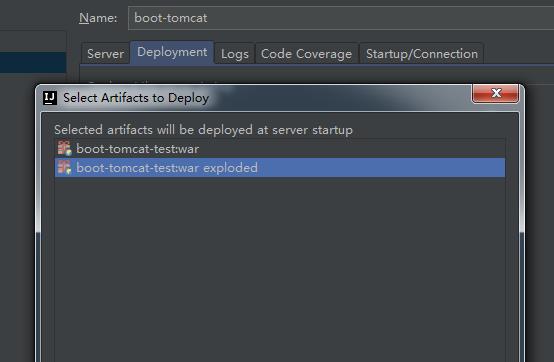
5.配置项目到tomcat,然后启动tomcat


访问:http://localhost:8080/

ok了!
以上是关于SpringBoot项目部署到tomcat的主要内容,如果未能解决你的问题,请参考以下文章
