Hybrid app开发之Ionic+Cordova+Angular 系列篇——IOS端Jpush集成
Posted 文文time
tags:
篇首语:本文由小常识网(cha138.com)小编为大家整理,主要介绍了Hybrid app开发之Ionic+Cordova+Angular 系列篇——IOS端Jpush集成相关的知识,希望对你有一定的参考价值。
上一章主要是安卓集成,比较简单,但是ios的配置比较繁琐啦,当然,熟悉了一样简单。因为IOS端集成jpush踩了很多坑,所以单独详细讲解一下,按照下面的步骤,保证同学们毫无阻碍走向胜利。
在下面的步骤之前有两个比较重要的问题需要大家重视:
(1)更新你的MacOs
(2)更新你的Xcode
如果这两步没做,或者只更新了其中一个,你会被坑死的,各种稀奇古怪的问题都会出来,不要问我为什么,你去问问苹果开发者吧。
准备工作:
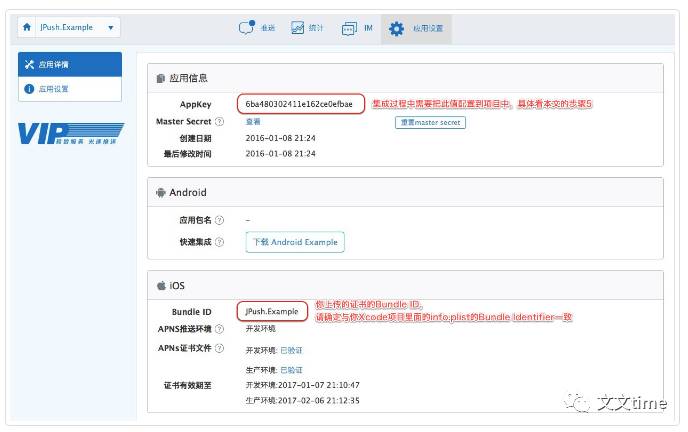
(1)创建应用
(2)创建成功后自动生成 AppKey 用以标识该应用。
言归正传啦,下面我们来看看具体步骤:
1,用xcdoe打开项目
2,在极光官网下载最新SDKhttps://docs.jiguang.cn/jpush/resources/
3,将SDK包解压,在Xcode中选择“Add files to 'Your project name'...”,将解压后的lib子文件夹(包含JPUSHService.h、jpush-ios-x.x.x.a、jcore-ios-x.x.x.a)添加到你的工程目录中
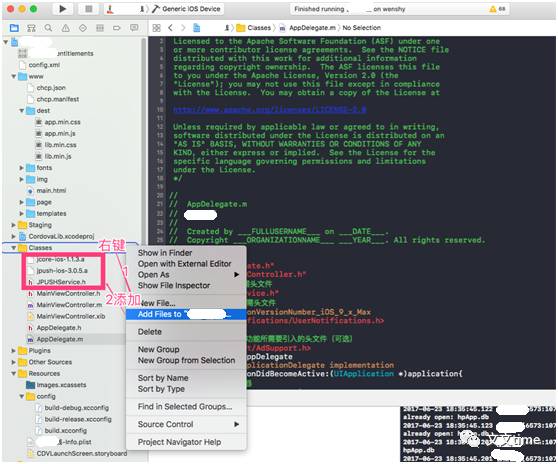
上面添加的三个文件如下:

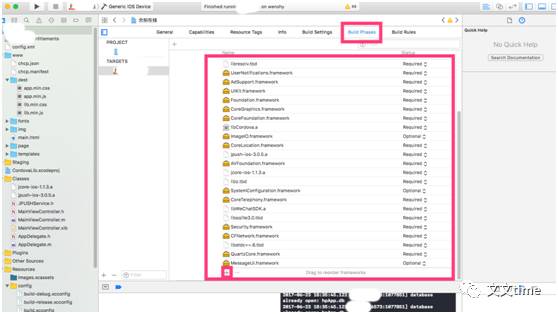
4, 添加Framework
a) CFNetwork.framework
b) CoreFoundation.framework
c) CoreTelephony.framework
d) SystemConfiguration.framework
e) CoreGraphics.framework
f) Foundation.framework
g) UIKit.framework
h) Security.framework
i) libz.tbd
j) AdSupport.framework
k) UserNotifications.framework
l) libresolv.tbd
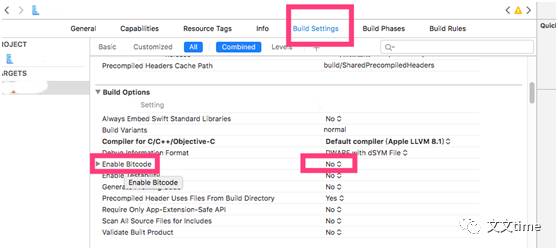
5, Build Settings
如果你的工程需要支持小于7.0的iOS系统,请到Build Settings 关闭bitCode选项,否则将无法正常编译通过。(默认一般是关闭的)
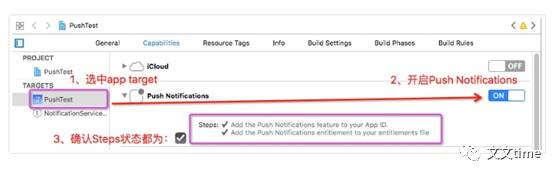
6,Capabilities
如使用Xcode8及以上环境开发,请开启Application Target的Capabilities->Push Notifications选项,如图:
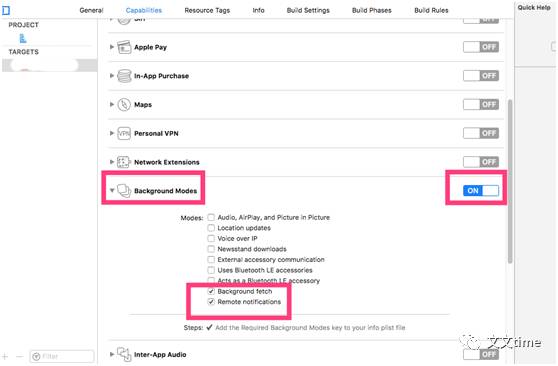
7,设置backgroundmodes打开状态为on
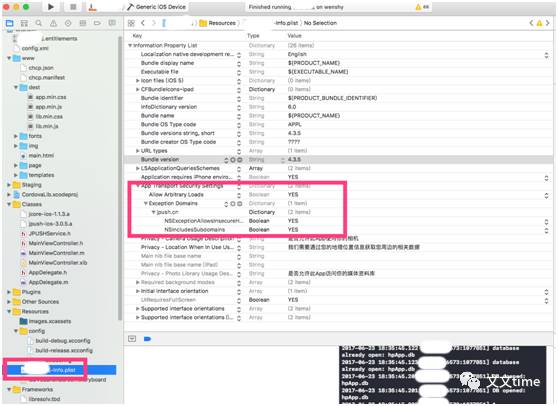
8,允许Xcode7支持Http传输方法
如果您使用的是2.1.9及以上的版本则不需要配置此步骤
如果用的是Xcode7或更新版本,需要在App项目的plist手动配置下key和值以支持http传输:
选择1:根据域名配置
在项目的info.plist中添加一个Key:NSAppTransportSecurity,类型为字典类型。然后给它添加一个NSExceptionDomains,类型为字典类型;把需要的支持的域添加給NSExceptionDomains。其中jpush.cn作为Key,类型为字典类型。
每个域下面需要设置2个属性:NSIncludesSubdomains、NSExceptionAllowsInsecureHTTPLoads。两个属性均为Boolean类型,值分别为YES、YES。
如图:

9,修改AppDelegate.m
将文件夹中到文件拷贝到这里即可,里面到源代码已经修改好

源代码如下(小编改这个源代码刚开始被坑了好久,其实官网也有描述,按照官网的写就Ok了,不要自作聪明写啦,否则写出一堆坑,小编被自己的坑埋了一次又一次,不要笑话小编哈):
/*
Licensed to the Apache Software Foundation (ASF) under one
or more contributor license agreements. See the NOTICE file
distributed with this work for additional information
regarding copyright ownership. The ASF licenses this file
to you under the Apache License, Version 2.0 (the
"License"); you may not use this file except in compliance
with the License. You may obtain a copy of the License at
http://www.apache.org/licenses/LICENSE-2.0
Unless required by applicable law or agreed to in writing,
software distributed under the License is distributed on an
"AS IS" BASIS, WITHOUT WARRANTIES OR CONDITIONS OF ANY
KIND, either express or implied. See the License for the
specific language governing permissions and limitations
under the License.
*/
//
// AppDelegate.m
//
// Created by ___FULLUSERNAME___ on ___DATE___.
// Copyright ___ORGANIZATIONNAME___ ___YEAR___. All rights reserved.
//
#import "AppDelegate.h"
#import "MainViewController.h"
// 引入JPush功能所需头文件
#import "JPUSHService.h"
// iOS10注册APNs所需头文件
#ifdef NSFoundationVersionNumber_iOS_9_x_Max
#import <UserNotifications/UserNotifications.h>
#endif
// 如果需要使用idfa功能所需要引入的头文件(可选)
#import <AdSupport/AdSupport.h>
@implementation AppDelegate
#pragma mark UIApplicationDelegate implementation
- (void)applicationDidBecomeActive:(UIApplication *)application{
// 极光服务器
[JPUSHService setBadge:0];
[[UIApplication sharedApplication]setApplicationIconBadgeNumber:0];
NSLog(@"\n ===> 程序重新激活 !");
}
- (BOOL)application:(UIApplication*)application didFinishLaunchingWithOptions:(NSDictionary*)launchOptions
{ //Required
//notice: 3.0.0及以后版本注册可以这样写,也可以继续用之前的注册方式
JPUSHRegisterEntity * entity = [[JPUSHRegisterEntity alloc] init];
entity.types = JPAuthorizationOptionAlert|JPAuthorizationOptionBadge|JPAuthorizationOptionSound;
if ([[UIDevice currentDevice].systemVersion floatValue] >= 8.0) {
// 可以添加自定义categories
// NSSet<UNNotificationCategory *> *categories for iOS10 or later
// NSSet<UIUserNotificationCategory *> *categories for iOS8 and iOS9
}
[JPUSHService registerForRemoteNotificationConfig:entity delegate:self];
// Optional
// 获取IDFA
// 如需使用IDFA功能请添加此代码并在初始化方法的advertisingIdentifier参数中填写对应值
NSString *advertisingId = [[[ASIdentifierManager sharedManager] advertisingIdentifier] UUIDString];
// Required
// init Push
// notice: 2.1.5版本的SDK新增的注册方法,改成可上报IDFA,如果没有使用IDFA直接传nil
// 如需继续使用pushConfig.plist文件声明appKey等配置内容,请依旧使用[JPUSHService setupWithOption:launchOptions]方式初始化。
[JPUSHService setupWithOption:launchOptions appKey:@"4f7d35225604521c822323c7"
channel:@"App Store"
apsForProduction:YES
advertisingIdentifier:nil];
self.viewController = [[MainViewController alloc] init];
return [super application:application didFinishLaunchingWithOptions:launchOptions];
}
- (void)application:(UIApplication *)application
didRegisterForRemoteNotificationsWithDeviceToken:(NSData *)deviceToken {
/// Required - 注册 DeviceToken
[JPUSHService registerDeviceToken:deviceToken];
}
- (void)application:(UIApplication *)application didFailToRegisterForRemoteNotificationsWithError:(NSError *)error {
//Optional
NSLog(@"did Fail To Register For Remote Notifications With Error: %@", error);
}
// iOS 10 Support
- (void)jpushNotificationCenter:(UNUserNotificationCenter *)center willPresentNotification:(UNNotification *)notification withCompletionHandler:(void (^)(NSInteger))completionHandler {
// Required
NSDictionary * userInfo = notification.request.content.userInfo;
if([notification.request.trigger isKindOfClass:[UNPushNotificationTrigger class]]) {
[JPUSHService handleRemoteNotification:userInfo];
}
completionHandler(UNNotificationPresentationOptionAlert); // 需要执行这个方法,选择是否提醒用户,有Badge、Sound、Alert三种类型可以选择设置
}
// iOS 10 Support
- (void)jpushNotificationCenter:(UNUserNotificationCenter *)center didReceiveNotificationResponse:(UNNotificationResponse *)response withCompletionHandler:(void (^)())completionHandler {
// Required
NSDictionary * userInfo = response.notification.request.content.userInfo;
if([response.notification.request.trigger isKindOfClass:[UNPushNotificationTrigger class]]) {
[JPUSHService handleRemoteNotification:userInfo];
}
completionHandler(); // 系统要求执行这个方法
}
- (void)application:(UIApplication *)application didReceiveRemoteNotification:(NSDictionary *)userInfo fetchCompletionHandler:(void (^)(UIBackgroundFetchResult))completionHandler {
// Required, iOS 7 Support
[JPUSHService handleRemoteNotification:userInfo];
completionHandler(UIBackgroundFetchResultNewData);
}
- (void)application:(UIApplication *)application didReceiveRemoteNotification:(NSDictionary *)userInfo {
// Required,For systems with less than or equal to iOS6
[JPUSHService handleRemoteNotification:userInfo];
}
@end
10,如果控制台输出以下日志则代表您已经集成成功
11,检验
如果不放心,在极光推送网站发送一条消息成功表示集成成功
12,推送角标到问题需要注意的问题(参考如下):
http://blog.csdn.net/jpush/article/details/62883028
角标问题是jpush自身的一个bug,所以需要大家特别注意,否则你会发现应用图标总是不消失,或者总是出现一个1等等各种头疼的问题,另外,提醒一下大家在我们的Js中一定要记得清除角标哦,否则对于强迫症患者来说是非常煎熬的!
PS:极光推送官网也给出了大家详细的步骤,大家可以参考参考,但是作为小白,个人感觉官网没小编写的详细形象,而且其中容易碰到的坑,大家就不要再往下跳了,如果你有钻研精神,那也可以试试,哈哈!
-------------------------------------
欢迎分享或转发,也可以关注文文time
以上是关于Hybrid app开发之Ionic+Cordova+Angular 系列篇——IOS端Jpush集成的主要内容,如果未能解决你的问题,请参考以下文章