消息队列ActiveMQ的使用详解
Posted Java面试通关手册
tags:
篇首语:本文由小常识网(cha138.com)小编为大家整理,主要介绍了消息队列ActiveMQ的使用详解相关的知识,希望对你有一定的参考价值。
通过上一篇文章 ,我们已经消息队列是什么、使用消息队列的好处以及常见消息队列的简单介绍。
这一篇文章,主要带大家详细了解一下消息队列ActiveMQ的使用。
学习消息队列ActiveMQ的使用之前,我们先来搞清JMS。
JMS
1. JMS基本概念
JMS(JAVA Message Service,java消息服务)是java的消息服务,JMS的客户端之间可以通过JMS服务进行异步的消息传输。JMS(JAVA Message Service,java消息服务)API是一个消息服务的标准或者说是规范,允许应用程序组件基于JavaEE平台创建、发送、接收和读取消息。它使分布式通信耦合度更低,消息服务更加可靠以及异步性。
2. JMS五种不同的消息正文格式
JMS定义了五种不同的消息正文格式,以及调用的消息类型,允许你发送并接收以一些不同形式的数据,提供现有消息格式的一些级别的兼容性。
StreamMessage -- Java原始值的数据流
MapMessage--一套名称-值对
TextMessage--一个字符串对象
ObjectMessage--一个序列化的 Java对象
BytesMessage--一个字节的数据流
3.JMS两种消息模型
1 .点到点(P2P)模型
使用队列(Queue)作为消息通信载体;满足生产者与消费者模式,一条消息只能被一个消费者使用,未被消费的消息在队列中保留直到被消费或超时。比如:我们生产者发送100条消息的话,两个消费者来消费一般情况下两个消费者会按照消息发送的顺序各自消费一半(也就是你一个我一个的消费。)后面我们会通过代码演示来验证。
2. 发布/订阅(Pub/Sub)模型
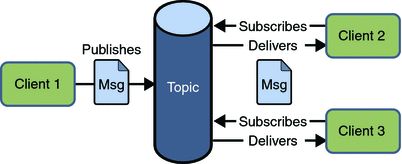 发布订阅模型(Pub/Sub) 使用主题(Topic)作为消息通信载体,类似于广播模式;发布者发布一条消息,该消息通过主题传递给所有的订阅者,在一条消息广播之后才订阅的用户则是收不到该条消息的。
4.JMS编码接口之间的关系
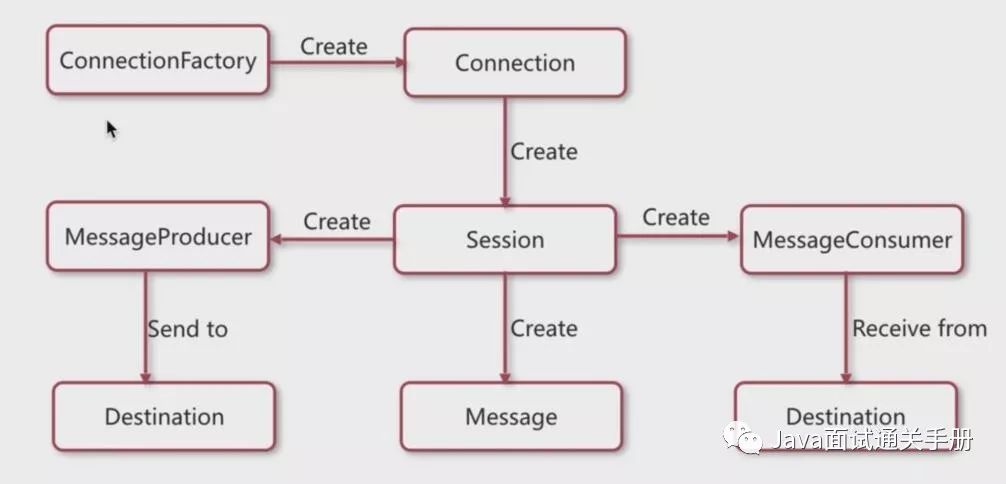
ConnectionFactory:创建Connection对象的工厂,针对两种不同的jms消息模型,分别有QueueConnectionFactory和TopicConnectionFactory两种。可以通过JNDI来查找ConnectionFactory对象。
Connection:Connection表示在客户端和JMS系统之间建立的链接(对TCP/IP socket的包装)。Connection可以产生一个或多个Session。跟ConnectionFactory一样,Connection也有两种类型:QueueConnection和TopicConnection。
Session:Session是操作消息的接口。可以通过session创建生产者、消费者、消息等。Session提供了事务的功能。当需要使用session发送/接收多个消息时,可以将这些发送/接收动作放到一个事务中。同样,也分QueueSession和TopicSession。
MessageProducer:消息生产者由Session创建,并用于将消息发送到Destination。同样,消息生产者分两种类型:QueueSender和TopicPublisher。可以调用消息生产者的方法(send或publish方法)发送消息。
MessageConsumer :消息消费者由Session创建,用于接收被发送到Destination的消息。两种类型:QueueReceiver和TopicSubscriber。可分别通过session的createReceiver(Queue)或createSubscriber(Topic)来创建。当然,也可以session的creatDurableSubscriber方法来创建持久化的订阅者。
Destination:Destination的意思是消息生产者的消息发送目标或者说消息消费者的消息来源。对于消息生产者来说,它的Destination是某个队列(Queue)或某个主题(Topic);对于消息消费者来说,它的Destination也是某个队列或主题(即消息来源)。
MessageListener: 消息监听器。如果注册了消息监听器,一旦消息到达,将自动调用监听器的onMessage方法。
参考:https://blog.csdn.net/shaobingj126/article/details/50585035
消息队列ActiveMQ
1.简介
ActiveMQ 是Apache出品,最流行的,能力强劲的开源消息总线。ActiveMQ 是一个完全支持JMS1.1和J2EE 1.4规范的 JMS Provider实现,尽管JMS规范出台已经是很久的事情了,但是JMS在当今的J2EE应用中间仍然扮演着特殊的地位。
2.简单使用
安装过程很简单这里就不贴安装过程了,可以自行google.
添加Maven依赖
      <dependency>


          <groupId>org.apache.activemq</groupId>


          <artifactId>activemq-all</artifactId>


          <version>5.15.3</version>


      </dependency>
2.1.测试点对点模型通信
生产者发送消息测试方法:
      @Test


      public void testQueueProducer() throws Exception {


          // 1、创建一个连接工厂对象,需要指定服务的ip及端口。


          ConnectionFactory connectionFactory = new ActiveMQConnectionFactory("tcp://192.168.25.155:61616");


          // 2、使用工厂对象创建一个Connection对象。


          Connection connection = connectionFactory.createConnection();


          // 3、开启连接,调用Connection对象的start方法。


          connection.start();


          // 4、创建一个Session对象。


          // 第一个参数:是否开启事务。如果true开启事务,第二个参数无意义。一般不开启事务false。


          // 第二个参数:应答模式。自动应答或者手动应答。一般自动应答。


          Session session = connection.createSession(false, Session.AUTO_ACKNOWLEDGE);


          // 5、使用Session对象创建一个Destination对象。两种形式queue、topic,现在应该使用queue


          Queue queue = session.createQueue("test-queue");


          // 6、使用Session对象创建一个Producer对象。


          MessageProducer producer = session.createProducer(queue);


          // 7、创建一个Message对象,可以使用TextMessage。


          for (int i = 0; i < 50; i++) {


              TextMessage textMessage = session.createTextMessage("第"+i+ "一个ActiveMQ队列目的地的消息");


              // 8、发送消息


              producer.send(textMessage);


          }


          // 9、关闭资源


          producer.close();


          session.close();


          connection.close();


      }
消费者消费消息测试方法
      @Test


      public void testQueueConsumer() throws Exception {


          // 创建一个ConnectionFactory对象连接MQ服务器


          ConnectionFactory connectionFactory = new ActiveMQConnectionFactory("tcp://192.168.25.155:61616");


          // 创建一个连接对象


          Connection connection = connectionFactory.createConnection();


          // 开启连接


          connection.start();


          // 使用Connection对象创建一个Session对象


          Session session = connection.createSession(false, Session.AUTO_ACKNOWLEDGE);


          // 创建一个Destination对象。queue对象


          Queue queue = session.createQueue("test-queue");


          // 使用Session对象创建一个消费者对象。


          MessageConsumer consumer = session.createConsumer(queue);


          // 接收消息


          consumer.setMessageListener(new MessageListener() {


              @Override


              public void onMessage(Message message) {


                  // 打印结果


                  TextMessage textMessage = (TextMessage) message;


                  String text;


                  try {


                      text = textMessage.getText();


                      System.out.println("这是接收到的消息:" + text);


                  } catch (JMSException e) {


                      e.printStackTrace();


                  }


              }


          });


          // 等待接收消息


          System.in.read();


          // 关闭资源


          consumer.close();


          session.close();


          connection.close();


      }
我们开启两个消费者进程来监听(运行两次testQueueConsumer()方法)。 然后我们运行运行生产者测试方法发送消息.先发送消息还是先监听消息一般不会不影响。
效果如下:
两个消费者各自消费一半消息,而且还是按照消息发送到消息队列的顺序,这也验证了我们上面的说法。 第一个消费者
第二个消费者
2.2.测试发布/订阅(Pub/Sub)模型通信
生产者发送消息测试方法:
      @Test


      public void testTopicProducer() throws Exception {


          // 1、创建一个连接工厂对象,需要指定服务的ip及端口。


          ConnectionFactory connectionFactory = new ActiveMQConnectionFactory("tcp://192.168.25.155:61616");


          // 2、使用工厂对象创建一个Connection对象。


          Connection connection = connectionFactory.createConnection();


          // 3、开启连接,调用Connection对象的start方法。


          connection.start();


          // 4、创建一个Session对象。


          // 第一个参数:是否开启事务。如果true开启事务,第二个参数无意义。一般不开启事务false。


          // 第二个参数:应答模式。自动应答或者手动应答。一般自动应答。


          Session session = connection.createSession(false, Session.AUTO_ACKNOWLEDGE);


          // 5、使用Session对象创建一个Destination对象。两种形式queue、topic,现在应该使用topic


          Topic topic = session.createTopic("test-topic");


          // 6、使用Session对象创建一个Producer对象。


          MessageProducer producer = session.createProducer(topic);


          // 7、创建一个Message对象,可以使用TextMessage。


          for (int i = 0; i < 50; i++) {


              TextMessage textMessage = session.createTextMessage("第"+i+ "一个ActiveMQ队列目的地的消息");


              // 8、发送消息


              producer.send(textMessage);


          }


          // 9、关闭资源


          producer.close();


          session.close();


          connection.close();


      }
消费者消费消息测试方法:
      @Test


      public void testTopicConsumer() throws Exception {


          // 创建一个ConnectionFactory对象连接MQ服务器


          ConnectionFactory connectionFactory = new ActiveMQConnectionFactory("tcp://192.168.25.155:61616");


          // 创建一个连接对象


          Connection connection = connectionFactory.createConnection();


          // 开启连接


          connection.start();


          // 使用Connection对象创建一个Session对象


          Session session = connection.createSession(false, Session.AUTO_ACKNOWLEDGE);


          // 创建一个Destination对象。topic对象


          Topic topic = session.createTopic("test-topic");


          // 使用Session对象创建一个消费者对象。


          MessageConsumer consumer = session.createConsumer(topic);


          // 接收消息


          consumer.setMessageListener(new MessageListener() {


              @Override


              public void onMessage(Message message) {


                  // 打印结果


                  TextMessage textMessage = (TextMessage) message;


                  String text;


                  try {


                      text = textMessage.getText();


                      System.out.println("这是接收到的消息:" + text);


                  } catch (JMSException e) {


                      e.printStackTrace();


                  }


              }


          });


          System.out.println("topic消费者启动。。。。");


          // 等待接收消息


          System.in.read();


          // 关闭资源


          consumer.close();


          session.close();


          connection.close();


      }
先运行两个消费者进程(提前订阅,不然收不到发送的消息),然后运行生产者测试方法发送消息。
结果是: 两个消费者进程都可以接收到生产者发送过来的所有消息,我这里就不贴图片了, 这样验证了我们上面的说法。
我们从上面代码就可以看出,点对点通信和发布订阅通信模式的区别就是创建生产者和消费者对象时提供的Destination对象不同,如果是点对点通信创建的Destination对象是Queue,发布订阅通信模式通信则是Topic。
3.整合Spring使用
整合spring除了我们上面依赖的Jar包还要依赖
       <dependency>


          <groupId>org.springframework</groupId>


          <artifactId>spring-jms</artifactId>


          <version>4.2.7.RELEASE</version>


      </dependency>


      <dependency>


          <groupId>org.springframework</groupId>


          <artifactId>spring-context-support</artifactId>


          <version>4.2.7.RELEASE</version>


       </dependency>
比如我们在我们的系统中现在有两个服务,第一个服务发送消息,第二个服务接收消息,我们下面看看这是如何实现的。
发送消息
发送消息的配置文件:
  <?xml version="1.0" encoding="UTF-8"?>


  <beans xmlns="http://www.springframework.org/schema/beans"


      xmlns:context="http://www.springframework.org/schema/context" xmlns:p="http://www.springframework.org/schema/p"


      xmlns:aop="http://www.springframework.org/schema/aop" xmlns:tx="http://www.springframework.org/schema/tx"


      xmlns:xsi="http://www.w3.org/2001/XMLSchema-instance"


      xsi:schemaLocation="http://www.springframework.org/schema/beans http://www.springframework.org/schema/beans/spring-beans-4.2.xsd


      http://www.springframework.org/schema/context http://www.springframework.org/schema/context/spring-context-4.2.xsd


      http://www.springframework.org/schema/aop http://www.springframework.org/schema/aop/spring-aop-4.2.xsd http://www.springframework.org/schema/tx http://www.springframework.org/schema/tx/spring-tx-4.2.xsd


      http://www.springframework.org/schema/util http://www.springframework.org/schema/util/spring-util-4.2.xsd">


      <!-- 真正可以产生Connection的ConnectionFactory,由对应的 JMS服务厂商提供 -->


      <bean id="targetConnectionFactory" class="org.apache.activemq.ActiveMQConnectionFactory">


          <property name="brokerURL" value="tcp://192.168.25.155:61616" />


      </bean>


      <!-- Spring用于管理真正的ConnectionFactory的ConnectionFactory -->


      <bean id="connectionFactory"


          class="org.springframework.jms.connection.SingleConnectionFactory">


          <!-- 目标ConnectionFactory对应真实的可以产生JMS Connection的ConnectionFactory -->


          <property name="targetConnectionFactory" ref="targetConnectionFactory" />


      </bean>


      <!-- 配置生产者 -->


      <!-- Spring提供的JMS工具类,它可以进行消息发送、接收等 -->


      <bean id="jmsTemplate" class="org.springframework.jms.core.JmsTemplate">


          <!-- 这个connectionFactory对应的是我们定义的Spring提供的那个ConnectionFactory对象 -->


          <property name="connectionFactory" ref="connectionFactory" />


      </bean>


      <!--这个是队列目的地,点对点的 -->


      <bean id="queueDestination" class="org.apache.activemq.command.ActiveMQQueue">


          <constructor-arg>


              <value>spring-queue</value>


          </constructor-arg>


      </bean>


      <!--这个是主题目的地,一对多的 -->


      <bean id="topicDestination" class="org.apache.activemq.command.ActiveMQTopic">


          <constructor-arg value="topic" />


      </bean>


  </beans>
发送消息的测试方法:
  @Test


      public void testSpringActiveMq() throws Exception {


          //初始化spring容器


          ApplicationContext applicationContext = new ClassPathXmlApplicationContext("classpath:spring/applicationContext-activemq.xml");


          //从spring容器中获得JmsTemplate对象


          JmsTemplate jmsTemplate = applicationContext.getBean(JmsTemplate.class);


          //从spring容器中取Destination对象


          Destination destination = (Destination) applicationContext.getBean("queueDestination");


          //使用JmsTemplate对象发送消息。


          jmsTemplate.send(destination, new MessageCreator() {


              @Override


              public Message createMessage(Session session) throws JMSException {


                  //创建一个消息对象并返回


                  TextMessage textMessage = session.createTextMessage("spring activemq queue message");


                  return textMessage;


              }


          });


      }
我们上面直接ApplicationContext的getBean方法获取的对象,实际在项目使用依赖注入即可。
接收消息
创建一个MessageListener的实现类。
  public class MyMessageListener implements MessageListener {


      @Override


      public void onMessage(Message message) {


          try {


              TextMessage textMessage = (TextMessage) message;


              //取消息内容


              String text = textMessage.getText();


              System.out.println(text);


          } catch (JMSException e) {


              e.printStackTrace();


          }


      }


  }
接收消息的配置文件:
  <?xml version="1.0" encoding="UTF-8"?>


  <beans xmlns="http://www.springframework.org/schema/beans"


      xmlns:context="http://www.springframework.org/schema/context" xmlns:p="http://www.springframework.org/schema/p"


      xmlns:aop="http://www.springframework.org/schema/aop" xmlns:tx="http://www.springframework.org/schema/tx"


      xmlns:xsi="http://www.w3.org/2001/XMLSchema-instance"


      xsi:schemaLocation="http://www.springframework.org/schema/beans http://www.springframework.org/schema/beans/spring-beans-4.2.xsd


      http://www.springframework.org/schema/context http://www.springframework.org/schema/context/spring-context-4.2.xsd


      http://www.springframework.org/schema/aop http://www.springframework.org/schema/aop/spring-aop-4.2.xsd http://www.springframework.org/schema/tx http://www.springframework.org/schema/tx/spring-tx-4.2.xsd


      http://www.springframework.org/schema/util http://www.springframework.org/schema/util/spring-util-4.2.xsd">


      <!-- 真正可以产生Connection的ConnectionFactory,由对应的 JMS服务厂商提供 -->


      <bean id="targetConnectionFactory" class="org.apache.activemq.ActiveMQConnectionFactory">


          <property name="brokerURL" value="tcp://192.168.25.168:61616" />


      </bean>


      <!-- Spring用于管理真正的ConnectionFactory的ConnectionFactory -->


      <bean id="connectionFactory"


          class="org.springframework.jms.connection.SingleConnectionFactory">


          <!-- 目标ConnectionFactory对应真实的可以产生JMS Connection的ConnectionFactory -->


          <property name="targetConnectionFactory" ref="targetConnectionFactory" />


      </bean>


      <!--这个是队列目的地,点对点的 -->


      <bean id="queueDestination" class="org.apache.activemq.command.ActiveMQQueue">


          <constructor-arg>


              <value>spring-queue</value>


          </constructor-arg>


      </bean>


      <!--这个是主题目的地,一对多的 -->


      <bean id="topicDestination" class="org.apache.activemq.command.ActiveMQTopic">


          <constructor-arg value="topic" />


      </bean>


      <!-- 接收消息 -->


      <!-- 配置监听器 -->


      <bean id="myMessageListener" class="cn.e3mall.search.listener.MyMessageListener" />


      <!-- 消息监听容器 -->


      <bean class="org.springframework.jms.listener.DefaultMessageListenerContainer">


          <property name="connectionFactory" ref="connectionFactory" />


          <property name="destination" ref="queueDestination" />


          <property name="messageListener" ref="myMessageListener" />


      </bean>


  </beans>
测试接收消息的代码
  @Test


      public void testQueueConsumer() throws Exception {


          //初始化spring容器


          ApplicationContext applicationContext = new ClassPathXmlApplicationContext("classpath:spring/applicationContext-activemq.xml");


          //等待


          System.in.read();


      }
以上是关于消息队列ActiveMQ的使用详解的主要内容,如果未能解决你的问题,请参考以下文章