这就是你日思夜想的 React 原生动态加载
Posted 悲伤日记
tags:
篇首语:本文由小常识网(cha138.com)小编为大家整理,主要介绍了这就是你日思夜想的 React 原生动态加载相关的知识,希望对你有一定的参考价值。
React.lazy 是什么
随着前端应用体积的扩大,资源加载的优化是我们必须要面对的问题,动态代码加载就是其中的一个方案,webpack 提供了符合 ECMAScript 提案 (https://github.com/tc39/proposal-dynamic-import) 的 import()语法 (https://www.webpackjs.com/api/module-methods#import-) ,让我们来实现动态地加载模块(注:require.ensure 与 import() 均为 webpack 提供的代码动态加载方案,在 webpack 2.x 中,require.ensure 已被 import 取代)。
在 React 16.6 版本中,新增了 React.lazy 函数,它能让你像渲染常规组件一样处理动态引入的组件,配合 webpack 的 Code Splitting,只有当组件被加载,对应的资源才会导入 ,从而达到懒加载的效果。
使用 React.lazy
// 不使用 React.lazy
import OtherComponent from './OtherComponent';
// 使用 React.lazy
const OtherComponent = React.lazy(() => import('./OtherComponent'))
React.lazy 接受一个函数作为参数,这个函数需要调用 import() 。它需要返回一个 Promise,该 Promise 需要 resolve 一个 defalut export 的 React 组件。
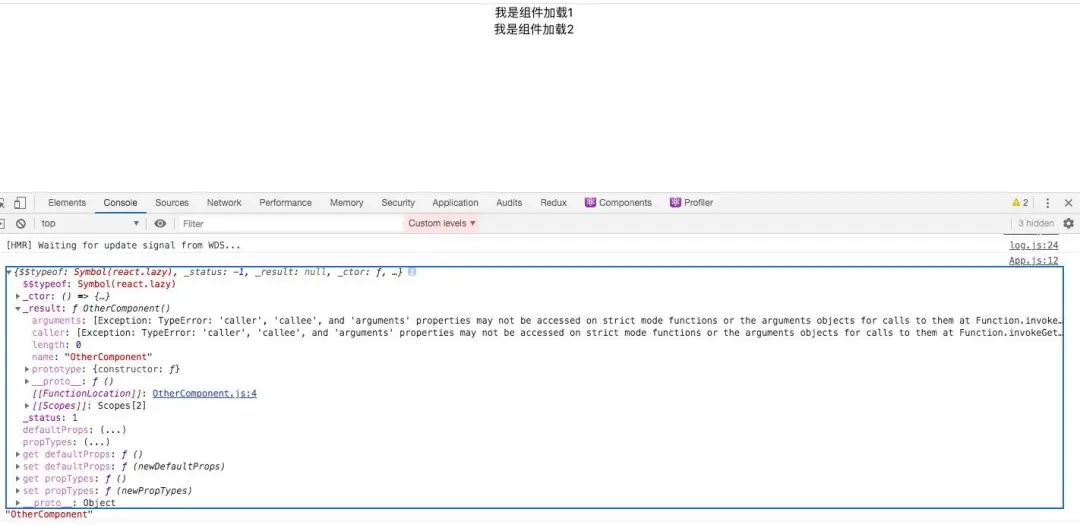
// react/packages/shared/ReactLazyComponent.js
 export const Pending = 0;
 export const Resolved = 1;
 export const Rejected = 2;
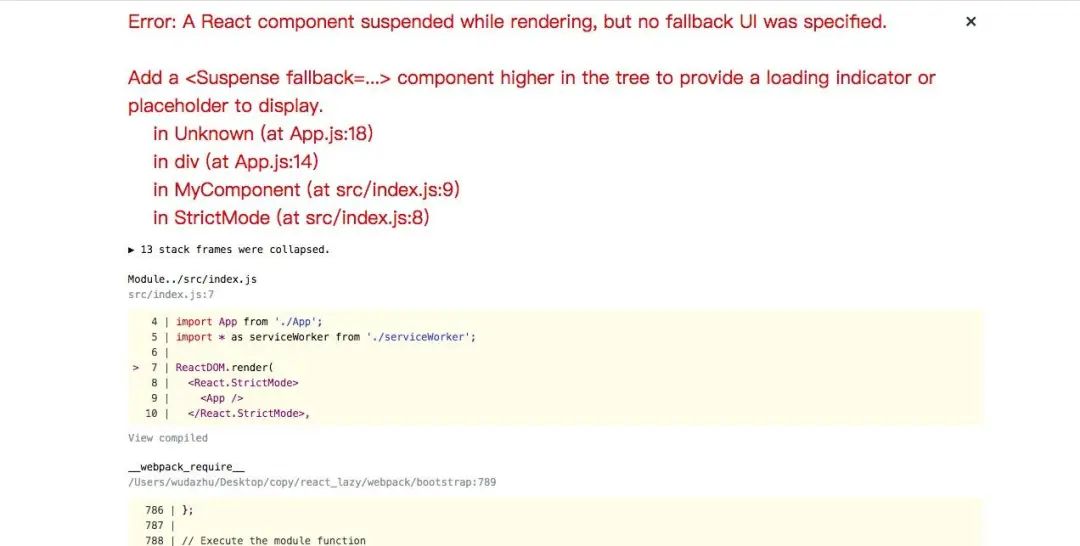
上面的错误指出组件渲染挂起时,没有 fallback UI,需要加上 Suspense 组件一起使用。
其中在 Suspense 组件中,fallback 是一个必需的占位属性,如果没有这个属性的话也是会报错的。
接下来我们可以看看渲染效果,为了更清晰的展示加载效果,我们将网络环境设置为 Slow 3G。

组件的加载效果:

可以看到在组件未加载完成前,展示的是我们所设置的 fallback 组件。
在动态加载的组件资源比较小的情况下,会出现 fallback 组件一闪而过的的体验问题,如果不需要使用可以将 fallback 设置为 null。
 <Suspense
   maxDuration={500}
   fallback={<div>抱歉,请耐心等待 Loading...</div>}
 >
   <OtherComponent />
   <OtherComponentTwo />
</Suspense>
Suspense 可以包裹多个动态加载的组件,这也意味着在加载这两个组件的时候只会有一个 loading 层,因为 loading 的实现实际是 Suspense 这个父组件去完成的,当所有的子组件对象都 resolve 后,再去替换所有子组件。这样也就避免了出现多个 loading 的体验问题。所以 loading 一般不会针对某个子组件,而是针对整体的父组件做 loading 处理。
以上是 React.lazy 的一些使用介绍,下面我们一起来看看整个懒加载过程中一些核心内容是怎么实现的,首先是资源的动态加载。
Webpack 动态加载
上面使用了 import() 语法,webpack 检测到这种语法会自动代码分割。使用这种动态导入语法代替以前的静态引入,可以让组件在渲染的时候,再去加载组件对应的资源,这个异步加载流程的实现机制是怎么样呢?
__webpack_require__.e = function requireEnsure(chunkId) {
    // installedChunks 是在外层代码中定义的对象,可以用来缓存了已加载 chunk
  var installedChunkData = installedChunks[chunkId]
    // 判断 installedChunkData 是否为 0:表示已加载
  if (installedChunkData === 0) {
    return new Promise(function(resolve) {
      resolve()
    })
  }
  if (installedChunkData) {
    return installedChunkData[2]
  }
  // 如果 chunk 还未加载,则构造对应的 Promsie 并缓存在 installedChunks 对象中
  var promise = new Promise(function(resolve, reject) {
    installedChunkData = installedChunks[chunkId] = [resolve, reject]
  })
  installedChunkData[2] = promise
  // 构造 script 标签
  var head = document.getElementsByTagName("head")[0]
  var script = document.createElement("script")
  script.type = "text/javascript"
  script.charset = "utf-8"
  script.async = true
  script.timeout = 120000
  if (__webpack_require__.nc) {
    script.setAttribute("nonce", __webpack_require__.nc)
  }
  script.src =
    __webpack_require__.p +
    "static/js/" +
    ({ "0": "alert" }[chunkId] || chunkId) +
    "." +
    { "0": "620d2495" }[chunkId] +
    ".chunk.js"
  var timeout = setTimeout(onScriptComplete, 120000)
  script.onerror = script.onload = onScriptComplete
  function onScriptComplete() {
    script.onerror = script.onload = null
    clearTimeout(timeout)
    var chunk = installedChunks[chunkId]
    // 如果 chunk !== 0 表示加载失败
    if (chunk !== 0) {
        // 返回错误信息
      if (chunk) {
        chunk[1](new Error("Loading chunk " + chunkId + " failed."))
      }
      // 将此 chunk 的加载状态重置为未加载状态
      installedChunks[chunkId] = undefined
    }
  }
  head.appendChild(script)
    // 返回 fullfilled 的 Promise
  return promise
}
const OtherComponent = React.lazy(() => import(/* webpackChunkName: "OtherComponent" */'./OtherComponent'));
const OtherComponentTwo = React.lazy(() => import(/* webpackChunkName: "OtherComponentTwo" */'./OtherComponentTwo'));
webpackChunckName 后面跟的就是打包后组件的名称。
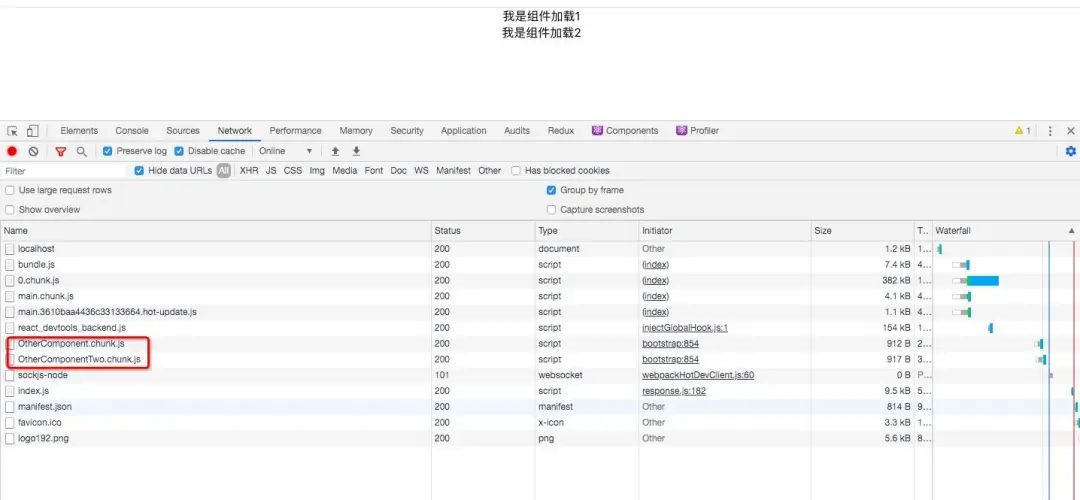
打包后的文件中多了动态引入的 OtherComponent、OtherComponentTwo 两个 js 文件。
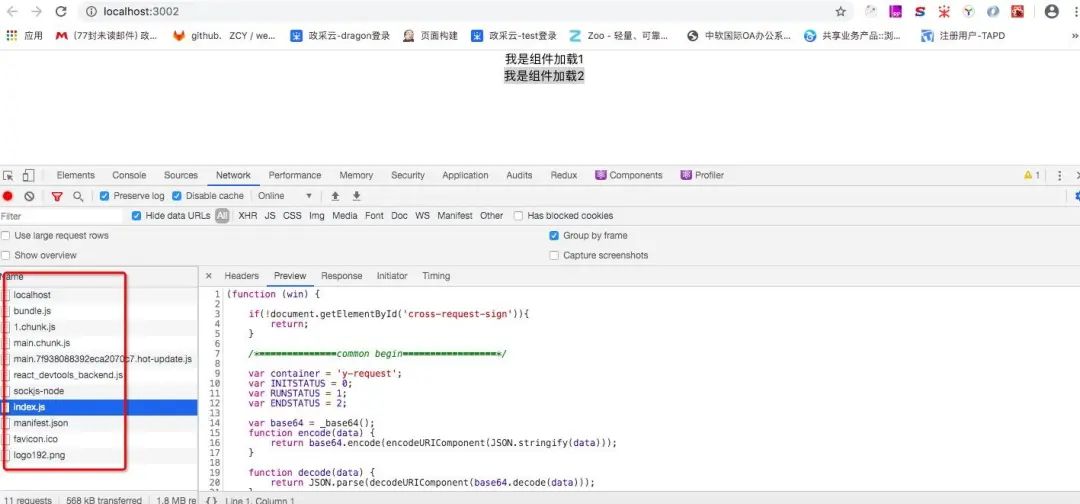
以上是资源的动态加载过程,当资源加载完成之后,进入到组件的渲染阶段,下面我们再来看看,Suspense 组件是如何接管 lazy 组件的。
Suspense 组件
// react/packages/react-cache/src/ReactCache.js
export function unstable_createResource<I, K: string | number, V>(
  fetch: I => Thenable<V>,
  maybeHashInput?: I => K,
): Resource<I, V> {
  const hashInput: I => K =
    maybeHashInput !== undefined ? maybeHashInput : (identityHashFn: any);
  const resource = {
    read(input: I): V {
      readContext(CacheContext);
      const key = hashInput(input);
      const result: Result<V> = accessResult(resource, fetch, input, key);
      // 状态捕获
      switch (result.status) {
        case Pending: {
          const suspender = result.value;
          throw suspender;
        }
        case Resolved: {
          const value = result.value;
          return value;
        }
        case Rejected: {
          const error = result.value;
          throw error;
        }
        default:
          // Should be unreachable
          return (undefined: any);
      }
    },
    preload(input: I): void {
      readContext(CacheContext);
      const key = hashInput(input);
      accessResult(resource, fetch, input, key);
    },
  };
  return resource;
}
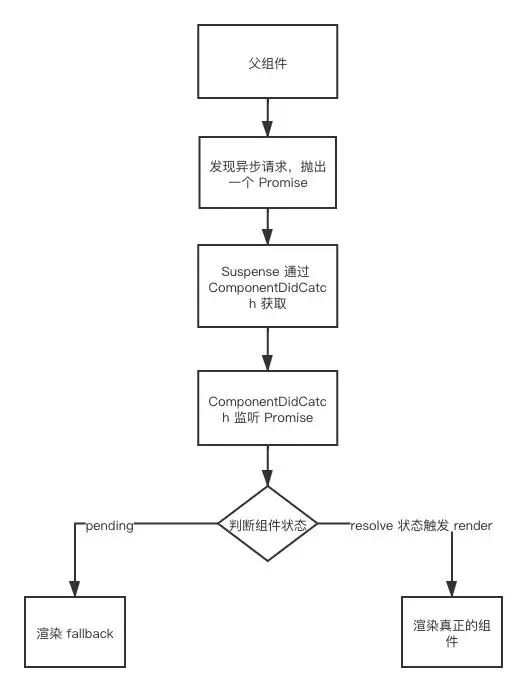
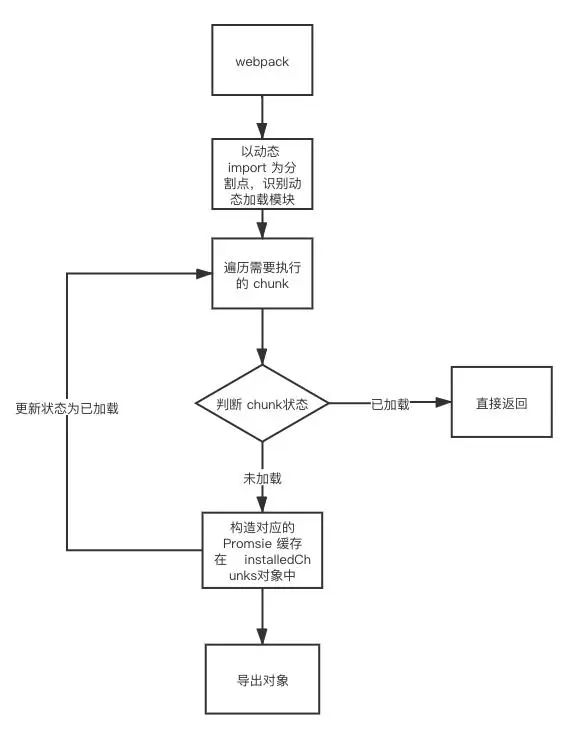
结合该部分源码,它的流程如下所示:
Error Boundaries 处理资源加载失败场景
如果遇到网络问题或是组件内部错误,页面的动态资源可能会加载失败,为了优雅降级,可以使用 Error Boundaries (https://react.docschina.org/docs/error-boundaries.html) 来解决这个问题。
class ErrorBoundary extends React.Component {
  constructor(props) {
    super(props);
    this.state = { hasError: false };
  }

  static getDerivedStateFromError(error) { // 更新 state 使下一次渲染能够显示降级后的 UI
      return { hasError: true };
  }
  componentDidCatch(error, errorInfo) { // 你同样可以将错误日志上报给服务器
      logErrorToMyService(error, errorInfo);
  }
  render() {
    if (this.state.hasError) { // 你可以自定义降级后的 UI 并渲染
        return <h1>对不起,发生异常,请刷新页面重试</h1>;
    }
    return this.props.children;
  }
}
<ErrorBoundary>
  <MyWidget />
</ErrorBoundary>
我们可以模拟动态加载资源失败的场景。首先在本地启动一个 http-server 服务器,然后去访问打包好的 build 文件,手动修改下打包的子组件包名,让其查找不到子组件包的路径。然后看看页面渲染效果。
可以看到当资源加载失败,页面已经降级为我们在错误边界组件中定义的展示内容。
需要注意的是:错误边界仅可以捕获其子组件的错误,它无法捕获其自身的错误。
总结
React.lazy() 和 React.Suspense 的提出为现代 React 应用的性能优化和工程化提供了便捷之路。React.lazy 可以让我们像渲染常规组件一样处理动态引入的组件,结合 Suspense 可以更优雅地展现组件懒加载的过渡动画以及处理加载异常的场景。
“注意:React.lazy 和 Suspense 尚不可用于服务器端,如果需要服务端渲染,可遵从官方建议使用 Loadable Components (https://github.com/gregberge/loadable-components)。
参考文档
-
Concurrent (https://zh-hans.reactjs.org/docs/concurrent-mode-intro.html) 模式 -
代码分割 (https://zh-hans.reactjs.org/docs/code-splitting.html) -
webpack 优化之code splitting (https://github.com/xiaoxiangdaiyu/webpack_demo/tree/master/codesplitting)
看完两件事
如果你觉得这篇内容对你挺有启发,我想邀请你帮我两件小事
1.点个「在看」,让更多人也能看到这篇内容(点了「在看」,bug -1 以上是关于这就是你日思夜想的 React 原生动态加载的主要内容,如果未能解决你的问题,请参考以下文章
