React开发必须知道的34个技巧(建议收藏)
Posted 前端潮咖
tags:
篇首语:本文由小常识网(cha138.com)小编为大家整理,主要介绍了React开发必须知道的34个技巧(建议收藏)相关的知识,希望对你有一定的参考价值。
(给前端潮咖加星标,提升前端技能)
前端潮咖 · 精选文章
关注

https://juejin.im/post/5dcb5a80e51d4520db
前 言
React是前端三大框架之一,在开发中也是一项技能;这里从实际开发中总结了React开发的一些技巧,适合React初学或者有一定项目经验的同学。
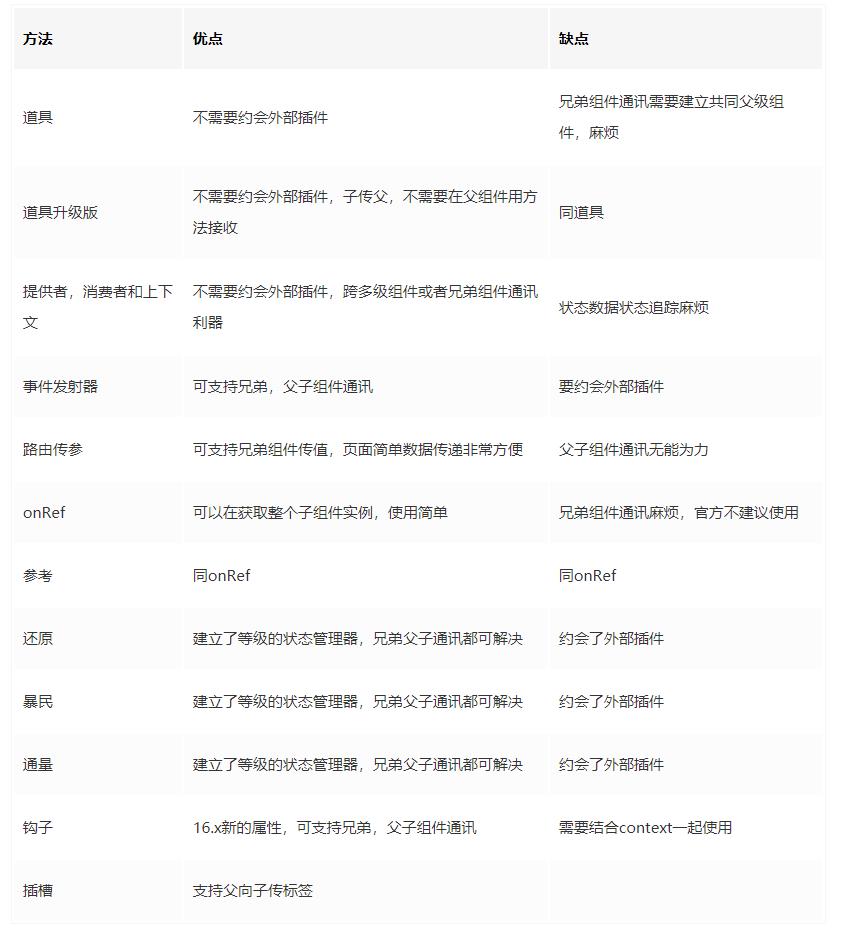
组件通讯
道具
子组件
import React from "react";import PropTypes from "prop-types";import { Button } from "antd";export default class EightteenChildOne extends React.Component {static propTypes = { //propTypes校验传入类型,详情在技巧11name: PropTypes.string};click = () => {// 通过触发方法子传父this.props.eightteenChildOneToFather("这是 props 改变父元素的值");};render() {return (<div><div>这是通过 props 传入的值{this.props.name}</div><Button type="primary" onClick={this.click}>点击改变父元素值</Button></div>);}}
父组件
<EightteenChildOne name={'props 传入的 name 值'} eightteenChildOneToFather={(mode)=>this.eightteenChildOneToFather(mode)}></EightteenChildOne>// 或者<EightteenChildOne name={'props 传入的 name 值'} eightteenChildOneToFather={this.eightteenChildOneToFather.bind(this)}></EightteenChildOne>
传传值时:
传统写法
const {dataOne,dataTwo,dataThree} = this.state<Com dataOne={dataOne} dataTwo={dataTwo} dataThree={dataThree}>
升级写法
<Com {...{dataOne,dataTwo,dataThree}}>道具升级版
原理:子组件里面利用props获取父组件方法直接调用,从而改变父组件的值
注意:此方法和props大同小异,都是props的应用,所以在源码中没有模仿
用父组件方法改变该值
// 父组件state = {count: {}}changeParentState = obj => {this.setState(obj);}// 子组件onClick = () => {this.props.changeParentState({ count: 2 });}
提供者,消费者和上下文
Context在16.x之前是定义一个类别的对象,类似vue的eventBus,如果组件要使用到该值直接通过this.context获取
//根组件class MessageList extends React.Component {getChildContext() {return {color: "purple",text: "item text"};}render() {const {messages} = this.props || {}const children = messages && messages.map((message) =><Message text={message.text} />);return <div>{children}</div>;}}MessageList.childContextTypes = {color: React.PropTypes.stringtext: React.PropTypes.string};//中间组件class Message extends React.Component {render() {return (<div><MessageItem /><Button>Delete</Button></div>);}}//孙组件(接收组件)class MessageItem extends React.Component {render() {return (<div>{this.context.text}</div>);}}MessageItem.contextTypes = {text: React.PropTypes.string //React.PropTypes在 15.5 版本被废弃,看项目实际的 React 版本};class Button extends React.Component {render() {return (<button style={{background: this.context.color}}>{this.props.children}</button>);}}Button.contextTypes = {color: React.PropTypes.string};
16.x之后的上下文使用了提供商和客户模式,在某些提供商的初始值,在子孙级的消费者中获取该值,并且能够传递函数,修改了上下文声明了一个上下文的定义,上下文。js
import React from 'react'let { Consumer, Provider } = React.createContext();//创建 context 并暴露Consumer和Provider模式export {Consumer,Provider}
父组件导入
// 导入 Providerimport {Provider} from "../../utils/context"<Provider value={name}><div style={{border:'1px solid red',width:'30%',margin:'50px auto',textAlign:'center'}}><p>父组件定义的值:{name}</p><EightteenChildTwo></EightteenChildTwo></div></Provider>
子组件
// 导入Consumerimport { Consumer } from "../../utils/context"function Son(props) {return (//Consumer容器,可以拿到上文传递下来的name属性,并可以展示对应的值<Consumer>{name => (<divstyle={{border: "1px solid blue",width: "60%",margin: "20px auto",textAlign: "center"}}>// 在 Consumer 中可以直接通过 name 获取父组件的值<p>子组件。获取父组件的值:{name}</p></div>)}</Consumer>);}export default Son;
EventEmitter
EventEmiter传送门 使用事件插件定义一个类别的事件机制
路由传参
参数
<Route path='/path/:name' component={Path}/><link to="/path/2">xxx</Link>this.props.history.push({pathname:"/path/" + name});读取参数用:this.props.match.params.name
查询
<Route path='/query' component={Query}/><Link to={{ pathname : '/query' , query : { name : 'sunny' }}}>this.props.history.push({pathname:"/query",query: { name : 'sunny' }});读取参数用: this.props.location.query.name状态
<Route path='/query' component={Query}/><Link to={{ pathname : '/query' , query : { name : 'sunny' }}}>this.props.history.push({pathname:"/query",query: { name : 'sunny' }});读取参数用: this.props.location.query.name搜索
<Route path='/web/search ' component={Search}/><link to="web/search?id=12121212">xxx</Link>this.props.history.push({pathname:`/web/search?id ${row.id}`});读取参数用: this.props.location.search
这个在react-router-dom:v4.2.2有bug,传参替换页面会空白,刷新才会加载出来
优缺点
1.params在HashRouter和BrowserRouter路由中刷新页面参数都不会丢失2.state在BrowserRouter中刷新页面参数不会丢失,在HashRouter路由中刷新页面会丢失3.query:在HashRouter和BrowserRouter路由中刷新页面参数都会丢失4.query和 state 可以传对象
onRef
原理:onRef通讯原理就是通过props的事件机制将组件的this(组件实例)当做参数传到父组件,父组件就可以操作子组件的状态和方法
十八儿童四.jsx
export default class EightteenChildFour extends React.Component {state={name:'这是组件EightteenChildFour的name 值'}componentDidMount(){this.props.onRef(this)console.log(this) // ->将EightteenChildFour传递给父组件this.props.onRef()方法}click = () => {this.setState({name:'这是组件click 方法改变EightteenChildFour改变的name 值'})};render() {return (<div><div>{this.state.name}</div><Button type="primary" onClick={this.click}>点击改变组件EightteenChildFour的name 值</Button></div>);}}
seven.jsx
<EightteenChildFour onRef={this.eightteenChildFourRef}></EightteenChildFour>eightteenChildFourRef = (ref)=>{console.log('eightteenChildFour的Ref值为')// 获取的 ref 里面包括整个组件实例console.log(ref)// 调用子组件方法ref.click()}
参考
原理:就是通过React的ref属性获取到整个子组件实例,再进行操作
十八子孙Five.jsx
// 常用的组件定义方法export default class EightteenChildFive extends React.Component {state={name:'这是组件EightteenChildFive的name 值'}click = () => {this.setState({name:'这是组件click 方法改变EightteenChildFive改变的name 值'})};render() {return (<div><div>{this.state.name}</div><Button type="primary" onClick={this.click}>点击改变组件EightteenChildFive的name 值</Button></div>);}}
seven.jsx
// 钩子获取实例componentDidMount(){console.log('eightteenChildFive的Ref值为')// 获取的 ref 里面包括整个组件实例,同样可以拿到子组件的实例console.log(this.refs["eightteenChildFiveRef"])}// 组件定义 ref 属性<EightteenChildFive ref="eightteenChildFiveRef"></EightteenChildFive>
挂钩
hooks是利用userReducer和context实现通讯,下面模拟实现一个简单的redux
核心文件分为action,reducer,键入action.js
import * as Types from './types';export const onChangeCount = count => ({type: Types.EXAMPLE_TEST,count: count + 1})
reducer.js
import * as Types from "./types";export const defaultState = {count: 0};export default (state, action) => {switch (action.type) {case Types.EXAMPLE_TEST:return {...state,count: action.count};default: {return state;}}};
types.js
export const EXAMPLE_TEST = 'EXAMPLE_TEST';18.jsx
export const ExampleContext = React.createContext(null);//创建createContext上下文// 定义组件function ReducerCom() {const [exampleState, exampleDispatch] = useReducer(example, defaultState);return (<ExampleContext.Providervalue={{ exampleState, dispatch: exampleDispatch }}><EightteenChildThree></EightteenChildThree></ExampleContext.Provider>);}
EightteenChildThree.jsx //组件
import React, { useEffect, useContext } from 'react';import {Button} from 'antd'import {onChangeCount} from '../../pages/TwoTen/store/action';import { ExampleContext } from '../../pages/TwoTen/eighteen';const Example = () => {const exampleContext = useContext(ExampleContext);useEffect(() => { // 监听变化console.log('变化执行啦')}, [exampleContext.exampleState.count]);return (<div><p>值为{exampleContext.exampleState.count}</p><Button onClick={() => exampleContext.dispatch(onChangeCount(exampleContext.exampleState.count))}>点击加 1</Button></div>)}export default Example;
hooks实际上就是对常设React的API进行了封装,暴露比较方便使用的钩子;
钩子有:
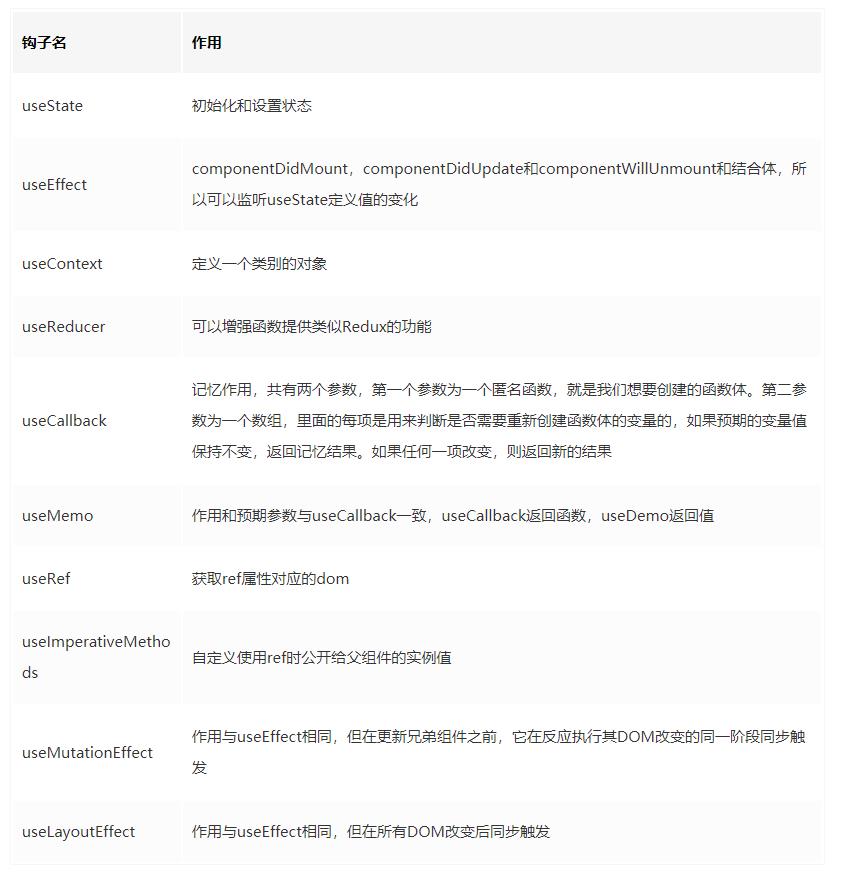
使用即时方法
function FancyInput(props, ref) {const inputRef = useRef();useImperativeMethods(ref, () => ({focus: () => {inputRef.current.focus();}}));return <input ref={inputRef} ... />;}FancyInput = forwardRef(FancyInput);
插槽
slot就是将父组件的标签传给子组件,类似vue的v-slot
场景:一些组件只是共享部分dom逻辑,里面有部分逻辑是独立的
// 父组件文件import SlotChild from 'SlotChild'<SlotChildslot={<div>这是父组件的 slot</div>}></SlotChild>// 子组件子组件直接获取 this.props.slot 就可获取到内容
对比
redux,mobx和flux比较

require.context()
这个是webpack的api,这个在vue技巧中有介绍,因为Vue和React工程都是基于webpack打包,所以在react也可以使用
const path = require('path')const files = require.context('@/components/home', false, /\.vue$/)const modules = {}files.keys().forEach(key => {const name = path.basename(key, '.vue')modules[name] = files(key).default || files(key)})
装潢
定义:decorator是ES7的一个新特性,可以修改class的属性
import React from 'react'import Test from '../../utils/decorators'@Test//只要Decorator后面是Class,默认就已经把Class当成参数隐形传进Decorator了。class TwentyNine extends React.Component{componentDidMount(){console.log(this,'decorator.js') // 这里的this是类的一个实例console.log(this.testable)}render(){return (<div>这是技巧23</div>)}}export default TwentyNine
decorators.js
function testable(target) {console.log(target)target.isTestable = true;target.prototype.getDate = ()=>{console.log( new Date() )}}export default testable
很多中间件,像redux里面就封装了Decorator的使用
使用if ... else
场景:有些时候需要根据不同状态值页面显示不同内容
import React from "react";export default class Four extends React.Component {state = {count: 1};render() {let infoif(this.state.count===0){info=(<span>这是数量为 0 显示</span>)} else if(this.state.count===1){info=(<span>这是数量为 1 显示</span>)}return (<div>{info}</div>);}}
state值改变的五种方式
方式1:
let {count} = this.statethis.setState({count:2})
方式2:callBack
this.setState(({count})=>({count:count+2}))方式3:接收状态和道具参数
this.setState((state, props) => {return { count: state.count + props.step };});
方式4:钩
const [count, setCount] = useState(0)// 设置值setCount(count+2)
方式5:state值改变后调用
this.setState({count:3},()=>{//得到结果做某种事})
监听状态变化
16.x之前使用componentWillReceiveProps
componentWillReceiveProps (nextProps){if(this.props.visible !== nextProps.visible){//props 值改变做的事}}
注意:有些时候componentWillReceiveProps在props值未变化也会触发,因为在生命周期的第一次渲染后不会被调用,但是会在之后的每次渲染中被调用=当父组件再次传送props
16.x之后使用getDerivedStateFromProps,16.x以后componentWillReveiveProps也未删除
export default class Six extends React.Component {state = {countOne:1,changeFlag:''};clickOne(){let {countOne} = this.statethis.setState({countOne:countOne+1})};static getDerivedStateFromProps (nextProps){console.log('变化执行')return{changeFlag:'state 值变化执行'}}render() {const {countOne,changeFlag} = this.statereturn (<div><div><Button type="primary" onClick={this.clickOne.bind(this)}>点击加 1</Button><span>countOne 值为{countOne}</span><div>{changeFlag}</div></div></div>);}}
组件定义方法
方式1:ES5的功能定义
function FunCom(props){return <div>这是Function 定义的组件</div>}ReactDOM.render(<FunCom name="Sebastian" />, mountNode)// 在 hooks 未出来之前,这个是定义无状态组件的方法,现在有了 hooks 也可以处理状态
方式2:ES5的createClass定义
const CreateClassCom = React.createClass({render: function() {return <div>这是React.createClass定义的组件</div>}});
方式3:ES6的扩展
class Com extends React.Component {render(){return(<div>这是React.Component定义的组件</div>)}}
召唤
export default class Seven extends React.Component {render() {return (<div><FunCom></FunCom><Com></Com></div>);}}
ES5的createClass是利用功能模拟类的写法做出来的es6; 通过es6添加类的属性创建的组件此组件创建简单。
通过ref属性获取component
方式1:也是初始的用法,通过this.refs [属性名获取]也可以作用到组件上,从而拿到组件实例
class RefOne extends React.Component{componentDidMount() {this.refs['box'].innerhtml='这是 div 盒子,通过 ref 获取'}render(){return(<div ref="box"></div>)}}
方式2:通过函数,在dom例程或组件上挂载函数,函数的入参是dom例程或组件实例,达到效果与字符串形式是一样的,都是获取其引用
class RefTwo extends React.Component{componentDidMount() {this.input.value='这是输入框默认值';this.input.focus();}render(){return(<input ref={comp => { this.input = comp; }}/>)}}
方式3:React.createRef()React 16.3版本后,使用此方法来创建ref。
将其赋值给一个变量,通过ref挂载在dom例程或组件上,该ref的当前属性,将能拿到dom例程或组件的实例
class RefThree extends React.Component{constructor(props){super(props);this.myRef=React.createRef();}componentDidMount(){console.log(this.myRef.current);}render(){return <input ref={this.myRef}/>}}
方式4:React.forwardRefReact 16.3版本后提供的,可以建立创建子组件,以传递ref
class RefFour extends React.Component{constructor(props){super(props);this.myFourRef=React.forwardRef();}componentDidMount(){console.log(this.myFourRef.current);}render(){return <Child ref={this.myFourRef}/>}}
子组件通过React.forwardRef来创建,可以将ref传递到内部的例程或组件,并且实现跨层级的引用。forwardRef在高阶组件中可以获取到原始组件的实例。这个功能在技巧18会着重讲
static使用
场景:声明静态方法的关键字,静态方法是指即使没有组件实例也可以直接调用
export default class Nine extends React.Component {static update(data) {console.log('静态方法调用执行啦')}render() {return (<div>这是 static 关键字技能</div>);}}Nine.update('2')
注意:
ES6的类,我们定义一个组件的时候通常是定义了一个类,而static则是创建了一个属于这个类的属性或方法;
组件则是这个类的一个实例,component的props和状态是属于这个实例的,因此实例仍未创建;
.static静态反应定义的,而加上static关键字,就表示该方法不会被实例继承,而是直接通过类来调用,所以也是无法访问到此;
getDerivedStateFromProps也通过静态方法监听值,详情请见技巧6。
构造函数和超级
回顾:
谈这两个属性之前,先回顾一下ES6函数定义方法;
每一个使用类方式定义的类的都有一个构造函数,这个函数是构造函数的主函数,该函数体内部的this指向生成的实例;
super关键字用于访问和调用一个对象的父对象上的函数
export default class Ten extends React.Component {constructor() { // class 的主函数super() // React.Component.prototype.constructor.call(this),其实就是拿到父类的属性和方法this.state = {arr:[]}}render() {return (<div>这是技巧 10</div>);}}
属性类型
场景:检测预定子组件的数据类型
类型检查PropTypes自反应v15.5起已弃用,请使用prop-types
方式1:旧的写法
class PropTypeOne extends React.Component {render() {return (<div><div>{this.props.email}</div><div>{this.props.name}</div></div>);}}PropTypeOne.propTypes = {name: PropTypes.string, //值可为array,bool,func,number,object,symbolemail: function(props, propName, componentName) { //自定义校验if (!/^([a-zA-Z0-9_-])+@([a-zA-Z0-9_-])+(.[a-zA-Z0-9_-])+/.test(props[propName])) {return new Error("组件" + componentName + "里的属性" + propName + "不符合邮箱的格式");}},};
方法2:利用ES7的静态属性关键字static
class PropTypeTwo extends React.Component {static propTypes = {name:PropTypes.string};render() {return (<div><div>{this.props.name}</div></div>);}}
使用类分类声明语法
场景:可以在不使用构造函数的情况下初始化本地状态,并通过使用箭头函数声明类方法,而无需另外对它们进行绑定
class Counter extends Component {state = { value: 0 };handleIncrement = () => {this.setState(prevState => ({value: prevState.value + 1}));};handleDecrement = () => {this.setState(prevState => ({value: prevState.value - 1}));};render() {return (<div>{this.state.value}<button onClick={this.handleIncrement}>+</button><button onClick={this.handleDecrement}>-</button></div>)}}
初步组件
场景:路由切换,如果同步加载多个页面路由会导致缓慢
核心API:
加载程序:需要加载的组件;
加载:未加载出来的页面展示组件;
延迟:延迟加载时间;
超时:超时时间
使用方法:安装react-loadable,语法动态导入。react-loadable是通过webpack的异步导入实现的
const Loading = () => {return <div>loading</div>;};const LoadableComponent = Loadable({loader: () => import("../../components/TwoTen/thirteen"),loading: Loading});export default class Thirteen extends React.Component {render() {return <LoadableComponent></LoadableComponent>;}}
Loadable.Map()并行加载多个资源的高阶组件
动态组件
场景:做一个tab切换时就会涉及到组件动态加载
重置是利用三元表达式判断组件是否显示
class FourteenChildOne extends React.Component {render() {return <div>这是动态组件 1</div>;}}class FourteenChildTwo extends React.Component {render() {return <div>这是动态组件 2</div>;}}export default class Fourteen extends React.Component {state={oneShowFlag:true}tab=()=>{this.setState({oneShowFlag:!this.state.oneShowFlag})}render() {const {oneShowFlag} = this.statereturn (<div><Button type="primary" onClick={this.tab}>显示组件{oneShowFlag?2:1}</Button>{oneShowFlag?<FourteenChildOne></FourteenChildOne>:<FourteenChildTwo></FourteenChildTwo>}</div>);}}
如果是单个组件是否显示可以用短路运算
oneShowFlag&&<FourteenChildOne></FourteenChildOne>递归组件
场景:tree组件
利用React.Fragment或div封装循环
class Item extends React.Component {render() {const list = this.props.children || [];return (<div className="item">{list.map((item, index) => {return (<React.Fragment key={index}><h3>{item.name}</h3>{// 当该节点还有children时,则递归调用本身item.children && item.children.length ? (<Item>{item.children}</Item>) : null}</React.Fragment>);})}</div>);}}
惯性组件和不惯性组件
保守组件:组件的状态通过React的状态值state或props控制
class Controll extends React.Component {constructor() {super();this.state = { value: "这是受控组件默认值" };}render() {return <div>{this.state.value}</div>;}}
不适用组件:组件不被React的状态值控制,通过dom的特性或者React的ref来控制
class NoControll extends React.Component {render() {return <div>{this.props.value}</div>;}}
简介代码:
export default class Sixteen extends React.Component {componentDidMount() {console.log("ref 获取的不受控组件值为", this.refs["noControll"]);}render() {return (<div><Controll></Controll><NoControllvalue={"这是不受控组件传入值"}ref="noControll"></NoControll></div>);}}
高阶组件(HOC)
定义:
就是类似高阶函数的定义,将组件作为参数或返回一个组件的组件;
作用:捕获重复代码,实现组件合并,常见场景,页面分解;条件渲染,控制组件的渲染逻辑(渲染劫持),常见场景,权限控制;
捕获/劫持被处理组件的生命周期,常见场景,组件渲染性能追踪,日志打点。
实现方法
属性代理
import React,{Component} from 'react';const Seventeen = WrappedComponent =>class extends React.Component {render() {const props = {...this.props,name: "这是高阶组件"};return <WrappedComponent {...props} />;}};class WrappedComponent extends React.Component {state={baseName:'这是基础组件'}render() {const {baseName} = this.stateconst {name} = this.propsreturn <div><div>基础组件值为{baseName}</div><div>通过高阶组件属性代理的得到的值为{name}</div></div>}}export default Seventeen(WrappedComponent)
反向继承
原理就是利用超级改变改组件的这个方向,继而就可以在该组件处理容器组件的一些值
const Seventeen = (WrappedComponent)=>{return class extends WrappedComponent {componentDidMount() {this.setState({baseName:'这是通过反向继承修改后的基础组件名称'})}render(){return super.render();}}}class WrappedComponent extends React.Component {state={baseName:'这是基础组件'}render() {const {baseName} = this.statereturn <div><div>基础组件值为{baseName}</div></div>}}export default Seventeen(WrappedComponent);
元素是否显示
一般用三元表达式
flag?<div>显示内容</div>:''flag&&<div>显示内容</div>
Dialog组件创建
对话框应该是用的比较多的组件,下面有多种不同的创建方法
方式1:通过状态控制组件是否显示
class NineteenChildOne extends React.Component {render() {const Dialog = () => <div>这是弹层1</div>;return this.props.dialogOneFlag && <Dialog />;}}
方式2:通过ReactDom.render创建播放层-挂载根路由器外层
通过原生的createElement,appendChild,removeChild和react的ReactDOM.render,ReactDOM.unmountComponentAtNode来控制元素的显示和隐藏
NineteenChild.jsx
import ReactDOM from "react-dom";class Dialog {constructor(name) {this.div = document.createElement("div");this.div.style.width = "200px";this.div.style.height = "200px";this.div.style.backgroundColor = "green";this.div.style.position = "absolute";this.div.style.top = "200px";this.div.style.left = "400px";this.div.id = "dialog-box";}show(children) {// 销毁const dom = document.querySelector("#dialog-box");if(!dom){ //兼容多次点击// 显示document.body.appendChild(this.div);ReactDOM.render(children, this.div);}}destroy() {// 销毁const dom = document.querySelector("#dialog-box");if(dom){//兼容多次点击ReactDOM.unmountComponentAtNode(this.div);dom.parentNode.removeChild(dom);}}}export default {show: function(children) {new Dialog().show(children);},hide: function() {new Dialog().destroy();}};
nineteen.jsx
twoSubmit=()=>{Dialog.show('这是弹层2')}twoCancel=()=>{Dialog.hide()}
React.memo
作用:当类组件的输入属性相同时,可以使用pureComponent或shouldComponentUpdate来避免组件的渲染。现在,你可以通过将函数组件包装在React.memo中来实现相同的功能
import React from "react";function areEqual(prevProps, nextProps) {/*如果把 nextProps 传入 render 方法的返回结果与将 prevProps 传入 render 方法的返回结果一致则返回 true,否则返回 false*/if (prevProps.val === nextProps.val) {return true;} else {return false;}}// React.memo()两个参数,第一个是纯函数,第二个是比较函数export default React.memo(function twentyChild(props) {console.log("MemoSon rendered : " + Date.now());return <div>{props.val}</div>;}, areEqual);
React.PureComponent
作用:
React.PureComponent和React.Component类似,是定义一个组件类;
不同是React.Component没有实现shouldComponentUpdate(),而React.PureComponent通过道具和状态的浅比较实现了;
React .PureComponent是作用在类中,而React.memo是作用在函数中;
如果组件的道具和状态相同时,呈现的内容也一致,那么就可以使用React.PureComponent了,这样可以提高组件的性能
class TwentyOneChild extends React.PureComponent{ //组件直接继承React.PureComponentrender() {return <div>{this.props.name}</div>}}export default class TwentyOne extends React.Component{render(){return (<div><TwentyOneChild name={'这是React.PureComponent的使用方法'}></TwentyOneChild></div>)}}
22、反应组件
作用:是基于ES6类的React组件,React允许定义一个类或功能作为组件,那么定义一个组件类,就需要继承React.Component
export default class TwentyTwo extends React.Component{ //组件定义方法render(){return (<div>这是技巧22</div>)}}
23、在JSX打印falsy值
定义:
falsy值(虚值)是在布尔值上下文中识别为false的值;
值有0,“”,“,``,null,undefined,NaN
export default class TwentyThree extends React.Component{state={myVariable:null}render(){return (<div>{String(this.state.myVariable)}</div>)}}
虚值如果直接展示,会发生隐式转换,为false,所以页面不显示
24、ReactDOM.createPortal
作用:组件的渲染函数返回的元素会被挂载在它的父级组件上,createPortal提供了一种将子节点渲染到存在于父组件之外的DOM优秀的方案
import React from "react";import ReactDOM from "react-dom";import {Button} from "antd"const modalRoot = document.body;class Modal extends React.Component {constructor(props) {super(props);this.el = document.createElement("div");this.el.style.width = "200px";this.el.style.height = "200px";this.el.style.backgroundColor = "green";this.el.style.position = "absolute";this.el.style.top = "200px";this.el.style.left = "400px";}componentDidMount() {modalRoot.appendChild(this.el);}componentWillUnmount() {modalRoot.removeChild(this.el);}render() {return ReactDOM.createPortal(this.props.children, this.el);}}function Child() {return (<div className="modal">这个是通过ReactDOM.createPortal创建的内容</div>);}export default class TwentyFour extends React.Component {constructor(props) {super(props);this.state = { clicks: 0 };this.handleClick = this.handleClick.bind(this);}handleClick() {this.setState(prevState => ({clicks: prevState.clicks + 1}));}render() {return (<div><Button onClick={this.handleClick}>点击加1</Button><p>点击次数: {this.state.clicks}</p><Modal><Child /></Modal></div>);}}
这样元素就追加到指定的元素下面啦
25、在React使用innerHTML
场景:有些后台返回是html格式,就需要用到innerHTML属性
export default class TwentyFive extends React.Component {render() {return (<div dangerouslySetInnerHTML={{ __html: "<span>这是渲染的 HTML 内容</span>" }}></div>);}}
26、React.createElement
语法:React.createElement(type,[props],[... children])
原始码:
export default class TwentySix extends React.Component {render() {return (<div>{React.createElement("div",{ id: "one", className: "two" },React.createElement("span", { id: "spanOne" }, "这是第一个 span 标签"),React.createElement("br"),React.createElement("span", { id: "spanTwo" }, "这是第二个 span 标签"))}</div>);}}
原理:JSX的dom最后转化为js都是React.createElement
// jsx 语法<div id='one' class='two'><span id="spanOne">this is spanOne</span><span id="spanTwo">this is spanTwo</span></div>// 转化为 jsReact.createElement("div",{ id: "one", class: "two" },React.createElement( "span", { id: "spanOne" }, "this is spanOne"),React.createElement("span", { id: "spanTwo" }, "this is spanTwo"));
27、React.cloneElement
语法:
React.cloneElement(element,[props],[...children])
作用:这个方法的作用是复制组件,给组件传值或添加属性核心
代码
React.Children.map(children, child => {return React.cloneElement(child, {count: _this.state.count});});
28、React.Fragment
作用:React.Fragment可以让你聚合一个子元素列表,并且不在DOM中增加额外的内核
代码
render() {const { info } = this.state;return (<div>{info.map((item, index) => {return (<React.Fragment key={index}><div>{item.name}</div><div>{item.age}</div></React.Fragment>);})}</div>);}
29、循环元素
内部没有封装像vue里面v-for的指令,另外通过map遍历
{arr.map((item,index)=>{return(<div key={item.id}><span>{item.name}</span><span>{item.age}</span></div>)})}
30、给DOM设置和获取自定义属性
作用:有些要通过自定义属性传值
export default class Thirty extends React.Component {click = e => {console.log(e.target.getAttribute("data-row"));};render() {return (<div><div data-row={"属性1"} data-col={"属性 2"} onClick={this.click}>点击获取属性</div></div>);}}
31、绑定事件
场景:交互就会涉及到事件点击,然后点击值传参也是一个很常见的场景
import React from "react";import { Button } from 'antd'export default class Three extends React.Component {state = {flag: true,flagOne: 1};click(data1,data2){console.log('data1 值为',data1)console.log('data2 值为',data2)}render() {return (<div><Button type="primary" onClick={this.click.bind(this,'参数 1','参数 2')}>点击事件</Button></div>);}}
使用方法在原始代码route.js有详细使用
32、反应路由器
V3和V4的区别
V3或者说V早期版本是把router和layout组件分开;
V4是集中式路由器,通过路由嵌套,实现布局和页面嵌套,布局和页面组件是作为路由器的一部分;
在V3中的路由规则是排他性的,意思是最终只获得一个路由;
V4中的路线默认为包容性的,这就意味着多个;可以同时匹配和呈现。如果只想匹配一个路由,可以使用Switch,在中只有一个会被渲染,同时可以再在每个路由添加exact,做到精准匹配Redirect,浏览器重定向,当多有都不匹配的时候,进行匹配
使用
import { HashRouter as Router, Switch } from "react-router-dom";class App extends React.Component{render(){const authPath = '/login' // 默认未登录的时候返回的页面,可以自行设置let authed = this.props.state.authed || localStorage.getItem('authed') // 如果登陆之后可以利用redux修改该值return (<Router><Switch>{renderRoutes(routes, authed, authPath)}</Switch></Router>)}}
V4是通过Route嵌套,实现Layout和page嵌套,Switch切换路由的作用
33、样式约会方法
方式1:import导入
import './App.css';方式2:内联方式
import React from 'react';const Header = () => {const heading = '头部组件'return(<div style={{backgroundColor:'orange'}}><h1>{heading}</h1></div>)}或者import React from 'react';const footerStyle = {width: '100%',backgroundColor: 'green',padding: '50px',font: '30px',color: 'white',fontWeight: 'bold'}export const Footer = () => {return(<div style={footerStyle}>底部组件</div>)}
34、动态绑定className
原理:通过三元表达式控制className值
render(){const flag=truereturn (<div className={flag?"active":"no-active"}>这是技巧 34</div>)}
总 结
这就是我从实际项目开发总结的React的34个技巧,希望对各位有所帮助。
支持
点个「在看」,让更多的人也能看到这篇内容(喜欢不点在看,都是耍流氓 -_-)
给前端潮咖加星标,最快看到最新高阶前端文章
怪鹿前端:

前端潮咖
喜欢本篇请给我们点个在看呗
以上是关于React开发必须知道的34个技巧(建议收藏)的主要内容,如果未能解决你的问题,请参考以下文章