SCRAPY爬虫框架入门实例
Posted 巴别科技python交流
tags:
篇首语:本文由小常识网(cha138.com)小编为大家整理,主要介绍了SCRAPY爬虫框架入门实例相关的知识,希望对你有一定的参考价值。
流程分析
抓取内容(百度贴吧:网络爬虫吧)
页面:http://tieba.baidu.com/f?kw=%E7%BD%91%E7%BB%9C%E7%88%AC%E8%99%AB&ie=utf-8
数据:1.帖子标题;2.帖子作者;3.帖子回复数
通过观察页面html代码来帮助我们获得所需的数据内容。
流程分析
抓取内容(百度贴吧:网络爬虫吧)
页面http://tieba.baidu.com/f?kw=%E7%BD%91%E7%BB%9C%E7%88%AC%E8%99%AB&ie=utf-8
数据:1.帖子标题;2.帖子作者;3.帖子回复数
通过观察页面html代码来帮助我们获得所需的数据内容。
一、工程建立
我的创建过程:
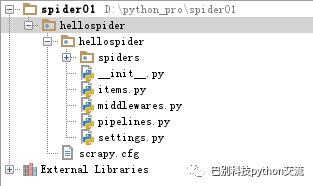
我们看一下目录结构:

scrapy.cfg: 项目的配置文件
hellospider/: 该项目的python模块。之后您将在此加入代码。
hellospider/items.py:需要提取的数据结构定义文件。
hellospider/middlewares.py: 是和Scrapy的请求/响应处理相关联的框架。
hellospider/pipelines.py: 用来对items里面提取的数据做进一步处理,如保存等。
hellospider/settings.py: 项目的配置文件。
hellospider/spiders/: 放置spider代码的目录。
二、实现过程
1、在items.py中定义自己要抓取的数据:
import scrapyclass DetailItem(scrapy.Item):# 抓取内容:1.帖子标题;2.帖子作者;3.帖子回复数title = scrapy.Field()author = scrapy.Field()reply = scrapy.Field()
2、然后在spiders目录下编辑myspider.py那个文件:
import scrapyfrom hellospider.items import DetailItemimport sysclass MySpider(scrapy.Spider):"""name:scrapy唯一定位实例的属性,必须唯一allowed_domains:允许爬取的域名列表,不设置表示允许爬取所有start_urls:起始爬取列表start_requests:它就是从start_urls中读取链接,然后使用make_requests_from_url生成Request,这就意味我们可以在start_requests方法中根据我们自己的需求往start_urls中写入我们自定义的规律的链接parse:回调函数,处理response并返回处理后的数据和需要跟进的urllog:打印日志信息closed:关闭spider"""# 设置namename = "spidertieba"# 设定域名allowed_domains = ["baidu.com"]# 填写爬取地址start_urls = ["http://tieba.baidu.com/f?kw=%E7%BD%91%E7%BB%9C%E7%88%AC%E8%99%AB&ie=utf-8",]# 编写爬取方法def parse(self, response):for line in response.xpath('//li[@class=" j_thread_list clearfix"]'):# 初始化item对象保存爬取的信息item = DetailItem()# 这部分是爬取部分,使用xpath的方式选择信息,具体方法根据网页结构而定item['title'] = line.xpath('.//div[contains(@class,"threadlist_title pull_left j_th_tit ")]/a/text()').extract()item['author'] = line.xpath('.//div[contains(@class,"threadlist_author pull_right")]//span[contains(@class,"frs-author-name-wrap")]/a/text()').extract()item['reply'] = line.xpath('.//div[contains(@class,"col2_left j_threadlist_li_left")]/span/text()').extract()
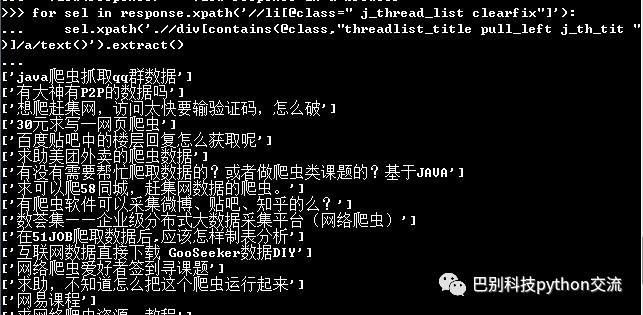
我们可以通过命令进入scrapy shell:
scrapy shell http://tieba.baidu.com/f?kw=%E7%BD%91%E7%BB%9C%E7%88%AC%E8%99%AB&ie=utf-8。

获得结果如下图所示:

其中xpath语法可以由该网址查询
http://www.w3school.com.cn/xpath/xpath_syntax.asp
3、执行命令 scrapy crawl [类中name值]

由于第二步中我们在类MySpider下定义了 name ="spidertieba" ,所以执行命令:scrapy crawl spidertieba -o items.json。 -o 指定文件。
这样我们就会看到此目录下生成了items.json文件

items.json文件的内容就是要爬取的内容。
简单查看一下:
#!/usr/bin/env python# Version = 3.5.2# __auth__ = '无名小妖'import jsonwith open('hellospider/items.json') as f:rownum = 0new_list = json.load(f)for i in new_list:rownum += 1print("""line{}: title:{}, author:{}, reply:{}.""".format(rownum,i['title'][0],i['author'][0],i['reply'][0]))
结果如图所示:
至此,scrapy的最简单的应用就完成了。
以上是关于SCRAPY爬虫框架入门实例的主要内容,如果未能解决你的问题,请参考以下文章