nginx在ubuntu上的反向代理实现
Posted IT肌肉男
tags:
篇首语:本文由小常识网(cha138.com)小编为大家整理,主要介绍了nginx在ubuntu上的反向代理实现相关的知识,希望对你有一定的参考价值。
nginx笔记
注:
1)如果是非root权限用户,使用sudo权限
2)使用ubuntu系统
3)前提是删除了其他类似Apache的代理
安装
apt-get install nginx
2.编辑nginx自带配置文件
cd /etc/nginx/nginx.conf
将下面两行注释取消
include /etc/nginx/conf.d/*.conf 将conf.d下的所有conf配置文件加载进来
include /etc/nginx/sites-enabled/* 将sites-enabled下的所有配置文件加载进来
3.编写反向代理脚本
vim /etc/nginx/conf.d/脚本名
脚本内容:
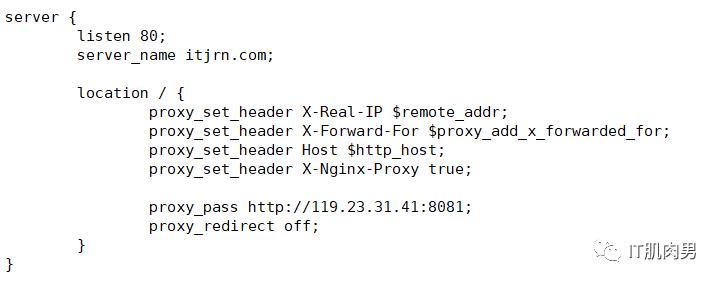
server {
listen 80;
server_name itjrn.com;
location / {
proxy_set_header X-Real-IP $remote_addr;
proxy_set_header X-Forward-For $proxy_add_x_forwarded_for;
proxy_set_header Host $http_host;
proxy_set_header X-Nginx-Proxy true;
proxy_pass http://119.23.31.41:8081;
proxy_redirect off;
}
}
该配置文件表示, http://119.23.31.41:8081 的服务被反向代理到 itjrn.com:80 上, 也就是 8081 的服务 使用 itjrn.com 打开
4.测试一下编写的脚本是否正确
nginx -t
如果显示 ok 和 successful证明配置都没问题

5.重启nginx
nginx -s reload
6.打开网页 itjrn.com 查看是否成功
注: 该网站模板引用于慕课网 河畔一角 讲师的 案例:Vue2.0+Node.js+MongoDB全栈打造商城系统
以上是关于nginx在ubuntu上的反向代理实现的主要内容,如果未能解决你的问题,请参考以下文章