从系统源码学设计模式-装饰模式
Posted 码上就好
tags:
篇首语:本文由小常识网(cha138.com)小编为大家整理,主要介绍了从系统源码学设计模式-装饰模式相关的知识,希望对你有一定的参考价值。
一、装饰模式介绍
装饰模式介绍
动态地给一个对象添加一下额外的职责。就增加功能来说,装饰模式相比生成子类更为灵活。
装饰模式使用场景
需要透明而且动态地扩展的功能的时候
装饰模式的UML类图
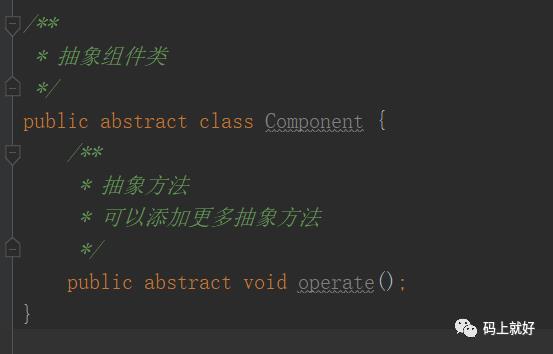
根据类图可以得出通用的模式代码如下:
(1)抽象组件类如下:
可以是一个接口或抽象类,其充当的就是被装饰的原始对象

(2)组件具体实现类
该类是Component类的基本实现,也是我们装饰的具体对象

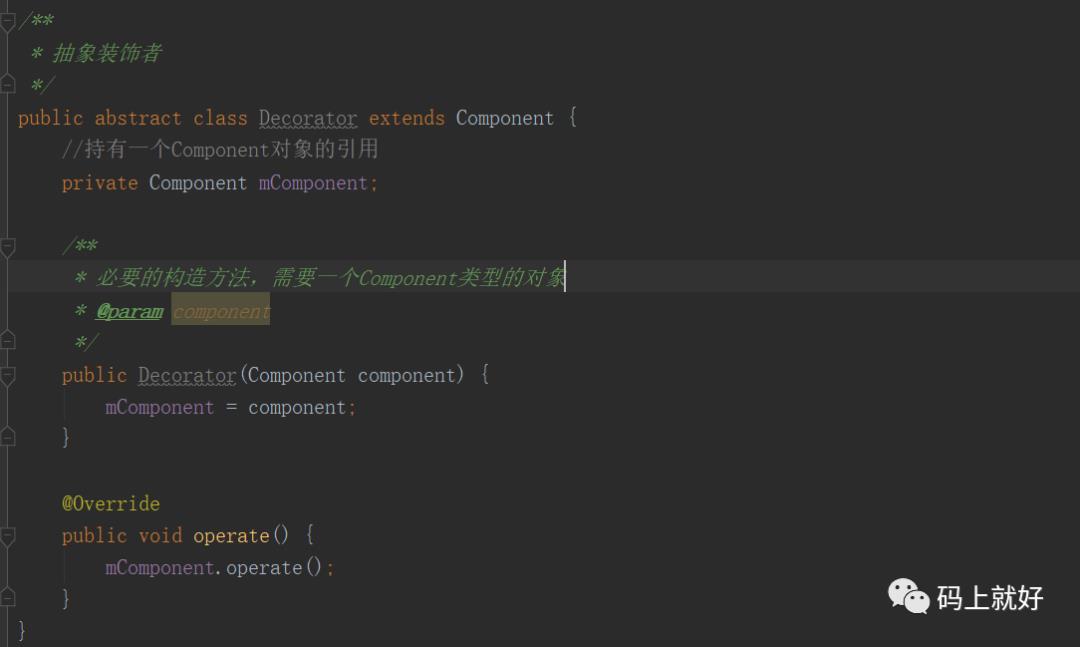
(3)抽象装饰者
其承担的职责就是为了装饰我们的组件的对象,其内部一定要有一个指向组件对象的引用。在大多数情况下,该类为抽象类,需要根据不同的装饰逻辑实现不同的具体子类。当然,如果装饰逻辑单一,只有一个情况下我们可以省略该类直接作为具体的装饰者

(4)装饰者具体实现类
只是对抽象装饰者做出具体的实现
public class ConcreteDecoratorA extends Decorator{/*** 必要的构造方法,需要一个Component类型的对象** @param component*/public ConcreteDecoratorA(Component component) {super(component);}public void operate() {//装饰方法A和B既可以在父类方法前调用也可以在之后调用operateA();super.operate();operateB();}/*** 自定义装饰方法A*/private void operateA() {//装饰方法逻辑...}/*** 自定义装饰方法B*/private void operateB() {//装饰方法逻辑...}}
(5)模拟客户调用
二、Android源码中的实现
我们以Context为例,介绍装饰模式在android源码中的应用。我们先大概了解一下Context类集成关系图,如下:
Context类是个抽象类,相当于我们的抽象组件Component,而在其内部定义了大量的抽象方法,比如startActivity。源码如下:
public abstract class Context {//.......省略一些代码.......public abstract void startActivity(@RequiresPermission Intent intent);public abstract void startActivity(@RequiresPermission Intent intent,@Nullable Bundle options);//.......省略一些代码.......}
而真正的实现是在ContextImpl中完成的,ContextImpl集成Context,实现了抽象方法,核心源码如下:
class ContextImpl extends Context {//.......省略一些代码.......@Overridepublic void startActivity(Intent intent) {warnIfCallingFromSystemProcess();startActivity(intent, null);}@Overridepublic void startActivity(Intent intent, Bundle options) {warnIfCallingFromSystemProcess();// Calling start activity from outside an activity without FLAG_ACTIVITY_NEW_TASK is// generally not allowed, except if the caller specifies the task id the activity should// be launched in. A bug was existed between N and O-MR1 which allowed this to work. We// maintain this for backwards compatibility.final int targetSdkVersion = getApplicationInfo().targetSdkVersion;if ((intent.getFlags() & Intent.FLAG_ACTIVITY_NEW_TASK) == 0&& (targetSdkVersion < Build.VERSION_CODES.N|| targetSdkVersion >= Build.VERSION_CODES.P)&& (options == null|| ActivityOptions.fromBundle(options).getLaunchTaskId() == -1)) {throw new AndroidRuntimeException("Calling startActivity() from outside of an Activity "+ " context requires the FLAG_ACTIVITY_NEW_TASK flag."+ " Is this really what you want?");}mMainThread.getInstrumentation().execStartActivity(getOuterContext(), mMainThread.getApplicationThread(), null,(Activity) null, intent, -1, options);}//.......省略一些代码.......ContextThemeWrapper}
这里ContextImpl就相当于组件具体实现类,那么谁来充当装饰者的身份呢?从上面的Context集成图知道,Activity继承于ContextThemeWrapper,
public class Activity extends ContextThemeWrapperimplements LayoutInflater.Factory2,Window.Callback, KeyEvent.Callback,OnCreateContextMenuListener, ComponentCallbacks2,Window.OnWindowDismissedCallback, WindowControllerCallback,AutofillManager.AutofillClient, ContentCaptureManager.ContentCaptureClient{//.......省略一些代码.......}
而ContextThemeWrapper集成于ContextWrapper
public class ContextThemeWrapper extends ContextWrapper {//.......省略一些代码.......}
这个ContextWrapper就是我们要找的装饰者,在ContextWrapper中持有一个Context的引用如下:
public class ContextWrapper extends Context {Context mBase;public ContextWrapper(Context base) {mBase = base;}//.......省略一些代码.......}
已经可以看出一点装饰者的样子了,但是好像缺点啥。对,就是来自组件的抽象方法,如上面提到的startActivity,再次查看源码:
public class ContextWrapper extends Context {//.......省略一些代码.......public void startActivity(Intent intent) {mBase.startActivity(intent);}public void startActivity(Intent intent, Bundle options) {mBase.startActivity(intent, options);}//.......省略一些代码.......}
这里可以看到ContextWrapper中的startActivity方法也仅仅是简单的调用了具体组件实现类ContextImpl中对应的方法而已,实质上ContextWrapper中所有的方法都仅仅是调用了ContextImpl中对应的方法,是不是和我们上面说的装饰模式离职或者类图越来越像了?装饰模式应用的套路都是很相似的,对应具体的方法的包装扩展则是由ContextWrapper的具体的子类完成,比如我们的Activity、service、Application。这3个类的具体方法就不在给出了,可自行查看。
那么ContextImpl又是在何时何地被创建的呢?为什么上面我们会说装饰者leiContextWrapper中的context引用指向的是一个ContextImpl的实例呢?要搞清楚这些问题,首先要知道一个应用在哪启动的。在我们的ActivityThread中。
在处理启动Activity中,主要是调用handleLaunchActivity方法来处理启动的具体逻辑。在handleLaunchActivity方法中调用perforLaunchActivity方法来获取一个Activity的实例。
public Activity handleLaunchActivity(ActivityClientRecord r,PendingTransactionActions pendingActions, Intent customIntent)//.......省略一些代码.......final Activity a = performLaunchActivity(r, customIntent);//.......省略一些代码.......}
查看performLaunchActivity代码
/** Core implementation of activity launch. */private Activity performLaunchActivity(ActivityClientRecord r, Intent customIntent) {//.......省略一些代码.......ContextImpl appContext = createBaseContextForActivity(r);Activity activity = null;//.......省略一些代码.......activity = mInstrumentation.newActivity(cl, component.getClassName(), r.intent);//.......省略一些代码.......appContext.setOuterContext(activity);//.......省略一些代码.......return activity;}
createBaseContextForActivity方法查看源码,如下:
private ContextImpl createBaseContextForActivity(ActivityClientRecord r) {//.......省略一些代码.......ContextImpl appContext = ContextImpl.createActivityContext(this, r.packageInfo, r.activityInfo, r.token, displayId, r.overrideConfig);//.......省略一些代码.......return appContext;}
通过调用ContextImpl中的createActivityContext方法来创建一个ContextImpl的实例。并且通过setOuterContext方法将ContextImpl与Activity关联。
这就是我们系统源码中装饰模式的体现,是不是很简单~
以上是关于从系统源码学设计模式-装饰模式的主要内容,如果未能解决你的问题,请参考以下文章