实战|使用自动化运维工具Ansible集中化管理服务器
Posted 学神IT教育
tags:
篇首语:本文由小常识网(cha138.com)小编为大家整理,主要介绍了实战|使用自动化运维工具Ansible集中化管理服务器相关的知识,希望对你有一定的参考价值。
学神IT教育:XueGod-IT
最负责任的线上直播教育平台
本节所讲内容:
29.1 ansible概述和运行机制
29.2 实战-安装并配置Ansible管理两个节点
29.3 ansible常见模块高级使用方法
29.4 实战-使用Playbook批量部署多台LAMP环境

29.1.1 ansible概述
Ansible是一款为类Unix系统开发的自由开源的配置和自动化工具。它用Python写成,类似于saltstack和Puppet,但是有一个不同和优点是我们不需要在节点中安装任何客户端。它使用SSH来和节点进行通信。Ansible基于 Python paramiko 开发,分布式,无需客户端,轻量级,配置语法使用 YMAL 及 Jinja2模板语言,更强的远程命令执行操作。

官方网站:https://www.ansible.com/

IT业界励志事件:
2015年10月,红帽(Red Hat)宣布收购软件开发公司 Ansible,消息称此次收购耗资逾 1亿美元,也有消息称接近 1.5亿美元。
Ansible 成立于 2013年,总部设在北卡罗来纳州达勒姆,联合创始人 aïd Ziouani 和高级副总裁 Todd Barr 都是红帽的老员工。Ansible 旗下的开源软件 Ansible 十分流行。这家公司还提供 Tower 软件和咨询服务,这款软件能使开发者轻松地建立和管理规模化应用程序的 IT 基础架构。
所以,希望大家可以进一个好公司,把技术提升好了,做一个好产品。
ansiblle具有如下特点:
1、部署简单,只需在主控端部署Ansible环境,被控端无需做任何操作;
2、默认使用SSH协议对设备进行管理;
3、主从集中化管理;
4、配置简单、功能强大、扩展性强;
5、支持API及自定义模块,可通过Python轻松扩展;
6、通过Playbooks来定制强大的配置、状态管理
7、对云计算平台、大数据都有很好的支持;
29.1.2 Ansible 工作机制
Ansible 在管理节点将 Ansible 模块通过 SSH 协议推送到被管理端执行,执行完之后自动删除,可以使用 SVN 等来管理自定义模块及编排。
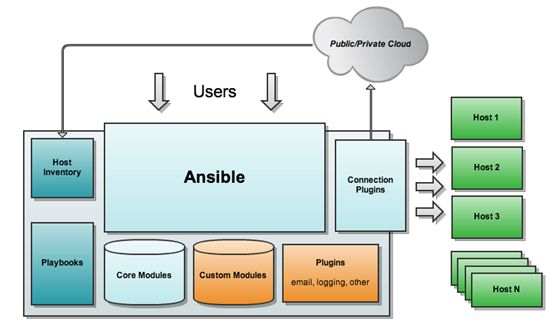
由上面的图可以看到 Ansible 的组成由 5 个部分组成:
Ansible :ansible核心
Modules :包括Ansible自带的核心模块及自定义模块
Plugins :完成模块功能的补充,包括连接插件、邮件插件等
Playbooks :剧本;定义Ansible多任务配置文件,由Ansible自动执行
Inventory :定义Ansible管理主机的清单[ˈɪnvəntri] 清单
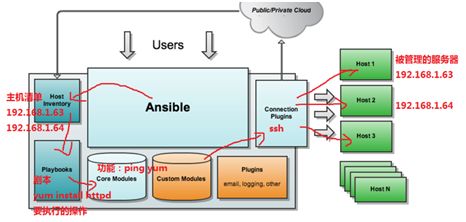

29.2.1 安装ansible服务
实验环境:

ansible 服务端 xuegod63 192.168.1.63
ansible节点1:xuegod63 192.168.1.63
ansible节点2:xuegod63 192.168.1.63
在xuegod63上安装ansible
1、设置EPEL仓库
Ansible仓库默认不在yum仓库中,因此我们需要使用下面的命令启用epel仓库。
[root@xuegod63 ~]#yum install epel-release -y
2、使用yum安装Ansible
[root@xuegod63 ~]#yum installansible -y
安装完成后,检查ansible版本:
[root@xuegod63 ~]#ansible --version
29.2.2 ansible命令参数
anisble命令语法:ansible [-i 主机文件] [-f 批次] [组名] [-m 模块名称] [-a模块参数]
ansible详细参数:
-v,–verbose # 详细模式,如果命令执行成功,输出详细的结果 (-vv –vvv -vvvv)
-i PATH, -inventory=PATH # 指定 host 文件的路径,默认是在 /etc/ansible/hosts
inventory [ˈɪnvəntri] 库存
-f NUM,-forks=NUM # NUM 是指定一个整数,默认是 5 ,指定 fork 开启同步进程的个数。
-m NAME,-module-name=NAME # 指定使用的 module 名称,默认使用 command模块
-a,MODULE_ARGS #指定 module 模块的参数
-k,-ask-pass #提示输入 ssh 的密码,而不是使用基于 ssh 的密钥认证
-sudo # 指定使用 sudo 获得 root 权限
-K,-ask-sudo-pass #提示输入 sudo 密码,与 -sudo 一起使用
-u USERNAME,-user=USERNAME # 指定移动端的执行用户
-C,–check #测试此命令执行会改变什么内容,不会真正的去执行
ansible-doc详细参数:
ansible-doc -l #列出所有的模块列表
ansible-doc -s 模块名 #查看指定模块的参数 -s, --snippet # [ˈsnɪpɪt] 片断
例:[root@xuegod63~]# ansible-doc -s service
29.2.3 定义主机清单
1、基于端口,用户,密码定义主机清单
ansible基于ssh连接-i (inventory)参数后指定的远程主机时,也可以写端口,用户,密码。
格式:ansible_ssh_port:指定ssh端口 ansible_ssh_user:指定 ssh 用户 ansible_ssh_pass:指定 ssh 用户登录是认证密码(明文密码不安全) ansible_sudo_pass:指明 sudo 时候的密码
例:[root@xuegod63~]# vim /etc/ansible/hosts #文件 /etc/ansible/hosts 维护着Ansible中服务器的清单。在文件最后追加以下内容
[web-servers] #主机组名
192.168.1.64 ansible_ssh_port=22 ansible_ssh_user=root ansible_ssh_pass=123456
简单测试下主机的连通性
[root@xuegod63~]# ansible -i /etc/ansible/hosts web-servers-m ping
-i # 指定 host 文件的路径,默认是在 /etc/ansible/hosts
-m # 指定使用的ping模块
报错:
192.168.1.63 |FAILED! => {
"msg": "Using a SSH passwordinstead of a key is not possible because Host Key checking is enabled andsshpass does not support this. Please add this host's fingerprint to your known_hosts file to manage this host."
}
解决:[root@xuegod63~]# ssh root@192.168.1.63 #手动连接一下/etc/ansible/hosts主机清单中的主机,这样就可以在ansible服务器上保存目标主机的fingerprint指纹。后期可以正常连接了
[root@xuegod63 ~]#ansible -i hosts web-servers -m ping #测试成功
192.168.1.64 | SUCCESS => { #表示成测试。通信成功。
"changed": false, #因为ping命令不会改变被管理的服务器的状态。所以是false正常
"ping": "pong"
}
2、基于ssh密钥来访问定义主机清单
一般来说,使用明文密码不安全,所以增加主机无密码访问。
在Ansible服务端生成密钥,并且复制公钥到节点中。
root@xuegod63 ~]#ssh-keygen #一路回车
使用ssh-copy-id命令来复制Ansible公钥到节点:xuegod63和xuegod63
[root@xuegod63 ~]#ssh-copy-id root@192.168.1.63
[root@xuegod63 ~]#ssh-copy-id root@192.168.1.64
[root@xuegod63 ~]#ssh 192.168.1.64
[root@xuegod64 ~]#exit
[root@xuegod63 ~]# vim /etc/ansible/hosts #在文件的最后添加以下内容
删除之前在最后添加的两行主机清单:
[web-servers]
192.168.1.64 ansible_ssh_port=22 ansible_ssh_user=root ansible_ssh_pass=123456
增加:
[web-servers]
192.168.1.63
192.168.1.64
29.2.3 在Ansible服务端运行命令
ping模块检查网络连通性
command模块执行shell命令,command:作为ansible的默认模块,可以运行远程权限范围内的所有shell命令
例1:使用ping检查‘web-servers’或者ansible节点的连通性。
[root@xuegod63 ~]#ansible -i /etc/ansible/hosts 'web-servers' -m ping
或:
[root@xuegod63 ~]#ansible 'web-servers' -m ping #不指定,默认使用/etc/ansible/hosts文件
192.168.1.63 |SUCCESS => {
"changed": false,
"ping": "pong"
}
192.168.1.64 |SUCCESS => {
"changed": false,
"ping": "pong"
}
例2:检查Ansible节点的运行时间(uptime)
[root@xuegod63 ~]#ansible -m command -a "uptime" 'web-servers' #也可以把主机清单组名写到最后,这样方便阅读命令
192.168.1.63 |SUCCESS | rc=0 >>
12:45:23 up 32min, 5 users, load average: 0.17, 0.11, 0.27
192.168.1.64 |SUCCESS | rc=0 >>
12:45:23 up 26 min, 2 users, load average: 0.03, 0.03, 0.10
例3:检查节点的内核版本
[root@xuegod63 ~]#ansible -m command -a "uname -r" 'web-servers'
例4:给节点增加用户
[root@xuegod63 ~]#ansible -m command -a "useradd mk123" 'web-servers'
192.168.1.64 |SUCCESS | rc=0 >>
192.168.1.63 |SUCCESS | rc=0 >>
[root@xuegod63 ~]#ansible -m command -a "grep mk123 /etc/passwd" 'web-servers'
例5:将df命令在所有节点执行后,重定向输出到本机的/tmp/command-output.txt文件中
[root@xuegod63 ~]# ansible-m command -a "df -Th" 'web-servers' > /tmp/command-output.txt
[root@xuegod63 ~]#cat /tmp/command-output.txt

29.3.1 ansible常用模块
1、3个远程命令模块的区别
(1)command模块为ansible默认模块,不指定-m参数时,使用的就是command模块;comand模块比较简单,常见的命令都可以使用,但其命令的执行不是通过shell执行的,所以,像这些 "<", ">", "|", and"&"操作都不可以,当然,也就不支持管道;缺点:不支持管道,没法批量执行命令;
(2)shell模块:使用shell模块,在远程命令通过/bin/sh来执行;所以,我们在终端输入的各种命令方式,都可以使用。
例1:运行free -m 命令
[root@xuegod63 ~]#ansible -i /etc/ansible/hosts web-servers -m shell -a "free -m"
注:但是我们自己定义在~/.bashrc或~/.bash_profile中的环境变量shell模块由于没有加载,所以无法识别;如果需要使用自定义的环境变量,就需要在最开始,执行加载自定义脚本的语句;
对shell模块的使用可以分成两块:
1) 如果待执行的语句少,可以直接写在一句话中:
[root@xuegod63 ~]# ansible -i /etc/ansible/hosts web-servers -m shell -a "source ~/.bash_profile && df -h | grep sda3"
2) 如果在远程待执行的语句比较多,可写成一个脚本,通过copy模块传到远端,然后再执行;但这样就又涉及到两次ansible调用;对于这种需求,ansible已经为我们考虑到了,script模块就是干这事的;
(3)scripts模块
使用scripts模块可以在本地写一个脚本,在远程服务器上执行:
[root@xuegod63 ~]# vim /etc/ansible/net.sh
#!/bin/bash
date
hostname
[root@xuegod63~]# ansible -i /etc/ansible/hosts web-servers -m script -a "/etc/ansible/net.sh"
2、copy模块:实现主控端向目标主机拷贝文件,类似scp功能
例1:把ansible主机上的/etc/hosts文件复制到主机组中机器的/tmp目录下
[root@xuegod63 ~]#ansible -i /etc/ansible/hosts web-servers -m copy -a "src=/etc/hostsdest=/tmp/ owner=root group=root mode=0755"

在xuegod64上查看
[root@xuegod64 ~]# ll/tmp/hosts
-rwxr-xr-x 1 rootroot 240 8月 24 16:09 /tmp/hosts
3、file模块设置文件属性。
例如:
[root@xuegod63 ~]#ansible -i /etc/ansible/hosts web-servers -m file -a "path=/tmp/hostsmode=0777"
验证:
[root@xuegod63 ~]# ll/tmp/hosts
-rwxrwxrwx 1 rootroot 112 Aug 31 04:38 /tmp/hosts
4、stat模块获取远程文件信息
[root@xuegod63 ~]#ansible -i /etc/ansible/hosts web-servers -m stat -a"path=/tmp/hosts"
5、get_url模块实现远程主机下载指定url到本地,支持sha256sum文件校验。
例如:下载epel-release-latest-7.noarch.rpm到主机清单中的/tmp/目录下
[root@xuegod63 ~]# ansible -i /etc/ansible/hosts web-servers-m get_url -a "url=https://dl.fedoraproject.org/pub/epel/epel-release-latest-7.noarch.rpm dest=/tmp/ mode=0440 force=yes"
注:url=https://xxx 的等号=前后不能有空格
扩展:查看force=yes的作用
[root@xuegod63 ~]#ansible-doc -s get_url #在弹出的信息中找到force
如果force=yes,当下载文件时,如果所下的内容和原目录下的文件内容不一样,则替换原文件,如果一样,就不下载了。
如果为“否”,则仅在目标不存在时才下载文件。一般来说,只有小型本地文件才应该为“是”。在0.6之前,该模块表现为默认为“是”。
查看下载的文件:
[root@xuegod63 ~]# ll/tmp/epel-release-latest-7.noarch.rpm
-r--r----- 1 rootroot 15080 8月 24 16:20/tmp/epel-release-latest-7.noarch.rpm
测试:下载文件时,当文件不一样时,会替换原来的文件
[root@xuegod64 ~]# cp/etc/passwd /tmp/epel-release-latest-7.noarch.rpm
[root@xuegod63 ~]# ansible -i /etc/ansible/hosts web-servers -m get_url -a"url=https://dl.fedoraproject.org/pub/epel/epel-release-latest-7.noarch.rpm dest=/tmp/ mode=0440 force=yes"
192.168.1.63 |SUCCESS => {
"changed":false, #xuegod63上原来的文件和当前的文件一样,就没有改变。执行成功,但没有发生改变,那么显示绿色
。。。
}
192.168.1.64 |SUCCESS => {
"changed": true, #xuegod64上的文件名字一样,但是内容变,就会重新下载。执行成功,且发生改变,那么显示黄色
6、yum模块linux平台软件包管理。
yum模块可以提供的status状态:latest ,present,installed #这3个代表安装;removed, absent #后面2个是卸载
例子:安装httpd软件
[root@xuegod63 ~]#ansible -i /etc/ansible/hosts web-servers -m yum -a "name=httpd state=latest"
7、cron模块远程主机crontab配置。
例如:增加每30分钟执行ls /tmp
[root@xuegod63 ~]#ansible -i /etc/ansible/hosts web-servers -m cron -a "name='list dir'minute='*/30' job='ls /tmp'"
在xuegod63上查看
[root@xuegod63 ~]#crontab -l
#Ansible: list dir
*/30 * * * * ls /tmp
8、service模块远程主机系统服务管理。
service模块常用参数:
(1)name参数:此参数用于指定需要操作的服务名称,比如 nginx,httpd。
(2)state参数:此参数用于指定服务的状态,比如,我们想要启动远程主机中的httpd,则可以将 state 的值设置为 started;如果想要停止远程主机中的服务,则可以将 state 的值设置为 stopped。此参数的可用值有 started、stopped、restarted(重启)、reloaded。
enabled参数:此参数用于指定是否将服务设置为开机启动项,设置为 yes 表示将对应服务设置为开机启动,设置为 no 表示不会开机启动。
注:想使用service模块启动服务,被启动的服务,必须可以使用service 命令启动或关闭
例如:远程启动apache服务
[root@xuegod63 ~]#ansible -i /etc/ansible/hosts web-servers -m service -a "name=httpdstate=restarted"
9、sysctl模块远程主机sysctl配置。
例:开启路由转发功能
[root@xuegod63 ~]#ansible -i /etc/ansible/hosts web-servers -m sysctl -a"name=net.ipv4.ip_forward value=1 reload=yes"
验证:
[root@xuegod63 ~]#cat /proc/sys/net/ipv4/ip_forward
1
10、user模块远程主机用户管理
例如:
[root@xuegod63 ~]#ansible -i /etc/ansible/hosts web-servers -m user -a "name=xuegod6state=present"
# present [ˈpreznt] 目前
验证:
[root@xuegod63 ~]# idxuegod6
uid=1001(xuegod6)gid=1001(xuegod6) 组=1001(xuegod6)

29.4.1 Playbook是一个不同于使用ansible命令行执行方式的模式,功能更强大更灵活。
playbooks使用步骤:
1、在playbooks 中定义任务:
- name:task description #任务描述信息
module_name: module_args #需要使用的模块名字:模块参数
2、ansible-playbook 执行 命令:
[root@xuegod63 ~]#ansible-playbook site.yml
playbook是由一个或多个"play"组成的列表。play的主要功能在于将事先归为一组的主机装扮成事先通过ansible中的task定义好的角色。
github上提供了大量的实例供大家参考 https://github.com/ansible/ansible-examples
29.4.1 实战-使用Playbook批量部署多台LAMP环境
Playbook常用文件夹作用:
files:存放需要同步到异地服务器的源码文件及配置文件;
handlers:当服务的配置文件发生变化时需要进行的操作,比如:重启服务,重新加载配置文件;['hændləz] 处理程序
meta:角色定义,可留空; ['metə] 元
tasks:需要进行的执行的任务;#任务
templates:用于执行lamp安装的模板文件,一般为脚本; ['templɪts] 模板
vars:本次安装定义的变量
29.4.2 实战-使用Playbook批量部署多台LAMP环境
首先,我们可以在ansible服务器上安装LAMP环境,然后,再将配置文件通过ansible拷贝到远程主机上
第一步:安装httpd软件
[root@xuegod63 ~]#yum install httpd -y
第二部:安装mysql
root@xuegod63 ~]# yuminstall mariadb-server mariadb -y
[root@xuegod63 ~]#mkdir -p /mydata/data #创建目录作为数据存放的位置
[root@xuegod63 ~]#chown -R mysql:mysql /mydata/
[root@xuegod63 ~]#vim /etc/my.cnf #改变数据存放目录
改:2datadir=/var/lib/mysql
为:2datadir=/mydata/data
[root@xuegod63 ~]#systemctl start mariadb
第三步:安装php和php-mysql模块
[root@xuegod63 ~]#yum install php php-mysql -y
第四步:提供php的测试页
[root@xuegod63 ~]#vim /var/www/html/index.php
<?php
phpinfo();
?>
启动httpd服务,在浏览器中访问
[root@xuegod63 ~]#systemctl restart httpd
[root@xuegod63 ~]#iptables -F
测试:http://192.168.1.63/index.php
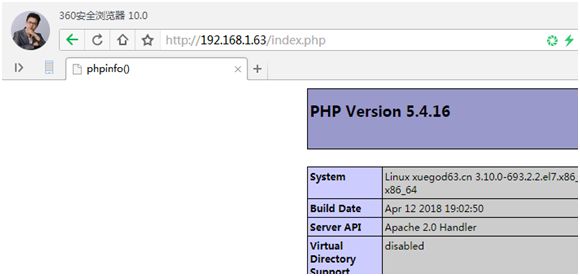
确保已经出现上面的测试页,而且,要看到MySQL已经被整合进来了,才能进行下一步操作
定义组名:
[root@xuegod63 ~]#vim /etc/ansible/hosts #还使用之前定义好的,这里不用修改
[web-servers]
192.168.1.63
192.168.1.64
然后,将公钥信息复制到被控制节点,ansible和两个节点间通过ssh进行连接。下面3个命令之前已经做过,不用执行了。
[root@xuegod63 ~]#ssh-keygen
[root@xuegod63 ~]#ssh-copy-id root@192.168.1.63
[root@xuegod63 ~]#ssh-copy-id root@192.168.1.64
29.4.2 使用playbook创建一个LAMP构建的任务
1、创建相关文件
[root@xuegod63 ~]# mkdir -pv/etc/ansible/lamp/roles/{prepare,httpd,mysql,php}/{tasks,files,templates,vars,meta,default,handlers}我们将上面搭建成功的LAMP环境的httpd和MySQL的配置文件拷贝到对应目录下
[root@xuegod63 ~]# cd/etc/ansible/
[root@xuegod63 ~]# cp/etc/httpd/conf/httpd.conf lamp/roles/httpd/files/
[root@xuegod63 ~]# cp/etc/my.cnf lamp/roles/mysql/files/
写prepare(前期准备)角色的playbooks
[root@xuegod63ansible]# vim lamp/roles/prepare/tasks/main.yml #复制以下红色内容到文件中,配置好yum源
- name: delete yumconfig
shell: rm -rf /etc/yum.repos.d/* #删除原有的yum配置文件
- name: provide yumrepofile
shell: wget -O /etc/yum.repos.d/CentOS-Base.repohttp://mirrors.aliyun.com/repo/Centos-7.repo #下载新的yum配置文件
- name: clean the yumrepo
shell: yum cleanall #清除原有的yum缓存信息
- name: clean theiptables
shell: iptables -F #清除原有防火墙规则,不然后可能上不了网
2、构建httpd的任务
[root@xuegod63roles]# cd /etc/ansible/lamp/roles
[root@xuegod63roles]# mv /var/www/html/index.php httpd/files/
[root@xuegod63roles]# vim httpd/tasks/main.yml #将以下内容复制到文件中
- name: web serverinstall
yum:name=httpd state=present #安装httpd服务
- name: provide testpage
copy:src=index.php dest=/var/www/html #提供测试页
- name: delete apacheconfig
shell: rm -rf /etc/httpd/conf/httpd.conf #删除原有的apache配置文件,如果不删除,下面的copy任务是不会执行的,因为当源文件httpd.conf和目标文件一样时,copy命令是不执行的。如果copy命令不执行,那么notify将不调用handler。
- name: provideconfiguration file
copy: src=httpd.confdest=/etc/httpd/conf/httpd.conf #提供httpd的配置文件
notify: restart httpd #当前面的copy复制成功后,通过notify通知名字为restart httpd的handlers运行。
扩展:notify和handlers notify [ˈnəʊtɪfaɪ] 通知
notify:这个action可用于在每个play的最后被触发,这样可以避免多次有改变发生时,每次都执行指定的操作,取而代之,仅在所有的变化发生完成后一次性地执行指定操作。
在notify中列出的操作称为handler,也即notify中调用handler中定义的操作。
---- name: test.ymljust for test
hosts: testserver
vars:
region: ap-southeast-1
tasks:
- name: template configuration
file template: src=template.j2dest=/etc/foo.conf
notify:
- restart memcached
- restart apache
handlers:
- name: restart memcached
service: name=memcachedstate=restarted
- name: restart apache
service: name=apachestate=restarted
handlers概述:
Handlers 也是一些 task 的列表,通过名字来引用,它们和一般的 task 并没有什么区别。
Handlers 是由通知者进行notify, 如果没有被 notify,handlers 不会执行。
不管有多少个通知者进行了notify,等到 play 中的所有task 执行完成之后,handlers 也只会被执行一次。
Handlers 最佳的应用场景是用来重启服务,或者触发系统重启操作.除此以外很少用到了。
3、构建httpd的handlers
[root@xuegod63roles]# vim httpd/handlers/main.yml
- name: restart httpd
service:name=httpd enabled=yes state=restarted
4、部署我们的mariadb数据库
创建MySQL服务的任务,需要安装MySQL服务,改变属主信息,启动MySQL
[root@xuegod63roles]# cd /etc/ansible/lamp/roles
[root@xuegod63roles]# vim mysql/tasks/main.yml
- name: install themysql
yum: name=mariadb-server state=present #安装mysql服务
- name: mkdir date directory
shell: mkdir -p /mydata/data #创建挂载点目录
- name: provideconfigration file
copy: src=my.cnf dest=/etc/my.cnf #提供mysql的配置文件
- name: chage theowner
shell: chown -R mysql:mysql /mydata/* #更改属主和属组
- name: start mariadb
service: name=mariadb enabled=yesstate=started #启动mysql服务
5、构建PHP的任务
[root@xuegod63roles]# vim php/tasks/main.yml
- name: install php
yum: name=phpstate=present #安装php
- name: installphp-mysql
yum:name=php-mysql state=present #安装php与mysql交互的插件
6、定义整个的任务
[root@xuegod63roles]# cd /etc/ansible/lamp/roles
[root@xuegod63roles]# vim site.yml #写入以下内容
- name: LAMP build
remote_user: root
hosts: web-servers
roles:
- prepare
- mysql
- php
- httpd
注:所有yml的配置文件中,空格必须严格对齐
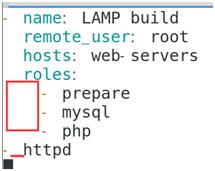
开始部署:
[root@xuegod63roles]# ansible-playbook -i /etc/ansible/hosts /etc/ansible/lamp/roles/site.yml
然后,在浏览器中访问这两台节点主机,可以直接访问成功。
http://192.168.1.63/index.php
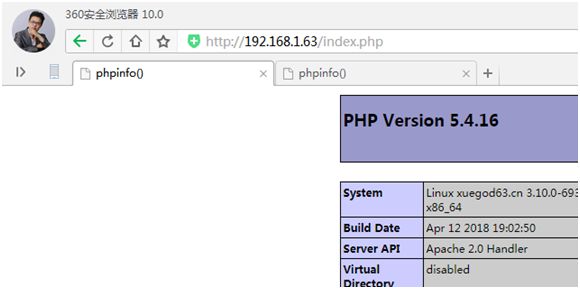
http://192.168.1.64/index.php
注:
1、默认情况下,首次登陆一台服务器,系统会提示是否要记住对端的指纹,用ansible也会这样,这样会导致需要手工输入yes或no,ansible 才可以往下执行。如需避免这种情况,需要在 /etc/ansible/ansible.cfg 文件中设置 host_key_checking= False
例1:
[root@xuegod63roles]# rm -rf /root/.ssh/known_hosts
[root@xuegod63roles]# ansible-playbook -i /etc/ansible/hosts ./site.yml #发现需要输入yes,来保存对端的指纹
解决:
[root@xuegod63roles]# vim /etc/ansible/ansible.cfg
改:62 #host_key_checking =False #就是把前面的#号去了
为:host_key_checking = False
[root@xuegod63roles]# rm -rf /root/.ssh/known_hosts
[root@xuegod63roles]# ansible-playbook -i /etc/ansible/hosts ./site.yml #发现不需要输入yes,可以自动安装了
总结:
29.1 ansible概述和运行机制
29.2 实战-安装并配置Ansible管理两个节点
29.3 ansible常见模块高级使用方法
29.4 实战-使用Playbook批量部署多台LAMP环境
扫码添加老师微信,
免费获取5G学习资料
老师QQ:2217978235
点【阅读原文】订阅课程,每天免费学习:
以上是关于实战|使用自动化运维工具Ansible集中化管理服务器的主要内容,如果未能解决你的问题,请参考以下文章