10分钟学会 OpenCV CUDA编程
Posted OpenCV学堂
tags:
篇首语:本文由小常识网(cha138.com)小编为大家整理,主要介绍了10分钟学会 OpenCV CUDA编程相关的知识,希望对你有一定的参考价值。
OpenCV4 CUDA编程代码教程
预计阅读时间 :12 mins
CUDA支持模块
01
OpenCV4支持通过GPU实现CUDA加速执行,实现对OpenCV图像处理程序的加速运行,当前支持加速的模块包括如下:
图像背景分割
视频编解码
特征2D
卷积滤波
图像处理
对象检测
光流
双目视觉
基本上包含了OpenCV图像处理的主要功能,这里有一个地方需要特别注意,就是编译时候选择不同的CUDA版本,对上述模块的支持略微不同。比如最新的CUDA10.0来说已经不支持级联检测器的加速啦。
要想利用GPU实现CUDA OpenCV加速,第一步当然是重新编译OpenCV源码实现对CUDA的支持,这个可以参考我之前发的文章
收到大家的反馈,觉得视频比较好,所以又录制了一个OpenCV4 + CUDA加速编译与配置的视频教程,B站可以免费看:
https://www.bilibili.com/video/av71643385代码演示教程
02
检测CUDA设备支持,代码如下:
cuda::printCudaDeviceInfo(cuda::getDevice());
int count = cuda::getCudaEnabledDeviceCount();
printf("GPU Device Count : %d \n", count);
运行截图:
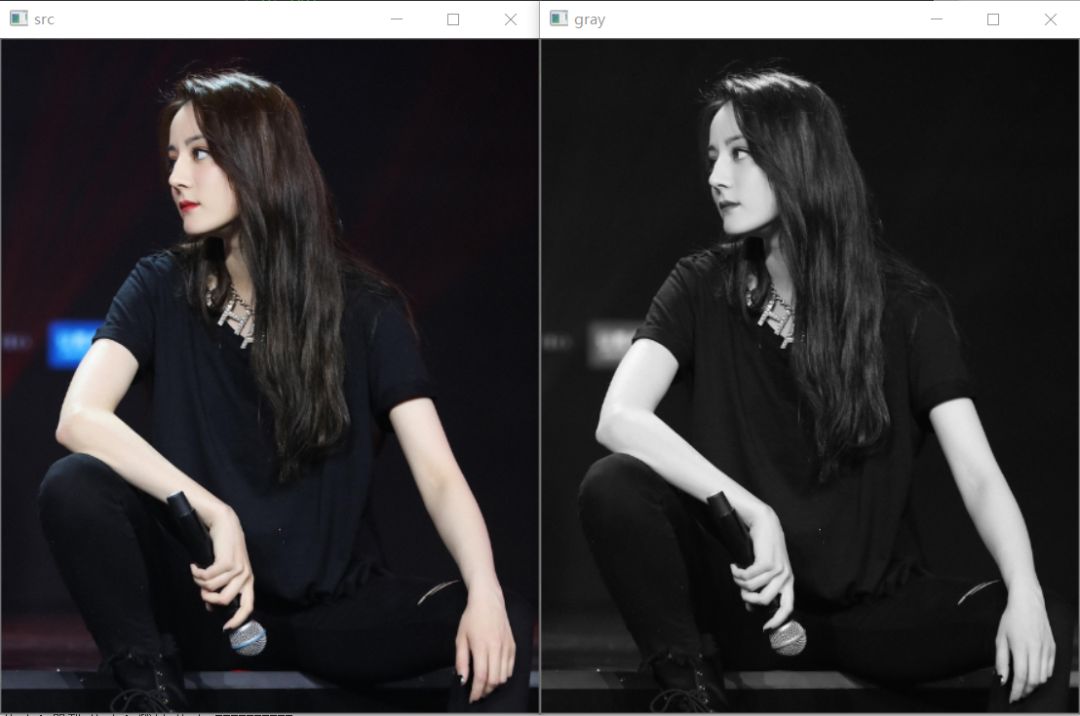
CUDA处理图像的时候,首先需要把Mat图像上载到CUDA数据单元GpuMat对象中去,然后调用CUDA支持的相关API进行处理,处理完成之后,再从GpuMat下载数据到原始Mat对象中,完成后续操作。以图像灰度转换为例,代码演示如下:
// 灰度转换
Mat src_host = imread("D:/images/test.png");
GpuMat src, gray;
src.upload(src_host);
cuda::cvtColor(src, gray, COLOR_BGR2GRAY);
Mat gray_host;
gray.download(gray_host);
imshow("src", src_host);
imshow("gray", gray_host);
waitKey(0);
效果演示如下:
CUDA支持各种卷积处理,卷积处理支持盒子模糊、高斯模糊、图像梯度(Soble\Scharr)、二阶导数算子-拉普拉斯算子、以高斯模糊为例,代码演示如下:
cv::Mat h_img1 = cv::imread("D:/images/test1.png");
cv::cuda::GpuMat d_img1, d_result3x3, d_result5x5, d_result7x7;
// 加载数据
d_img1.upload(h_img1);
// 创建高斯
auto filter3x3 = cv::cuda::createGaussianFilter(CV_8UC3, CV_8UC3, cv::Size(3, 3), 5);
auto filter5x5 = cv::cuda::createGaussianFilter(CV_8UC3, CV_8UC3, cv::Size(5, 5), 5);
auto filter7x7 = cv::cuda::createGaussianFilter(CV_8UC3, CV_8UC3, cv::Size(7, 7), 5);
// 执行
filter3x3->apply(d_img1, d_result3x3);
filter5x5->apply(d_img1, d_result5x5);
filter7x7->apply(d_img1, d_result7x7);
// 获取结果
cv::Mat h_result3x3, h_result5x5, h_result7x7;
d_result3x3.download(h_result3x3);
d_result5x5.download(h_result5x5);
d_result7x7.download(h_result7x7);
// 显示
cv::imshow("Original Image ", h_img1);
cv::imshow("Blurred with kernel size 3x3", h_result3x3);
cv::imshow("Blurred with kernel size 5x5", h_result5x5);
cv::imshow("Blurred with kernel size 7x7", h_result7x7);
waitKey(0);
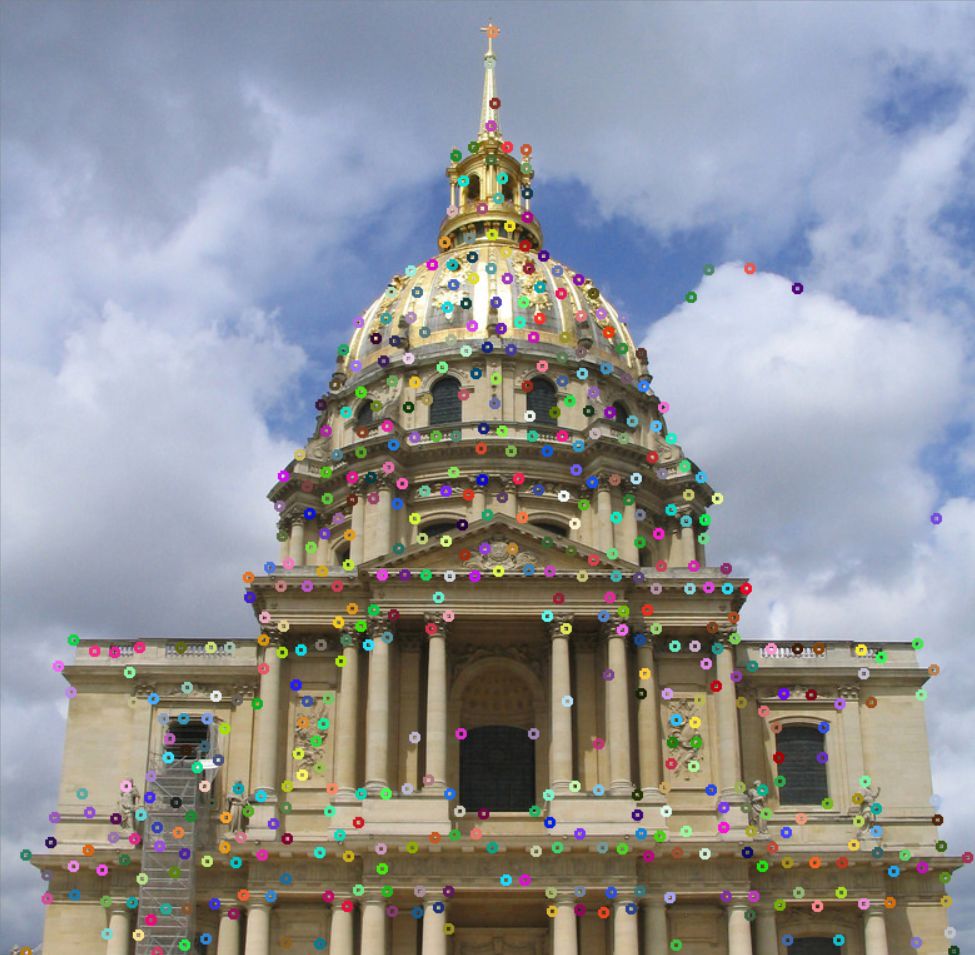
return;CUDA支持图像的角点检测,支持Harris与shi-tomas角点检测,以shi-tomas角点检测为例,代码演示如下:
Mat src_host = imread("D:/images/building.png");
imshow("input", src_host);
GpuMat src, gray, corners;
Mat dst;
src.upload(src_host);
cuda::cvtColor(src, gray, COLOR_BGR2GRAY);
auto corner_detector = cuda::createGoodFeaturesToTrackDetector(gray.type(), 1000, 0.01, 15, 3);
corner_detector->detect(gray, corners);
corners.download(dst);
printf("detected corners %d....\n", corners.cols);
for (int i = 0; i < dst.cols; i++) {
    int r = rng.uniform(0, 255);
    int g = rng.uniform(0, 255);
    int b = rng.uniform(0, 255);
    Point2f pt = dst.at<Point2f>(0, i);
    circle(src_host, pt, 3, Scalar(b, g, r), 2, 8, 0);
}
imshow("corner detect", src_host);
waitKey(0);
return;
效果显示如下:
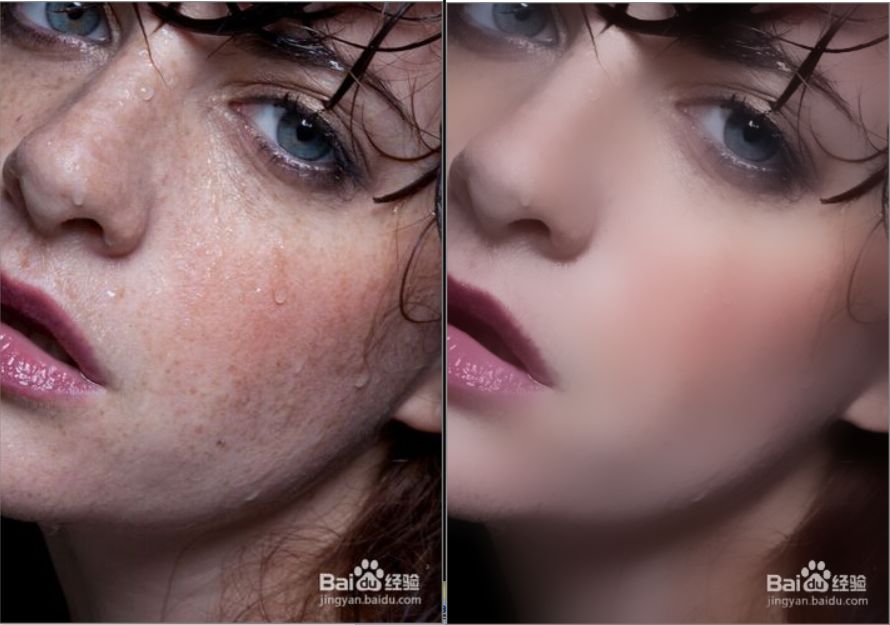
我们都知道OpenCV中的双边模糊是处理速度比较慢的边缘保留算法,但是它的CUDA版本完全可以做到实时运行无压力,在线美颜很轻松,代码演示如下:
try {
    Mat src_host = imread("D:/images/example.png");
    imshow("input", src_host);
    GpuMat src(src_host);
    GpuMat dst;
    cuda::bilateralFilter(src, dst, 0, 100, 15, 4);
    Mat dst_host;
    dst.download(dst_host);
    imshow("result", dst_host);
}
catch (const Exception& ec) {
    std::cout << "Error" << ec.what() << std::endl;
}
waitKey(0);
return;
运行结果如下:
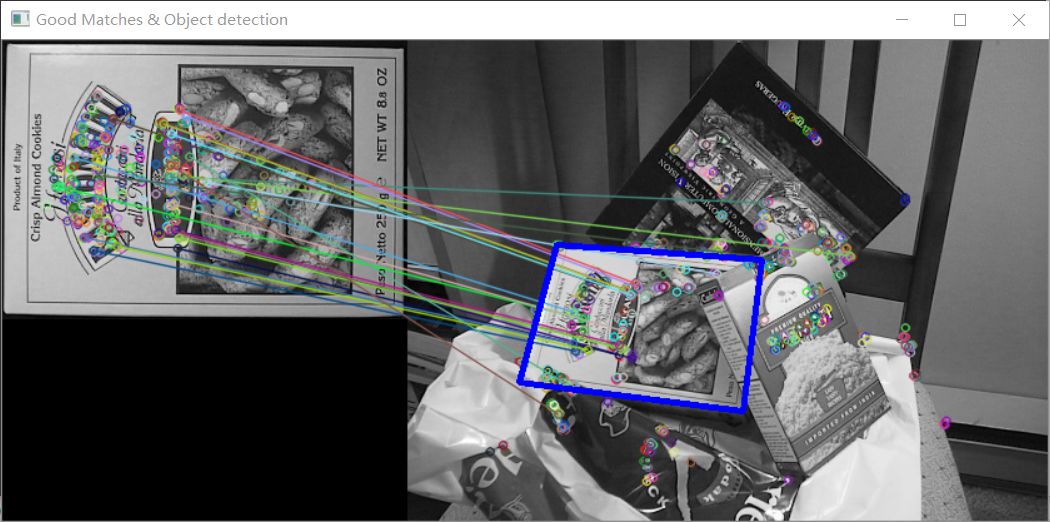
CUDA还支持各种特征匹配,以ORB特征匹配为例,实现CUDA版本的特征匹配会比没有CUDA版本的速度快到10倍以上,基本也可以达到实时级别。以ORB特征匹配为例,代码演示如下:
// gpu data
cuda::GpuMat d_object_image;
cuda::GpuMat d_scene_image;

// cuda::GpuMat d_keypoints_scene, d_keypoints_object;       // GPU key points
vector< KeyPoint > h_keypoints_scene, h_keypoints_object; // CPU key points
cuda::GpuMat d_descriptors_scene, d_descriptors_object;   // GPU descriptor

// Image CPU uploaded to GPU
d_object_image.upload(h_object_image);
d_scene_image.upload(h_scene_image);

// 对象检测
auto orb = cuda::ORB::create();
// Detect feature points and extract corresponding descriptors
orb->detectAndCompute(d_object_image, cuda::GpuMat(), h_keypoints_object, d_descriptors_object);
orb->detectAndCompute(d_scene_image, cuda::GpuMat(), h_keypoints_scene, d_descriptors_scene);

// Brute Force Violence Matcher
Ptr< cuda::DescriptorMatcher > matcher = cuda::DescriptorMatcher::createBFMatcher(NORM_HAMMING);
vector< vector< DMatch> > d_matches;
matcher->knnMatch(d_descriptors_object, d_descriptors_scene, d_matches, 2);

std::cout << "match size:" << d_matches.size() << endl;
std::vector< DMatch > good_matches;
for (int k = 0; k < std::min(h_keypoints_object.size() - 1, d_matches.size()); k++)
{
    if ((d_matches[k][0].distance < 0.9*(d_matches[k][1].distance)) &&
        ((int)d_matches[k].size() <= 2 && (int)d_matches[k].size()>0))
    {
        good_matches.push_back(d_matches[k][0]);
    }
}
std::cout << "size:" << good_matches.size() << endl;
运行结果如下:
CUDA支持各种光流算法,这里需要注意的时候,最新的OpenCV4中出现的DIS光流还不支持CUDA加速调用。CUDA光流算法支持调用基本上都可以达到10帧左右。调用CUDA加速的稠密光流法, CPU版本运行在1~2帧左右,CUDA加速效果很明显。
// GPU 光流法
cuda::cvtColor(frame, gray, COLOR_BGR2GRAY);
farn->calc(preGray, gray, flow);

// GPU数据处理
vector<GpuMat> mm;
cuda::split(flow, mm);
cuda::cartToPolar(mm[0], mm[1], gMag, gAng);
运行结果如下
上面所有的测试都是基于OpenCV4 + GTX 1050TI的显卡 + Windows 10 系统上完成。希望通过上述的代码演示,觉得不错,请戳 好看 支持
推荐阅读
围观
热文
以上是关于10分钟学会 OpenCV CUDA编程的主要内容,如果未能解决你的问题,请参考以下文章