只需 4 步,自己搞个 Spring Boot Starter!
Posted Java基基
tags:
篇首语:本文由小常识网(cha138.com)小编为大家整理,主要介绍了只需 4 步,自己搞个 Spring Boot Starter!相关的知识,希望对你有一定的参考价值。
做积极的人,而不是积极废人!
源码精品专栏
来源:my.oschina.net/floor/blog/4435699
-
引言 -
第一步 创建maven项目 -
第二步写自动配置逻辑 -
2.1.定义AspectLog注解,该注解用于标注需要打印执行时间的方法。 -
2.2定义配置文件对应类 -
2.3定义自动配置类 -
第三步META-INF/spring.factories -
第四步打包测试
引言
只要你用Springboot,一定会用到各种spring-boot-starter。其实写一个spring-boot-starter
,仅需4步。下面我们就写一个starter,它将实现,在日志中打印方法执行时间。
“推荐一个艿艿写的 6000+ Star 的 SpringBoot + SpringCloud + Dubbo 教程的仓库:https://github.com/YunaiV/SpringBoot-Labs
第一步 创建maven项目
在使用spring-boot-starter,会发现,有的项目名称是 XX-spring-boot-starter,有的是
spring-boot-starter-XX,这个项目的名称有什么讲究呢?
从springboot官方文档摘录如下:
““
Do not start your module names with spring-boot, even if you use a different Maven groupId. We may offer official support for the thing you auto-configure in the future.
As a rule of thumb, you should name a combined module after the starter.
从这段话可以看出spring-boot-starter命名的潜规则。
命名潜规则
spring-boot-starter-XX是springboot官方的starter
XX-spring-boot-starter是第三方扩展的starter
打印方法执行时间的功能,需要用到aop,咱们的项目就叫做
aspectlog-spring-boot-starter吧。
项目的pom文件如下:
<?xml version="1.0" encoding="UTF-8"?>
<project xmlns="http://maven.apache.org/POM/4.0.0"
         xmlns:xsi="http://www.w3.org/2001/XMLSchema-instance"
         xsi:schemaLocation="http://maven.apache.org/POM/4.0.0 http://maven.apache.org/xsd/maven-4.0.0.xsd">
    <modelVersion>4.0.0</modelVersion>

    <groupId>org.example</groupId>
    <artifactId>aspectlog-spring-boot-starter</artifactId>
    <version>1.0.2</version>
    <parent>
        <groupId>org.springframework.boot</groupId>
        <artifactId>spring-boot-starter-parent</artifactId>
        <version>2.1.15.RELEASE</version>
    </parent>

    <dependencies>
        <dependency>
            <groupId>org.springframework.boot</groupId>
            <artifactId>spring-boot-autoconfigure</artifactId>
        </dependency>
        <dependency>
            <groupId>org.springframework.boot</groupId>
            <artifactId>spring-boot-starter-aop</artifactId>
        </dependency>
        <dependency>
            <groupId>org.springframework.boot</groupId>
            <artifactId>spring-boot-configuration-processor</artifactId>
            <optional>true</optional>
        </dependency>
    </dependencies>

</project>
关于spring-boot-configuration-processor的说明,引自springBoot官方文档:
““
Spring Boot uses an annotation processor to collect the conditions on auto-configurations in a metadata file ( META-INF/spring-autoconfigure-metadata.properties ). If that file is present, it is used to eagerly filter auto-configurations that do not match, which will improve startup time. It is recommended to add the following dependency in a module that contains auto-configurations:
org.springframework.boot
spring-boot-autoconfigure-processor
true
简单说就是:写starter时,在pom中配置spring-boot-autoconfigure-processor,在编译时会自动收集配置类的条件,写到一个META-INF/spring-autoconfigure-metadata.properties中。
“推荐一个艿艿写的 3000+ Star 的 SpringCloud Alibaba 电商开源项目的仓库:https://github.com/YunaiV/onemall
第二步写自动配置逻辑
各种condition
| 类型 | 注解 | 说明 |
|---|---|---|
| Class Conditions类条件注解 | @ConditionalOnClass | 当前classpath下有指定类才加载 |
| @ConditionalOnMissingClass | 当前classpath下无指定类才加载 | |
| Bean ConditionsBean条件注解 | @ConditionalOnBean | 当期容器内有指定bean才加载 |
| @ConditionalOnMissingBean | 当期容器内无指定bean才加载 | |
| Property Conditions环境变量条件注解(含配置文件) | @ConditionalOnProperty | prefix 前缀name 名称havingValue 用于匹配配置项值matchIfMissing 没找指定配置项时的默认值 |
| ResourceConditions 资源条件注解 | @ConditionalOnResource | 有指定资源才加载 |
| Web Application Conditionsweb条件注解 | @ConditionalOnWebApplication | 是web才加载 |
| @ConditionalOnNotWebApplication | 不是web才加载 | |
| SpEL Expression Conditions | @ConditionalOnExpression | 符合SpEL 表达式才加载 |
本次我们就选用@ConditionalOnProperty。即配置文件中有aspectLog.enable=true,才加载我们的配置类。
下面开始写自动配置类
2.1.定义AspectLog注解,该注解用于标注需要打印执行时间的方法。
package com.shanyuan.autoconfiguration.aspectlog;
import java.lang.annotation.ElementType;
import java.lang.annotation.Retention;
import java.lang.annotation.RetentionPolicy;
import java.lang.annotation.Target;
/**
 * class_name: ScheduleManage
 * describe:   用于控制定时任务的开启与关闭
 * 对应切面
 * creat_user: wenl
 * creat_time:  2018/11/10 18:45
 **/
@Target(ElementType.METHOD)
@Retention(RetentionPolicy.RUNTIME)
public @interface   AspectLog {
}
2.2定义配置文件对应类
package com.shanyuan.autoconfiguration.aspectlog;
import org.springframework.boot.context.properties.ConfigurationProperties;

@ConfigurationProperties("aspectLog")
public class AspectLogProperties {
    private boolean enable;
    public boolean isEnable() {
        return enable;
    }
    public void setEnable(boolean enable) {
        this.enable = enable;
    }
}
2.3定义自动配置类
package com.shanyuan.autoconfiguration.aspectlog;

import org.aspectj.lang.ProceedingJoinPoint;
import org.aspectj.lang.annotation.Around;
import org.aspectj.lang.annotation.Aspect;
import org.slf4j.Logger;
import org.slf4j.LoggerFactory;
import org.springframework.boot.autoconfigure.condition.*;
import org.springframework.context.annotation.Configuration;
import org.springframework.context.annotation.EnableAspectJAutoProxy;
import org.springframework.core.PriorityOrdered;

@Aspect
@EnableAspectJAutoProxy(exposeProxy = true, proxyTargetClass = true)
@Configuration
@ConditionalOnProperty(prefix = "aspectLog", name = "enable",
                     havingValue = "true", matchIfMissing = true)
public class AspectLogAutoConfiguration implements PriorityOrdered {

    protected Logger logger = LoggerFactory.getLogger(getClass());

@Around("@annotation(com.shanyuan.autoconfiguration.aspectlog.AspectLog) ")
    public Object isOpen(ProceedingJoinPoint thisJoinPoint)
                                        throws Throwable {
        //执行方法名称
        String taskName = thisJoinPoint.getSignature()
            .toString().substring(
                thisJoinPoint.getSignature()
                    .toString().indexOf(" "),
                    thisJoinPoint.getSignature().toString().indexOf("("));
        taskName = taskName.trim();
        long time = System.currentTimeMillis();
        Object result = thisJoinPoint.proceed();
        logger.info("method:{} run :{} ms", taskName,
                            (System.currentTimeMillis() - time));
        return result;
    }
    @Override
    public int getOrder() {
        //保证事务等切面先执行
        return Integer.MAX_VALUE;
    }
}
配置类简要说明:
@ConditionalOnProperty(prefix = "aspectLog", name = "enable",havingValue = "true", matchIfMissing = true)
当配置文件有aspectLog.enable=true时开启,如果配置文件没有设置aspectLog.enable也开启。
第三步META-INF/spring.factories
META-INF/spring.factories是spring的工厂机制,在这个文件中定义的类,都会被自动加载。多个配置使用逗号分割,换行用\
如果有兴趣可以查看这2篇blog:
2.@Enable驱动原理(设置连接)
3.@EnableAutoConfiguration处理逻辑(设置连接)
org.springframework.boot.autoconfigure.EnableAutoConfiguration=\
com.shanyuan.autoconfiguration.aspectlog.AspectLogAutoConfiguration
第四步打包测试
这是我们最终的目录结构
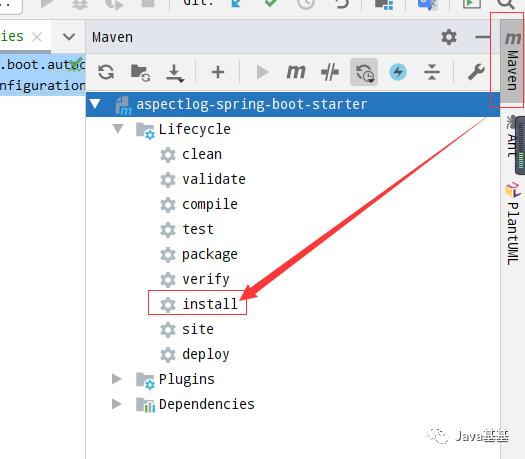
在IDEA中,进行mvn intall

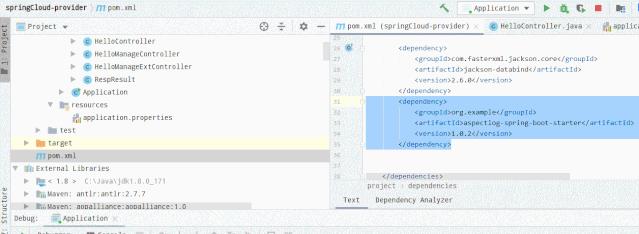
打包完成后,在其他项目中的pom中引入进行测试

参考资料
-
https://docs.spring.io/spring-boot/docs/2.1.15.RELEASE/reference/html/boot-features-developing-auto-configuration.html#boot-features-custom-starter
已在知识星球更新源码解析如下:
最近更新《芋道 SpringBoot 2.X 入门》系列,已经 20 余篇,覆盖了 MyBatis、Redis、MongoDB、ES、分库分表、读写分离、SpringMVC、Webflux、权限、WebSocket、Dubbo、RabbitMQ、RocketMQ、Kafka、性能测试等等内容。
提供近 3W 行代码的 SpringBoot 示例,以及超 4W 行代码的电商微服务项目。
以上是关于只需 4 步,自己搞个 Spring Boot Starter!的主要内容,如果未能解决你的问题,请参考以下文章