MySQL(19) Mycat分片(分库分表)配置
Posted 郑清
tags:
篇首语:本文由小常识网(cha138.com)小编为大家整理,主要介绍了MySQL(19) Mycat分片(分库分表)配置相关的知识,希望对你有一定的参考价值。
一、前言
本文将基于主从复制,读写分离的环境基础上进行一个简单的分片(分库分表)配置
二、Mycat分片配置
mycat分片主要在scheam.xml,rule.xml这2个表中配置
① scheam.xml:配置逻辑表以及对应使用的分片规则
<?xml version="1.0"?>
<!DOCTYPE mycat:schema SYSTEM "schema.dtd">
<mycat:schema xmlns:mycat="http://io.mycat/">
    <!-- 逻辑库:TESTDB 限制每一条sql最多访问100条数据 指定数据节点:dn1 -->
    <schema name="TESTDB" checkSQLschema="true" sqlMaxLimit="100">
        <!-- 对`t_user`表进行分片,主键id,自增,数据节点为dn1,dn2,dn3,分片规则为`auto-sharding-long` -->
        <table name="t_user" primaryKey="id" autoIncrement="true" dataNode="dn1,dn2,dn3" rule="auto-sharding-long" />
    </schema>
    <!-- 指定数据节点对应指定的数据主机以及后端真实物理数据库 -->
    <dataNode name="dn1" dataHost="localhost1" database="db1" />
    <dataNode name="dn2" dataHost="localhost1" database="db2" />
    <dataNode name="dn3" dataHost="localhost1" database="db3" />
    <!-- 定义最大连接数,最小连接数,是否对后端的多个从库进行负载均衡,数据库类型,驱动... -->
    <dataHost name="localhost1" maxCon="1000" minCon="10" balance="1" writeType="0" dbType="mysql" dbDriver="native" switchType="1" slaveThreshold="100">
        <!-- 定义如何监测后端数据库是否健康 -->
        <heartbeat>select user()</heartbeat>
        <!-- 写数据库 -->
        <writeHost host="www.zhengqingya.com" url="www.zhengqingya.com:3310" user="root" password="root">
            <!-- 读数据库 -->
            <readHost host="www.zhengqingya.com" url="www.zhengqingya.com:3311" user="root" password="root" />
        </writeHost>
    </dataHost>
</mycat:schema>
这里小编主要对t_user表进行分片,使用的分片规则为auto-sharding-long(每个库下的表中保存500万条数据),也就是说:分了3个库(db1,db2,db3),这3个库下的t_user表分别保存500万条数据
db1: 1~5000000db2: 5000001~10000000db3: 10000001~15000000
详细的分片规则主要在rule.xml中定义,然后取tableRule标签中的name属性值即可 比如上面使用到的auto-sharding-long:
<tableRule name="auto-sharding-long">
    <rule>
        <columns>id</columns>
        <algorithm>rang-long</algorithm>
    </rule>
</tableRule>
<function name="rang-long" class="io.mycat.route.function.AutoPartitionByLong">
    <property name="mapFile">autopartition-long.txt</property>
</function>
如果对多个表进行分片配置则配置多个table,指定相应的dataNode,rule等信息即可
② rule.xml :定义分片规则
在这里我们可以自定义分片规则,然后在schema.xml中使用
tableRule
name: 对应schema.xml配置文件中table标签对应的rule属性,即逻辑表的分片规则columns: 指定拆分的列字段algorithm: 定义分片规则即具体的分片算法,对应function标签的name属性值
function
name: 分片算法名class: 分片算法对应的具体的类property: 算法具体需要的一些属性,不同的算法对应的配置不同
下面贴出mycat默认的一些分片规则,实际应用中可根据自已的需求来自定义!
<?xml version="1.0" encoding="UTF-8"?>
<!-- - - Licensed under the Apache License, Version 2.0 (the "License");
 - you may not use this file except in compliance with the License. - You
 may obtain a copy of the License at - - http://www.apache.org/licenses/LICENSE-2.0
 - - Unless required by applicable law or agreed to in writing, software -
 distributed under the License is distributed on an "AS IS" BASIS, - WITHOUT
 WARRANTIES OR CONDITIONS OF ANY KIND, either express or implied. - See the
 License for the specific language governing permissions and - limitations
 under the License. -->
<!DOCTYPE mycat:rule SYSTEM "rule.dtd">
<mycat:rule xmlns:mycat="http://io.mycat/">
    <tableRule name="rule1">
        <rule>
            <columns>id</columns>
            <algorithm>func1</algorithm>
        </rule>
    </tableRule>

    <tableRule name="rule2">
        <rule>
            <columns>user_id</columns>
            <algorithm>func1</algorithm>
        </rule>
    </tableRule>

    <tableRule name="sharding-by-intfile">
        <rule>
            <columns>sharding_id</columns>
            <algorithm>hash-int</algorithm>
        </rule>
    </tableRule>
    <tableRule name="auto-sharding-long">
        <rule>
            <columns>id</columns>
            <algorithm>rang-long</algorithm>
        </rule>
    </tableRule>
    <tableRule name="mod-long">
        <rule>
            <columns>id</columns>
            <algorithm>mod-long</algorithm>
        </rule>
    </tableRule>
    <tableRule name="sharding-by-murmur">
        <rule>
            <columns>id</columns>
            <algorithm>murmur</algorithm>
        </rule>
    </tableRule>
    <tableRule name="crc32slot">
        <rule>
            <columns>id</columns>
            <algorithm>crc32slot</algorithm>
        </rule>
    </tableRule>
    <tableRule name="sharding-by-month">
        <rule>
            <columns>create_time</columns>
            <algorithm>partbymonth</algorithm>
        </rule>
    </tableRule>
    <tableRule name="latest-month-calldate">
        <rule>
            <columns>calldate</columns>
            <algorithm>latestMonth</algorithm>
        </rule>
    </tableRule>

    <tableRule name="auto-sharding-rang-mod">
        <rule>
            <columns>id</columns>
            <algorithm>rang-mod</algorithm>
        </rule>
    </tableRule>

    <tableRule name="jch">
        <rule>
            <columns>id</columns>
            <algorithm>jump-consistent-hash</algorithm>
        </rule>
    </tableRule>

    <function name="murmur"
 class="io.mycat.route.function.PartitionByMurmurHash">
        <property name="seed">0</property><!-- 默认是0 -->
        <property name="count">2</property><!-- 要分片的数据库节点数量,必须指定,否则没法分片 -->
        <property name="virtualBucketTimes">160</property><!-- 一个实际的数据库节点被映射为这么多虚拟节点,默认是160倍,也就是虚拟节点数是物理节点数的160倍 -->
        <!-- <property name="weightMapFile">weightMapFile</property> 节点的权重,没有指定权重的节点默认是1。以properties文件的格式填写,以从0开始到count-1的整数值也就是节点索引为key,以节点权重值为值。所有权重值必须是正整数,否则以1代替 -->
        <!-- <property name="bucketMapPath">/etc/mycat/bucketMapPath</property>
 用于测试时观察各物理节点与虚拟节点的分布情况,如果指定了这个属性,会把虚拟节点的murmur hash值与物理节点的映射按行输出到这个文件,没有默认值,如果不指定,就不会输出任何东西 -->
    </function>

    <function name="crc32slot"
 class="io.mycat.route.function.PartitionByCRC32PreSlot">
        <property name="count">2</property><!-- 要分片的数据库节点数量,必须指定,否则没法分片 -->
    </function>
    <function name="hash-int"
 class="io.mycat.route.function.PartitionByFileMap">
        <property name="mapFile">partition-hash-int.txt</property>
    </function>
    <function name="rang-long"
 class="io.mycat.route.function.AutoPartitionByLong">
        <property name="mapFile">autopartition-long.txt</property>
    </function>
    <function name="mod-long" class="io.mycat.route.function.PartitionByMod">
        <!-- how many data nodes -->
        <property name="count">3</property>
    </function>

    <function name="func1" class="io.mycat.route.function.PartitionByLong">
        <property name="partitionCount">8</property>
        <property name="partitionLength">128</property>
    </function>
    <function name="latestMonth"
 class="io.mycat.route.function.LatestMonthPartion">
        <property name="splitOneDay">24</property>
    </function>
    <function name="partbymonth"
 class="io.mycat.route.function.PartitionByMonth">
        <property name="dateFormat">yyyy-MM-dd</property>
        <property name="sBeginDate">2015-01-01</property>
    </function>

    <function name="rang-mod" class="io.mycat.route.function.PartitionByRangeMod">
        <property name="mapFile">partition-range-mod.txt</property>
    </function>

    <function name="jump-consistent-hash" class="io.mycat.route.function.PartitionByJumpConsistentHash">
        <property name="totalBuckets">3</property>
    </function>
</mycat:rule>
③ 重启mycat服务
三、创建表插入数据测试分片
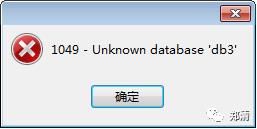
这里注意要先在mysql主库上新建我们上面scheam.xml配置文件中配置的db1,db2,db3这3个库再连接mycat服务哦,不然连接mycat的时候会出现如下的问题

1、Navicat连接Mycat创建表t_user
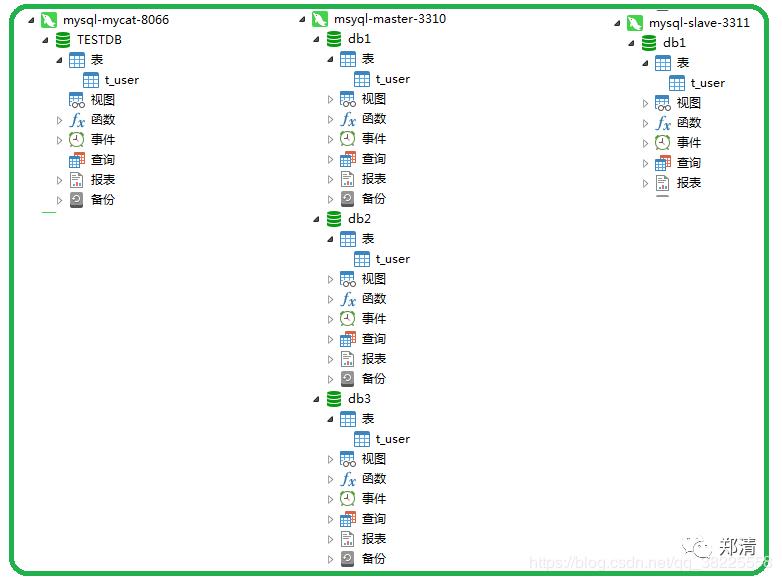
温馨小提示:如果之前mycat中已经有了t_user表,即之前的操作中我们的mysql下已经存在一个db1库下的t_user表,但db2以及db3库下却没有的话,需要我们自己手动在db2,db3库下创建与db1库下t_user表相同的
表结构,这里小编为了方便是直接将之前存在的t_user表删除后重新创建一个新的,但实际情况中建议不要这样操作哦,毕竟表里面是存在数据的,数据就是财富,如果吗,没有数据的话就随便怎么搞!
创建完成效果为主从数据库下的db1,db2,db3库下都会出现t_user表

2、插入数据
温馨小提示:在mycat中操作数据,mysql中刷新以查看效果哦~
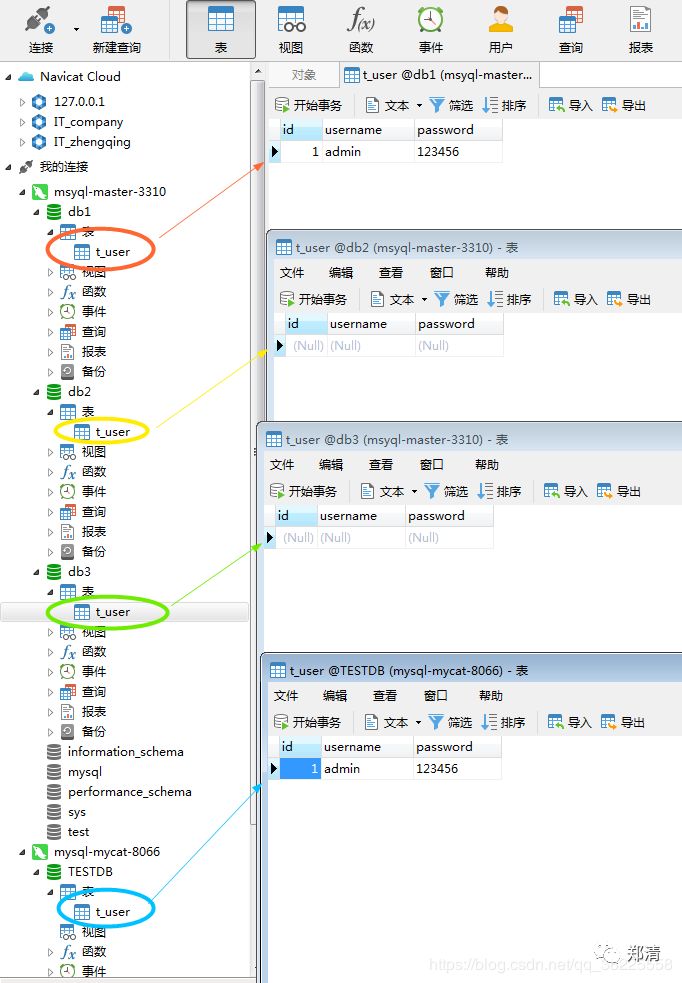
① 插入id为1~5000000的数据
效果如下,只有db1库下存在数据,db2,db3库下均无数据
② 插入id为5000001~10000000的数据
效果如下,只有db2库下存在数据,db1,db3库下均无数据
③ 插入id为10000001~15000000的数据
效果如下,只有db3库下存在数据,db1,db2库下均无数据
最后我们一个简单的mycat分片配置就成功完成了~
以上是关于MySQL(19) Mycat分片(分库分表)配置的主要内容,如果未能解决你的问题,请参考以下文章