Docker | 第三章:Docker常用命令
Posted 一枚趔趄的猿
tags:
篇首语:本文由小常识网(cha138.com)小编为大家整理,主要介绍了Docker | 第三章:Docker常用命令相关的知识,希望对你有一定的参考价值。
前言
上一章节,简单介绍了在
CentOS下的Docker的安装过程,以及运行了一个官方提供的Hello,World镜像运行了第一个Docker。就像上一章中,验证Docker是否安装成功,我们执行的是docker info命令。运行镜像时,执行的是docker run imagesName。所以学习一个工具,主要还是学习如何利用本身工具提供的一些命令进行相应的操作。所以本章节,主要来介绍下Docker的常用命令。
Docker命令清单
docker提供了查看其所有支持的命令清单,只需运行
docker
或
docker help

从提示中可以看出, Docker命令是很多的,可以管理 Docker,有操作 镜像、 容器等等。对于常用的可能就是操作 镜像和 容器了。所以这里主要列举下对于 镜像、 容器常用的一些命令操作,同时也会列举下一些其他常用的命令。对于某个命令想知道其详细的参数选项时,可依照此模式进行查看。
docker COMMAND --help
如,查看 run的详细信息
docker run --help
列举的 run的详细选项及其用法说明(真的很多呀!)
  Usage:    docker run [OPTIONS] IMAGE [COMMAND] [ARG...]


  Run a command in a new container


  Options:


        --add-host list                  Add a custom host-to-IP mapping (host:ip)


    -a, --attach list                    Attach to STDIN, STDOUT or STDERR


        --blkio-weight uint16            Block IO (relative weight), between 10 and 1000, or 0 to disable (default 0)


        --blkio-weight-device list       Block IO weight (relative device weight) (default [])


        --cap-add list                   Add Linux capabilities


        --cap-drop list                  Drop Linux capabilities


        --cgroup-parent string           Optional parent cgroup for the container


        --cidfile string                 Write the container ID to the file


        --cpu-period int                 Limit CPU CFS (Completely Fair Scheduler) period


        --cpu-quota int                  Limit CPU CFS (Completely Fair Scheduler) quota


        --cpu-rt-period int              Limit CPU real-time period in microseconds


        --cpu-rt-runtime int             Limit CPU real-time runtime in microseconds


    -c, --cpu-shares int                 CPU shares (relative weight)


        --cpus decimal                   Number of CPUs


        --cpuset-cpus string             CPUs in which to allow execution (0-3, 0,1)


        --cpuset-mems string             MEMs in which to allow execution (0-3, 0,1)


    -d, --detach                         Run container in background and print container ID


        --detach-keys string             Override the key sequence for detaching a container


        --device list                    Add a host device to the container


        --device-cgroup-rule list        Add a rule to the cgroup allowed devices list


        --device-read-bps list           Limit read rate (bytes per second) from a device (default [])


        --device-read-iops list          Limit read rate (IO per second) from a device (default [])


        --device-write-bps list          Limit write rate (bytes per second) to a device (default [])


        --device-write-iops list         Limit write rate (IO per second) to a device (default [])


        --disable-content-trust          Skip image verification (default true)


        --dns list                       Set custom DNS servers


        --dns-option list                Set DNS options


        --dns-search list                Set custom DNS search domains


        --entrypoint string              Overwrite the default ENTRYPOINT of the image


    -e, --env list                       Set environment variables


        --env-file list                  Read in a file of environment variables


        --expose list                    Expose a port or a range of ports


        --group-add list                 Add additional groups to join


        --health-cmd string              Command to run to check health


        --health-interval duration       Time between running the check (ms|s|m|h) (default 0s)


        --health-retries int             Consecutive failures needed to report unhealthy


        --health-start-period duration   Start period for the container to initialize before starting health-retries countdown (ms|s|m|h) (default 0s)


        --health-timeout duration        Maximum time to allow one check to run (ms|s|m|h) (default 0s)


        --help                           Print usage


    -h, --hostname string                Container host name


        --init                           Run an init inside the container that forwards signals and reaps processes


    -i, --interactive                    Keep STDIN open even if not attached


        --ip string                      IPv4 address (e.g., 172.30.100.104)


        --ip6 string                     IPv6 address (e.g., 2001:db8::33)


        --ipc string                     IPC mode to use


        --isolation string               Container isolation technology


        --kernel-memory bytes            Kernel memory limit


    -l, --label list                     Set meta data on a container


        --label-file list                Read in a line delimited file of labels


        --link list                      Add link to another container


        --link-local-ip list             Container IPv4/IPv6 link-local addresses


        --log-driver string              Logging driver for the container


        --log-opt list                   Log driver options


        --mac-address string             Container MAC address (e.g., 92:d0:c6:0a:29:33)


    -m, --memory bytes                   Memory limit


        --memory-reservation bytes       Memory soft limit


        --memory-swap bytes              Swap limit equal to memory plus swap: '-1' to enable unlimited swap


        --memory-swappiness int          Tune container memory swappiness (0 to 100) (default -1)


        --mount mount                    Attach a filesystem mount to the container


        --name string                    Assign a name to the container


        --network string                 Connect a container to a network (default "default")


        --network-alias list             Add network-scoped alias for the container


        --no-healthcheck                 Disable any container-specified HEALTHCHECK


        --oom-kill-disable               Disable OOM Killer


        --oom-score-adj int              Tune host's OOM preferences (-1000 to 1000)


        --pid string                     PID namespace to use


        --pids-limit int                 Tune container pids limit (set -1 for unlimited)


        --privileged                     Give extended privileges to this container


    -p, --publish list                   Publish a container's port(s) to the host


    -P, --publish-all                    Publish all exposed ports to random ports


        --read-only                      Mount the container's root filesystem as read only


        --restart string                 Restart policy to apply when a container exits (default "no")


        --rm                             Automatically remove the container when it exits


        --runtime string                 Runtime to use for this container


        --security-opt list              Security Options


        --shm-size bytes                 Size of /dev/shm


        --sig-proxy                      Proxy received signals to the process (default true)


        --stop-signal string             Signal to stop a container (default "SIGTERM")


        --stop-timeout int               Timeout (in seconds) to stop a container


        --storage-opt list               Storage driver options for the container


        --sysctl map                     Sysctl options (default map[])


        --tmpfs list                     Mount a tmpfs directory


    -t, --tty                            Allocate a pseudo-TTY


        --ulimit ulimit                  Ulimit options (default [])


    -u, --user string                    Username or UID (format: <name|uid>[:<group|gid>])


        --userns string                  User namespace to use


        --uts string                     UTS namespace to use


    -v, --volume list                    Bind mount a volume


        --volume-driver string           Optional volume driver for the container


        --volumes-from list              Mount volumes from the specified container(s)


    -w, --workdir string                 Working directory inside the container
镜像常用命令
搜索镜像,利用
search命令。
docker search jdk
拉取镜像,利用
pull命令。
    用法:docker pull [OPTIONS] NAME[:TAG|@DIGEST]


    docker pull jboss/base-jdk:8

查看已下载镜像列表,利用
images命令
docker images jboss/base-jdk:8
可查看所有已下载的镜像:
  REPOSITORY          TAG                 IMAGE ID            CREATED             SIZE


  hello-world         latest              2cb0d9787c4d        2 weeks ago         1.85kB
镜像拷贝,同时重命名,利用
tag命令
    # 比如,想创建拷贝一个镜像`hello-wrold`,同时命名为`lqdev.cn/hello-world:1`


    docker tag hello-world lqdev.cn/hello-world:1
此时查看镜像列表,就会发现多了一个镜像了:
  [root@xx ~]# docker images


  REPOSITORY             TAG                 IMAGE ID            CREATED             SIZE


  hello-world            latest              2cb0d9787c4d        2 weeks ago         1.85kB


  lqdev.cn/hello-world   1                   2cb0d9787c4d        2 weeks ago         1.85kB
基于Dockerfile创建一个新的镜像,利用
build命令(对于Dockerfile,在下一章节会详细进行说明的,这里就不过多介绍了。)
  # 使用当前目录下的Dockerfile,同时镜像命名(`-t`,指tag)为:lqdev.cn/first:1


  docker build -t lqdev.cn/first:1
删除镜像,利用
rmi命令(这里需要注意,当镜像有容器在使用时,是无法删除的,需要先删除容器再来删除镜像。)
    docker rmi jboss/base-jdk:8


    或者根据images_id删除


    docker rmi b123d943e165
容器常用命令
运行容器,利用
run命令。
docker run hello-world
运行命令是最常用的命令了,这里其常用选项进行列举说明下
  -a stdin: 指定标准输入输出内容类型,可选 STDIN/STDOUT/STDERR 三项;


  -d: 后台运行容器,并返回容器ID;


  -i: 以交互模式运行容器,通常与 -t 同时使用;


  -p: 端口映射,格式为:主机(宿主)端口:容器端口


  -t: 为容器重新分配一个伪输入终端,通常与 -i 同时使用;


  --name="nginx-lb": 为容器指定一个名称;


  --dns 8.8.8.8: 指定容器使用的DNS服务器,默认和宿主一致;


  --dns-search example.com: 指定容器DNS搜索域名,默认和宿主一致;


  -h "mars": 指定容器的hostname;


  -e username="ritchie": 设置环境变量;


  --env-file=[]: 从指定文件读入环境变量;


  --cpuset="0-2" or --cpuset="0,1,2": 绑定容器到指定CPU运行;


  -m :设置容器使用内存最大值;


  --net="bridge": 指定容器的网络连接类型,支持 bridge/host/none/container: 四种类型;


  --link=[]: 添加链接到另一个容器;


  --expose=[]: 开放一个端口或一组端口;
比如,我们后台运行 redis实例,同时指定其宿主端口为 16379。
docker run -p 16379:6379 -d redis:3.2
容器列表,使用
ps命令,可以列举出当前运行的容器,需要所有容器时,加入-a选项即可。
docker ps -a
此时,可看见所有的容器信息:
  CONTAINER ID        IMAGE                    COMMAND             CREATED             STATUS                     PORTS               NAMES


  3ba5b7475423        lqdev.cn/hello-world:1   "/hello"            7 seconds ago       Exited (0) 6 seconds ago                       distracted_goldwasser


  02f1c3cc2a31        hello-world              "/hello"            20 hours ago        Exited (0) 20 hours ago                        vibrant_ritchie
停止容器,利用
stop命令。
   # docker stop 容器id


   docker stop 3ba5b7475423
启动已停止容器,利用
start命令。
   # docker start 容器id


     docker start 3ba5b7475423
重启容器,利用
restart命令。
    # docker restart 容器id


    docker restart 3ba5b7475423
强制停止容器,利用
kill命令。
    # docker kill 容器id


    docker kill 3ba5b7475423
删除容器,利用
rm命令(只能删除已经停止的容器,若需要删除正在运行的容器,可加入-f参数选项)
   # docker rm 容器ID


   docker rm 3ba5b7475423
进入容器,在一些场景下,比如想查看
redis的客户端redis-cli时,这个时候就需要进入容器了。进入容器有很多中,这里就exec进行讲解下,其他的比如attach不熟悉,大家可自行搜索下。
    # docker exec -it 容器ID 参数


    docker exec -it 3ba5b7475423 redis-cli


    参数说明:


      -d:分离模式: 在后台运行


      -i:即使没有附加也保持STDIN 打开


      -t:分配一个伪终端
此时就可以看见已经进入到客户端了,进行相应操作了。
  [root@xxx ~]# docker exec -it 3ba5b7475423 redis-cli


  127.0.0.1:6379> keys *


  (empty list or set)


  127.0.0.1:6379> set name okong


  OK


  127.0.0.1:6379> keys *


  1) "name"


  127.0.0.1:6379> get name


  "okong"


  127.0.0.1:6379>
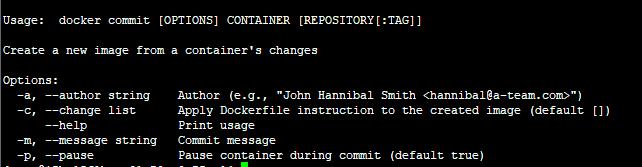
容器中创建一个镜像。在制作一些私有镜像时,常常是依赖于一个基础镜像后,然后进入容器中进行相关系统环境的配置,或者相应的优化。但若容器一删除,之前的修改都会没有了。故在这些场景下,可直接从修改后的容器中创建一个自己的私有镜像,这样里面的一些环境和相关优化项还是保留的。这个主要会在构建私有镜像章节时具体展开。
    # docker commit [options] 容器id name:tag


    docker commit 3ba5b7475423 lqdev.cn/redis:1


    参数说明:


      -a:提交的镜像作者


      -c:使用Dockerfile指令来创建镜像


      -m:提交时的说明文字


      -p:在commit时,将容器暂停
其他常用命令
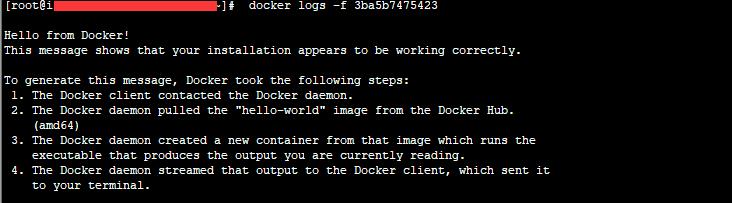
查看日志,利用
logs命令。
    # docker logs [OPTIONS] 容器ID


     docker logs -f 3ba5b7475423


     参数说明:


       -f : 跟踪日志输出


      --since :显示某个开始时间的所有日志


       -t : 显示时间戳


      --tail :仅列出最新N条容器日志
宿主和容器之间相互拷贝文件,利用
cp命令。
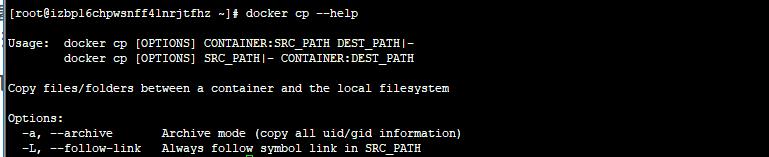
简单来说就是:
   # docker cp 容器名:要拷贝的文件在容器里面的路径  要拷贝到宿主机的相应路径


   # docker cp 要拷贝的文件路径 容器名:要拷贝到容器里面对应的路径


   docker cp 3ba5b7475423:/opt/a.json /opt


   docker cp /opt/a.json 3ba5b7475423:/opt
总结
本章节主要是介绍了下
Docker的一些常用命令的说明。文中未列举的命令,大家可直接使用命令docker command--help查看其命令说明或者自行谷歌下。熟悉了这些常用命令后,下一章节,主要会介绍下Dockerfile文件的语法及简单示例。
最后
若文中有错误或者遗漏之处,还望指出,共同进步!
参考资料
https://docs.docker.com/engine/reference/commandline/docker/
http://www.runoob.com/docker/docker-command-manual.html
老生常谈
个人QQ:
499452441
个人博客:http://blog.lqdev.cn
以上是关于Docker | 第三章:Docker常用命令的主要内容,如果未能解决你的问题,请参考以下文章