带有Selenium的Apache ANT:完整教程
Posted python全栈测试社区
tags:
篇首语:本文由小常识网(cha138.com)小编为大家整理,主要介绍了带有Selenium的Apache ANT:完整教程相关的知识,希望对你有一定的参考价值。
什么是Apache Ant?
在创建完整的软件产品时,需要注意不同的第三方API,它们的类路径,清理先前的可执行二进制文件,编译我们的源代码,执行源代码,创建报告和部署代码库等。如果完成了这些任务一个接一个地手动操作,将花费大量时间,并且该过程容易出错。
这就是像Ant这样的构建工具的重要性。它按Ant配置文件(通常为build.xml)中提到的顺序存储,执行和自动化所有过程。

Apache ANT建造的好处
Ant创建了应用程序生命周期,即清理,编译,设置依赖项,执行,报告等。
第三方API依赖关系可以由Ant设置,即其他Jar文件的类路径可以由Ant构建文件设置。
为端到端交付和部署创建了一个完整的应用程序。
它是一个简单的构建工具,其中所有配置都可以使用XML文件完成,并且可以从命令行执行。
由于配置与实际的应用程序逻辑分开,因此可以使您的代码清晰。
如何安装Ant
在Windows中安装Ant的步骤如下
步骤1)转到http://ant.apache.org/bindownload.cgi从apache-ant-1.9.4-bin.zip 下载.zip文件

步骤2)解压缩文件夹,然后将路径复制到解压缩文件夹的根目录


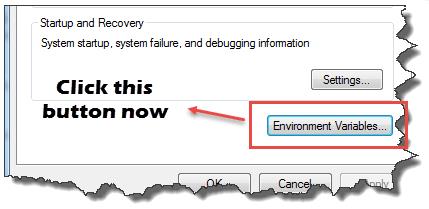
步骤4)打开一个新窗口。单击“环境变量...”按钮。
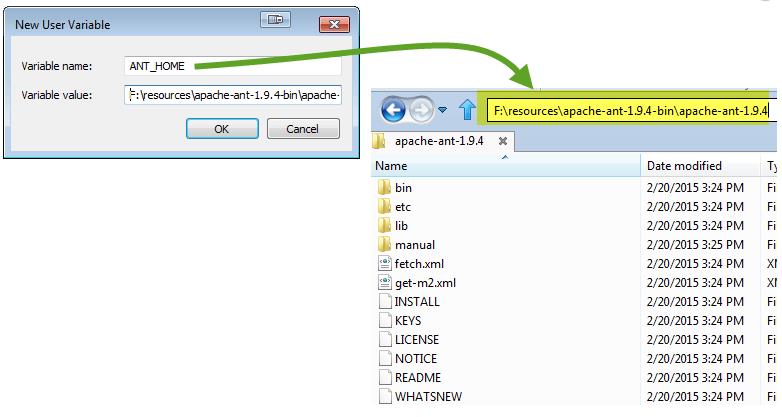
步骤5)单击“新建…”按钮,并将变量名称设置为“ ANT_HOME”,并将变量值设置为解压缩文件夹的根路径,然后单击“确定”。
步骤6)现在从列表中选择“路径”变量,然后单击“编辑”并追加;%ANT_HOME% bin。
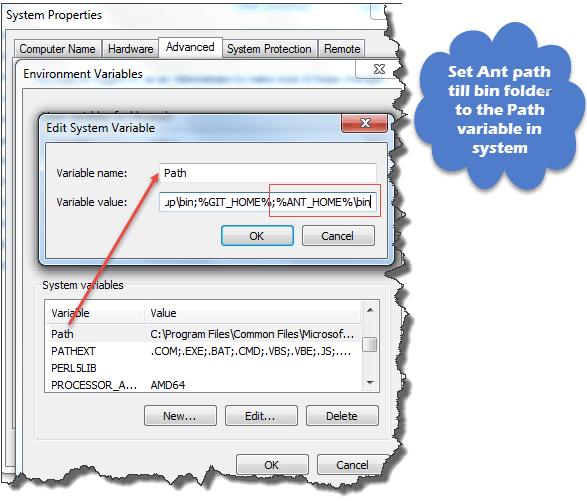
一次重新启动系统,现在就可以使用Ant构建工具了。
步骤7)要使用命令行检查Ant版本:
ant -version
了解Build.xml
Build.xml是Ant构建工具最重要的组件。对于Java项目,此文件中以XML格式提到了所有与清理,设置,编译和部署相关的任务。当我们使用命令行或任何IDE插件执行此XML文件时,写入该文件的所有指令都将按顺序执行。
让我们了解示例build.XML中的代码
1)项目标签用于提及项目名称和basedir属性。basedir是应用程序的根目录
<project name="YTMonetize" basedir=".">2) 属性标记在build.XML文件中用作变量,以在后续步骤中使用
<property name="build.dir" value="${basedir}/build"/><property name="external.jars" value=". esources"/><property name="ytoperation.dir" value="${external.jars}/YTOperation"/><property name="src.dir"value="${basedir}/src"/>
3) 目标标记用作将按顺序执行的步骤。Name属性是目标的名称。您可以在一个build.xml中包含多个目标
<pathelement path="${basedir}/"/>4) path标记用于逻辑上捆绑位于公共位置的所有文件
<path id ="classpath_jars">5) pathelement标记会将路径设置为存储所有文件的公共位置的根
<pathelement path="${basedir}/"/>6) pathconvert标记,用于将path标记内的所有通用文件的路径转换为系统的classpath格式
<pathconvert pathsep=";" property="test.classpath" refid="classpath_jars"/> <fileset dir="${ytoperation.dir}" includes="*.jar"/><echo message="deleting existing build directory"/><delete dir="${build.dir}"/> <mkdir dir="${build.dir}"/><javac destdir="${build.dir}" srcdir="${src.dir}"><classpath refid="classpath_jars"/></javac>
<jar destfile="${ytoperation.dir}/YTOperation.jar" basedir="${build.dir}"><manifest><attribute name="Main-Class" value="test.Main"/></manifest>
<target name="run" depends="compile"> <java jar="${ytoperation.dir}/YTOperation.jar" fork="true"/> 使用Eclipse插件运行Ant
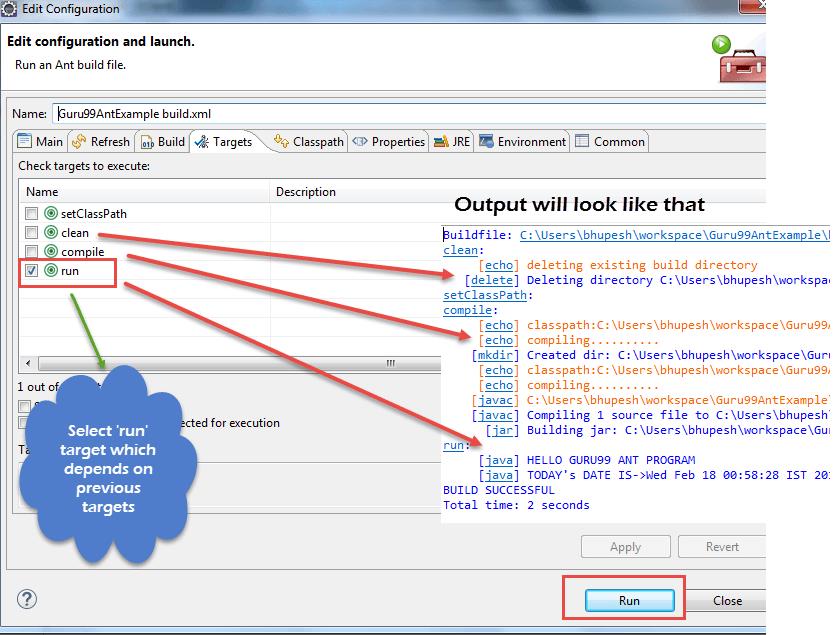
要从eclipse运行Ant,请转到build.xml文件->右键单击文件-> Run as ...->单击Build文件
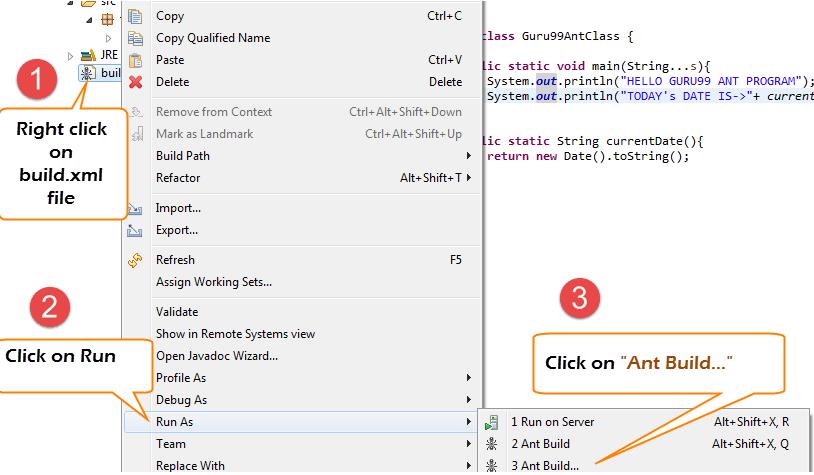
例:
我们将使用一个小示例程序,该程序将非常清楚地解释Ant功能。我们的项目结构看起来像–
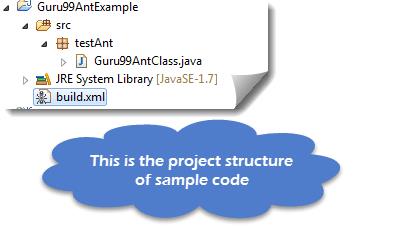
在此示例中,我们有4个目标
设置外部罐子的类路径,
清理以前编译的代码
编译现有的Java代码
运行代码
Guru99AntClass.class
package testAnt;import java.util.Date;public class Guru99AntClass {public static void main(String...s){System.out.println("HELLO GURU99 ANT PROGRAM");System.out.println("TODAY's DATE IS->"+ currentDate() );}public static String currentDate(){return new Date().toString();}}
<!--用于提及项目名称的项目标记,basedir属性将是应用程序的根目录--><project name="YTMonetize" basedir="."><!--属性标记将用作build.xml文件中的变量,以便在以后的步骤中使用--><property name="build.dir" value="${basedir}/build"/><property name="external.jars" value=". esources"/><property name="ytoperation.dir" value="${external.jars}/YTOperation"/><property name="src.dir"value="${basedir}/src"/><!--用作将按顺序执行的步骤的目标标记。name属性将是目标的名称,用于使一个目标依赖于另一个目标--><target name="setClassPath"><path id="classpath_jars"><pathelement path="${basedir}/"/></path><pathconvert pathsep=";"property="test.classpath" refid="classpath_jars"/></target><target name="clean"><!--echo标记将用于在控制台--><echo message="deleting existing build directory"/><!--删除标记将清除给定文件夹中的数据--><delete dir="${build.dir}"/></target><target name="compile" depends="clean,setClassPath"><echo message="classpath:${test.classpath}"/><echo message="compiling.........."/><!--mkdir标记将创建新的控制器--><mkdir dir="${build.dir}"/><echo message="classpath:${test.classpath}"/><echo message="compiling.........."/><!--用于编译java源代码并将.class文件移动到新文件夹--><javac destdir="${build.dir}" srcdir="${src.dir}"><classpath refid="classpath_jars"/></javac><!--jar标记将从.class文件--><jar destfile="${ytoperation.dir}/YTOperation.jar"basedir="${build.dir}"><!--manifest标记将设置要执行的主类--><manifest><attribute name="Main-Class" value="testAnt.Guru99AntClass"/></manifest></jar></target><target name="run" depends="compile"><!--java标记将从编译目标部分--><java jar="${ytoperation.dir}/YTOperation.jar"fork="true"/></target></project>
如何使用Ant执行TestNG代码
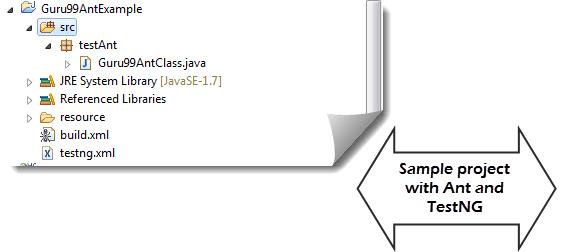
在这里,我们将创建一个类TestNG的方法和组级道路测试中的build.xml。
现在要执行testng方法,我们将创建另一个testng.xml文件,并从build.xml文件中调用该文件。
步骤1)我们在包testAnt中创建一个“ Guru99AntClass.class”
Guru99AntClass.class
package testAnt;import java.util.Date;import org.testng.annotations.Test;public class Guru99AntClass {public void Guru99AntTestNGMethod(){System.out.println("HELLO GURU99 ANT PROGRAM");System.out.println("TODAY's DATE IS->"+ currentDate() );}public static String currentDate(){return new Date().toString();}}
步骤2)创建一个目标以在Build.xml中加载此类
<!--加载testNG并添加到应用程序的类路径--><target name="loadTestNG" depends="setClassPath"><!—using taskdef tag we can add a task to run on the current project. In below line, we are adding testing task in this project. Using testing task here now we can run testing code using the ant script --><taskdef resource="testngtasks" classpath="${test.classpath}"/></target>
步骤3)建立testng.xml
testng.xml
<suite name="YT"thread-count="1"><test name="GURU99TestNGAnt"><classes><class name="testAnt.Guru99AntClass"></class></classes></test></suite>
步骤4)在Build.xml中创建目标以运行此TestNG代码
<target name="runGuru99TestNGAnt" depends="compile"><!--testng标记将用于使用相应的testng.xml文件执行testng代码。这里的classpath属性将testng的jar的classpath设置为项目--><testng classpath="${test.classpath};${build.dir}"><!—xmlfileset tag is used here to run testng's code using testing.xml file. Using includes tag we are mentioning path to testing.xml file--><xmlfileset dir="${basedir}" includes="testng.xml"/></testng>
步骤5)完整的Build.xml
<!--用于提及项目名称的项目标记,basedir属性将是应用程序的根目录--><project name="YTMonetize" basedir="."><!--属性标记将用作build.xml文件中的变量,以便在以后的步骤中使用--><property name="build.dir"value="${basedir}/build"/><!--将testng相关的jar放在资源文件夹--><property name="external.jars" value=". esource"/><property name="src.dir" value="${basedir}/src"/><!--用作将按顺序执行的步骤的目标标记。name属性将是name使一个目标依赖另一个目标--><!--加载testNG并添加到应用程序的类路径--><target name="loadTestNG"depends="setClassPath"><taskdef resource="testngtasks"classpath="${test.classpath}"/></target><target name="setClassPath"><path id="classpath_jars"><pathelement path="${basedir}/"/><fileset dir="${external.jars}" includes="*.jar"/></path><pathconvert pathsep=";"property="test.classpath"refid="classpath_jars"/></target><target name="clean"><!--echo标记将用于在控制台--><echo message="deleting existing build directory"/><!--删除标记将清除给定文件夹中的数据--><delete dir="${build.dir}"/></target><target name="compile"depends="clean,setClassPath,loadTestNG"><echo message="classpath:${test.classpath}"/><echo message="compiling.........."/><!--mkdir标记将创建新的控制器--><mkdir dir="${build.dir}"/><echo message="classpath:${test.classpath}"/><echo message="compiling.........."/><!--用于编译java源代码并将.class文件移动到新文件夹--><javac destdir="${build.dir}"srcdir="${src.dir}"><classpath refid="classpath_jars"/></javac></target><target name="runGuru99TestNGAnt"depends="compile"><!--testng标记将用于使用相应的testng.xml文件--><testng classpath="${test.classpath};${build.dir}"><xmlfileset dir="${basedir}"includes="testng.xml"/></testng></target></project>
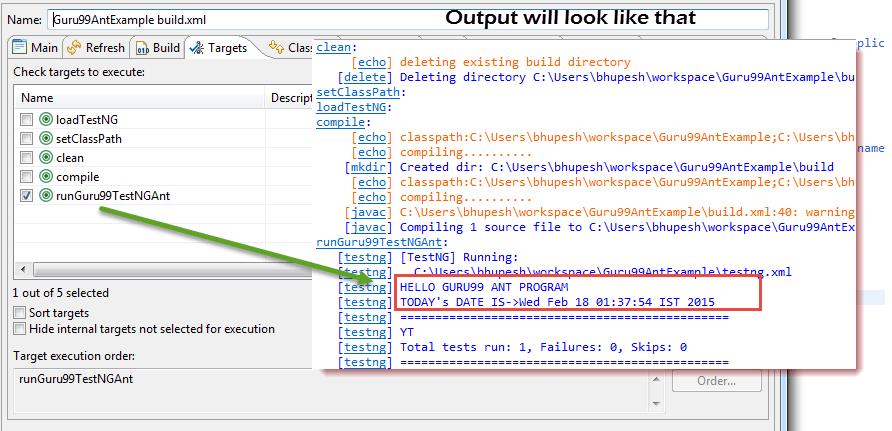
步骤6)输出
带有Selenium Webdriver的Ant:
到目前为止,我们已经了解到,使用ANT,我们可以将所有第三方jar放在系统中的特定位置,并为我们的项目设置它们的路径。使用这种方法,我们可以在一个地方设置项目的所有依赖项,并使其更可靠地进行编译,执行和部署。
同样,对于我们使用硒的测试项目,我们可以在build.xml中轻松提及硒依赖性,而无需在应用程序中手动添加它的类路径。
因此,现在您可以忽略下面提到的为项目设置类路径的传统方法。

例:
我们将修改前面的示例
步骤1)将属性selenium.jars设置为资源文件夹中与硒相关的jar
<property name="selenium.jars" value=".selenium"/>步骤2)在目标setClassPath中,添加Selenium文件
<target name="setClassPath"><path id="classpath_jars"><pathelement path="${basedir}/"/><fileset dir="${external.jars}" includes="*.jar"/><!-- selenium jar added here --><fileset dir="${selenium.jars}" includes="*.jar"/></path>
步骤3)完成Build.xml:
<!--用于提及项目名称的项目标记,basedir属性将是应用程序的根目录--><project name="YTMonetize" basedir="."><!--属性标记将用作build.xml文件中的变量,以便在以后的步骤中使用--><property name="build.dir" value="${basedir}/build"/><!--将testng相关的jar放在资源文件夹--><property name="external.jars" value=". esource"/><!--将selenium相关的jar放入资源文件夹--><property name="selenium.jars" value=".selenium"/><property name="src.dir" value="${basedir}/src"/><!--用作将按顺序执行的步骤的目标标记。name属性将是name使一个目标依赖另一个目标--><!--加载testNG并添加到应用程序的类路径--><target name="loadTestNG" depends="setClassPath"><taskdef resource="testngtasks" classpath="${test.classpath}"/></target><target name="setClassPath"><path id="classpath_jars"><pathelement path="${basedir}/"/><fileset dir="${external.jars}" includes="*.jar"/><!--Selenium jar 添加在这里--><fileset dir="${selenium.jars}"includes="*.jar"/></path><pathconvert pathsep=";" property="test.classpath" refid="classpath_jars"/></target><target name="clean"><!--echo标记将用于在控制台--><echo message="deleting existing build directory"/><!--删除标记将清除给定文件夹中的数据--><delete dir="${build.dir}"/></target><target name="compile" depends="clean,setClassPath,loadTestNG"><echo message="classpath:${test.classpath}"/><echo message="compiling.........."/><!--mkdir标记将创建新的控制器--><mkdir dir="${build.dir}"/><echo message="classpath:${test.classpath}"/><echo message="compiling.........."/><!--用于编译java源代码并将.class文件移动到新文件夹--><javac destdir="${build.dir}"srcdir="${src.dir}"><classpath refid="classpath_jars"/></javac></target><target name="runGuru99TestNGAnt" depends="compile"><!--testng标记将用于使用相应的testng.xml文件--><testng classpath="${test.classpath};${build.dir}"><xmlfileset dir="${basedir}" includes="testng.xml"/></testng></target></project>
Guru99AntClass.java:
package testAnt;import java.util.List;import org.openqa.selenium.By;import org.openqa.selenium.WebDriver;import org.openqa.selenium.WebElement;import org.openqa.selenium.firefox.FirefoxDriver;import org.testng.annotations.Test;public class Guru99AntClass {@Testpublic void Guru99AntTestNGMethod(){WebDriver driver = new FirefoxDriver();driver.get("http://demo.guru99.com/test/guru99home/");List<WebElement> listAllCourseLinks = driver.findElements(By.xpath("//div[@class='canvas-middle']//a"));for(WebElement webElement : listAllCourseLinks) {System.out.println(webElement.getAttribute("href"));}}}
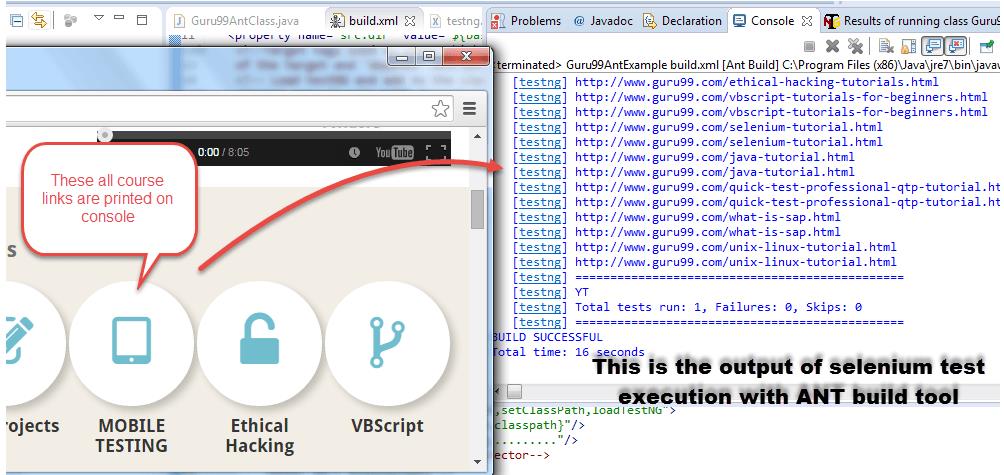
步骤5)成功执行后,输出将如下所示:
摘要:
Ant是Java的构建工具。
Ant用于代码编译,部署,执行过程。
可以从Apache网站下载Ant 。
Build.xml文件,用于使用Ant配置执行目标。
可以从命令行或合适的IDE插件(如eclipse)运行Ant。


感谢您抽出 
 · 来阅读此文
更多精彩请点击【阅读原文】哦
↓↓↓
以上是关于带有Selenium的Apache ANT:完整教程的主要内容,如果未能解决你的问题,请参考以下文章