Docker & ASP.NET Core 2.0 微服务跨平台实践
Posted dotNET跨平台
tags:
篇首语:本文由小常识网(cha138.com)小编为大家整理,主要介绍了Docker & ASP.NET Core 2.0 微服务跨平台实践相关的知识,希望对你有一定的参考价值。
本篇博文的目的:在 Mac OS 中使用 VS Code 开发 ASP.NET Core 2.0 应用程序,然后在 Ubuntu 服务器配置 Docker 环境,并使用 Docker 运行 Consul 和 Fabio 环境,最后使用 Docker 运行 ASP.NET Core 2.0 应用程序。
你要的项目源码:https://github.com/yuezhongxin/HelloDocker.Sample
上面配置看起来还蛮简单,但实际去操作的时候,还是遇到了蛮多的问题,并且花了很多的时间去解决,比如 Docker 运行 Consul 和 Fabio,下面详细说下过程。
1. Docker 运行 Consul 环境
关于 Consul 的概念:
Consul 是 HashiCorp 公司推出的开源工具,用于实现分布式系统的服务发现与配置。与其他分布式服务注册与发现的方案,比如 Airbnb 的 SmartStack 等相比,Consul 的方案更“一站式”,内置了服务注册与发现框 架、分布一致性协议实现、健康检查、Key/Value 存储、多数据中心方案,不再需要依赖其他工具(比如 ZooKeeper 等)。使用起来也较 为简单。Consul 用 Golang 实现,因此具有天然可移植性(支持 Linux、windows 和 Mac OS X);安装包仅包含一个可执行文件,方便部署,与 Docker 等轻量级容器可无缝配合。
配置 Consul 的微服务集群环境,需要先配置下 Server 服务端(需要独立服务器环境),配置命令(没有使用 Docker):
$ consul agent -server -bootstrap-expect 1 -data-dir /tmp/consul -ui-dir=./dist -config-dir /etc/consul.d -bind=10.9.10.110一开始,我想在 Mac OS 环境中使用 Docker 配置 Consul Client 客户端,但遇到了一些问题,配置命令:
$ docker run -d --net=host --name=consul-client consul agent -bind=10.9.10.190 -client=0.0.0.0 -node=mac-xishuai -retry-join=10.9.10.236先解析下命令的意思:
这里需要再重点说下-client=,一开始我没有理解,先看下官方说明:
If you want to expose the Consul interfaces to other containers via a different network, such as the bridge network, use the
-clientoption for Consul.
With this configuration, Consul's client interfaces will be bound to the bridge IP and available to other containers on that network, but not on the host network. Note that we still keep the cluster address out on the host network for performance. Consul will also accept the-client=0.0.0.0option to bind to all interfaces.
这里需要再说明下,Docker 部署 ASP.NET Core 2.0、Consul 和 Fabio 有两种方式:
使用一个 Docker 容器:很简单,在一个容器中完成服务部署,并且配置 Consul 和 Fabio 环境,这样容器就会很臃肿,并且每次发布的时候都得重新配置 Consul 和 Fabio 环境,如果服务很多的话,想想就觉得恐怖。
分别独立 Docker 容器:服务部署、配置 Consul 和 Fabio 环境,都是独立容器实现,互不影响,也可以跨服务实现,简单灵活。
显而易见,推荐第二种方式。
回到正题,上面配置命令,在 Mac OS 报如下错误:
$ docker logs consul-client
==> Starting Consul agent...
==> Error starting agent: Failed to start Consul client: Failed to start lan serf: Failed to create memberlist: Could not set up network transport: failed to obtain an address: Failed to start TCP listener on "10.9.10.190" port 8301: listen tcp 10.9.10.190:8301: bind: cannot assign requested address
这个问题花了很多时间也没有解决,奇怪的是不使用 Docker,直接运行 Consul Client 配置命令,却是可以的,后来没办法,我就在 Mac OS 中使用 Ubuntu 虚拟机了(版本 14.04),使用的 Vagrant 管理工具。
再重新运行配置命令:
$ docker run -d --net=host --name=consul-client consul agent -bind=10.9.10.89 -client=0.0.0.0 -node=vagrant-ubuntu-xishuai -retry-join=10.9.2.236
$ docker psCONTAINER ID IMAGE COMMAND CREATED STATUS PORTS NAMES9c4988cf475f consul "docker-entrypoint..." 2 seconds ago Up 2 seconds consul-client
$ docker logs consul-client
==> Starting Consul agent...
==> Consul agent running! Version: 'v1.0.0'
Node ID: '34e63f0a-d361-f152-3803-b9fda0642e4d'
Node name: 'vagrant-ubuntu-xishuai'
Datacenter: 'dc1' (Segment: '') Server: false (Bootstrap: false) Client Addr: [0.0.0.0] (HTTP: 8500, HTTPS: -1, DNS: 8600) Cluster Addr: 10.9.10.89 (LAN: 8301, WAN: 8302) Encrypt: Gossip: false, TLS-Outgoing: false, TLS-Incoming: false==> Log data will now stream in as it occurs: 2017/11/14 06:40:52 [INFO] serf: EventMemberJoin: vagrant-ubuntu-xishuai 10.9.10.89 2017/11/14 06:40:52 [INFO] agent: Started DNS server 0.0.0.0:8600 (udp) 2017/11/14 06:40:52 [INFO] agent: Started DNS server 0.0.0.0:8600 (tcp) 2017/11/14 06:40:52 [INFO] agent: Started HTTP server on [::]:8500 (tcp) 2017/11/14 06:40:52 [INFO] agent: Retry join LAN is supported for: aws azure gce softlayer 2017/11/14 06:40:52 [INFO] agent: Joining LAN cluster... 2017/11/14 06:40:52 [INFO] agent: (LAN) joining: [10.9.2.236] 2017/11/14 06:40:52 [WARN] manager: No servers available 2017/11/14 06:40:52 [ERR] agent: failed to sync remote state: No known Consul servers 2017/11/14 06:40:52 [INFO] serf: EventMemberJoin: agent_1 10.9.2.236 2017/11/14 06:40:52 [INFO] agent: (LAN) joined: 1 Err: <nil>
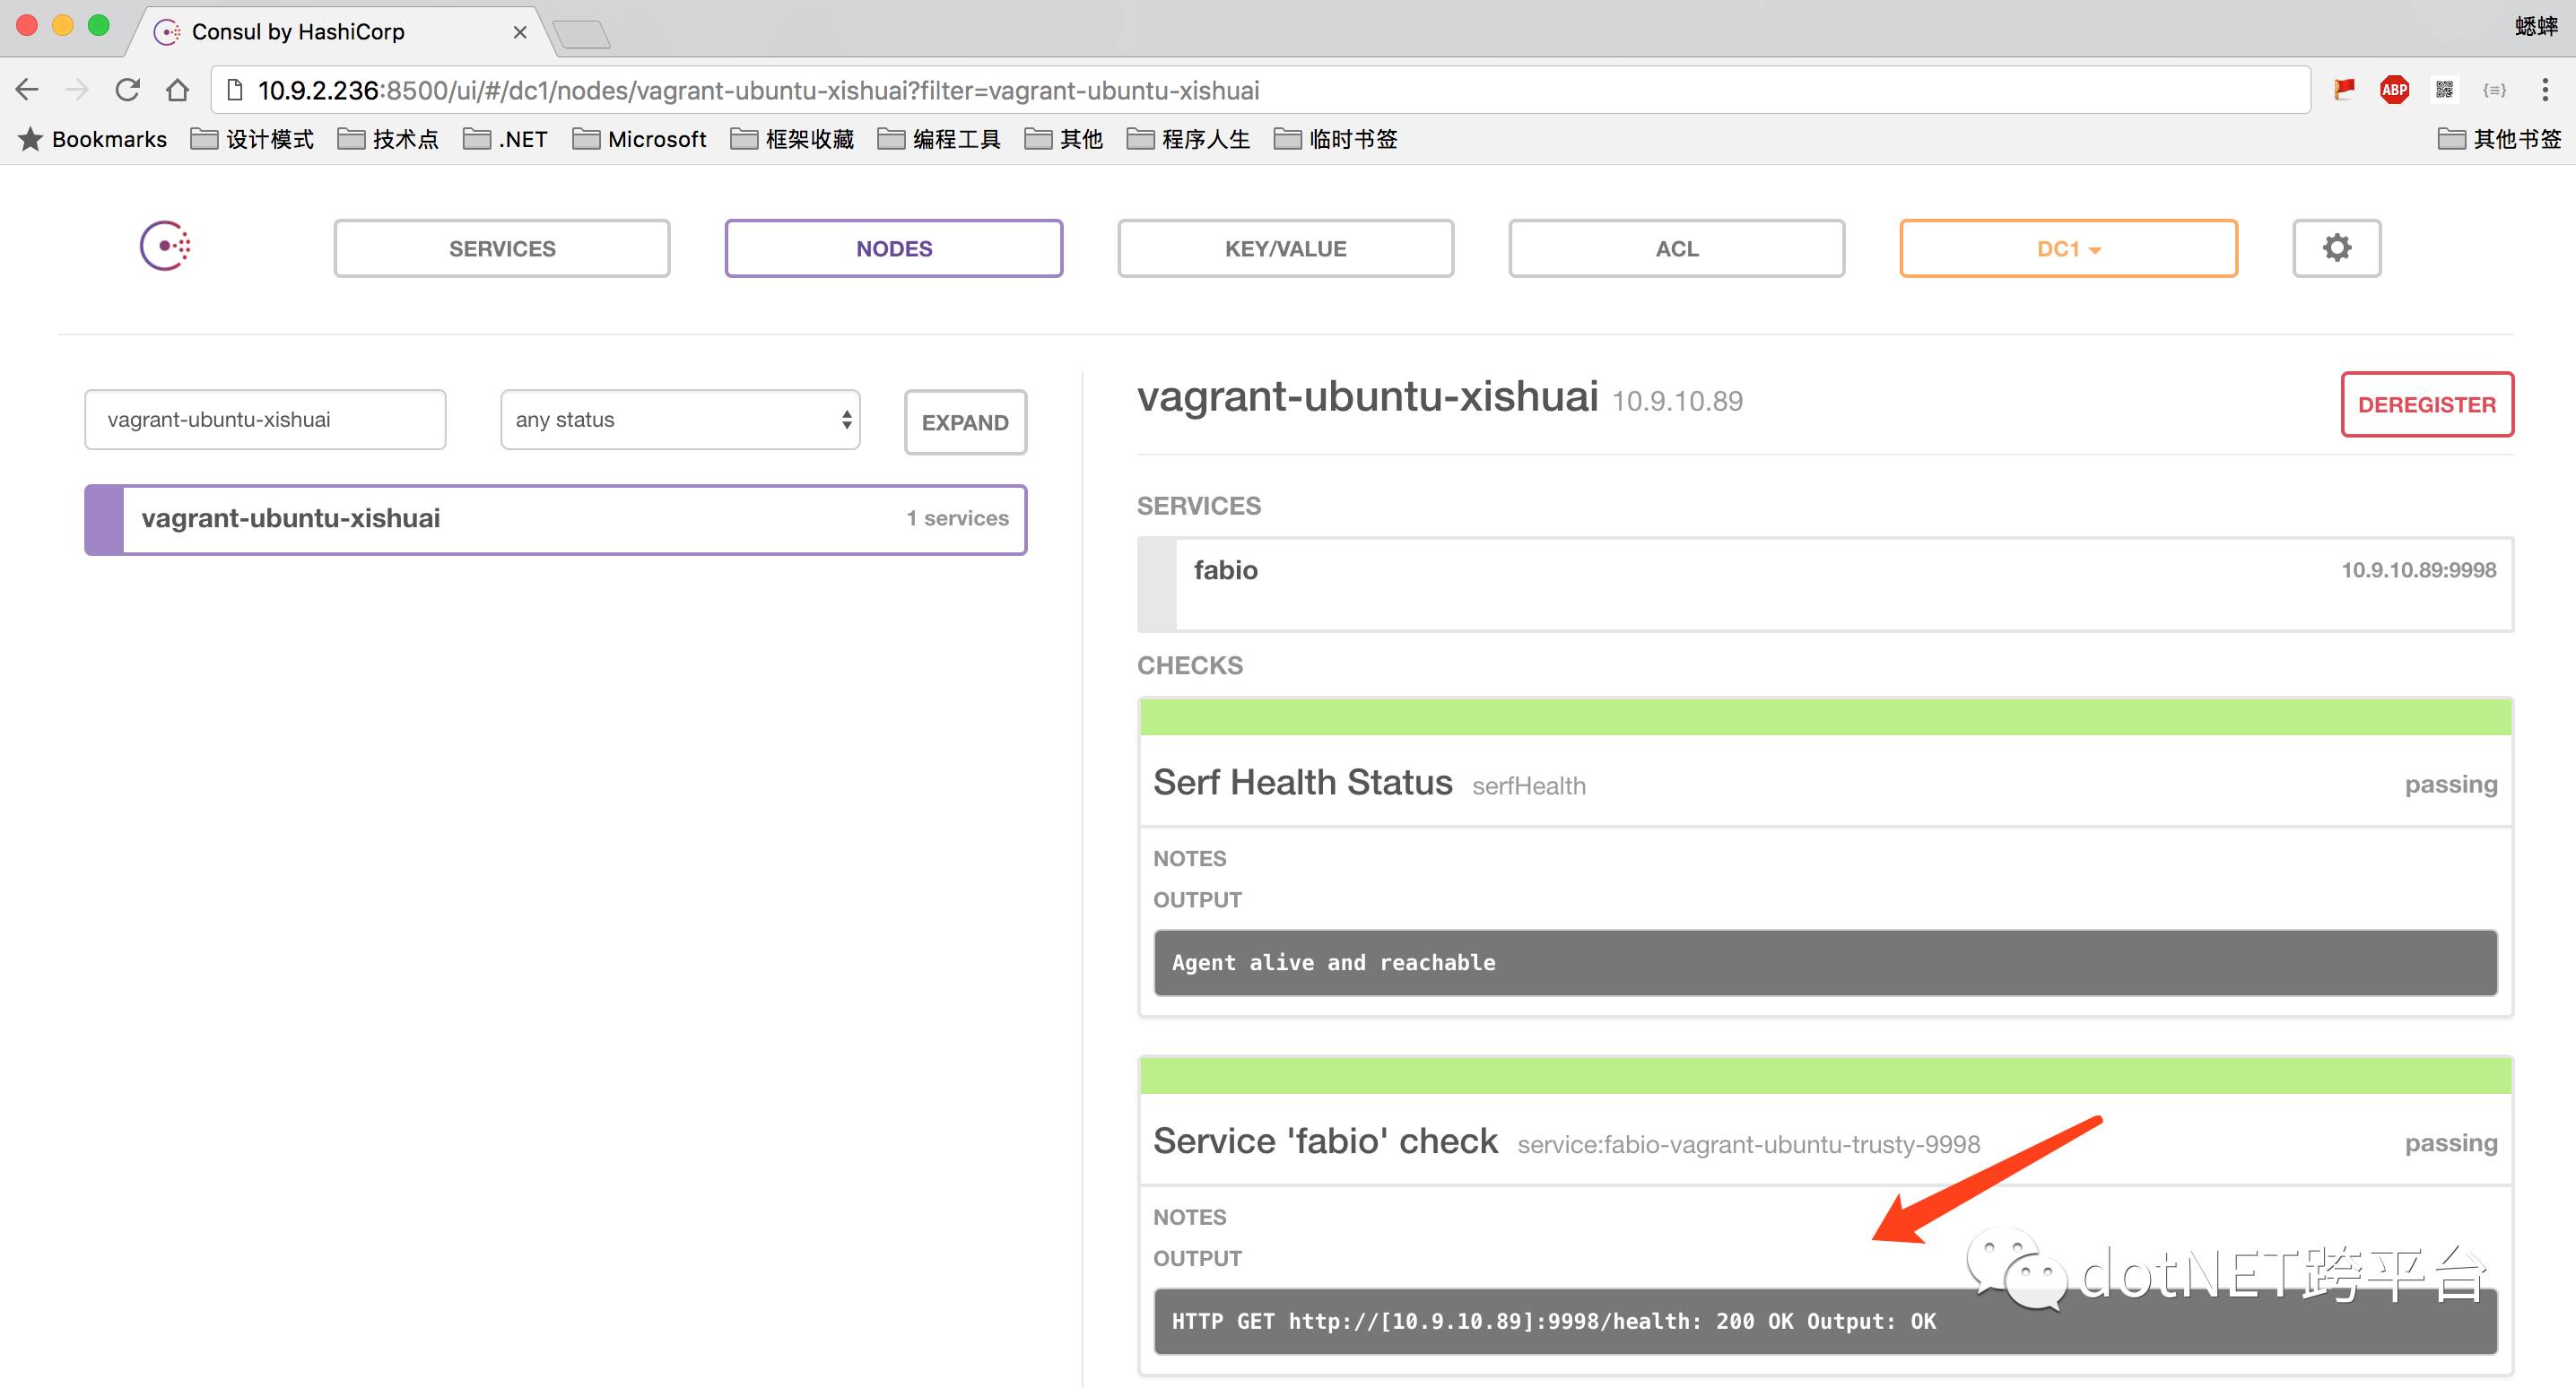
2017/11/14 06:40:52 [INFO] agent: Join LAN completed. Synced with 1 initial agents 2017/11/14 06:40:52 [INFO] consul: adding server agent_1 (Addr: tcp/10.9.2.236:8300) (DC: dc1)打开 Consul UI 界面,就可以看到我们配置的 Consul Client 了:
2. Docker 运行 Fabio 环境
Fabio 是一个快速、现代、zero-conf 负载均衡 HTTP(S) 路由器,用于部署 Consul 管理的微服务。
配置命令:
$ docker run -d --net=host --name=fabio -e 'registry_consul_addr=10.9.10.89:8500' magiconair/fabio需要注意的两个属性值:
首先,在/etc/fabio/目录下创建一个fabio.properties文件(示例配置),然后vim fabio.properties增加下面配置:
registry.consul.register.addr = 10.9.10.89:9998registry.consul.addr = 10.9.10.89:8500然后切换到/etc/fabio/目录,执行配置命令:
$ docker run -d -p 9999:9999 -p 9998:9998 --net=host --name=fabio -v $PWD/fabio.properties:/etc/fabio/fabio.properties magiconair/fabio

$ docker psCONTAINER ID        IMAGE               COMMAND                  CREATED              STATUS              PORTS               NAMES301fe4a5b40b        magiconair/fabio    "/fabio -cfg /etc/..."   About a minute ago   Up About a minute                       fabio9c4988cf475f        consul              "docker-entrypoint..."   4 hours ago          Up 4 hours                              consul-client
查看执行日志:
$ docker logs fabio2017/11/14 10:10:58 [INFO] Version 1.5.3 starting2017/11/14 10:10:58 [INFO] Go runtime is go1.9.22017/11/14 10:10:58 [INFO] Metrics disabled2017/11/14 10:10:58 [INFO] Setting GOGC=8002017/11/14 10:10:58 [INFO] Setting GOMAXPROCS=12017/11/14 10:10:58 [INFO] consul: Connecting to "10.9.10.89:8500" in datacenter "dc1"2017/11/14 10:10:58 [INFO] Admin server access mode "rw"2017/11/14 10:10:58 [INFO] Admin server listening on ":9998"2017/11/14 10:10:58 [INFO] Waiting for first routing table2017/11/14 10:10:58 [INFO] consul: Using dynamic routes2017/11/14 10:10:58 [INFO] consul: Using tag prefix "urlprefix-"2017/11/14 10:10:58 [INFO] consul: Watching KV path "/fabio/config"2017/11/14 10:10:58 [INFO] consul: Manual config changed to #37239382017/11/14 10:10:58 [INFO] HTTP proxy listening on :99992017/11/14 10:10:58 [INFO] Access logging disabled2017/11/14 10:10:58 [INFO] Using routing strategy "rnd"2017/11/14 10:10:58 [INFO] Using route matching "prefix"2017/11/14 10:10:58 [INFO] consul: Health changed to #37273392017/11/14 10:10:59 [INFO] consul: Registered fabio with id "fabio-vagrant-ubuntu-trusty-9998"2017/11/14 10:10:59 [INFO] consul: Registered fabio with address "10.9.10.89"2017/11/14 10:10:59 [INFO] consul: Registered fabio with tags ""2017/11/14 10:10:59 [INFO] consul: Registered fabio with health check to "http://[10.9.10.89]:9998/health"2017/11/14 10:11:00 [INFO] Config updates可以通过 Consul UI,进行查看 Fabio 是否正常:
也可以直接浏览 http://10.9.10.89:9998/routes?filter=,查看已经注册的服务:

其实,如果不清楚配置命令的话,我们也可以查看 Consul 源码,有可能会帮助我们熟悉命令,比如(https://github.com/fabiolb/fabio/blob/master/registry/consul/register.go):
3. 使用 Consul 注册 ASP.NET Core 2.0 服务
在 Mac OS 中使用 VS Code 开发 ASP.NET Core 2.0 应用程序,就像写 Markdown 一样方便。
安装程序包(VS Code 需要使用NuGet Pakcage Manager命令安装):
> install-package Conusl然后添加一个RegisterWithConsul扩展服务:
using System;
using System.Collections.Generic;
using System.Linq;
using Consul;
using Microsoft.AspNetCore.Builder;
using Microsoft.AspNetCore.Hosting;
using Microsoft.AspNetCore.Hosting.Server.Features;
using Microsoft.AspNetCore.Http;
using Microsoft.AspNetCore.Http.Features;
using Microsoft.Extensions.DependencyInjection;

public static class ApplicationBuilderExtensions{

public static IApplicationBuilder RegisterWithConsul(this IApplicationBuilder app, IApplicationLifetime lifetime)    {        //var consulClient = new ConsulClient(x => x.Address = new Uri($"http://{Program.IP}:8500"));//如果服务和 Consul 在同一台服务器上,使用此代码
        var consulClient = new ConsulClient(x => x.Address = new Uri($"http://10.9.10.89:8500"));//请求注册的 Consul 地址
        var httpCheck = new AgentServiceCheck()
        {
            DeregisterCriticalServiceAfter = TimeSpan.FromSeconds(5),//服务启动多久后注册
            Interval = TimeSpan.FromSeconds(10),//健康检查时间间隔,或者称为心跳间隔
            HTTP = $"http://{Program.IP}:{Program.Port}/health",//健康检查地址
            Timeout = TimeSpan.FromSeconds(5)
        };        // Register service with consul
        var registration = new AgentServiceRegistration()
        {
            Checks = new[] { httpCheck },
            ID = Guid.NewGuid().ToString(),
            Name = Program.ServiceName,
            Address = Program.IP,
            Port = Program.Port,
            Tags = new[] { $"urlprefix-/{Program.ServiceName}" }//添加 urlprefix-/servicename 格式的 tag 标签,以便 Fabio 识别
        };

        consulClient.Agent.ServiceRegister(registration).Wait();//服务启动时注册,内部实现其实就是使用 Consul API 进行注册(HttpClient发起)
        lifetime.ApplicationStopping.Register(() =>
        {
            consulClient.Agent.ServiceDeregister(registration.ID).Wait();//服务停止时取消注册
        });        return app;
    }
}Start.cs配置代码:
public void Configure(IApplicationBuilder app, IHostingEnvironment env,              ILoggerFactory loggerFactory, IApplicationLifetime lifetime){    if (env.IsDevelopment())
    {
        app.UseDeveloperExceptionPage();
    }

    app.UseMvc();
app.RegisterWithConsul(lifetime);//here}Program.cs配置代码:
public class Program{
public static string IP = "";
  public const int Port = 54917;
  public const string ServiceName = "hello-docker";    public const string Version = "v1";

   public static void Main(string[] args)    {        //Program.IP = LocalIPAddress;//使用 Docker 的时候,获取的是 IP 地址不正确,需要进行完善
        Program.IP = "10.9.10.190";//Docker 容器中的 IP 地址,如果使用 host 网络模式,也是主机的 IP 地址
        BuildWebHost(args).Run();
    }    public static IWebHost BuildWebHost(string[] args) =>
        WebHost.CreateDefaultBuilder(args)
            .UseUrls($"http://*:{Program.Port}")
            .UseStartup<Startup>()
            .Build();

    public static string LocalIPAddress
    {
    get
        {
            UnicastIPAddressInformation mostSuitableIp = null;
    var networkInterfaces = NetworkInterface.GetAllNetworkInterfaces();            foreach (var network in networkInterfaces)
            {
      if (network.OperationalStatus != OperationalStatus.Up)
       continue;
       var properties = network.GetIPProperties();                if (properties.GatewayAddresses.Count == 0)                    continue;
         foreach (var address in properties.UnicastAddresses)
                {
           if (address.Address.AddressFamily != AddressFamily.InterNetwork)                        continue;
            if (IPAddress.IsLoopback(address.Address))                        continue;
                  return address.Address.ToString();
                }
            }
                   return mostSuitableIp != null
                ? mostSuitableIp.Address.ToString()
                : "";
        }
    }
}
健康检查配置代码:
[Route("[controller]")]
public class HealthController : Controller{

 private static readonly HttpClient _httpClient;    static HealthController()    {
        _httpClient = new HttpClient();
    }

    [HttpGet]
  public IActionResult Get() => Ok("ok");    //或者使用fabio进行健康检查
    //[Route("")]
    //[HttpGet]
    //public async Task<HttpResponseMessage> GetWithFabio() => await _httpClient.GetAsync("http://127.0.0.1:9998/health");}
4. 使用 Docker 发布部署 ASP.NET Core 2.0 服务
我们需要在 ASP.NET Core 2.0 应用程序目录下,添加一个Dockerfile文件,用来构建自定义镜像(命令参考:使用 Dockerfile 定制镜像),示例:
FROM microsoft/aspnetcore-build AS build-envWORKDIR /app# copy csproj and restore as distinct layersCOPY *.csproj ./RUN dotnet restore# copy everything else and buildCOPY . ./RUN dotnet publish -c Release -o out# build runtime imageFROM microsoft/aspnetcoreWORKDIR /appCOPY --from=build-env /app/out .ENTRYPOINT ["dotnet", "HelloDocker.Web.dll"]简单来说,就是先使用microsoft/aspnetcore-build镜像,还原程序包并发布,然后再使用microsoft/aspnetcore镜像,运行 ASP.NET Core 2.0 应用程序。
构建镜像命令:
$ docker build -t hello-docker:v1 .Sending build context to Docker daemon 41.98kBStep 1/10 : FROM microsoft/aspnetcore-build AS build-env ---> d6273f7c44d4Step 2/10 : WORKDIR /app ---> e37f90cd9aafRemoving intermediate container a4e4db93ea06Step 3/10 : COPY *.csproj ./ ---> 56278755f94cStep 4/10 : RUN dotnet restore ---> Running in 3b7e8c5d01f4 Restoring packages for /app/HelloDocker.Web.csproj... Restore completed in 411.99 ms for /app/HelloDocker.Web.csproj. Installing System.Security.Principal.Windows 4.4.0-preview1-25305-02. Installing Microsoft.NETCore.Platforms 2.0.0-preview1-25305-02. Installing System.Security.AccessControl 4.4.0-preview1-25305-02. Installing Microsoft.Win32.Registry 4.3.0. Installing System.Security.Permissions 4.4.0-preview1-25305-02. Installing System.Diagnostics.Process 4.3.0. Installing Newtonsoft.Json 10.0.2. Installing System.Net.Http.WinHttpHandler 4.0.0. Installing CoreCompat.System.Drawing.v2 5.2.0-preview1-r131. Installing System.Data.Common 4.3.0. Installing System.Security.Cryptography.Pkcs 4.3.0. Installing System.Xml.XPath.XmlDocument 4.3.0. Installing Pomelo.EntityFrameworkCore.mysql 2.0.0. Installing MySqlConnector 0.26.4. Installing Pomelo.JsonObject 1.1.1. Installing Consul 0.7.2.3. Installing EPPlus.Core 1.5.2. Generating MSBuild file /app/obj/HelloDocker.Web.csproj.nuget.g.props. Generating MSBuild file /app/obj/HelloDocker.Web.csproj.nuget.g.targets. Restore completed in 5.71 sec for /app/HelloDocker.Web.csproj. ---> cdf6ca65acf6Removing intermediate container 3b7e8c5d01f4Step 5/10 : COPY . ./ ---> fffa81d15ddcStep 6/10 : RUN dotnet publish -c Release -o out ---> Running in 291c8eea750fMicrosoft (R) Build Engine version 15.4.8.50001 for .NET CoreCopyright (C) Microsoft Corporation. All rights reserved. HelloDocker.Web -> /app/bin/Release/netcoreapp2.0/HelloDocker.Web.dll HelloDocker.Web -> /app/out/ ---> 078311772175Removing intermediate container 291c8eea750fStep 7/10 : FROM microsoft/aspnetcore ---> b97d3cf55223Step 8/10 : WORKDIR /app ---> b0637e3d706bRemoving intermediate container 7095565fbbcaStep 9/10 : COPY --from=build-env /app/out . ---> c3cb8a708c4bStep 10/10 : ENTRYPOINT dotnet HelloDocker.Web.dll ---> Running in d4111dc055f8 ---> 29121f0eb2b0Removing intermediate container d4111dc055f8Successfully built 29121f0eb2b0Successfully tagged hello-docker:v1上面构建镜像的过程,非常详细,我们可以得到很多的信息,这边就不叙述了,构建完镜像之后,我们可以查看下是否成功:
$ docker imagesREPOSITORY TAG IMAGE ID CREATED SIZEhello-docker v1 29121f0eb2b0 Less than a second ago 284MB<none> <none> 078311772175 Less than a second ago 1.9GBmicrosoft/aspnetcore-build latest d6273f7c44d4 4 days ago 1.85GBmicrosoft/aspnetcore latest b97d3cf55223 4 days ago 280MBconsul latest dff07cab6abd 9 days ago 51.8MBmagiconair/fabio latest b0d96559369f 10 days ago 11.8MBhello-docker下面没命名的镜像,是临时生成的,作用是使用microsoft/aspnetcore-build镜像,还原程序包的时候,不需要重新安装了。
另外,我们可以在 ASP.NET Core 2.0 应用程序目录下,添加.dockerignore文件,来减少我们构建的镜像文件大小,示例:
bin/*
obj/*
需要说明下,Consul 和 Fabio 我都是部署在虚拟机的 Docker 容器中,ASP.NET Core 2.0 应用程序,我打算运行在 Mac OS 系统中,也就是说服务和 Consul 是跨服务器的。
运行命令:
$ docker run -d -p 54917:54917 --name hello-docker-web hello-docker:v1查看下是否运行成功:
$ docker psCONTAINER ID        IMAGE               COMMAND                  CREATED                  STATUS              PORTS                      NAMES396d42f37185        hello-docker:v1        "dotnet Hello-Dock..."   Less than a second ago   Up 2 seconds        0.0.0.0:54917->54917/tcp   hello-docker-web

$ docker logs hello-docker-webHosting environment: ProductionContent root path: /appNow listening on: http://[::]:54917Application started. Press Ctrl+C to shut down.
可以看到,运行是成功的。
我们可以请求验证下:
$ curl http://10.9.10.190:54917/api/values
["value1","value2"]
或者使用 Fabio 的网关请求(Fabio 可以用作负载均衡):
$ curl http://10.9.10.89:9999/hello-docker/api/values
["value1","value2"]
我们可以查看 Consul UI 中的服务是否运行正常:
图片
或者查看 Fabio UI 中的服务是否存在(通过健康检查后会出现):
图片
查看资料:
Dockerize a .NET Core application
consul - Hub.Docker
magiconair/fabio - Hub.Docker
todo-backend-aspnetcore
Docker 结合 Consul 实现的服务发现(一)
使用 Consul 进行服务发现
服务发现 - consul 的介绍、部署和使用
fabio Installation
Consul + fabio 实现自动服务发现、负载均衡
.NET API for Consul
Winton.Extensions.Configuration.Consul
Configuring .NET Core Applications using Consul
Using Consul for Service Discovery with ASP.NET Core
Service Discovery And Health Checks In ASP.NET Core With Consul
How to self register a service with Consul
Nomad and Consul Configuration Overview
以上是关于Docker & ASP.NET Core 2.0 微服务跨平台实践的主要内容,如果未能解决你的问题,请参考以下文章