HBase之Phoenix
Posted 健哥说编程
tags:
篇首语:本文由小常识网(cha138.com)小编为大家整理,主要介绍了HBase之Phoenix相关的知识,希望对你有一定的参考价值。
Phoenix 音标:[ˈfi:nɪks] 凤凰
主页:
http://phoenix.apache.org/
官网的说明:
Apache Phoenix enables OLTP(On-Line Transaction Processing联机事务处理过程) and operational analytics in Hadoop for low latency applications by combining the best of both worlds:
the power of standard SQL and JDBC APIs with full ACID transaction capabilities and
支持SQL和JDBC及ACID事务
the flexibility of late-bound, schema-on-read capabilities from the NoSQL world by leveraging HBase as its backing store
Apache Phoenix is fully integrated with other Hadoop products such as Spark, Hive, Pig, Flume, and Map Reduce.
也可以与Spark,Hive,Pig,Flume及MapReduce集成。
通过上面的说明,可以看出Phoenix就是使用SQL和JDBC技术操作HBase数据库。
1、安装与配置
1、将Phoenix-hbase-server-xxx.jar拷贝到所有Hbase的lib目录下。
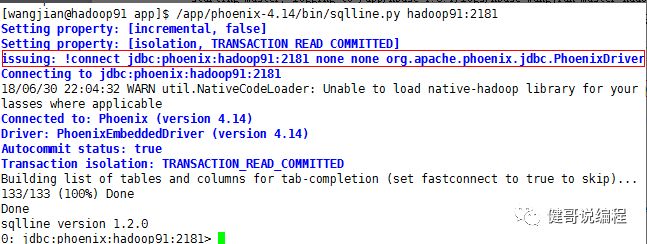
2、在$PHOENIX_HOME/bin目录下,执行sqlline.py <zk>就可以进入phoeni命令行模式。
1、在仅有hbase的情况下安装Phoenix
在仅仅安装hbase的情况下,也可以使用Phoenix。以下在单一Hbase节点上安装Phoenix。
步1、安装hbase
包含解压:Hbase1.3
[wangjian@hadoop91 app]$ tar -zxvf ~/hbase-1.3.1-bin.tar.gz -C .
配置Hbase
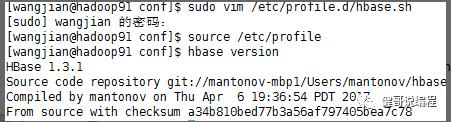
文件:hbase-env.sh
export JAVA_HOME=/usr/jdk1.8.0_171
文件:hbase-site.xml
<?xml version="1.0"?>
<?xml-stylesheet type="text/xsl" href="configuration.xsl"?>
<configuration>
<property>
<name>hbase.rootdir</name>
<value>file:///app/hbase/datas</value>
</property>
<property>
<name>hbase.zookeeper.property.dataDir</name>
<value>/app/hbase/zookeeper</value>
</property>
</configuration>
步2、配置Hbase的环境变量
export HBASE_HOME=/app/hbase-1.3.1
export PATH=$PATH:$HBASE_HOME/bin
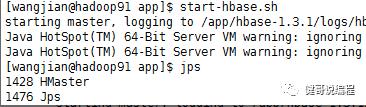
步3、启动hbase
访问16010端口的webui进行测试:
http://hadoop91:16010/master-status
登录hbase shell进行测试,如果都OK,至少说明HBase已经安装好了。
步4、安装Phoenix
首先要去Phoenix的官网http://phoenix.apache.org。先去下载对应hbase的版本。由于上面的Hbase安装的版本为1.3.1。所以此处下载:apache-phoenix-4.14.0-HBase-1.3-bin.tar.gz。
1、解压Phoenix
解压
$ tar -zxvf ~/apache-phoenix-4.14.0-HBase-1.3-bin.tar.gz -C .
修改目录名称
$ mv apache-phoenix-4.14.0-HBase-1.3-bin phoenix-4.14
2、将phoenix-4.14.0-HBase-1.3-server.jar文件拷贝到hbase/lib目录下
$ cp phoenix-4.14/phoenix-4.14.0-HBase-1.3-server.jar hbase-1.3.1/lib/
3、修改hbase-site.xml文件添加以下配置
Configuration
Parameters to enable namespace mapping:-
Property |
Description |
Default |
phoenix.schema.isNamespaceMappingEnabled |
If it is enabled, then the tables created with schema will be mapped to namespace.This needs to be set at client and server both. if set once, should not be rollback. Old client will not work after this property is enabled. |
false |
phoenix.schema.mapSystemTablesToNamespace |
Enabling this property will take affect when phoenix.connection.isNamespaceMappingEnabled is also set to true. If it is enabled, SYSTEM tables if present will automatically migrated to SYSTEM namespace. And If set to false , then system tables will be created in default namespace only. This needs to be set at client and server both. |
true |
只需要设置第一个参数就可以了,因为第二个参数默认值就是true。根据上面的说明isNamespaceMappingEnabled必须要在服务器上和客户端都进行配置。
<property>
<name>phoenix.schema.isNamespaceMappingEnabled</name>
<value>true</value>
</property>
上面的配置在hbase-site.xml文件配置完成以后,也同时将hbase-site.xml此文件放到phoenix-1.14/bin目录下。即放到客户端:
$ cp /app/hbase-1.3.1/conf/hbase-site.xml /app/phoenix-4.14/bin/
通过上面的配置,就已经配置好Phoenix了。
步5、启动hbase,登录sqlline.py
$ start-hbase.sh
starting master, logging to /app/hbase-1.3.1/logs/hbase-wangjian-master-hadoop91.out
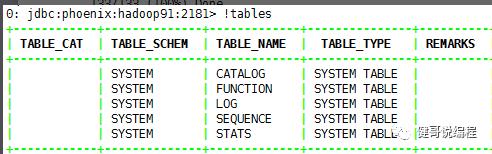
登录sqlline.py,在初次登录时,会创建phoenix的一些系统表,命名空间以SYSTEM开始:
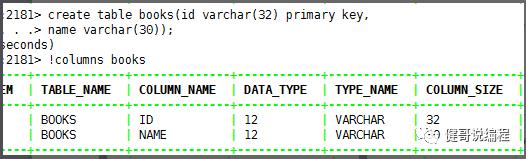
进行一些操作:
建议在创建表时,还是希望指定字段的长度,否则COLUMN_SIZE列的长度都是null:
步6、Java代码连接
创建Java项目,并将hbase-site.xml文件放到claspath目录下:
添加依赖:
<dependency>
<groupId>org.apache.phoenix</groupId>
<artifactId>phoenix-core</artifactId>
<version>4.14.0-HBase-1.3</version>
</dependency>
代码:
package cn.wangjian.phoenix;
import java.sql.Connection;
import java.sql.DriverManager;
import java.sql.ResultSet;
import java.sql.Statement;
import org.junit.After;
import org.junit.Before;
import org.junit.Test;
public class Demo01_Phoenix {
private Connection con;
@Before
public void before() throws Exception{
Class.forName("org.apache.phoenix.jdbc.PhoenixDriver");
String url = "jdbc:phoenix:hadoop91:2181";
con = DriverManager.getConnection(url);
}
@After
public void after() throws Exception{
con.close();
}
@Test
public void query() throws Exception {
Statement st = con.createStatement();
String sql = "select * from student";
ResultSet rs = st.executeQuery(sql);
while(rs.next()) {
String id = rs.getString("id");
String name = rs.getString("name");
String sex = rs.getString("sex");
int age = rs.getInt("age");
System.out.println(">>>:"+id+","+name+","+sex+","+age);
}
rs.close();
st.close();
}
/**
* 写入数据时,默认就是开事务的,所以最后必须要做commit<br>
* 否则数据表中没有数据
* @throws Exception
*/
@Test
public void upsert() throws Exception{
System.out.println("是否自动提交:"+con.getAutoCommit());
Statement st = con.createStatement();
String sql = "upsert into student values('S003','Smith','1',77)";
int row = st.executeUpdate(sql);
System.out.println("写入行数:"+row);
st.close();
con.commit();
}
}
步7、使用连接池
<dependency>
<groupId>com.mchange</groupId>
<artifactId>c3p0</artifactId>
<version>0.9.5.2</version>
</dependency>
创建连接池工具类:
package cn.wangjian.phoenix.utils;
import javax.sql.DataSource;
import com.mchange.v2.c3p0.ComboPooledDataSource;
public class DSUitls {
private static DataSource ds;
private DSUitls() {
}
static {
ds = new ComboPooledDataSource();
}
public static DataSource getDataSource() {
return ds;
}
}
代码测试:
DataSource ds = DSUitls.getDataSource();
Connection con = ds.getConnection();
Statement st = con.createStatement();
String sql = "select * from student";
ResultSet rs = st.executeQuery(sql);
while (rs.next()) {
String id = rs.getString("id");
String name = rs.getString("name");
String sex = rs.getString("sex");
int age = rs.getInt("age");
System.out.println(">>>:" + id + "," + name + "," + sex + "," + age);
}
rs.close();
st.close();
con.close();
至此为止,所以操作都已经成功。
以上是关于HBase之Phoenix的主要内容,如果未能解决你的问题,请参考以下文章