iOS组件化-利用CocoaPods拆分项目和私有化
Posted iOS开发精髓
tags:
篇首语:本文由小常识网(cha138.com)小编为大家整理,主要介绍了iOS组件化-利用CocoaPods拆分项目和私有化相关的知识,希望对你有一定的参考价值。
Cocoapods 执行流程
其实利用CocoaPods拆分项目就是根据业务和项目情况,就是把项目分成一个一个子项目,然后通过CocoaPods去将子项目打包成子工程,在主工程里面去引入子工程。
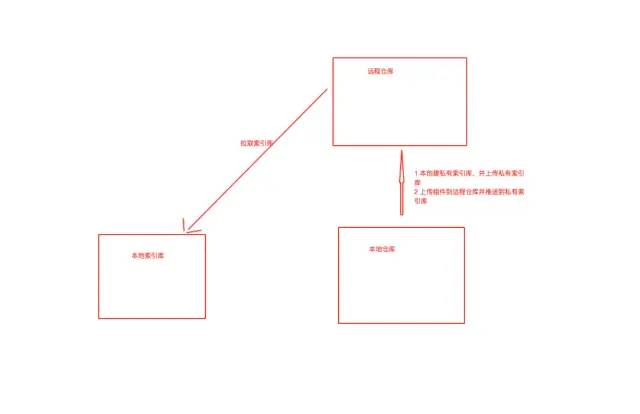
在利用CocoaPods实现拆分项目,并私有化组件之前先说一下CocoaPods 和 远程仓库的关系
在我们安装CocoaPods的时候,会把远程索引库master拉到本地,所以我们本地会有一个索引库master。当我们执行pod install的时候会去索引库master查找Podfile文件里面库对应的PodSpec,找到后会根据PodSpec找到对应的远程仓库。找到远程仓库后会把代码clone到本地缓存起来,然后copy到我们的工程中。
利用CocoaPods 生成模块以及将模块私有化
利用CocoaPods私有组件其实就是把远程共有索引库这一部分去掉
利用CocoaPods 拆分项目并私有化的流程如下
本地新建一个索引库,并上传到远程仓库上
利用Cocoapods命令创建子模块,把业务代码搬到子模块上,把子模块上传到远程仓库取
验证子模块是否符合Cocoapods的规范,如果符合,则推送到索引库
接下来一步一步去说明
1. 本地新建一个索引库,并上传到远程仓库上
首先上git新建一个索引库
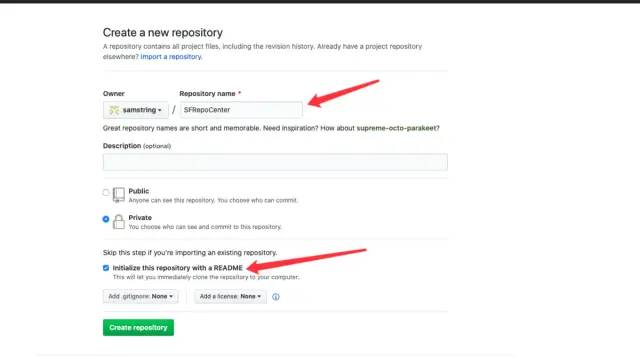
注意上图中红色箭头所指向的地方要勾选上,不然后面推送索引库有可能报以下错误
Your configuration specifies to merge with the ref 'refs/heads/master'
from the remote, but no such ref was fetched.
pod repo add SFRepoCenter https://github.com/samstring/SFRepoCenter.git
这时候 进入 ~/.cocoapods/repos 中就可以看到与远程仓库关联的本地索引库
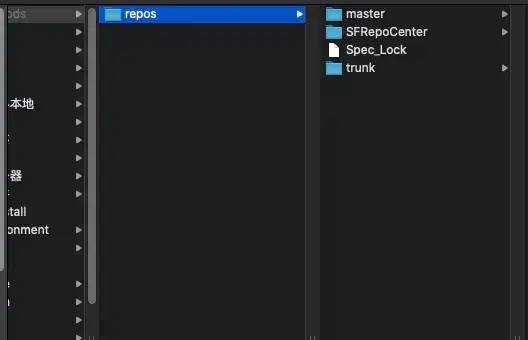
这时候一个私有的索引库就创建完毕
2 利用Cocoapods命令创建子模块,把业务代码搬到子项目上,把子项目上传到远程仓库取
在GitHub上新建一个子模块SFCommonKit
利用Cocoapods官方命令 pod lib create [模块名称] 创建子模块
pod lib create SFCommonKit
这时候会问你几个问题
1.What platformdoyou want to use?[ios/macOS] //将模块应用到什么平台上

2.What languagedoyou want to use?[Swift/ObjC] // 模块的开发语言

3.Would you like to include a demo applicationwithyour library?[Yes/No] //是否生成demo应用,这里建议生成,因为你可以在这里进行测试

4.Which testing frameworks will you use?[Specta/Kiwi/None] //是否集成测试框架

5.Would you like todo view based testing?[Yes/No]

6.What is your class prefix?  //开发前缀
执行完毕会生成以下文件
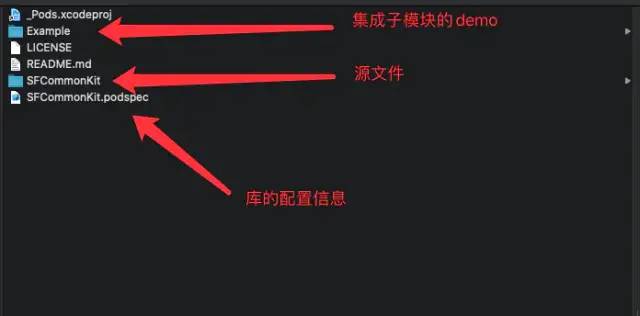
源文件里面的文件结构是这样的
这时候把我们讲子模块的类放到Classes文件夹,在Example工程里面pod install后就可以进行开发测试了,另外注意一下pod install后的导入Example里面的pod会放在Development Pods这个目录如下
开发完成后,我们需要查看SFCommonKit.podspec这个文件了,文件内容如下
#
# Be sure to run `pod lib lint SFCommonKit.podspec' to ensure this is a
# valid spec before submitting.
#
# Any lines starting with a # are optional, but their use is encouraged
# To learn more about a Podspec see https://guides.cocoapods.org/syntax/podspec.html
#
Pod::Spec.new do |s|
  s.name            = 'SFCommonKit'
  s.version          = '0.1.1'
  s.summary          = 'A short description of SFCommonKit.'
# This description is used to generate tags and improve search results.
#  * Think: What does it do? Why did you write it? What is the focus?
#  * Try to keep it short, snappy and to the point.
#  * Write the description between the DESC delimiters below.
#  * Finally, don't worry about the indent, CocoaPods strips it!
  s.description      = <<-DESC
TODO: Add long description of the pod here.
                       DESC
  s.homepage        = 'https://github.com/samstring/SFCommonKit'
  # s.screenshots    = 'www.example.com/screenshots_1', 'www.example.com/screenshots_2'
  s.license          = { :type => 'MIT', :file => 'LICENSE' }
  s.author          = { 'samstring' => '1264986115@qq.com' }
  s.source          = { :git => 'https://github.com/samstring/SFCommonKit.git', :tag => s.version.to_s }
  # s.social_media_url = 'https://twitter.com/'
  s.ios.deployment_target = '8.0'
  s.source_files = 'SFCommonKit/Classes/**/*'

  # s.resource_bundles = {
  #  'SFCommonKit' => ['SFCommonKit/Assets/*.png']
  # }
  # s.public_header_files = 'Pod/Classes/**/*.h'
  # s.frameworks = 'UIKit', 'MapKit'
   s.dependency 'AFNetworking', '~> 2.3'
end
其中,下面几个内容需要注意的
s.name  模块名称,将来pod install的名称是依据这个来的
s.version 模块版本,将来pod install的版本是依据这个来的
s.homepage 模块的主页
s.source 模块的远程仓库地址
s.frameworks 引用的系统库,如果用了静态库 ,验证的时候需要加--use-libraries
s.dependency 引用的第三方,如有多个,可以重复声明
检查完podspec确认无误后就可以就可以上传到远程仓库上了
git add .
git commit -m "初始化"
git remote add origin [远程仓库地址]
git push --set-upstream origin master
上传成功后需要加tag标志,注意一下这个tag标志需要与上面说到的s.version里面的版本号保持一致
git tag 0.1.0
git push --tags
3. 验证子模块是否符合Cocoapods的规范,如果符合,则推送到索引库
上传到成功后,我们就可以使用CocoaPods命令 pod lib lint 验证这个工程是否符合
pod lib lint SFCommonKit.podspec --allow-warnings
如果有依赖的静态库需要添加 --use-libraries
pod lib lint --use-libraries --allow-warnings
如果有依赖的其他私有库,需要加上--sources,如下
pod lib lint --sources='https://github.com/samstring/SFRepoCenter.git,https://github.com/CocoaPods/Specs.git' --allow-warnings
其中sources='https://github.com/samstring/SFRepoCenter.git,https://github.com/CocoaPods/Specs.git'中有两个值,一个是CocoaPods的索引库,一个是引用的私有库所在的私有化的索引库。
如果你的库不是私有库,是发布到了Cocopods的trunk(可以供所有人下载),或是你的这个私有库里面包含了一些像AFNetworking的第三方,sources里面需要添加https://github.com/CocoaPods/Specs.git
其实,上面验证这一步可以不做,可以直接向Spec Repo提交podspec的命令pod repo push [索引库] [库配置文件] --allow-warnings,因为这样做的话会自动帮我们去验证是否合法
pod repo push SFRepoCenter SFCommonKit.podspec --allow-warnings
到此,CocoaPods私有化已经完成,通过pod search SFCommonKit就可以搜索到我们刚才提交的私有库了
怎样使用刚才所生成的私有库
如果要在外部工程中使用刚才的私有库,需要指定索引库,否则只会默认在Cocopods 的master索引库去找,但是由于是私有库,所以会找不到我们所以库。那怎么制定所以库呢?其实只需要在Podfile中加入索引库即可,例子如下
use_frameworks!
platform :ios, '9.0'
source 'https://github.com/samstring/SFRepoCenter.git'
source'https://github.com/CocoaPods/Specs.git'
target 'SFMainProject' do
pod 'SFCommonKit'
pod 'SFUserModule'
end
注意,添加私有库索引的时候最好把master索引库也加上,否则会找不到master索引库里面的工程,如后期需要加入AFNetworking等第三方的时候会报找不到库的错误。
以上是关于iOS组件化-利用CocoaPods拆分项目和私有化的主要内容,如果未能解决你的问题,请参考以下文章