R语言可视化:密度分布图绘制
Posted bioinfomics
tags:
篇首语:本文由小常识网(cha138.com)小编为大家整理,主要介绍了R语言可视化:密度分布图绘制相关的知识,希望对你有一定的参考价值。


05.密度分布图绘制
清除当前环境中的变量
rm(list=ls())
设置工作目录
setwd("C:/Users/Dell/Desktop/R_Plots/05densityplot/")
基础plot函数绘制密度分布图
data <- read.table("demo_density.txt",header = T,row.names = 1,check.names = F)
head(data)
## Cell-1 Cell-2 Cell-3 Cell-4 Cell-5
## CDK4 -0.7928036 0.52768713 0.000622536 0.3567226 0.9332861
## LMTK3 0.1776205 -0.01606149 5.422113833 1.3070397 0.3558150
## LRRK2 -0.6978762 -0.55561026 -0.360497559 -0.4602367 -0.6807607
## UHMK1 0.8505465 -0.26327991 0.179253031 0.3986467 1.5376638
## EGFR 1.4124162 0.01898751 0.902251622 -0.1781375 0.7818190
## STK32A -0.3880397 -0.59262661 -0.244136510 0.7403647 3.0233484
## Cell-6 Cell-7 Cell-8 Cell-9 Cell-10 Cell-11
## CDK4 -0.1317285 0.80845194 4.2408848 -0.5402314 -0.98145695 -0.8468989
## LMTK3 0.2769050 0.48315391 -0.2404958 1.3364460 1.14961850 0.3614130
## LRRK2 -0.1694635 1.71570888 -0.5171048 0.1849877 0.81065970 -0.4403344
## UHMK1 0.5052914 0.90236649 -0.1662880 0.6307306 0.39944828 0.8471714
## EGFR 0.2118159 -0.02342718 3.5572960 1.1737836 -0.01236216 0.7697825
## STK32A -0.4339854 -0.63012446 1.1565320 0.4336962 3.84950782 -0.2254257
## Cell-12 Cell-13 Cell-14 Cell-15 Cell-16 Cell-17
## CDK4 -0.2527959 0.11418958 -0.06649884 0.1492188 1.3512639 0.6458672
## LMTK3 -0.3805189 -0.21354100 -0.47193864 -0.6208587 -0.1636371 -0.4872561
## LRRK2 -0.6210520 -0.08680336 -0.75396622 -0.4019720 -0.5620868 -0.5606446
## UHMK1 -0.4422681 0.44368676 1.55296903 1.1102835 -0.3266981 -0.4052674
## EGFR -0.6810317 -1.04737539 0.65206550 0.1723167 2.0724335 1.1357094
## STK32A -0.6561068 -0.31195336 -0.39745023 1.0440255 -0.2478169 3.6405243
## Cell-18 Cell-19 Cell-20 Cell-21 Cell-22 Cell-23
## CDK4 0.60561098 3.2324546 0.3426346 -0.4309123 -0.4059057 0.1995640
## LMTK3 -0.02956969 -0.2320578 -0.6690369 -0.4492417 1.1589304 0.5119620
## LRRK2 0.54230138 -0.3826391 -0.3778535 -0.7134729 -0.3776094 4.3089046
## UHMK1 0.66374718 0.4244700 0.2832219 -4.2439739 0.7183156 1.7473439
## EGFR -0.16997718 0.8810671 -0.4861590 -1.4518380 0.3712377 -0.5816653
## STK32A -0.59251039 0.5146662 -0.4539699 1.6497376 3.3660203 -0.4305022
## Cell-24 Cell-25 Cell-26 Cell-27 Cell-28
## CDK4 -1.1225363 2.2103346 0.40512632 -0.08976316 0.4051263
## LMTK3 2.3708342 0.2628939 -0.51312890 -0.50121007 0.4392776
## LRRK2 -0.6381319 -0.5561141 -0.31814576 -0.48958271 1.6773765
## UHMK1 -1.0209272 0.3050285 1.47174613 0.04890228 -0.2552836
## EGFR -0.1263562 0.2410047 1.06526919 0.97453180 0.6686451
## STK32A -0.2953123 2.8245515 -0.01427511 -0.41047779 -0.2297178
## Cell-29
## CDK4 0.34001277
## LMTK3 -0.34246051
## LRRK2 -0.68279046
## UHMK1 0.54822457
## EGFR 0.05696489
## STK32A 3.70982862

data <- as.data.frame(t(data))
gene_num <- ncol(data)
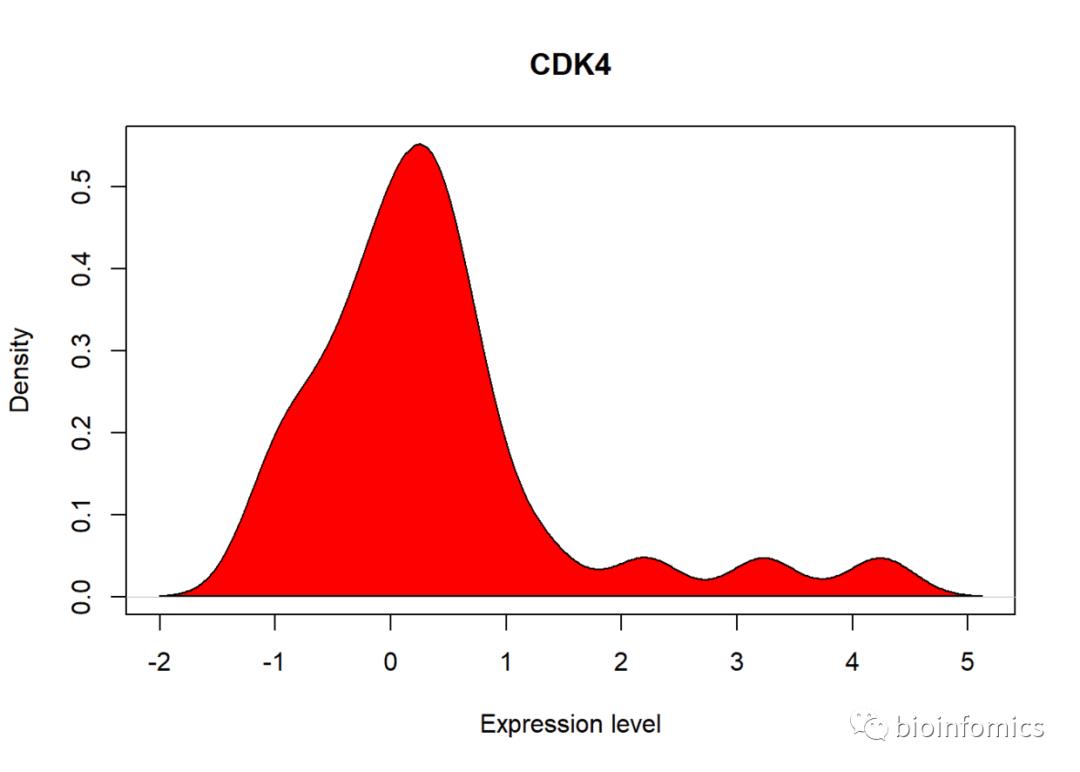
# 绘制第一个基因的密度分布图
plot(density(data[,1]), col=rainbow(gene_num)[1], lty=1,
     xlab = "Expression level", main = names(data)[1])
polygon(density(data[,1]),col=rainbow(gene_num)[1])
# 绘制所有基因的密度分布图
plot(density(data[,1]), col=rainbow(gene_num)[1], lty=1,
     xlab = "Expression level", ylim = c(0,1.5), main = "")
# polygon(density(data[,1]),col=rainbow(gene_num)[1])
# 添加其他基因的密度曲线
for (i in seq(2,gene_num)){
  lines(density(data[,i]), col=rainbow(gene_num)[i], lty=i)
  #polygon(density(data[,i]),col=rainbow(gene_num)[i])
}
# 添加图例
legend("topright", inset = 0.02, title = "Gene", names(data),
       col = rainbow(gene_num), lty = seq(1,gene_num), bg = "gray")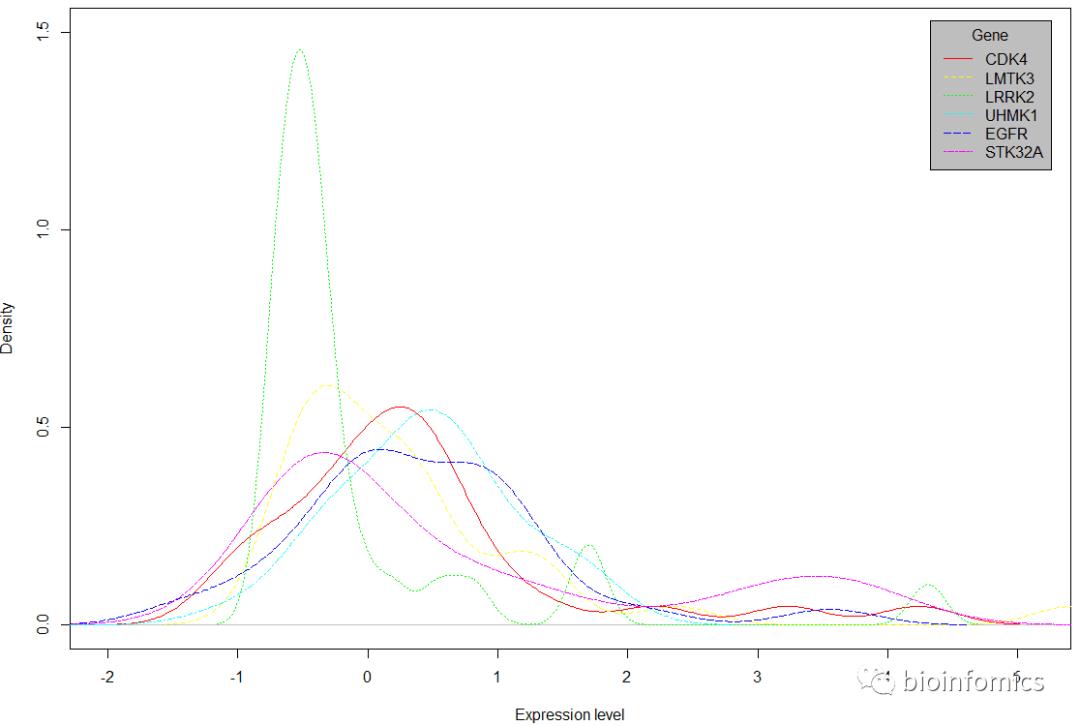
ggplot2包绘制密度分布图
library(ggplot2)
library(reshape2)
data <- read.table("demo_density.txt",header = T,check.names = F)
data <- melt(data)
## Using gene as id variables
head(data)
## gene variable value
## 1 CDK4 Cell-1 -0.7928036
## 2 LMTK3 Cell-1 0.1776205
## 3 LRRK2 Cell-1 -0.6978762
## 4 UHMK1 Cell-1 0.8505465
## 5 EGFR Cell-1 1.4124162
## 6 STK32A Cell-1 -0.3880397

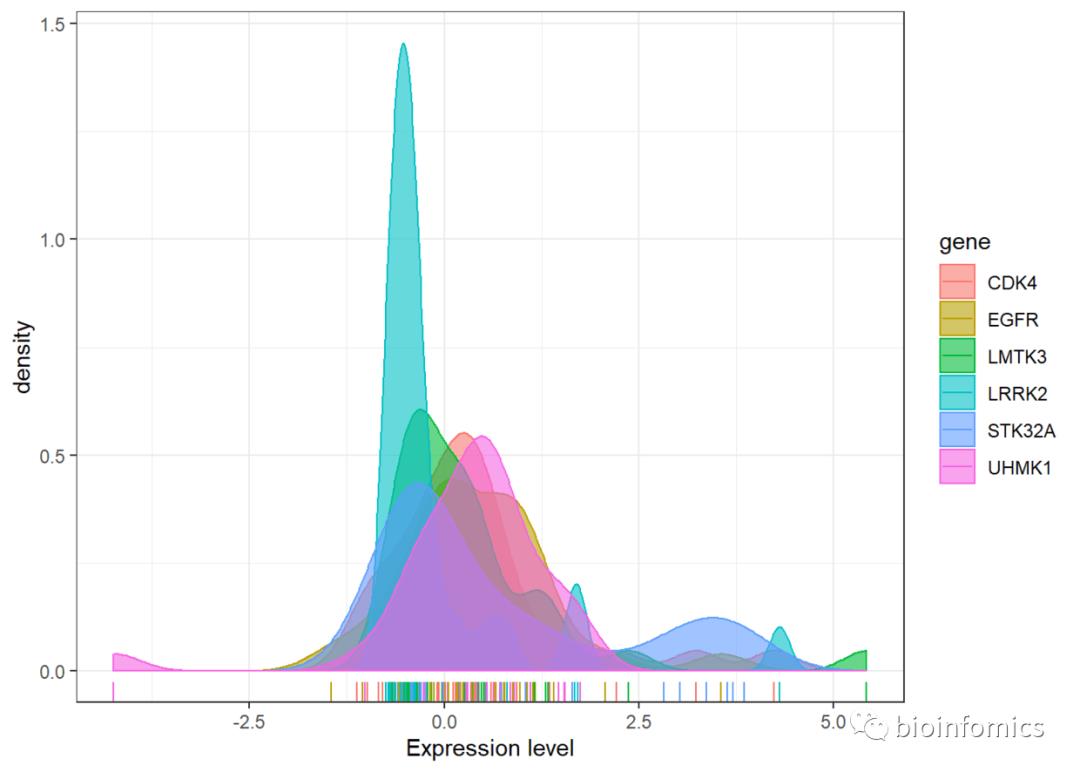
# 使用geom_density函数绘制密度分布曲线
ggplot(data,aes(value,fill=gene, color=gene)) +
  xlab("Expression level") +
  geom_density(alpha = 0.6) +
  geom_rug() + theme_bw()
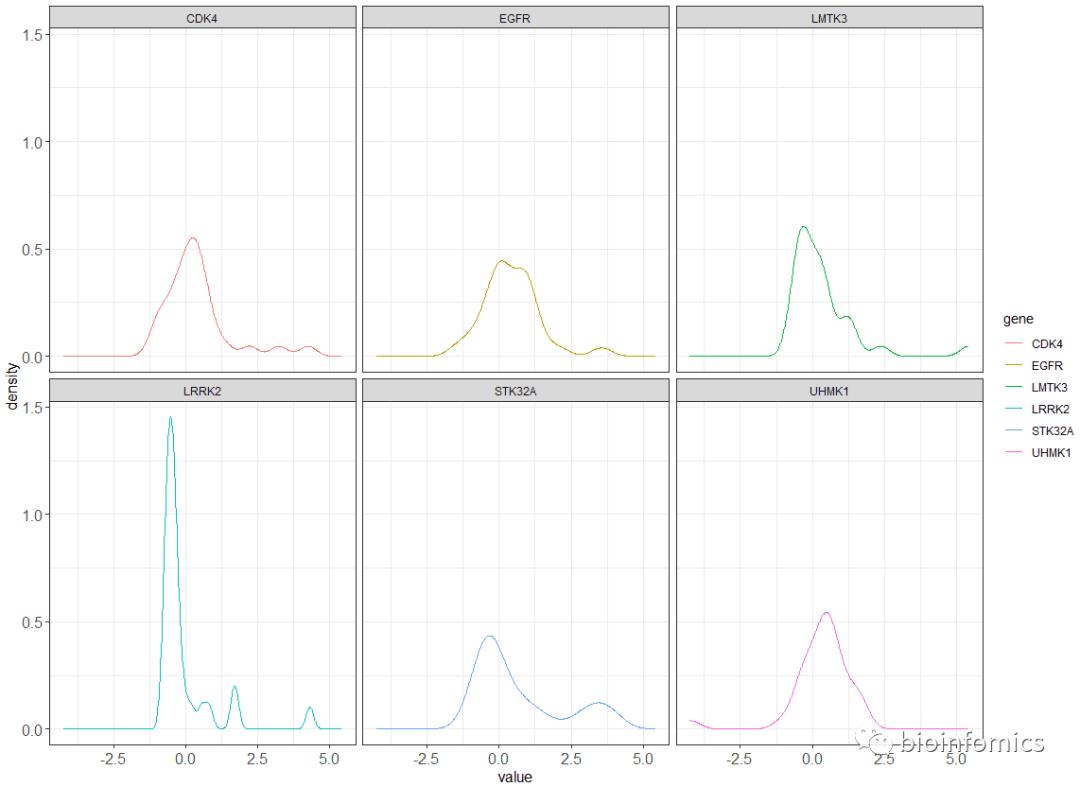
# 使用geom_line函数绘制密度分布曲线
ggplot(data,aes(value,..density.., color=gene))  +
  geom_line(stat="density") +
  theme_bw() + facet_wrap(.~gene) +
  theme(axis.title = element_text(size=16),
        axis.text=element_text(size=16))
ggpubr包绘制密度分布图
data <- read.table("demo_density.txt",header = T,check.names = F)
data <- melt(data)
## Using gene as id variables
head(data)
## gene variable value
## 1 CDK4 Cell-1 -0.7928036
## 2 LMTK3 Cell-1 0.1776205
## 3 LRRK2 Cell-1 -0.6978762
## 4 UHMK1 Cell-1 0.8505465
## 5 EGFR Cell-1 1.4124162
## 6 STK32A Cell-1 -0.3880397

library(ggpubr)
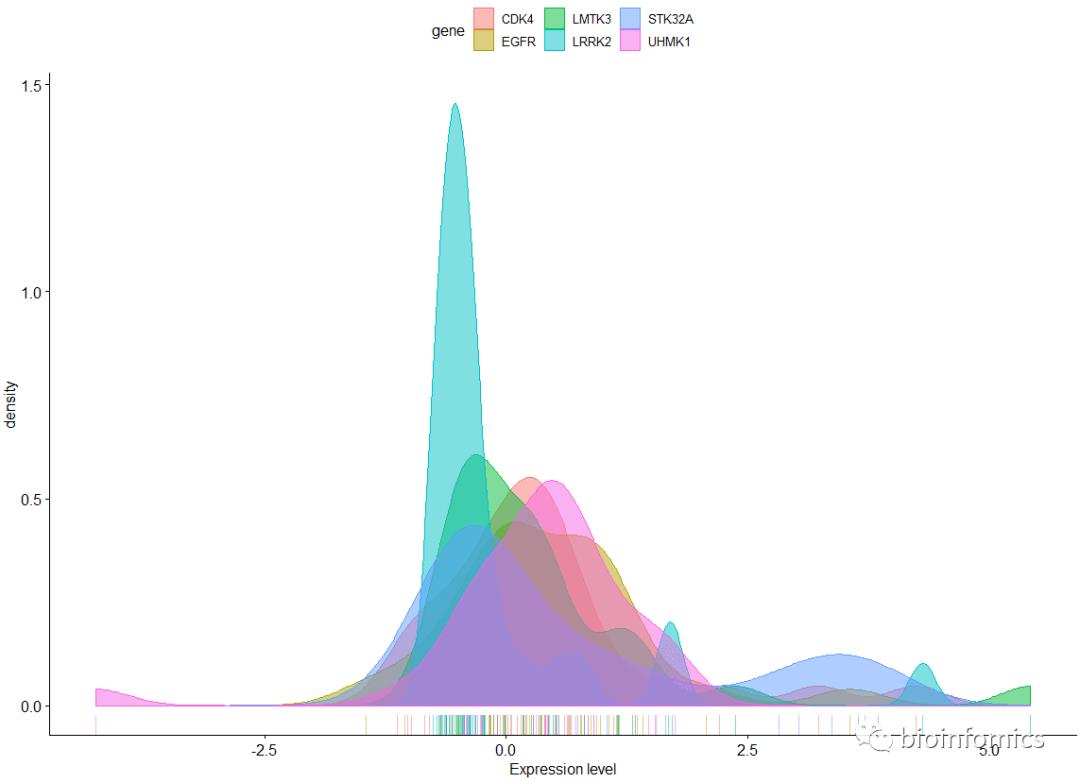
# 使用ggdensity函数绘制密度分布曲线
ggdensity(data, x = "value",
          rug = TRUE, xlab = "Expression level",
          color = "gene", fill = "gene")
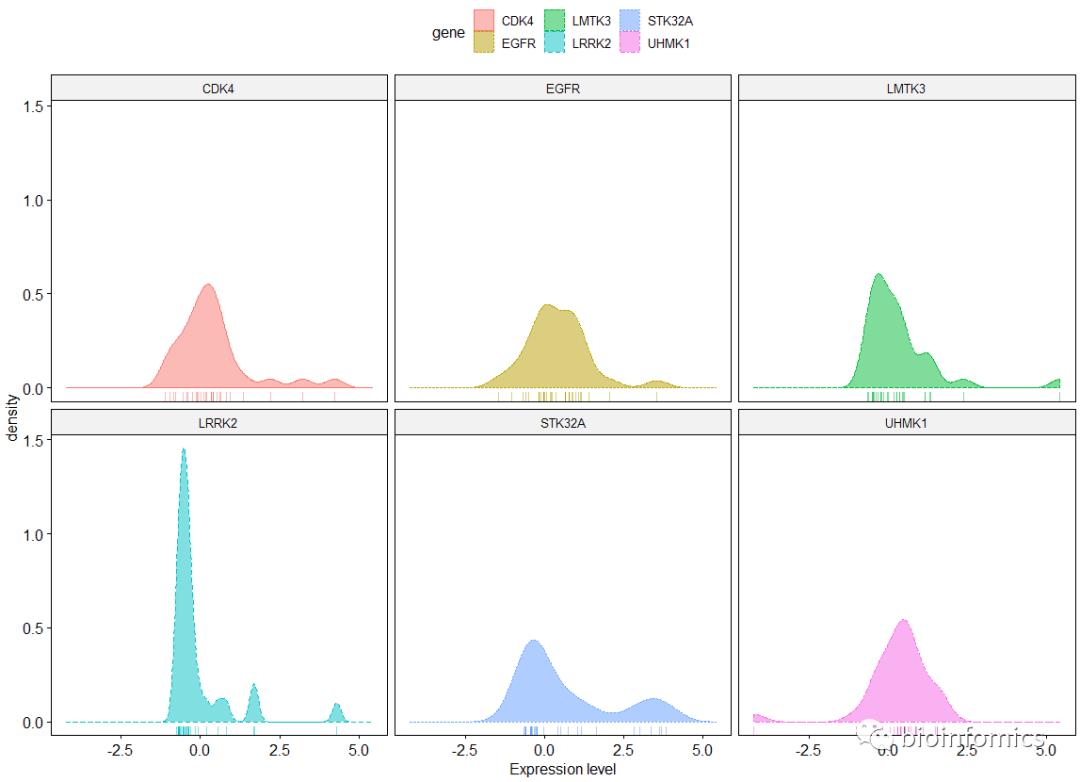
# 添加分面
ggdensity(data, x = "value",
          facet.by = "gene", linetype = "gene",
          rug = TRUE, xlab = "Expression level",
          color = "gene", fill = "gene")
sessionInfo()
## R version 3.6.0 (2019-04-26)
## Platform: x86_64-w64-mingw32/x64 (64-bit)
## Running under: Windows 10 x64 (build 18363)
##
## Matrix products: default
##
## locale:
## [1] LC_COLLATE=Chinese (Simplified)_China.936
## [2] LC_CTYPE=Chinese (Simplified)_China.936
## [3] LC_MONETARY=Chinese (Simplified)_China.936
## [4] LC_NUMERIC=C
## [5] LC_TIME=Chinese (Simplified)_China.936
##
## attached base packages:
## [1] stats graphics grDevices utils datasets methods base
##
## other attached packages:
## [1] ggpubr_0.2.1 magrittr_1.5 reshape2_1.4.3 ggplot2_3.2.0
##
## loaded via a namespace (and not attached):
## [1] Rcpp_1.0.1 knitr_1.23 tidyselect_0.2.5 munsell_0.5.0
## [5] colorspace_1.4-1 R6_2.4.0 rlang_0.4.0 plyr_1.8.4
## [9] stringr_1.4.0 dplyr_0.8.3 tools_3.6.0 grid_3.6.0
## [13] gtable_0.3.0 xfun_0.8 withr_2.1.2 htmltools_0.3.6
## [17] yaml_2.2.0 lazyeval_0.2.2 digest_0.6.20 assertthat_0.2.1
## [21] tibble_2.1.3 ggsignif_0.5.0 crayon_1.3.4 purrr_0.3.2
## [25] glue_1.3.1 evaluate_0.14 rmarkdown_1.13 labeling_0.3
## [29] stringi_1.4.3 compiler_3.6.0 pillar_1.4.2 scales_1.0.0
## [33] pkgconfig_2.0.2
END


以上是关于R语言可视化:密度分布图绘制的主要内容,如果未能解决你的问题,请参考以下文章