如何搭建spring boot
Posted
tags:
篇首语:本文由小常识网(cha138.com)小编为大家整理,主要介绍了如何搭建spring boot相关的知识,希望对你有一定的参考价值。
Helloworld使用传统的springmvc,需要配置web.xml,applicationContext.xml,然后打包为war在tomcat中运行,而如果使用springboot,一切都变得简单起来了。下面使用Maven来创建springboot的webapp工程pom.xml4.0.0org.springframeworkgs-spring-boot0.1.0org.springframework.bootspring-boot-starter-parent1.3.3.RELEASEorg.springframework.bootspring-boot-starter-weborg.springframework.bootspring-boot-starter-testtest1.8org.springframework.bootspring-boot-maven-pluginHelloControllerpackagehello;importorg.springframework.web.bind.annotation.RequestMapping;importorg.springframework.web.bind.annotation.RestController;@RestControllerpublicclassHelloController@RequestMapping("/")publicStringindex()return"GreetingsfromSpringBoot!";其中:@RestController表示使用springmvc来接收request请求@RequestMapping映射到主页当请求返回的时候,是纯文本,那是因为@RestController是由@Controller和@ResponseBody组成Application@SpringBootApplicationpublicclassApplicationpublicstaticvoidmain(String[]args)ApplicationContextctx=SpringApplication.run(Application.class,args);System.out.println("Let'sinspectthebeansprovidedbySpringBoot:");其中:@SpringBootApplication代表了其有四个注解组成:@Configuration,@EnableAutoConfiguration,@EnableWebMvc,@ComponentScan在SpringApplication.run中会去自动启动tomcatrun方法返回上下文,在这个上下文中可以拿到所有的bean没有一行配置代码、也没有web.xml。基于SpringBoot的应用在大多数情况下都不需要我们去显式地声明各类配置,而是将最常用的默认配置作为约定,在不声明的情况下也能适应大多数的开发场景。总体而言springboot是对javawebapp开发的简化单元测试@RunWith(SpringJUnit4ClassRunner.class)@SpringApplicationConfiguration(classes=MockServletContext.class)@WebAppConfigurationpublicclassHelloControllerTestprivateMockMvcmvc;@Beforepublicvoidbefore()throwsExceptionmvc=MockMvcBuilders.standaloneSetup(newHelloController()).build();@Afterpublicvoidafter()throwsException/****Method:index()**/@TestpublicvoidtestIndex()throwsException//TODO:Testgoesheremvc.perform(MockMvcRequestBuilders.get("/").accept(MediaType.APPLICATION_JSON)).andExpect(status().isOk()).andExpect(content().string(equalTo("GreetingsfromSpringBoot!")));建立restfullweb服务器接上,使用srpingboot建立web服务器就非常简单了,首先建立一个pojo类publicclassGreetingprivatefinallongid;privatefinalStringcontent;然后使用control来handlehttp请求@RestControllerpublicclassGreetingControllerprivatestaticfinalStringtemplate="Hello,%s!";privatefinalAtomicLongcounter=newAtomicLong();@RequestMapping("/greeting")publicGreetinggreeting(@RequestParam(value="name",defaultValue="World")Stringname)returnnewGreeting(counter.incrementAndGet(),String.format(template,name));其中:@RequestParam表明了参数要求,如果要必填则设置required=true返回是一个对象,会被自动转换为json当我们访问:greeting时候返回"id":1,"content":"Hello,World!"greeting?name=User时候返回"id":2,"content":"Hello,User!"数据库访问另一个非常常用的问题。在传统开发中,我们需要配置:类路径上添加数据访问驱动实例化DataSource对象,指定url,username,password注入JdbcTemplate对象,如果使用Mybatis,还要配置框架信息下面一个例子讲述用用springboot来代替。数据访问层我们将使用SpringDataJPA和Hibernate(JPA的实现之一)。开始之前先介绍两个概念springdata为了简化程序与数据库交互的代码,spring提供了一个现成的dao层框架,spring家族提供的spring-data适用于关系型数据库和nosql数据库;例如SpringDataJPA,SpringDataHadoop,SpringDataMongoDB,SpringDataSolr等;具体的可以参考官网:.mysql.jdbc.Driverspring.datasource.password=xxx#SpecifytheDBMSspring.jpa.database=MYSQL#Showornotlogforeachsqlqueryspring.jpa.show-sql=true#Hibernateddlauto(create,create-drop,update)spring.jpa.hibernate.ddl-auto=update#Namingstrategyspring.jpa.hibernate.naming-strategy=org.hibernate.cfg.ImprovedNamingStrategy#strippedbeforeaddingthemtotheentitymanager)spring.jpa.properties.hibernate.dialect=org.hibernate.dialect.MySQL5Dialect其中,hibernate的ddl-auto=update配置表名,数据库的表和列会自动创建写下实体类:@Entity@Table(name="student")publicclassStudent@Id@GeneratedValue(strategy=GenerationType.AUTO)privatelongid;@NotNullprivateStringname;privateStringage;@Entity,说明被这个注解修饰的类应该与一张数据库表相对应,表的名称可以由类名推断,当然了,也可以明确配置,只要加上@Table(name="books")即可。需要特别注意,每个Entity类都应该有一个protected访问级别的无参构造函数,用于给Hibernate提供初始化的入口。@Idand@GeneratedValue:@Id注解修饰的属性应该作为表中的主键处理、@GeneratedValue修饰的属性应该由数据库自动生成,而不需要明确指定。@ManyToOne,@ManyToMany表明具体的数据存放在其他表中,在这个例子里,书和作者是多对一的关系,书和出版社是多对一的关系,因此book表中的author和publisher相当于数据表中的外键;并且在Publisher中通过@OneToMany(mapped="publisher")定义一个反向关联(1——>n),表明book类中的publisher属性与这里的books形成对应关系。@Repository用来表示访问数据库并操作数据的接口,同时它修饰的接口也可以被componentscan机制探测到并注册为bean,这样就可以在其他模块中通过@Autowired织入。dao:@RepositorypublicinterfaceCustomerRepositoryextendsCrudRepositoryListfindByLastName(StringlastName);详细的可以看springjpa的具体介绍。最后使用:@RestControllerpublicclassDbController@AutowiredprivateStudentDaodao;@RequestMapping("/get-student-counts")@ResponseBodypublicStringgetAllStudents()Liststudents=(List)dao.findAll();returnString.format("%d",students.size());主要一点是:我在CustomerRepository实现中每天添加方法:findByLastName,@Autowired就会一直报错。 参考技术A Spring Boot: 1、微内核2、配置简单3、模块化4、开箱即用5、完全兼容Spring6、设计理念极其先进,很多思想来自OSGi,但是在现有技术的实现 缺点: 二次改造定制难缺少成熟的SOA或者RPC框架Dubbox: 1、完全兼容Dubbo2、功能强大3、性能强悍4、运行稳定 参考技术B 点击首菜单栏Help -> Eclipse Marketpl...1
进入Marketplace后,在Find输入框中输...
2
点击主菜单File->New->Spring Starter ...
3
在新建工程窗口中选择构建类型 Type: -...
4
根据工程类型配置属性“Packaging”, ...
5
点击“Finish”,生成工程。
6
Gradle Tasks Quick Launcher是Gradle...
7
执行“Build”构建项目, 并在Consol...
Spring-Boot快速搭建web项目详细总结
最近在学习Spring Boot 相关的技术,刚接触就有种相见恨晚的感觉,因为用spring boot进行项目的搭建是在太方便了,我们往往只需要很简单的几步,便可完成一个spring MVC项目的搭建,感觉就是下图:

好,下面就本人搭建项目的过程简单说说如何快速搭建一个spring MVC项目,相信我,spring-boot这趟车,你上了根本就停不下来了!
下面是这篇博客的主要内容:
1、spring boot 介绍
2、spring boot 项目快速搭建
3、spring-boot中单元测试
4、spring boot 与mybatis 的集成
一、初识spring boot
1、web项目传统的搭建方式
导入jar包,配置tomcat 的context.xml 、web.xml,配置class path ,启动。我靠,怎么一堆报错?classNotFoundException?尼玛哥不是导入了jar包吗,哦版本不对,那我使用maven管理jar包咯,千辛万苦终于配置好maven 并学会了如何使用,启动也没报错了,但是尼玛已经过去打半天了我都还没有开始正式代码的书写,赶紧开始写业务代码吧,又发现spring 中配置老是尼玛的报错,而我他妈只是想要搞个简单的发邮件功能啊。
所以说,自己搭建web项目,很多步骤都是重复性的,有没有什么工具可以一步达成啊?我只想快点投入到实际业务开发中去,我再也不想折腾jar包版本问题,再也不想折腾那繁琐的配置过程(虽然这是一个很好的学习过程),那么,spring boot 估计是老铁你不二的选择!
2、spring boot 是什么?
什么是spring boot?直接copy官网的介绍:

原谅我并不咋地的英文,官网说,spring boot 可以让你以一种非常简单的方式构建一个机遇Application 的spring 项目,而你索要做的仅仅是run 这个项目,spring boot 集成了主流的框架,我们构建项目大概只需要两三分钟,spring boot 项目,只需要很少的配置即可。
用了spring boot 后,你会发现,什么配置问题,什么jar包问题统统没有了,你的生产效力会提高很多,因为,spring boot 已经帮你弄好了一个项目原型,你只需要在这个原型上添加自己的业务代码,自己的service 和dao就万事大吉了!
spring boot 真的有那么厉害?好,下面就开始进入正题,说说怎么搭建利用spring boot搭建项目。
2、spring boot 项目快速搭建
1、快速搭建一个spring MVC项目
来开头来个Hello World先吧,下面紧跟我的步伐,利用spring boot 快速搭建一个MVC项目
第一步,上官网,进行项目原始jar 包的选取,官网在线搭建地址如下:https://start.spring.io/,看图:
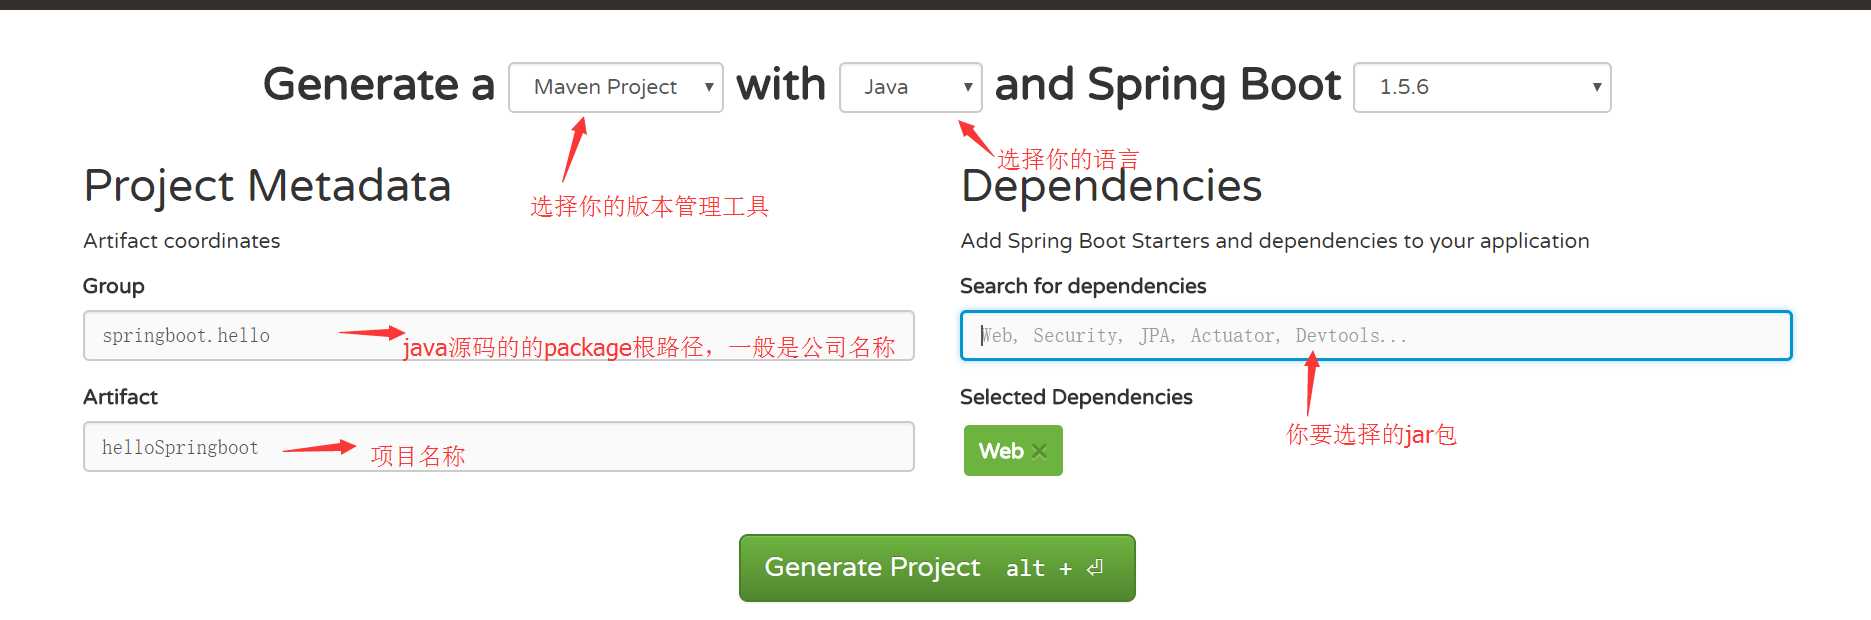
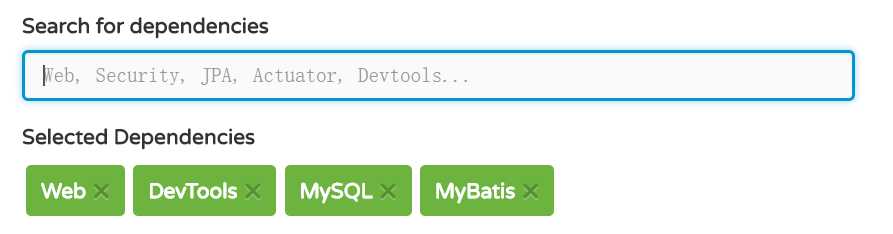
特别说明下:在选择你要的jar 包中,一般包括三部分:web部分--包含 了spring、springboot 等常用的web开发必须jar包;spring提供的工具类部分(devTool),这个用于热部署效果;数据库部分,spring boot自动可以帮你继承各种数据库框架,我这里以mybatis 为演示例子,最后选完jar包的效果如下:
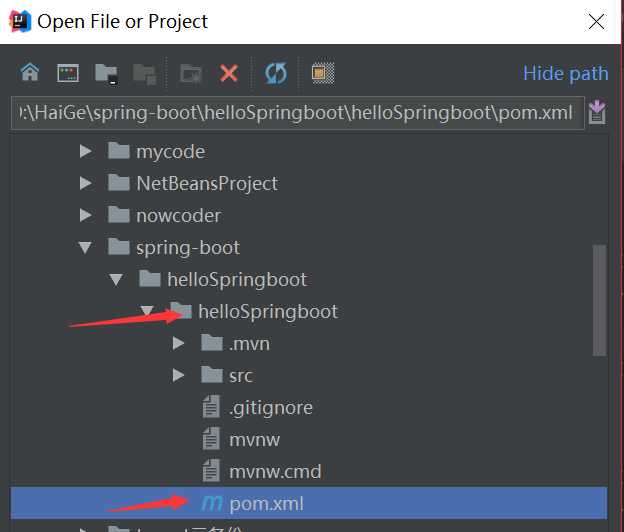
第二步、下载项目并导入IDE,当然,需要版本管理工具的支持,这里推荐IntelliJ IDEA 开发工具(它简直就是web开发的标配!),具体看下面截图:

解压后得到项目文件![]() ,然后,就可以打开我们的IDE,这里已我最爱的IntelliJ idea为例子
,然后,就可以打开我们的IDE,这里已我最爱的IntelliJ idea为例子
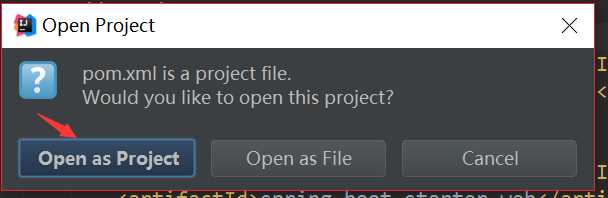
打开idea,找到file-->open-->选择项目的路径,找打pom文件-->以project 形式打开
第三步、hello spring项目 大概长什么样子?打开项目之后,maven 会加载必须的jar包,这段时间,你可以去喝杯香醇的龙井茶或者咖啡,当项目构建完成之后,你会看到下面这样的典型maven目录结构:
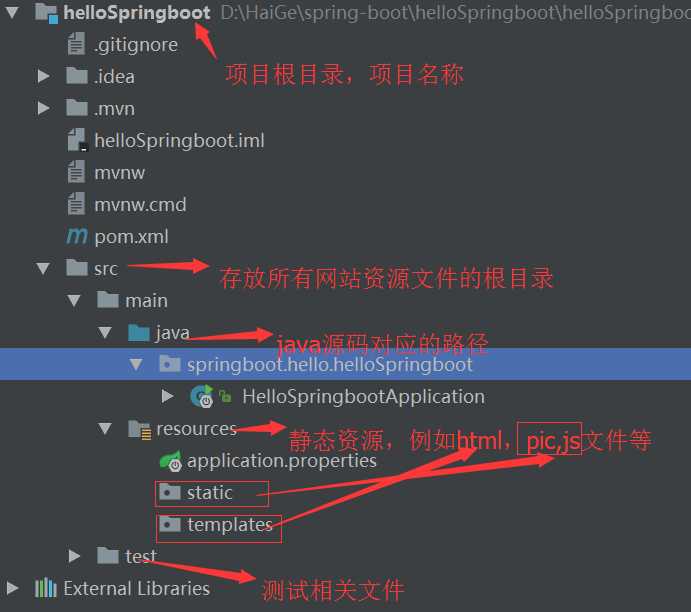
具体各个目录放什么,请参考截图,这里补充说明的是,HelloSpringbootApplication是整个项目的入口,我们启动项目不再是启动tomcat,而是运行这个类,这个类的main方法就是整个项目的main方法即执行入口,
第四步,写hello demo了。新建一个package demo,然后新建一个类HelloSpringBoot,写入以下代码
@RestController
public class HelloSpringBoot {
    @RequestMapping(path = {"/helloSpringBoot"})
    public String HelloSpring (){
        System.out.println("hello spring boot");
        return "hello spring boot";
    }
}
我们先不解释这个类里面的东西,先配置并启动网站,初步感受下spring boot的魔力:
在启动网站前,由于spring boot 是默认自动注册加载数据库相关的类文件的,所以为了不报错,我们需要打开数据库并在resource目录下的application.property中加入数据库配置相关文件,这里以mysql为例子,配置文件如下:
spring.datasource.url=jdbc:mysql://localhost:3306/wenda?useUnicode=true&characterEncoding=utf8&useSSL=false
spring.datasource.username=root
spring.datasource.password=root
配置文件中各个字段含义估计读者也能看懂,后面会再具体说明。
当然,如果没有安装数据库,读者也可以在HelloSpringbootApplication 类中利用exclude属性声明不自动注册加载数据库相关文件,具体参考下面的代码:
@SpringBootApplication(exclude={DataSourceAutoConfiguration.class,MybatisAutoConfiguration.class})//这里的MybatisAutoConfiguration.class对应你的数据库框架
public class HelloSpringbootApplication {

    public static void main(String[] args) {
        SpringApplication.run(HelloSpringbootApplication.class, args);
    }
}
然后,我们所有的工作就完成了,可以启动网站了,见证奇迹的时候到了。
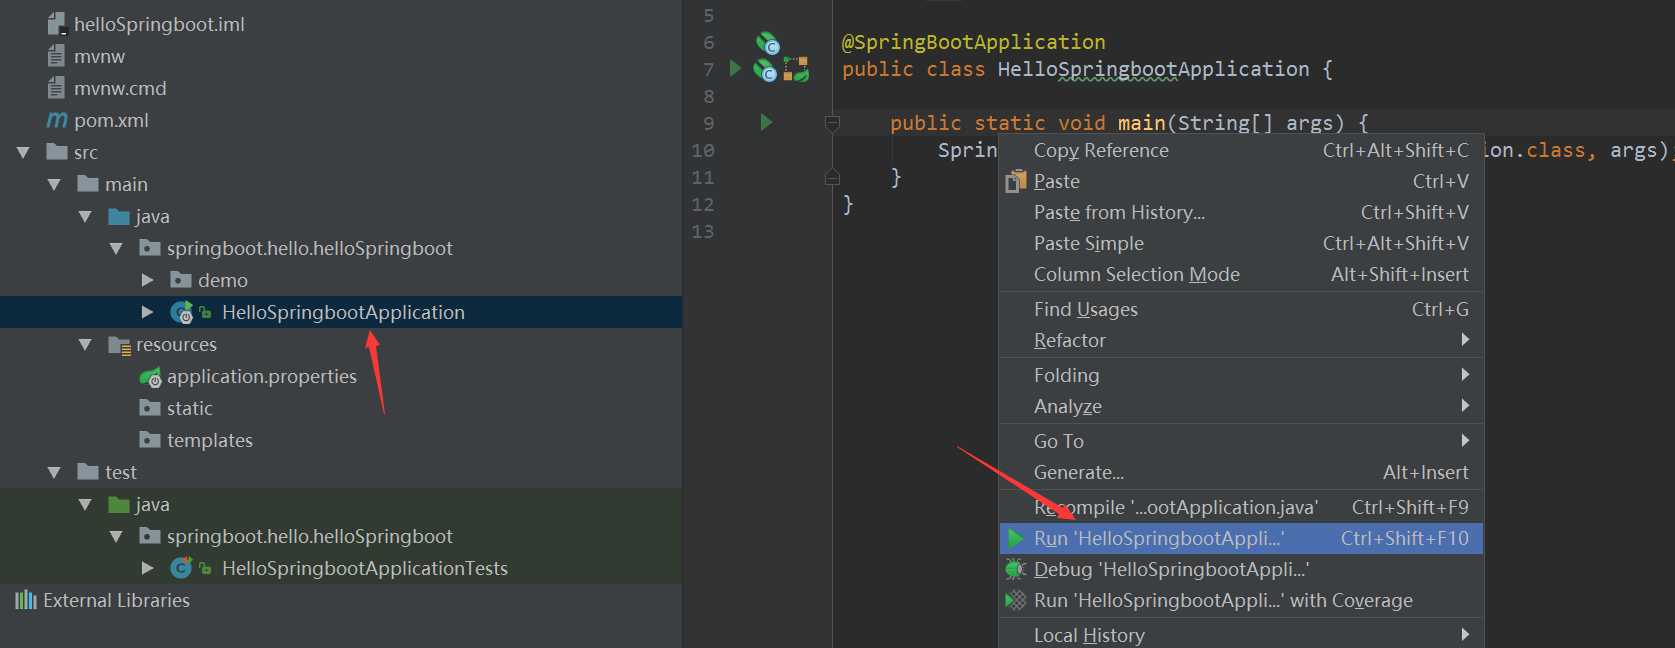
找到 HelloSpringbootApplication类,双击打卡,右击鼠标,run,然后项目就启动了。
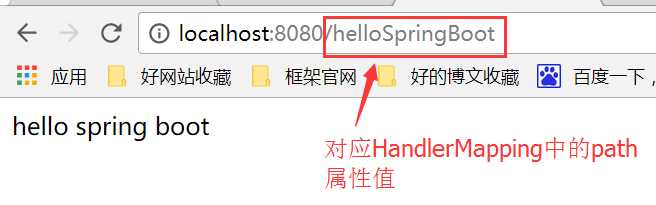
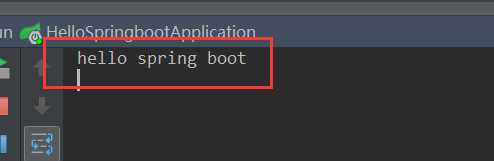
启动网站之后,输入http://localhost:8080/helloSpringBoot即可访问对应的方法。浏览器以及idea后台效果如图
这里简单解释下这个类里面的东西的含义:
首先是@RestController这个注解:用过spring的大佬估计知道是什么东西,当我们其他类要通过spring引用该类时,第一步就是要将该类注册到spring中,@RestController就是相当于将这个类注册到spring容器的意思当然,还有一种比较常用的就是@Controller,具体他们两区别后面再讨论吧。
然后就是@RequestMapping,通过设置这个注解里面面的path属性,就可以声明相对于项目根路径(localhost:8080)的访问路径。
2、spring boot 项目中利用springMVC实现传参
上面的demo中的方法只是一个非常简单的实例,在实际生产中, 我们的应用不可能这么简单的,前端还需要传输参数到后台,所以,用spring boot 构造的项目中,又如何实现传参呢?(感觉下面的都是在总结sprign MVC相关的内内容了,所以大神勿喷我脱离主题,因为感觉spring boot 如果单独总结的话,貌似的确没什么好总结的,而且spring boot 天生就不可能和其他spring 组件分割)具体请参开下面代码例子:
@RestController
public class HelloSpringBoot {/**
     * url传参,访问的路径类似这样:localhost:8080/getParamDemo1/1
     * 方法体中的参数要在前面加注释,@PathVariable,代表url中的参数
     */
    @RequestMapping(path = {"/getParamDemo1/{id}"})
    public String getParamDemo1 (@PathVariable("id") int userId){
        System.out.println("get param " + userId);
        return "success get param";
    }
    /**
     * 当然,你也可以通过这种传参方式:localhost:8080/getParamDemo?param1=1或者直接表单提交参数
     * 当然,同时方法中参数声明的注释也要变成@RequestParam,代表请求参数,required属性说明了参数是否是必须的
     */
    @RequestMapping(path = {"/getParamDemo2"})
    public String getParamDemo2 (@RequestParam(value="param1",required = false) int param){
        System.out.println("get param " + param);
        return "success get param";
    }
}
3、构建restful编程风格
最近,resultful风格编程挺火的(虽然个人觉得不可盲目跟风),而spring boot中利用其内置的spring MVC等框架,可以非常简单地实现这种编程风格。
例如说,我要请求查询一个数据,在resultful类的编程风格中,查询对应的是get请求,那么,spring boot(准确说是spring MVC) 可以针对不同的请求进行处理,请看下面代码:
@RestController
public class HelloSpringBoot {

    /**
     * 通过设置RequestMapping的method属性便可以设置该方法可处理的对应请求了,例如下面的getRequestDemo方法只会处理get请求
     */
    @RequestMapping(path = {"/getRequestDemo"},method = RequestMethod.GET)
    public String getRequestDemo (@RequestParam(value="param1",required = false) int param){
        System.out.println("get request test ,get param " + param);
        return "success get param";
    }
    /**
     * 下面的deleteRequestDemo方法只会处理delete请求
     */
    @RequestMapping(path = {"/deleteRequestDemo"},method = RequestMethod.DELETE)
    public String deleteRequestDemo (@RequestParam(value="param1",required = false) int param){
        System.out.println("delete request test ,get param " + param);
        return "success get param";
    }
}
另外,利用上面说的url中的值(类似这个:path="/member/{userid}")进行资源定位,也非常符合resultful的风格要求,例如这path="/getParamDemo1/{userid}"的配置就是对应的就是对会员级别的某个用户(由userid定位)进行某些操作,如果要删除该用户,则对应http请求的delete请求即可。
通过上面的那些步骤,估计读者对于如何用spring boot 进行一个简单的web项目快速搭建已经清楚了,下面在spring boot搭建的项目中如何进行单元测试。
三、spring boot 项目中的单元测试问题
spring boot 中集成了junite框架,对于单元测试,也不用写各种繁琐的类了,只需要对测试类进行一定的注释,spring boot 便会帮你做好一切,就算是数据库相关的操作,spring boot 也能很好地进行测试,具体还是看代码例子,下面是一个简单的测试业务类方法的例子:
首先,我们新建一个service 层,新增一个demo类,最后的demo代码如下:
@Component
public class ServiceDemo {
    public String testDemo(){
        String rtnAfterDosomething = "我是返回结果";
        //这里是业务代码
        return rtnAfterDosomething;
    }
}
下面的代码是测试类
@RunWith(SpringRunner.class)
@SpringBootTest
public class ServiceDemoTest {
    @Autowired
    ServiceDemo serviceDemo;
    @Test
    public void testDemo() {
        String rtn = serviceDemo.testDemo();
        Assert.assertEquals(rtn, "我是返回结果");
    }

}
如果要测试数据库dao,也是类似的,但是特别注意的是,测试之前必须启动项目(即HelloSpringbootApplication的run方法必须运行起来),否则将会包can not find ApplicationContext的错误。
四、spring boot中配置数据库框架(以mybatis为例子)
在spring boot中集成数据库相关的开源框架也是很方便的(当然,记得在一开始新建项目的时候引用相关的jar包),当你上面的步骤都没什么错误的时候,你只需要简单地配置下applocation.properties文件即可
spring.datasource.url=jdbc:mysql://localhost:3306/springboot?useUnicode=true&characterEncoding=utf8&useSSL=false
spring.datasource.username=root
spring.datasource.password=root
#下面这条配置声明了mybatis的配置文件路径,classpath对应的是和这个文件统计的resources
mybatis.config-location=classpath:mybatis-config.xml
目录的文件结构参考下面截图:
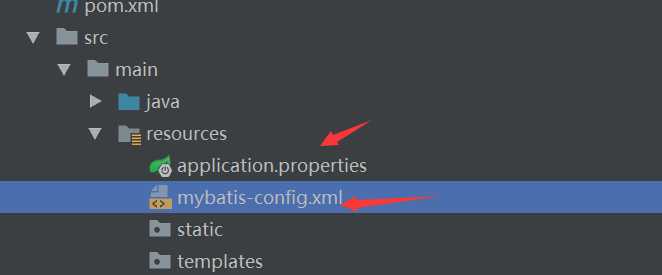
ok,mybatis 的引用配置便弄好了,下面我们尝试利用mybatis 这个数据库框架,进行一个数据库的简单查询操作,首先,看下面的mybatis-config.xml的配置内容,读者可以以这个为模板进行配置,当然,想了解更具体的mybatis配置说明,建议去官网看看,这里不展开了:
<?xml version="1.0" encoding="UTF-8"?>
<!DOCTYPE configuration
        PUBLIC "-//mybatis.org//DTD Config 3.0//EN"
        "http://mybatis.org/dtd/mybatis-3-config.dtd">
<configuration>

    <settings>
        <!-- Globally enables or disables any caches configured in any mapper under this configuration -->
        <setting name="cacheEnabled" value="true"/>
        <!-- Sets the number of seconds the driver will wait for a response from the database -->
        <setting name="defaultStatementTimeout" value="3000"/>
        <!-- Enables automatic mapping from classic database column names A_COLUMN to camel case classic Java property names aColumn -->
        <setting name="mapUnderscoreToCamelCase" value="true"/>
        <!-- Allows JDBC support for generated keys. A compatible driver is required.
        This setting     forces generated keys to be used if set to true,
         as some drivers deny compatibility but still work -->
        <setting name="useGeneratedKeys" value="true"/>
    </settings>

    <!-- Continue going here -->

</configuration>
恩,然后,就可以进行数据库的操作了,我简单用mysql建了个名字为springboot的数据库,在库里面建了一个简单的demo表(具体怎么建表那些不用我说了吧?实在没有接触过数据库的同学,可以自行百度或者谷歌去咯),然后,dao代码如下:
@Mapper
public interface DemoDao {
    @Select({"select demo_param from  demo "})
    String queryDemo();
}
注意,mybatis 的dao是一个接口,关于mybatis更多的内容,请读者参开官方文档,这里不展开了。
然后,就在原来的ServiceDemo类中调用一下吧,代码看下图吧:
import org.springframework.beans.factory.annotation.Autowired;
import org.springframework.stereotype.Component;
import org.springframework.stereotype.Controller;
import springboot.hello.helloSpringboot.dao.DemoDao;

@Component
public class ServiceDemo {
    @Autowired
    DemoDao demoDao;
    public String testDemo(){
        String rtnAfterDosomething = "我是返回结果";
        //这里是业务代码
        return rtnAfterDosomething;
    }
    public String queryDemo(){
        return demoDao.queryDemo();
    }
}
ok,简单写个测试类,出现小绿条,测试成功。
然后,所有项目原型的工作完成了,然后,我们就可以进行我们核心业务开发了,很快有没有?很爽有木有?所以说,spring boot 搭建项目的确飞快,可以让我们省去很多机械的前期操作,读者们赶紧去探索下吧,spring boot ,你值得捅有!
OK,今天总结到这里,这个项目的代码在gitHub上这个地址,需要的人自取:https://github.com/lcpandcode/helloSpringboot.git
最后说一遍,spring boot ,用得真他妈爽!赶紧来吧!
以上是关于如何搭建spring boot的主要内容,如果未能解决你的问题,请参考以下文章