高可用架构一利用HAproxy进行负载均衡服务器部署
Posted python运维实践
tags:
篇首语:本文由小常识网(cha138.com)小编为大家整理,主要介绍了高可用架构一利用HAproxy进行负载均衡服务器部署相关的知识,希望对你有一定的参考价值。
一.什么是负载均衡?
负载均衡,英文名称为Load Balance,是指建立在现有网络结构之上,并提供了一种廉价有效透明的方法扩展网络设备和服务器的带宽、增加吞吐量、加强网络数据处理能力、提高网络的灵活性和可用性。其原理就是数据流量分摊到多个服务器上执行,减轻每台服务器的压力,多台服务器共同完成工作任务,从而提高了数据的吞吐量。
二.HAproxy概述
(1)HAProxy 是一款提供高可用性、负载均衡以及基于TCP(第四层)和HTTP(第七层)应用的代理软件,支持虚拟主机,它是免费、快速并且可靠的一种解决方案。 HAProxy特别适用于那些负载特大的web站点,这些站点通常又需要会话保持或七层处理。HAProxy运行在时下的硬件上,完全可以支持数以万计的 并发连接。并且它的运行模式使得它可以很简单安全的整合进您当前的架构中, 同时可以保护你的web服务器不被暴露到网络上。
(2)HAProxy 实现了一种事件驱动、单一进程模型,此模型支持非常大的并发连接数。多进程或多线程模型受内存限制 、系统调度器限制以及无处不在的锁限制,很少能处理数千并发连接。事件驱动模型因为在有更好的资源和时间管理的用户端(User-Space) 实现所有这些任务,所以没有这些问题。此模型的弊端是,在多核系统上,这些程序通常扩展性较差。这就是为什么他们必须进行优化以使每个CPU时间片(Cycle)做更多的工作。
(3)HAProxy 支持连接拒绝 : 因为维护一个连接的打开的开销是很低的,有时我们很需要限制攻击蠕虫(attack bots),也就是说限制它们的连接打开从而限制它们的危害。 这个已经为一个陷于小型DDoS攻击的网站开发了而且已经拯救了很多站点,这个优点也是其它负载均衡器没有的。
在生产环境中,在7层处理上使用HAProxy作为昂贵的高端硬件负载均衡设备故障故障时的紧急解决方案也时长可见。硬件负载均衡设备在“报文”级别处理请求,这在支持跨报文请求(request across multiple packets)有着较高的难度,并且它们不缓冲任何数据,因此有着较长的响应时间。对应地,软件负载均衡设备使用TCP缓冲,可建立极长的请求,且有着较大的响应时间。
三.实现架构

场景说明:
1.服务器操作系统
  [root@haopython ~]# uname -a


  Linux haopython.com 3.10.0-862.2.3.el7.x86_64 #1 SMP Wed May 9 18:05:47 UTC 2018 x86_64 x86_64 x86_64 GNU/Linux


  [root@haopython ~]#
Centos7.3
2.应用软件
  [root@node01 ~]# rpm -qa | grep haproxy


  haproxy-1.5.18-7.el7.x86_64


  [root@web01 ~]# httpd -v


  Server version: Apache/2.4.6 (CentOS)


  Server built:   Apr 20 2018 18:10:38
3.服务器IP规划
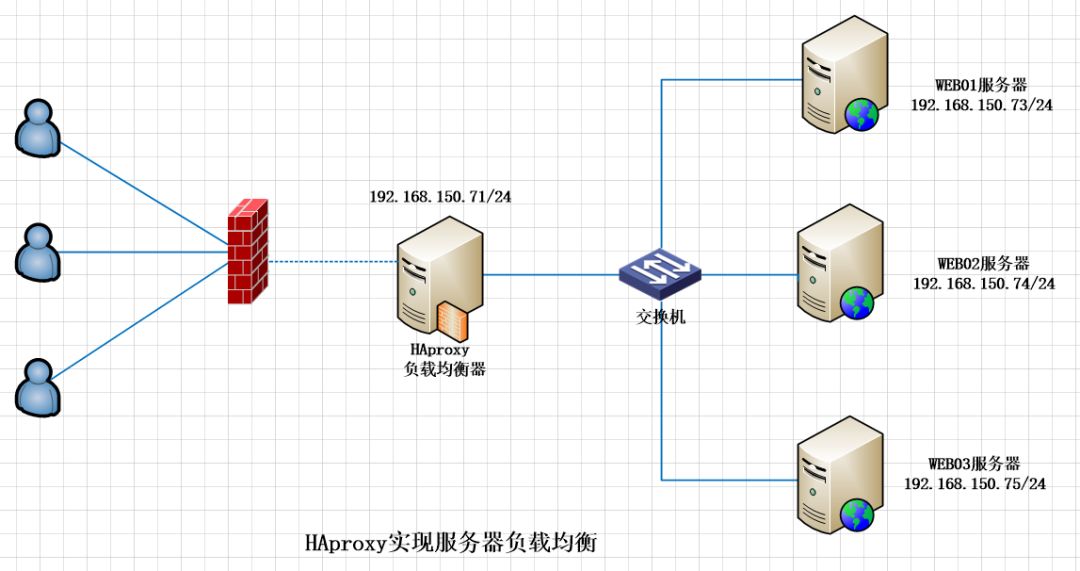
负载均衡器1台:192.168.150.71/24 Web服务器3台:192.168.150.73/24 192.168.150.74/24 192.168.150.75/24
四.软件安装与配置
本次主要配置haproxy代理服务器软件作为后端3台WEB服务器实现负载均衡的功能。
1.yum方式安装haproxy软件
[root@haopython ~]# yum install haproxy –y
2.配置haproxy代理服务器
  [root@haopython haproxy]# ls


  haproxy.cfg  haproxy.cfg.bak


  [root@haopython haproxy]# vim haproxy.cfg


  [root@haopython /]# vim /etc/haproxy/haproxy.cfg
配置文件内容:
  #---------------------------------------------------------------------


  # Example configuration for a possible web application.  See the


  # full configuration options online.


  #


  #   http://haproxy.1wt.eu/download/1.4/doc/configuration.txt


  #


  #---------------------------------------------------------------------


  #---------------------------------------------------------------------


  # Global settings


  #---------------------------------------------------------------------


  global


      # to have these messages end up in /var/log/haproxy.log you will


      # need to:


      #


      # 1) configure syslog to accept network log events.  This is done


      #    by adding the '-r' option to the SYSLOGD_OPTIONS in


      #    /etc/sysconfig/syslog


      #


      # 2) configure local2 events to go to the /var/log/haproxy.log


      #   file. A line like the following can be added to


      #   /etc/sysconfig/syslog


      #


      #    local2.*                       /var/log/haproxy.log


      #


      log         127.0.0.1 local2


      chroot      /var/lib/haproxy


      pidfile     /etc/haproxy/haproxy.cfg


      maxconn     4000


      user        haproxy


      group       haproxy


      daemon


      # turn on stats unix socket


      stats socket /var/lib/haproxy/stats


  #---------------------------------------------------------------------


  # common defaults that all the 'listen' and 'backend' sections will


  # use if not designated in their block


  #---------------------------------------------------------------------


  defaults


      mode                    http


      log                     global


      option                  httplog


      option                  dontlognull


      option http-server-close


      option forwardfor       except 127.0.0.0/8


      option                  redispatch


      retries                 3


      timeout http-request    10s


      timeout queue           1m


      timeout connect         10s


      timeout client          1m


      timeout server          1m


      timeout http-keep-alive 10s


      timeout check           10s


      maxconn                 3000


  #---------------------------------------------------------------------


  # main frontend which proxys to the backends


  #---------------------------------------------------------------------


  frontend  main *:80


      acl url_static       path_beg       -i /static /images /javascript /stylesheets


      acl url_static       path_end       -i .jpg .gif .png .css .js


      use_backend static          if url_static


      default_backend             app


  #---------------------------------------------------------------------


  # static backend for serving up images, stylesheets and such


  #---------------------------------------------------------------------


  backend static


      balance     roundrobin


      server      static 127.0.0.1:4331 check


  #---------------------------------------------------------------------


  # round robin balancing between the various backends


  #---------------------------------------------------------------------


  backend app


      balance     roundrobin


      server  app1 192.168.150.73:80 check


      server  app2 192.168.150.74:80 check


      stats   uri     /admin?stats


      stats   auth    admin:admin


      stats   admin   if TRUE
五.启动服务并测试
  [root@haopython /]# systemctl restart haproxy


  [root@haopython /]# curl http://192.168.150.71


  THIS IS WEB01!!!


  [root@haopython /]# curl http://192.168.150.71


  WEB02 SERVER


  [root@haopython /]# curl http://192.168.150.71


  THIS IS WEB01!!!


  [root@haopython /]#
六.查看haproxy的状态
  [root@haopython /]# systemctl status -l haproxy


  ● haproxy.service - HAProxy Load Balancer


     Loaded: loaded (/usr/lib/systemd/system/haproxy.service; disabled; vendor preset: disabled)


     Active: active (running) since Mon 2018-05-28 11:49:28 CST; 1min 41s ago


   Main PID: 3576 (haproxy-systemd)


      Tasks: 3


     CGroup: /system.slice/haproxy.service


             ├─3576 /usr/sbin/haproxy-systemd-wrapper -f /etc/haproxy/haproxy.cfg -p /run/haproxy.pid


             ├─3578 /usr/sbin/haproxy -f /etc/haproxy/haproxy.cfg -p /run/haproxy.pid -Ds


             └─3579 /usr/sbin/haproxy -f /etc/haproxy/haproxy.cfg -p /run/haproxy.pid -Ds


  May 28 11:49:28 haopython.com systemd[1]: Started HAProxy Load Balancer.


  May 28 11:49:28 haopython.com systemd[1]: Starting HAProxy Load Balancer...


  May 28 11:49:28 haopython.com haproxy-systemd-wrapper[3576]: haproxy-systemd-wrapper: executing /usr/sbin/haproxy -f /etc/haproxy/haproxy.cfg -p /run/haproxy.pid -Ds


  [root@haopython /]#


  [root@haopython /]#
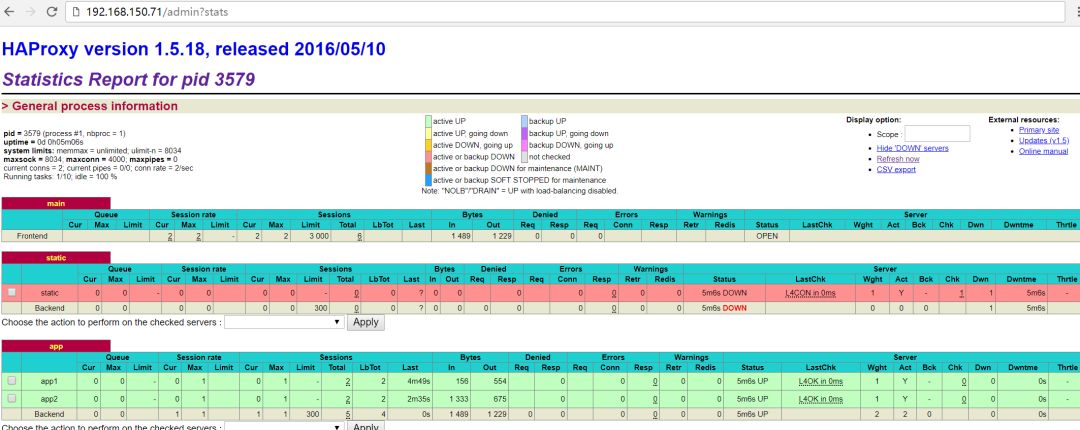
七.在浏览器中查看和修改haproxy的相关参数

学习|生活|分享|积累|永不停步
请留下你指尖的温度
让太阳拥抱你
微信ID:goodpython
以上是关于高可用架构一利用HAproxy进行负载均衡服务器部署的主要内容,如果未能解决你的问题,请参考以下文章