WebFlux 集成 Redis 实现缓存 | Spring Boot 2
Posted 程序员泥瓦匠
tags:
篇首语:本文由小常识网(cha138.com)小编为大家整理,主要介绍了WebFlux 集成 Redis 实现缓存 | Spring Boot 2相关的知识,希望对你有一定的参考价值。
点击蓝色“泥瓦匠BYSocket”,关注我哟
加个“星标”,不忘签到哦
这是泥瓦匠的第107篇原创
文章工程:
JDK 1.8
Maven 3.5.2
Spring Boot 2.1.3.RELEASE
工程名:springboot-webflux-7-redis-cache
前言
首先,补充下上一讲的内容,RedisTemplate 实现操作 Redis ,但操作是同步的,不是 Reactive 的。自然,支持 Reactive 的操作类为 ReactiveRedisTemplate。下面我们写个小案例
ReactiveRedisTemplate
在上一讲工程中,新建 CityWebFluxReactiveController 类,路由为 /city2 开头。
  @RestController


  @RequestMapping(value = "/city2")


  public class CityWebFluxReactiveController {


   @Autowired


   private ReactiveRedisTemplate reactiveRedisTemplate;


   @GetMapping(value = "/{id}")


   public Mono<City> findCityById(@PathVariable("id") Long id) {


   String key = "city_" + id;


   ReactiveValueOperations<String, City> operations = reactiveRedisTemplate.opsForValue();


   Mono<City> city = operations.get(key);


   return city;


   }


   @PostMapping


   public Mono<City> saveCity(@RequestBody City city) {


   String key = "city_" + city.getId();


   ReactiveValueOperations<String, City> operations = reactiveRedisTemplate.opsForValue();


   return operations.getAndSet(key, city);


   }


   @DeleteMapping(value = "/{id}")


   public Mono<Long> deleteCity(@PathVariable("id") Long id) {


   String key = "city_" + id;


   return reactiveRedisTemplate.delete(key);


   }


  }
写法和以前保持一致,@Autowired 注入 ReactiveRedisTemplate 对象
ReactiveValueOperations 是 String (或 value) 的操作视图,操作视图还有ReactiveHashOperations、ReactiveListOperations、ReactiveSetOperations 和 ReactiveZSetOperations 等
不一样的是,操作视图 set 方法是操作 City 对象。但可以 get 回 Mono 或者 Flux 对象。
结构
回到这个工程,新建一个工程编写整合 Redis 实现缓存案例。工程如图:
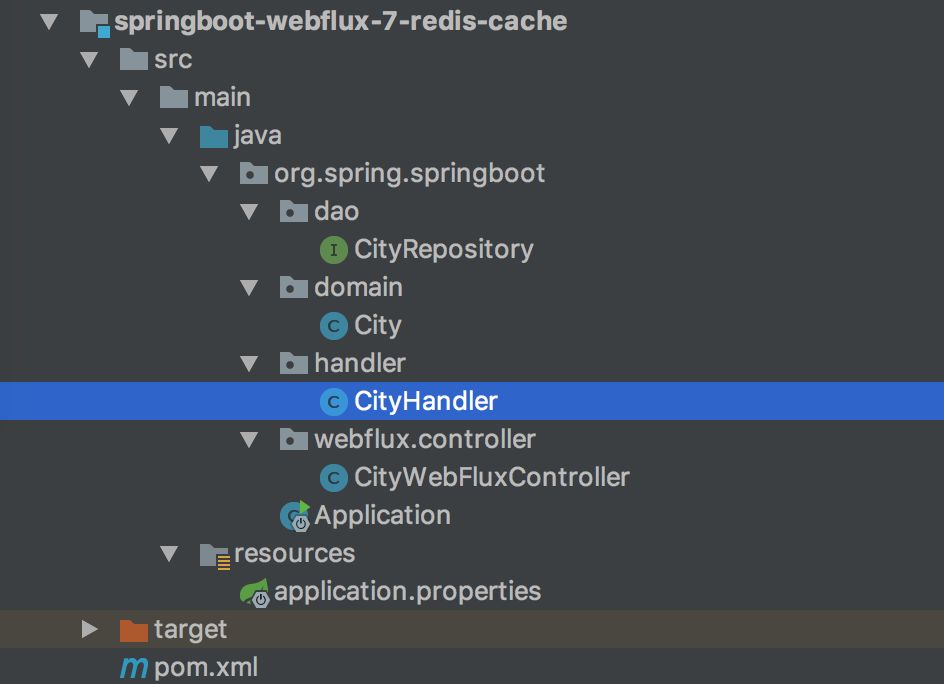
目录核心如下
pom.xml maven 配置
application.properties 配置文件
domain 实体类
dao mongodb数据操作层
handler 业务层,本文要点
controller 控制层
代码 GiHub :https://github.com/JeffLi1993/springboot-learning-example
控制层 CityWebFluxController
代码如下:
  @RestController


  @RequestMapping(value = "/city")


  public class CityWebFluxController {


   @Autowired


   private CityHandler cityHandler;


   @GetMapping(value = "/{id}")


   public Mono<City> findCityById(@PathVariable("id") Long id) {


   return cityHandler.findCityById(id);


   }


   @GetMapping()


   public Flux<City> findAllCity() {


   return cityHandler.findAllCity();


   }


   @PostMapping()


   public Mono<City> saveCity(@RequestBody City city) {


   return cityHandler.save(city);


   }


   @PutMapping()


   public Mono<City> modifyCity(@RequestBody City city) {


   return cityHandler.modifyCity(city);


   }


   @DeleteMapping(value = "/{id}")


   public Mono<Long> deleteCity(@PathVariable("id") Long id) {


   return cityHandler.deleteCity(id);


   }


  }
CityHandler 业务层
目前,@Cacheable 等注解形式实现缓存没有很好的集成,二者 Mono / Flux 对象没有实现 Serializable ,无法通过默认序列化器,解决方式是需要自定义序列化。这里通过手动方式与 Redis 手动集成,并实现缓存策略。
参考《缓存更新的套路》http://coolshell.cn/articles/17416.html,缓存更新的模式有四种:Cache aside, Read through, Write through, Write behind caching。
这里使用的是 Cache Aside 策略,从三个维度:(摘自 耗子叔叔博客)
失效:应用程序先从cache取数据,没有得到,则从数据库中取数据,成功后,放到缓存中。
命中:应用程序从cache中取数据,取到后返回。
更新:先把数据存到数据库中,成功后,再让缓存失效。
代码如下:
  @Component


  public class CityHandler {


   private static final Logger LOGGER = LoggerFactory.getLogger(CityHandler.class);


   @Autowired


   private RedisTemplate redisTemplate;


   private final CityRepository cityRepository;


   @Autowired


   public CityHandler(CityRepository cityRepository) {


   this.cityRepository = cityRepository;


   }


   public Mono<City> save(City city) {


   return cityRepository.save(city);


   }


   public Mono<City> findCityById(Long id) {


   // 从缓存中获取城市信息


   String key = "city_" + id;


   ValueOperations<String, City> operations = redisTemplate.opsForValue();


   // 缓存存在


   boolean hasKey = redisTemplate.hasKey(key);


   if (hasKey) {


   City city = operations.get(key);


   LOGGER.info("CityHandler.findCityById() : 从缓存中获取了城市 >> " + city.toString());


   return Mono.create(cityMonoSink -> cityMonoSink.success(city));


   }


   // 从 MongoDB 中获取城市信息


   Mono<City> cityMono = cityRepository.findById(id);


   if (cityMono == null)


   return cityMono;


   // 插入缓存


   cityMono.subscribe(cityObj -> {


   operations.set(key, cityObj);


   LOGGER.info("CityHandler.findCityById() : 城市插入缓存 >> " + cityObj.toString());


   });


   return cityMono;


   }


   public Flux<City> findAllCity() {


   return cityRepository.findAll().cache();


   }


   public Mono<City> modifyCity(City city) {


   Mono<City> cityMono = cityRepository.save(city);


   // 缓存存在,删除缓存


   String key = "city_" + city.getId();


   boolean hasKey = redisTemplate.hasKey(key);


   if (hasKey) {


   redisTemplate.delete(key);


   LOGGER.info("CityHandler.modifyCity() : 从缓存中删除城市 ID >> " + city.getId());


   }


   return cityMono;


   }


   public Mono<Long> deleteCity(Long id) {


   cityRepository.deleteById(id);


   // 缓存存在,删除缓存


   String key = "city_" + id;


   boolean hasKey = redisTemplate.hasKey(key);


   if (hasKey) {


   redisTemplate.delete(key);


   LOGGER.info("CityHandler.deleteCity() : 从缓存中删除城市 ID >> " + id);


   }


   return Mono.create(cityMonoSink -> cityMonoSink.success(id));


   }


  }
首先这里注入了 RedisTemplate 对象。联想到 Spring 的 JdbcTemplate ,RedisTemplate 封装了 RedisConnection,具有连接管理,序列化和 Redis 操作等功能。还有针对 String 的支持对象 StringRedisTemplate。
回到更新缓存的逻辑
a. findCityById 获取城市逻辑:
如果缓存存在,从缓存中获取城市信息
如果缓存不存在,从 DB 中获取城市信息,然后插入缓存
b. deleteCity 删除 / modifyCity 更新城市逻辑:
如果缓存存在,删除
如果缓存不存在,不操作
运行工程
一个操作 Redis 工程就开发完毕了,下面运行工程验证下。使用 IDEA 右侧工具栏,点击 Maven Project Tab ,点击使用下 Maven 插件的 install 命令。或者使用命令行的形式,在工程根目录下,执行 Maven 清理和安装工程的指令:
  cd springboot-webflux-7-redis-cache


  mvn clean install
在控制台中看到成功的输出:
  ... 省略


  [INFO] ------------------------------------------------------------------------


  [INFO] BUILD SUCCESS


  [INFO] ------------------------------------------------------------------------


  [INFO] Total time: 01:30 min


  [INFO] Finished at: 2018-10-15T10:00:54+08:00


  [INFO] Final Memory: 31M/174M


  [INFO] ------------------------------------------------------------------------
在 IDEA 中执行 Application 类启动,任意正常模式或者 Debug 模式。可以在控制台看到成功运行的输出:
  ... 省略


  2018-04-10 08:43:39.932 INFO 2052 --- [ctor-http-nio-1] r.ipc.netty.tcp.BlockingNettyContext : Started HttpServer on /0:0:0:0:0:0:0:0:8080


  2018-04-10 08:43:39.935 INFO 2052 --- [ main] o.s.b.web.embedded.netty.NettyWebServer : Netty started on port(s): 8080


  2018-04-10 08:43:39.960 INFO 2052 --- [ main] org.spring.springboot.Application : Started Application in 6.547 seconds (JVM running for 9.851)
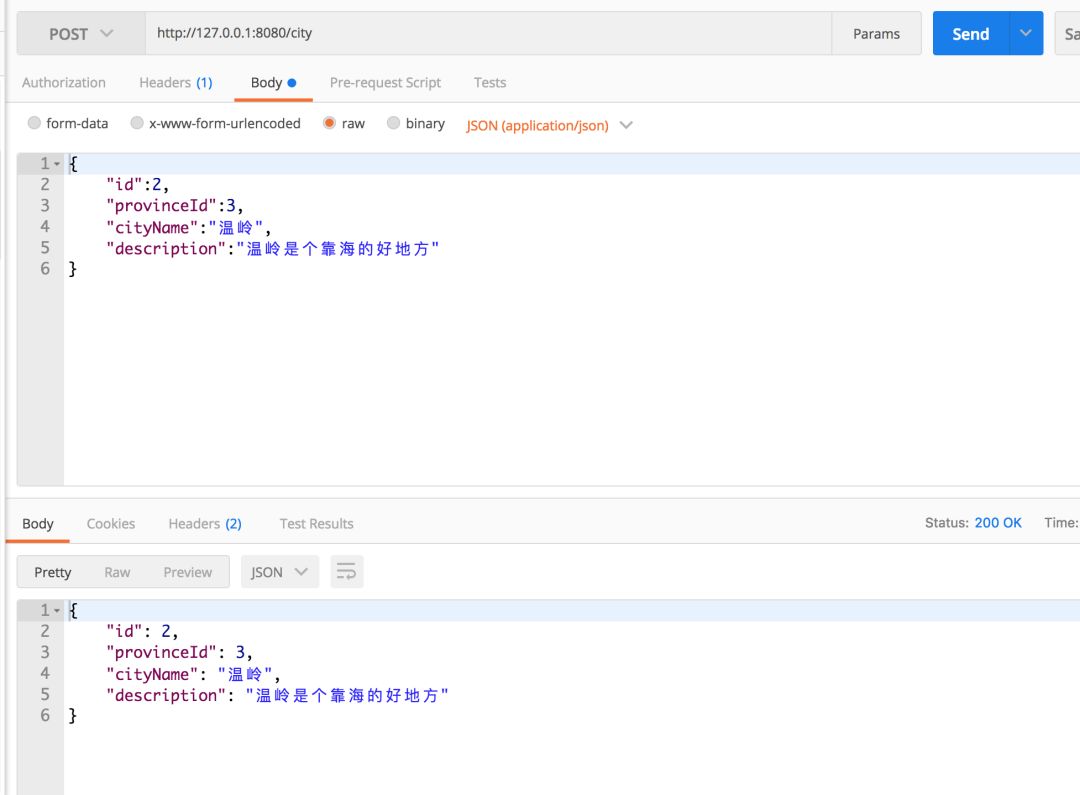
打开 POST MAN 工具,开发必备。进行下面操作:
新增城市信息 POST http://127.0.0.1:8080/city
获取城市信息 GET http://127.0.0.1:8080/city/2
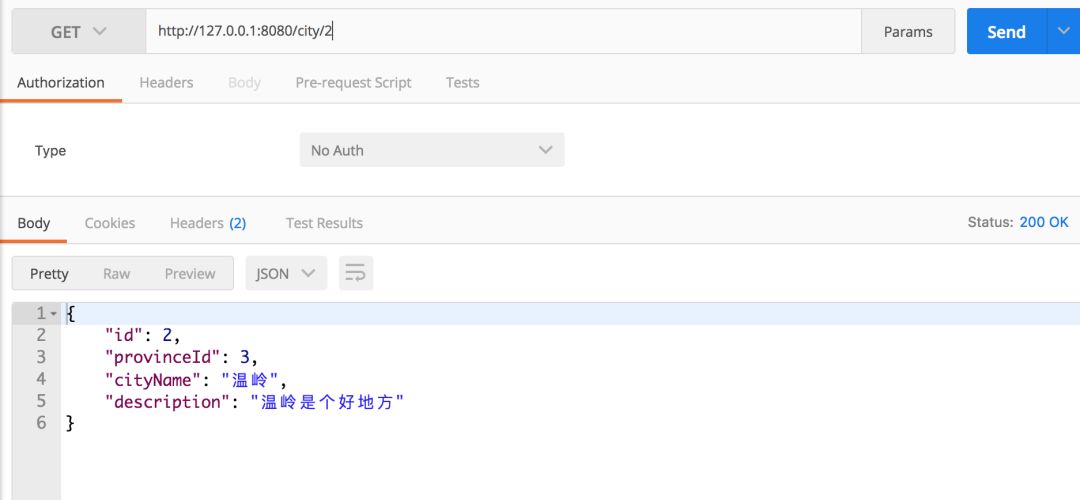
再请求一次,获取城市信息会发现数据获取的耗时快了很多。服务端 Console 输出的日志:
  2017-04-13 18:29:00.273 INFO 13038 --- [nio-8080-exec-1] findCityById() : 城市插入缓存 >> City{id=12, provinceId=3, cityName='三亚', description='水好,天蓝'}


  2017-04-13 18:29:03.145 INFO 13038 --- [nio-8080-exec-2] findCityById() : 从缓存中获取了城市 >> City{id=12, provinceId=3, cityName='三亚', description='水好,天蓝'}
可见,第一次是从数据库 MongoDB 获取数据,并插入缓存,第二次直接从缓存中取。
更新 / 删除城市信息,这两种操作中,如果缓存有对应的数据,则删除缓存。服务端 Console 输出的日志:
2017-04-13 18:29:52.248 INFO 13038 --- [nio-8080-exec-9] deleteCity() : 从缓存中删除城市 ID >> 12
总结
这一讲,主要补充了 Redis 对响应式的支持操作,以及缓存更新策略及实际应用小例子。
代码 GiHub :https://github.com/JeffLi1993/springboot-learning-example
系列教程目录
《01:WebFlux 系列教程大纲》
《02:WebFlux 快速入门实践》
《03:WebFlux Web CRUD 实践》
《04:WebFlux 整合 Mongodb》
《05:WebFlux 整合 Thymeleaf》
《06:WebFlux 中 Thymeleaf 和 Mongodb 实践》
《07:WebFlux 整合 Redis》
《08:WebFlux 中 Redis 实现缓存》
《09:WebFlux 中 WebSocket 实现通信》
《10:WebFlux 集成测试及部署》
《11:WebFlux 实战图书管理系统》
代码示例
本文示例读者可以通过查看下面仓库的中的模块工程名: 2-x-spring-boot-webflux-handling-errors:
Github:https://github.com/JeffLi1993/springboot-learning-example
Gitee:https://gitee.com/jeff1993/springboot-learning-example
如果您对这些感兴趣,欢迎 star、follow、收藏、转发给予支持!
参考资料
Spring Boot 2.x WebFlux 系列:https://www.bysocket.com/archives/2290
spring.io 官方文档
以下专题教程也许您会有兴趣
《程序兵法:算法与数据结构》 https://www.bysocket.com/archives/2314/algorithm
《Spring Boot 2.x 系列教程》 https://www.bysocket.com/springboot
《Java 核心系列教程》 https://www.bysocket.com/archives/2100
热门推荐
回复 [优惠券],领取极客时间最优惠的优惠券
回复 java 或 666 ,领取 Spring 等最新教程
回复 webflux 或 888,领取《Spring Boot 2 WebFlux 教程》
最新整理:回复 [获取资源], 领取
长按二维码,扫扫关注哦
✬关注即可得 Spring Boot Cloud、微服务等干货✬
如果文章对你有帮助的话
转发一下是最好的在看 ❤️
以上是关于WebFlux 集成 Redis 实现缓存 | Spring Boot 2的主要内容,如果未能解决你的问题,请参考以下文章