探索Flutter中线程模型/消息循环的底层逻辑
Posted 淘系技术
tags:
篇首语:本文由小常识网(cha138.com)小编为大家整理,主要介绍了探索Flutter中线程模型/消息循环的底层逻辑相关的知识,希望对你有一定的参考价值。
多线程模型以及线程中的事件循环机制在 OS 里都是必不可少的一部分,也扮演着非常重要的角色,主要用来做异步任务的分发与调度。例如浏览器 JSEngine 中的单线程事件循环机制,那么 Flutter 中的线程模型与事件循环是如何实现的呢?
关于 Flutter 的线程机制,官方给了一个比较宏观层面的说明,简单概括如下:
Flutter Engine 不创建/管理线程,都是由对应的平台层实现,并抽象 Task Runner 概念,共有 4 个 Task Runner ,并且不关心这 4 个 Task Runner 是否是相同的 Task Runner,也不关心是否运行在同一个线程。不过官方还是给出了指导性建议,为了性能,最好是一个 Task Runner 对应一个 Thread ,4 个 Task Runner 分别为:
1. Platform Task Runner :对应平台如 android/ios 的 UI/Main Thread。
2. UI Task Runner:所有 Dart Framework 层的代码均在此现场执行。
3. Raster Task Runner:真正执行渲染任务,光栅化所有从 UI Task Runner中提交过来的任务,最终渲染到屏幕上。
4. IO Task Runner:通常执行耗时计算任务,例如下载/解码远程图片,再交给 Raster Task Runner 渲染。
官方文档比较宏观介绍了这 4 个 Task Runner 的职责,但是细节上还是需要通过阅读源码才能一窥究竟,例如:
Task Runner 如何对应到线程
线程是如何被创建的,包括线程的锁机制、thread local 实现等
线程中的事件循环机制是如何实现的,如何进行事件分发,事件队列有没有优先级
本文会按照这些疑问为线索,逐步微观的介绍具体细节,包括实现细节的底层逻辑,因此文章会比较干,想了解的话,得耐心看看。
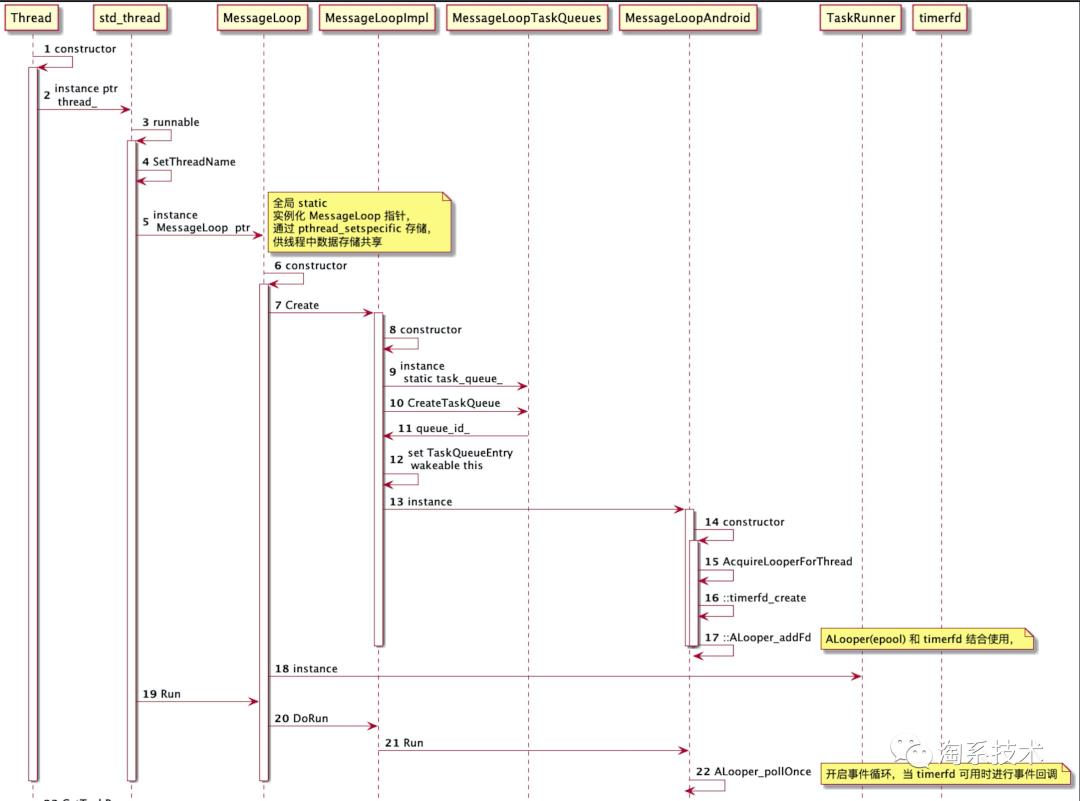
OverView

从整体流程图中可知,主要分为实例化 Thread、构建对应线程的 MessageLoop、构建对应 MessageLoop 的 Task Runner 这几个部分,以下会对这几个关键的步骤进行分析。
实例化 Thread
实例化 Thread 都是在统一的 Thread Host 中,创建对应的 4 个线程。
/path/to/flutter/engine/src/flutter/shell/common/thread_host.cc
ThreadHost::ThreadHost(std::string name_prefix, uint64_t mask) {if (mask & ThreadHost::Type::Platform) {platform_thread = std::make_unique<fml::Thread>(name_prefix + ".platform");}if (mask & ThreadHost::Type::UI) {ui_thread = std::make_unique<fml::Thread>(name_prefix + ".ui");}if (mask & ThreadHost::Type::GPU) {raster_thread = std::make_unique<fml::Thread>(name_prefix + ".raster");}if (mask & ThreadHost::Type::IO) {io_thread = std::make_unique<fml::Thread>(name_prefix + ".io");}}
Android 端初始化 Thread Host 是在 AndroidShellHolder 的构造函数中
/path/to/flutter/engine/src/flutter/shell/platform/android/android_shell_holder.cc
AndroidShellHolder::AndroidShellHolder(flutter::Settings settings,fml::jni::JavaObjectWeakGlobalRef java_object,bool is_background_view): settings_(std::move(settings)), java_object_(java_object) {...if (is_background_view) {thread_host_ = {thread_label, ThreadHost::Type::UI};} else {thread_host_ = {thread_label, ThreadHost::Type::UI | ThreadHost::Type::GPU |ThreadHost::Type::IO};}...}
iOS 端初始化 Thread Host 是在初始化 FlutterViewController 的容器时。
/path/to/flutter/engine/src/flutter/shell/platform/darwin/ios/framework/Source/FlutterEngine.mm
- (BOOL)createShell:(NSString*)entrypoint libraryURI:(NSString*)libraryURI {....const auto threadLabel = [NSString stringWithFormat:@"%@.%zu", _labelPrefix, shellCount++];// The current thread will be used as the platform thread. Ensure that the message loop is// initialized.fml::MessageLoop::EnsureInitializedForCurrentThread();_threadHost = {threadLabel.UTF8String, // labelflutter::ThreadHost::Type::UI | flutter::ThreadHost::Type::GPU |flutter::ThreadHost::Type::IO};....return _shell != nullptr;}
可以看到,两端在构造时均没有 Platform 类型,因为当前线程就是 Platform Thread。
我们再来具体看下 Thread 的具体实现、线程间并发、Thread Local 机制。
▐ 具体实现
使用了 C++ 11 提供的标准 std::thread 实现,而非 pthread ,理论上会更加标准化,不依赖具体的平台实现,有利于可移植。
▐ Concurrent 并发
/path/to/flutter/engine/src/flutter/fml/synchronization/waitable_event.cc
线程锁使用 C++ 11 提供的 std::condition_variable cv_,配合 std::mutex mutex_ 一起使用。
▐ Thread Local
存储对应线程的 Message Loop,这样在同一个线程的不同函数中都能拿到 Message Loop。
/path/to/flutter/engine/src/flutter/fml/message_loop.cc
FML_THREAD_LOCAL ThreadLocalUniquePtr<MessageLoop> tls_message_loop; // #define FML_THREAD_LOCAL static
FML_THREAD_LOCAL 是一个静态宏,tls_message_loop 存储了对应线程的 MessageLoop 指针。
▐ 具体实现
/path/to/flutter/engine/src/flutter/fml/thread_local.cc
ThreadLocalPointer::ThreadLocalPointer(void (*destroy)(void*)) {FML_CHECK(pthread_key_create(&key_, destroy) == 0);}ThreadLocalPointer::~ThreadLocalPointer() {FML_CHECK(pthread_key_delete(key_) == 0);}void* ThreadLocalPointer::get() const {return pthread_getspecific(key_);}void* ThreadLocalPointer::swap(void* ptr) {void* old_ptr = get();FML_CHECK(pthread_setspecific(key_, ptr) == 0);return old_ptr;}
可以看到,是通过 pthread_key_create 、pthread_setspecific、pthread_getspecific 机制实现了 Thread Local 机制。
通过 pthread_getpecific 与 pthread_setspecific 提供在同一个线程中不同函数间的共享数据,存储了对应线程的 MessageLoop 指针。
MessageLoop
接下来我们再来看下,Thread 中的 MessageLoop 是如何实现。
MessageLoop 提供了线程中的事件循环机制,使得在同一个线程中可以按照一定的顺序、优先级进行任务分发,异步执行任务。
MessageLoop 的初始化时在线程的构造函数回调中,回调函数内即为当前运行线程。
Thread::Thread(const std::string& name) : joined_(false) {...thread_ = std::make_unique<std::thread>([&latch, &runner, name]() -> void {SetCurrentThreadName(name);fml::MessageLoop::EnsureInitializedForCurrentThread();auto& loop = MessageLoop::GetCurrent();runner = loop.GetTaskRunner();latch.Signal();loop.Run();...});...}
▐ 实例化
/path/to/flutter/engine/src/flutter/fml/platform/android/message_loop_android.cc
fml::RefPtr<MessageLoopImpl> MessageLoopImpl::Create() {return fml::MakeRefCounted<MessageLoopDarwin>();return fml::MakeRefCounted<MessageLoopAndroid>();return fml::MakeRefCounted<MessageLoopFuchsia>();return fml::MakeRefCounted<MessageLoopLinux>();return fml::MakeRefCounted<MessageLoopWin>();return nullptr;}
Android 上对应的实现版本为 MessageLoopAndroid,具体的实现包括:创建 ALopper、添加 FD、等待事件、消费事件这几个步骤。
iOS 上对应的实现版本为 MessageLoopDarwin,具体使用了 CoreFoundation 框架中的 RunLoop 实现。
我们先来看 Android 端的实现,在 MessageLoopAndroid 中,是通过 Android NDK 提供的 ALooper 实现,而 ALooper 的底层逻辑实现是用的 Linux 中的 IO 多路复用 Epoll 机制。
Epoll 机制
简单来讲就是允许一个线程中可以有多个 IO 任务切换进行。
传统的阻塞型,一个线程只能处理一个 IO 流(一边读,一边写),而想要一个线程处理多个流,可以采用非阻塞型,非阻塞型就包括了轮询I/O 或者 事件代理型,轮询I/O 的效率比较低,而事件代理型就是 Epoll 机制的实现。
Epoll 的操作主要就是创建一个 Epoll(epoll_create) 句柄,然后往 Epoll 中增加/删除某一个流的某一个事件 (epoll_ctl),最后在一定的时间内等待事件的发生即可 (epoll_wait) 。
▐ 创建 ALooper
/path/to/flutter/engine/src/flutter/fml/platform/android/message_loop_android.cc
static ALooper* AcquireLooperForThread() {ALooper* looper = ALooper_forThread();if (looper == nullptr) {// No looper has been configured for the current thread. Create one and// return the same.looper = ALooper_prepare(0);}// The thread already has a looper. Acquire a reference to the same and return// it.ALooper_acquire(looper);return looper;}
▐ 添加 FD (File Descriptor)
/path/to/flutter/engine/src/flutter/fml/platform/android/message_loop_android.cc
MessageLoopAndroid::MessageLoopAndroid(): looper_(AcquireLooperForThread()),timer_fd_(::timerfd_create(kClockType, TFD_NONBLOCK | TFD_CLOEXEC)),running_(false) {...static const int kWakeEvents = ALOOPER_EVENT_INPUT;ALooper_callbackFunc read_event_fd = [](int, int events, void* data) -> int {if (events & kWakeEvents) {FML_DLOG(INFO) << "post task read event fd";reinterpret_cast<MessageLoopAndroid*>(data)->OnEventFired();}return 1; // continue receiving callbacks};int add_result = ::ALooper_addFd(looper_.get(), // loopertimer_fd_.get(), // fdALOOPER_POLL_CALLBACK, // identkWakeEvents, // eventsread_event_fd, // callbackthis // baton);...}
ALooper_addFd 向 looper 中添加 file descriptor , timer_fd_ 由 timerfd_create 创建。
事件为 ALOOPER_EVENT_INPUT,当在 fd 上有数据时,会回调方法 read_event_fd 。
timerfd 机制
timerfd 是 Linux 为用户程序提供的一个定时器接口,这个接口基于文件描述符,通过文件描述符的可读事件进行超时通知,当该文件描述符在超时时变得可读。
▐ 等待事件
/path/to/flutter/engine/src/flutter/fml/platform/android/message_loop_android.cc
void MessageLoopAndroid::Run() {...running_ = true;while (running_) {int result = ::ALooper_pollOnce(-1, // infinite timeoutnullptr, // out fd,nullptr, // out events,nullptr // out data);if (result == ALOOPER_POLL_TIMEOUT || result == ALOOPER_POLL_ERROR) {// This handles the case where the loop is terminated using ALooper APIs.running_ = false;}}}
ALooper_pollOnce 等待事件,这里 timeout 设置了 -1,说明一直等直到有事件出现。
▐ 消费事件
真正消费的事件就是在创建 Looper 时的回调方法 read_event_fd ,回调方法再回调自身方法 OnEventFired。
/path/to/flutter/engine/src/flutter/fml/platform/android/message_loop_android.cc
void MessageLoopAndroid::OnEventFired() {if (TimerDrain(timer_fd_.get())) {RunExpiredTasksNow();}}
以上是 Android 端 MessageLoope 的实现,我们再来看下 iOS 端的实现。
/path/to/flutter/engine/src/flutter/fml/platform/darwin/message_loop_darwin.mm
iOS 的实现基于 CoreFoundation 框架中 的 RunLoop 实现。
MessageLoopDarwin::MessageLoopDarwin(): running_(false), loop_((CFRunLoopRef)CFRetain(CFRunLoopGetCurrent())) {FML_DCHECK(loop_ != nullptr);// Setup the delayed wake source.CFRunLoopTimerContext timer_context = {.info = this,};delayed_wake_timer_.Reset(CFRunLoopTimerCreate(kCFAllocatorDefault, kDistantFuture /* fire date */,HUGE_VAL /* interval */, 0 /* flags */, 0 /* order */,reinterpret_cast<CFRunLoopTimerCallBack>(&MessageLoopDarwin::OnTimerFire)/* callout */,&timer_context /* context */));FML_DCHECK(delayed_wake_timer_ != nullptr);CFRunLoopAddTimer(loop_, delayed_wake_timer_, kCFRunLoopCommonModes);}
MessageLoopDarwin 与 MessageLoopAndoird 一样都是继承 MessageLoopImpl,因此 MessageLoopDarwin 也同时实现了 Run 、WakeUp 等方法,分别对应事件循环的开始并等待事件到来、事件消费等。
TaskRunner
创建完成 MessageLoop 后,会同时创建 TaskRunner,TaskRunner 会引用 MessageLoop ,TaskRunner 的主要作用是封装了些 task 的执行/分发方法,例如 PostTask 等。
每个线程对应的 TaskRunner 都封装在 TaskRunners 中,这样就可以方便的通过 TaskRunners 来获取到对应线程的 task 进行分发,例如:task_runners.GetRasterTaskRunner()->PostTask([]() {});
/path/to/flutter/engine/src/flutter/fml/task_runner.h
class TaskRunner : public fml::RefCountedThreadSafe<TaskRunner> {public:virtual ~TaskRunner();virtual void PostTask(const fml::closure& task);virtual void PostTaskForTime(const fml::closure& task,fml::TimePoint target_time);virtual void PostDelayedTask(const fml::closure& task, fml::TimeDelta delay);virtual bool RunsTasksOnCurrentThread();virtual TaskQueueId GetTaskQueueId();static void RunNowOrPostTask(fml::RefPtr<fml::TaskRunner> runner,const fml::closure& task);...}
/path/to/flutter/engine/src/flutter/common/task_runners.h
class TaskRunners {...fml::RefPtr<fml::TaskRunner> GetPlatformTaskRunner() const;fml::RefPtr<fml::TaskRunner> GetUITaskRunner() const;fml::RefPtr<fml::TaskRunner> GetIOTaskRunner() const;fml::RefPtr<fml::TaskRunner> GetRasterTaskRunner() const;...}
▐ 消费任务事件流程

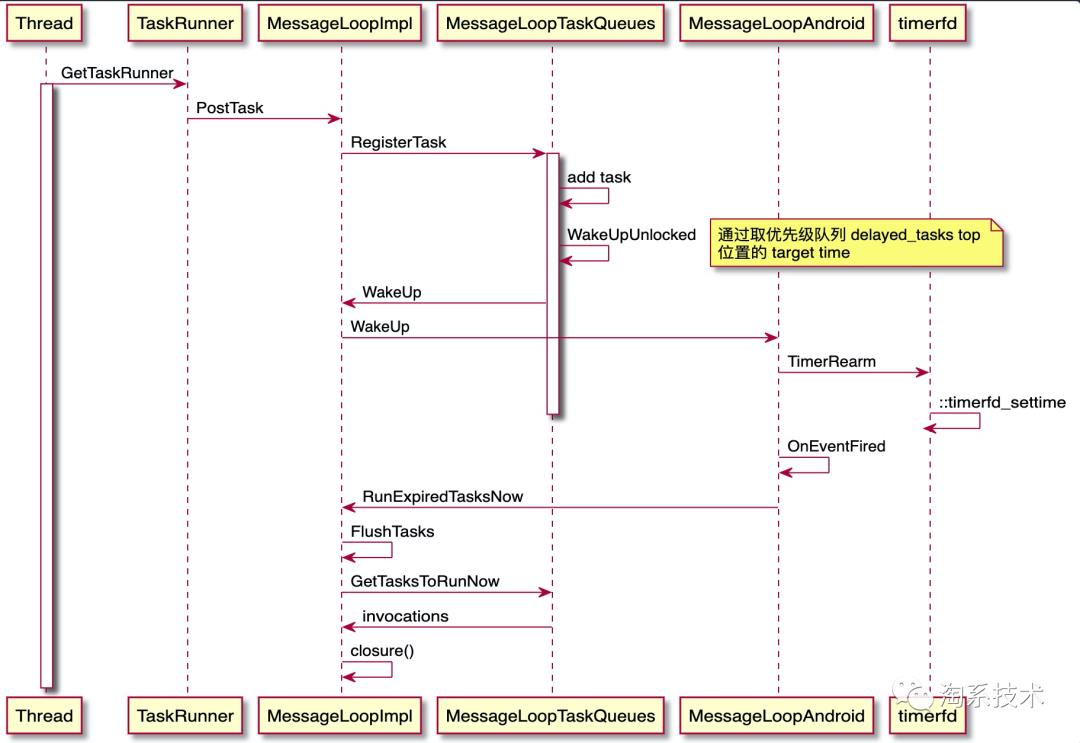
消费事件主要是指在特定的线程中按一定的规则处理任务队列中的一系列任务,主要分为 PostTask、WakeUp、callback 这几个步骤。以下对关键的几个步骤进行分析。
PostTask
MessageLoopImpl 的 PostTask 会调到 MessageLoopTaskQueues 的 RegisterTask。
/path/to/flutter/engine/src/flutter/fml/message_loop_task_queues.cc
void MessageLoopTaskQueues::RegisterTask(TaskQueueId queue_id,const fml::closure& task,fml::TimePoint target_time) {std::lock_guard guard(queue_mutex_);size_t order = order_++;const auto& queue_entry = queue_entries_.at(queue_id);queue_entry->delayed_tasks.push({order, task, target_time});TaskQueueId loop_to_wake = queue_id;if (queue_entry->subsumed_by != _kUnmerged) {loop_to_wake = queue_entry->subsumed_by;}WakeUpUnlocked(loop_to_wake,queue_entry->delayed_tasks.top().GetTargetTime());}
主要是向队列中塞入任务,其中事件循环中的任务队列 delayed_tasks 为
/path/to/flutter/engine/src/flutter/fml/delayed_task.h
using DelayedTaskQueue = std::priority_queue<DelayedTask,std::deque<DelayedTask>,std::greater<DelayedTask>>;
其类型为 priority_queue,使用了优先级队列,根据 std::priority_queue 文档 ,使用 std::greater<DelayedTask> 会使最小的元素在最上面,并且 DelayedTask 也对操作符 > 进行了操作符重载。
/path/to/flutter/engine/src/flutter/fml/delayed_task.cc
bool DelayedTask::operator>(const DelayedTask& other) const {if (target_time_ == other.target_time_) {return order_ > other.order_;}return target_time_ > other.target_time_;}
可以看到:
1. 当 target_time_ 相等的时候,按 order_ 从小到大排序
2. 否则按 target_time_ 从小到大排序
最终的优先级顺序为:按时间从小到大排序,在此基础之上按 order 优先级从小到大排序,也就是说时间越近,排序越小的优先级越高,最先执行。
WakeUp
Android 端通过 timerfd_settime 设置超时,使 ALooper 设置的对应 fd 可读,最终进行事件回调(Alooper 设置的回调 closure read_event_fd )。
/path/to/flutter/engine/src/flutter/fml/platform/android/message_loop_android.cc
void MessageLoopAndroid::WakeUp(fml::TimePoint time_point) {bool result = TimerRearm(timer_fd_.get(), time_point);FML_DCHECK(result);}
bool TimerRearm(int fd, fml::TimePoint time_point) {...int result = ::timerfd_settime(fd, TFD_TIMER_ABSTIME, &spec, nullptr);return result == 0;}
iOS 端则通过 CoreFoundation 框架中 的 CFRunLoopTimerSetNextFireDate 进行定时器 RunLoop 唤醒。
/path/to/flutter/engine/src/flutter/fml/platform/darwin/message_loop_darwin.mm
void MessageLoopDarwin::WakeUp(fml::TimePoint time_point) {// Rearm the timer. The time bases used by CoreFoundation and FXL are// different and must be accounted for.CFRunLoopTimerSetNextFireDate(delayed_wake_timer_,CFAbsoluteTimeGetCurrent() + (time_point - fml::TimePoint::Now()).ToSecondsF());}
callback
Android 端通过 Operating on a timer file descriptor 文档中描述的当 fd 可读时,会返回一个 8 字节的数,代表包含了已经发生的超时数量,说明已经有事件到来可以进行处理。
/path/to/flutter/engine/src/flutter/fml/platform/android/message_loop_android.cc
void MessageLoopAndroid::OnEventFired() {if (TimerDrain(timer_fd_.get())) {RunExpiredTasksNow();}}
/path/to/flutter/engine/src/flutter/fml/platform/linux/timerfd.cc
bool TimerDrain(int fd) {// 8 bytes must be read from a signaled timer file descriptor when signaled.uint64_t fire_count = 0;ssize_t size = FML_HANDLE_EINTR(::read(fd, &fire_count, sizeof(uint64_t)));if (size != sizeof(uint64_t)) {return false;}return fire_count > 0;}
iOS 端则直接调用到 loop->RunExpiredTasksNow(); 进行事件的分发处理。
以下是进行最终 tasks 的消费,并最终回调到调用者的 fml::closure 内。
/path/to/flutter/engine/src/flutter/fml/message_loop_impl.cc
void MessageLoopImpl::FlushTasks(FlushType type) {std::vector<fml::closure> invocations;task_queue_->GetTasksToRunNow(queue_id_, type, invocations);for (const auto& invocation : invocations) {invocation();std::vector<fml::closure> observers =task_queue_->GetObserversToNotify(queue_id_);for (const auto& observer : observers) {observer();}}}
根据 queue_id_ 拿到 task queue 中的任务,并执行回调方法,完成一次任务回调。
典型的一次线程内任务分发方式如下:
task_runners.GetUITaskRunner()->PostTask([]() {...});
可以在源码中看到非常多类似的调用,设计中也慢慢屏蔽掉了线程的概念,只有 TaskRunner 的概念,这应该就是软件设计中的亮点之一。
线程/MeesageLoop/TaskRunner 关系

每个 Thread 对应相应的 TaskRunner,并且通过 Thread Local机制存储对应的 MessageLoop
每个 TaskRunner 对应相应的 MessageLoop
每个 MessageLoop 中有对应的 TaskQueue,TaskQueue 使用 priority_queue 实现
每个 TaskQueue 通过 TaskQueueId 被存储在全局的 TaskQueues Map 中
后记
分析了这么多,整个 Thread 与事件机制方案和 Flutter 本身其实并没有太多关系,任何系统/架构其实都可以用类似的方式、思路。
对于 Android 开发同学,里面的概念会更新熟悉,整套的消息机制基本就是 Android 原生的消息机制的复刻版本。
iOS 的 MessageLoop 实现也是复用了端上的 RunLoop 机制。
以上是关于探索Flutter中线程模型/消息循环的底层逻辑的主要内容,如果未能解决你的问题,请参考以下文章
阅读源码可以让自己静下来,慢下来,抱着学习的心态,品味其中的细节,会有收获、惊喜,实践过的人应该会懂