Flink从入门到放弃之源码解析系列-第2章 Flink执行计划生成
Posted 大数据技术与架构
tags:
篇首语:本文由小常识网(cha138.com)小编为大家整理,主要介绍了Flink从入门到放弃之源码解析系列-第2章 Flink执行计划生成相关的知识,希望对你有一定的参考价值。
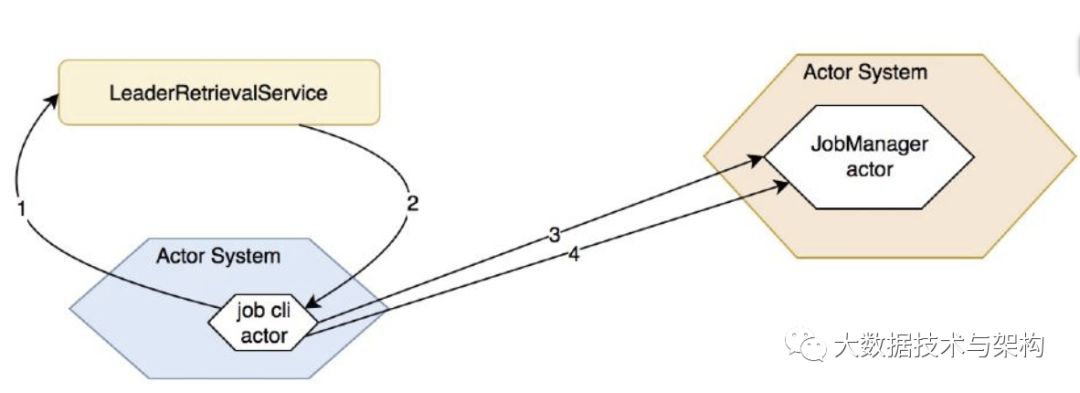
上一节讲到业务代码StreamExecutionEnvironment.execute()会触发job的客户端逻辑计划JobGraph 的生成,之后是客户端与JobManager的交互过程
//ClusterClient line497
public JobExecutionResult run(JobGraph jobGraph, ClassLoader classLoader) throwsProgramInvocationException {
waitForClusterToBeReady();
final ActorSystem actorSystem;
try {
actorSystem = actorSystemLoader.get();
} catch (FlinkException fe) {
throw new ProgramInvocationException("Could not start the ActorSystem needed to talk to the " +
"JobManager.", jobGraph.getJobID(), fe);
}
try {
logAndSysout("Submitting job with JobID: " + jobGraph.getJobID() + ". Waiting for job completion.");
this.lastJobExecutionResult = JobClient.submitJobAndWait(
actorSystem,
flinkConfig,
highAvailabilityServices,
jobGraph,
timeout,
printStatusDuringExecution,
classLoader);
return lastJobExecutionResult;
} catch (JobExecutionException e) {
throw new ProgramInvocationException("The program execution failed: " + e.getMessage(), jobGraph.getJobID(), e);
}
}
///jobClient 111
Props jobClientActorProps = JobSubmissionClientActor.createActorProps(
highAvailabilityServices.getJobManagerLeaderRetriever(HighAvailabilityServices.DEFAULT_JOB_ID),
timeout,
sysoutLogUpdates,
config);
///HighAvailabilityServices 88
LeaderRetrievalService getJobManagerLeaderRetriever(JobID jobID);
启动获取 leader JobManager 的服务,flink 支持 JobManager HA,需要通过 leader JobManager 获取当前的 leader JobManager,稍微介绍下这个服务:
JobManager Leader 选举
先来看获取 LeaderRetrievalService的逻辑:
//HighAvailabilityServices 88
LeaderRetrievalService getJobManagerLeaderRetriever(JobID jobID);
//ZooKeeperHaServices line141
@Override
public LeaderRetrievalService getJobManagerLeaderRetriever(JobID jobID) {
return ZooKeeperUtils.createLeaderRetrievalService(client, configuration,getPathForJobManager(jobID));
}
getJobManagerLeaderRetriever的实现有很多种,STANDALONE和ZOOKEEPER等
//ZooKeeperLeaderRetrievalService line1
@Override
public void nodeChanged() throws Exception {
synchronized (lock) {
if (running) {
try {
LOG.debug("Leader node has changed.");
ChildData childData = cache.getCurrentData();
String leaderAddress;
UUID leaderSessionID;
if (childData == null) {
leaderAddress = null;
leaderSessionID = null;
} else {
byte[] data = childData.getData();
if (data == null || data.length == 0) {
leaderAddress = null;
leaderSessionID = null;
} else {
ByteArrayInputStream bais = new ByteArrayInputStream(data);
ObjectInputStream ois = new ObjectInputStream(bais);
leaderAddress = ois.readUTF();
leaderSessionID = (UUID) ois.readObject();
}
}
if (!(Objects.equals(leaderAddress, lastLeaderAddress) &&
Objects.equals(leaderSessionID, lastLeaderSessionID))) {
LOG.debug(
"New leader information: Leader={}, session ID={}.",
leaderAddress,
leaderSessionID);
lastLeaderAddress = leaderAddress;
lastLeaderSessionID = leaderSessionID;
leaderListener.notifyLeaderAddress(leaderAddress, leaderSessionID);
}
} catch (Exception e) {
leaderListener.handleError(new Exception("Could not handle node changed event.", e));
throw e;
}
} else {
LOG.debug("Ignoring node change notification since the service has already been stopped.");
}
}
}
客户端JobGraph的提交
//JobClient line255
public static JobExecutionResult awaitJobResult(JobListeningContext listeningContext)throws JobExecutionException {
final JobID jobID = listeningContext.getJobID();
final ActorRef jobClientActor = listeningContext.getJobClientActor();
final Future<Object> jobSubmissionFuture = listeningContext.getJobResultFuture();
final FiniteDuration askTimeout = listeningContext.getTimeout();
// retrieves class loader if necessary
final ClassLoader classLoader = listeningContext.getClassLoader();
// wait for the future which holds the result to be ready
// ping the JobClientActor from time to time to check if it is still running
while (!jobSubmissionFuture.isCompleted()) {
try {
Await.ready(jobSubmissionFuture, askTimeout);
} catch (InterruptedException e) {
throw new JobExecutionException(
jobID,
"Interrupted while waiting for job completion.");
} catch (TimeoutException e) {
try {
Await.result(
Patterns.ask(
jobClientActor,
// Ping the Actor to see if it is alive
new Identify(true),
Timeout.durationToTimeout(askTimeout)),
askTimeout);
// we got a reply, continue waiting for the job result
} catch (Exception eInner) {
// we could have a result but the JobClientActor might have been killed and
// thus the health check failed
if (!jobSubmissionFuture.isCompleted()) {
throw new JobExecutionException(
jobID,
"JobClientActor seems to have died before the JobExecutionResult could be retrieved.",
eInner);
}
}
}
}
final Object answer;
try {
// we have already awaited the result, zero time to wait here
answer = Await.result(jobSubmissionFuture, Duration.Zero());
}
catch (Throwable throwable) {
throw new JobExecutionException(jobID,
"Couldn't retrieve the JobExecutionResult from the JobManager.", throwable);
}
finally {
// failsafe shutdown of the client actor
jobClientActor.tell(PoisonPill.getInstance(), ActorRef.noSender());
}
// second block handles the actual response
if (answer instanceof JobManagerMessages.JobResultSuccess) {
LOG.info("Job execution complete");
SerializedJobExecutionResult result = ((JobManagerMessages.JobResultSuccess) answer).result();
if (result != null) {
try {
return result.toJobExecutionResult(classLoader);
} catch (Throwable t) {
throw new JobExecutionException(jobID,
"Job was successfully executed but JobExecutionResult could not be deserialized.");
}
} else {
throw new JobExecutionException(jobID,
"Job was successfully executed but result contained a null JobExecutionResult.");
}
}
else if (answer instanceof JobManagerMessages.JobResultFailure) {
LOG.info("Job execution failed");
SerializedThrowable serThrowable = ((JobManagerMessages.JobResultFailure) answer).cause();
if (serThrowable != null) {
Throwable cause = serThrowable.deserializeError(classLoader);
if (cause instanceof JobExecutionException) {
throw (JobExecutionException) cause;
} else {
throw new JobExecutionException(jobID, "Job execution failed", cause);
}
} else {
throw new JobExecutionException(jobID,
"Job execution failed with null as failure cause.");
}
}
else if (answer instanceof JobManagerMessages.JobNotFound) {
throw new JobRetrievalException(
((JobManagerMessages.JobNotFound) answer).jobID(),
"Couldn't retrieve Job " + jobID + " because it was not running.");
}
else {
throw new JobExecutionException(jobID,
"Unknown answer from JobManager after submitting the job: " + answer);
}
}
...
//JobClientActor-> JobSubmissionClientActor line142
private void tryToSubmitJob() {
LOG.info("Sending message to JobManager {} to submit job {} ({}) and wait for progress",
jobManager.path().toString(), jobGraph.getName(), jobGraph.getJobID());
final ActorGateway jobManagerGateway = new AkkaActorGateway(jobManager,leaderSessionID);
final AkkaJobManagerGateway akkaJobManagerGateway = newAkkaJobManagerGateway(jobManagerGateway);
LOG.info("Upload jar files to job manager {}.", jobManager.path());
final CompletableFuture<InetSocketAddress> blobServerAddressFuture = JobClient.retrieveBlobServerAddress(
akkaJobManagerGateway,
Time.milliseconds(timeout.toMillis()));
final CompletableFuture<Void> jarUploadFuture = blobServerAddressFuture.thenAcceptAsync(
(InetSocketAddress blobServerAddress) -> {
try {
ClientUtils.extractAndUploadJobGraphFiles(jobGraph, () -> newBlobClient(blobServerAddress, clientConfig));
} catch (FlinkException e) {
throw new CompletionException(e);
}
},
getContext().dispatcher());
jarUploadFuture
.thenAccept(
(Void ignored) -> {
LOG.info("Submit job to the job manager {}.", jobManager.path());
jobManager.tell(
decorateMessage(
new JobManagerMessages.SubmitJob(
jobGraph,
ListeningBehaviour.EXECUTION_RESULT_AND_STATE_CHANGES)),
getSelf());
// issue a SubmissionTimeout message to check that we submit the job within
// the given timeout
getContext().system().scheduler().scheduleOnce(
timeout,
getSelf(),
decorateMessage(JobClientMessages.getSubmissionTimeout()),
getContext().dispatcher(),
ActorRef.noSender());
})
.whenComplete(
(Void ignored, Throwable throwable) -> {
if (throwable != null) {
getSelf().tell(
decorateMessage(new JobManagerMessages.JobResultFailure(
newSerializedThrowable(ExceptionUtils.stripCompletionException(throwable)))),
ActorRef.noSender());
}
});
}
总结下上面的过程:
启动JobClientActor用来和JobManager交互
上传用户 jar 包
提交 SubmitJob 命令,等待程序执行
JobManager执行计划生成
JobManager负责接收 flink 的作业,调度 task,收集 job 的状态、管理 TaskManagers。被实现为一个 akka actor。
客户端上传完 jar 包和JobGraph,flink 会进一步解析封装成运行

时的执行计划ExecutionGraph,JobManager的构造器在初始化的时候传入了很多组件,这里简单列举下功能方便后面的逻辑展开,具体的细节将会在下一节讲解。
BlobServer:实现了 BOLB server,其会监听收到的 requests,并会创建 目录结构存储 BLOBS 【持久化】或者临时性的缓存他们
InstanceManager:TaskManager在flink框架内部被叫做Instance,flink通过InstanceManager管理 flink 集群中当前所有活跃的 TaskManager,包括接收心跳,通知 InstanceListener Instance 的生成与死亡,一个典型的 InstanceListener 为 flink 的 Scheduler
BlobLibraryCacheManager:flink job 的 jar 包存储服务,使用上面的 BlobServer 完成。
MemoryArchivist备案已提交的flink作业,包括JobGraph、ExecutionGraph等
ZooKeeperCompletedCheckpointStore:负责持久化 job 的 checkpoint 信息,一个 job 可以持久化多个 checkpoint,但只有最新的会被使用,具体方式为先在文件系统中持久化一份,再将文件句柄更新到 zk,并在 zk上依次递增节点路径号,zk 上保存了最近的 10 次 checkpoint
SavepointStore:flink 的状态存储,负责存储算子内部定义的状态,与 checkpoint 稍有区别,后者由 flink 框架来维护
为了对JobManager中所起的 actors 服务有所了解,这里简单介绍下JobManager的启动过程
简单分析得知line1999: runJobManager是JobManager启动的入口,在获取JobManager启动的主机和端口后,变开始启动 actor system,web ui以及其他 actors:
//JobManager line1999
def runJobManager(
configuration: Configuration,
executionMode: JobManagerMode,
listeningAddress: String,
listeningPort: Int)
: Unit = {
val (jobManagerSystem, _, _, webMonitorOption, _) =startActorSystemAndJobManagerActors(
configuration,
executionMode,
listeningAddress,
listeningPort,
classOf[JobManager],
classOf[MemoryArchivist],
Option(classOf[StandaloneResourceManager])
)
// block until everything is shut down
jobManagerSystem.awaitTermination()
具体的启动逻辑在startActorSystemAndJobManagerActors方法中:
//JobManager line2147
def startActorSystem(
configuration: Configuration,
externalHostname: String,
port: Int): ActorSystem = {
// Bring up the job manager actor system first, bind it to the given address.
val jobManagerSystem = BootstrapTools.startActorSystem(
configuration,
externalHostname,
port,
LOG.logger)
val address = AkkaUtils.getAddress(jobManagerSystem)
configuration.setString(JobManagerOptions.ADDRESS, address.host.get)
configuration.setInteger(JobManagerOptions.PORT, address.port.get)
jobManagerSystem
}
简单列举下逻辑:
配置 Akka 并生成 ActorSystem
初始化 ZooKeeperLeaderRetrievalService,JobManager在启动的时候会以 LeaderRetrievalListener 的身份将自己注册进来,该 service 负责监听最新的 leader 信息,当发生改变时 通知所有 listener【所有的 JobManager】
启动FlinkResourceManager
到这里一个完整的JobManager actor 便启动起来了
既然是 actor ,那么他的核心逻辑一定是各种消息的路由和处理:
//JobManager
override def handleMessage: Receive = {
case GrantLeadership(newLeaderSessionID) =>
log.info(s"JobManager $getAddress was granted leadership with leader session ID " +
s"$newLeaderSessionID.")
leaderSessionID = newLeaderSessionID
介绍下这里比较重要的几种消息:
处理消息的核心方法
GrantLeadership 获得leader授权,将自身被分发到的 session id 写到 zookeeper,并恢复所有的 jobs.
RevokeLeadership 剥夺leader授权,打断清空所有的 job 信息,但是保留作业缓存,注销所有的 TaskManagers.
RegisterTaskManagers 注册 TaskManager,如果之前已经注册过,则只给对应的 Instance 发送消息,否则启动注册逻辑:在 InstanceManager 中注册该 Instance 的信息,并停止 Instance BlobLibraryCacheManager 的端口【供下载 lib 包用】,同时使用 watch 监听 task manager 的存活
SubmitJob 提交 jobGraph
执行计划 ExecutionGraph 的生成
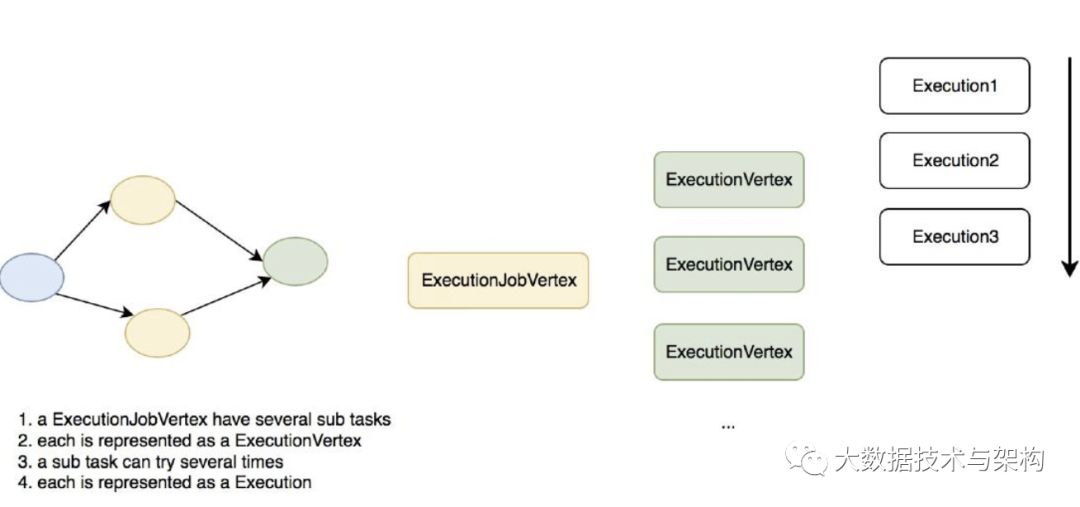
flink 的运行时执行计划为 ExecutionGraph,ExecutionGraph 对应之前的 JobGraph,一个 ExecutionGraph 包含多个 ExecutionJobVertex 节点,JobGraph 的 JobVertex,每个 ExecutionJobVertex 节点的并发子 task 对应一个 ExecutionVertex,每个 ExecutionVertex 的一次执行被抽象为一次 Execution,具体如下图所示:
下面会对每个抽象做详细的介绍

ExecutionGraph 的创建是在 JobManager 接收 SubmitJob 命令后开始的,这条消息会被路由到方法:
//JobManager line443
case SubmitJob(jobGraph, listeningBehaviour) =>
val client = sender()
val jobInfo = new JobInfo(client, listeningBehaviour, System.currentTimeMillis(),
jobGraph.getSessionTimeout)
submitJob(jobGraph, jobInfo)
其逻辑总结如下:
提交作业
将 JobGraph 转换为 ExecutionGraph 逻辑计划转化为物理计划 1283
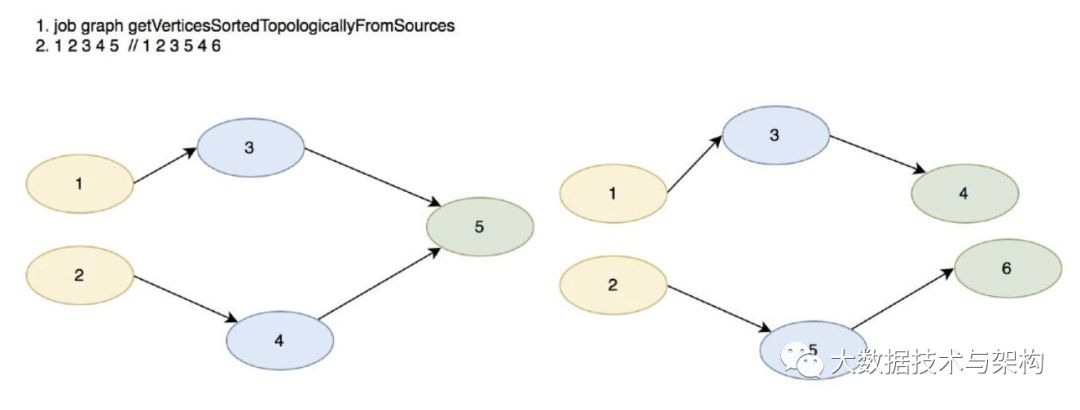
ExecutionJobVertex 在此处生成,通过 JobGraph 依照数据源顺序获取下游 JobVertex,具体算法如下:

flink排序节点的顺序:
数据源节点
只有一个上游的节点
sink节点
例如上图的两个拓扑结构,左边节点排序完的顺序为: 1 2 3 4 5 右边的节点排序完的顺序为:1 2 3 5 4 6
那么 flink 为什么要将 JobGraph 转换为 ExecutionGraph ,并且排序这些节点呢?ExecutionGraph 代表了运行时的执行计划,包括 task 的并发、连接、中间结果的维护等,排序的目的是给 task 的部署设置先后顺序,想来也是很自然的。我们来看一下 ExecutionGraph 的构造器就能了解个大概:
public ExecutionGraph(
ExecutionContext executionContext,
JobID jobId,
String jobName,
Configuration jobConfig,
SerializedValue<ExecutionConfig> serializedConfig,
FiniteDuration timeout,
RestartStrategy restartStrategy,
List<BlobKey> requiredJarFiles,
List<URL> requiredClasspaths,
ClassLoader userClassLoader,
MetricGroup metricGroup) {
...
this.executionContext = executionContext;
this.jobID = jobId;
this.jobName = jobName;
this.jobConfiguration = jobConfig;
this.userClassLoader = userClassLoader;
this.tasks = new ConcurrentHashMap<JobVertexID, ExecutionJobVertex>();
this.intermediateResults = new ConcurrentHashMap<IntermediateDataSetID,IntermediateResult>();
this.verticesInCreationOrder = new ArrayList<ExecutionJobVertex>();
this.currentExecutions = new ConcurrentHashMap<ExecutionAttemptID,Execution>();
this.jobStatusListenerActors = new CopyOnWriteArrayList<ActorGateway>();
this.executionListenerActors = new CopyOnWriteArrayList<ActorGateway>();
this.stateTimestamps = new long[JobStatus.values().length];
this.stateTimestamps[JobStatus.CREATED.ordinal()] =System.currentTimeMillis();
this.requiredJarFiles = requiredJarFiles;
this.requiredClasspaths = requiredClasspaths;
this.serializedExecutionConfig = checkNotNull(serializedConfig);
this.timeout = timeout;
this.restartStrategy = restartStrategy;
metricGroup.gauge(RESTARTING_TIME_METRIC_NAME, new RestartTimeGauge());
}
从构造器可以看出,ExecutionGraph 会维护当前的逻辑计划信息【就是有哪些task要执行】、中间结果生成信息,当前正在运行的 task,负责 job 和 task 状态切换的通知等。
执行计划节点 ExecutionJobVertex 的生成
attachJobGraph 是 ExecutionGraph 构造图结构的核心方法,而其中最关键的逻辑是 执行节点 ExecutionJobGraph 的创建,下面详细分析下其创建过程和核心功能:
//ExecutionJobVertex
public ExecutionJobVertex(ExecutionGraph graph, JobVertex jobVertex,
int defaultParallelism, FiniteDuration timeout, longcreateTimestamp)
throws JobException
{
...
this.graph = graph;
this.jobVertex = jobVertex;
int vertexParallelism = jobVertex.getParallelism();
int numTaskVertices = vertexParallelism > 0 ? vertexParallelism :defaultParallelism;
this.parallelism = numTaskVertices;
this.taskVertices = new ExecutionVertex[numTaskVertices];
this.inputs = new ArrayList<IntermediateResult>(jobVertex.getInputs().size());
// take the sharing group
this.slotSharingGroup = jobVertex.getSlotSharingGroup();
this.coLocationGroup = jobVertex.getCoLocationGroup();
...
// create the intermediate results
this.producedDataSets = newIntermediateResult[jobVertex.getNumberOfProducedIntermediateDataSets()];
for (int i = 0; i < jobVertex.getProducedDataSets().size(); i++) {
final IntermediateDataSet result =jobVertex.getProducedDataSets().get(i);
this.producedDataSets[i] = new IntermediateResult(
result.getId(),
this,
numTaskVertices,
result.getResultType(),
result.getEagerlyDeployConsumers());
}
// create all task vertices
for (int i = 0; i < numTaskVertices; i++) {
ExecutionVertex vertex = new ExecutionVertex(this, i,this.producedDataSets, timeout, createTimestamp);
this.taskVertices[i] = vertex;
}
...
// set up the input splits, if the vertex has any
try {
@SuppressWarnings("unchecked")
InputSplitSource<InputSplit> splitSource =(InputSplitSource<InputSplit>) jobVertex.getInputSplitSource();
if (splitSource != null) {
inputSplits = splitSource.createInputSplits(numTaskVertices);
if (inputSplits != null) {
if (splitSource instanceof StrictlyLocalAssignment) {
inputSplitsPerSubtask =computeLocalInputSplitsPerTask(inputSplits);
splitAssigner = newPredeterminedInputSplitAssigner(inputSplitsPerSubtask);
} else {
splitAssigner =splitSource.getInputSplitAssigner(inputSplits);
}
}
}
else {
inputSplits = null;
}
}
catch (Throwable t) {
throw new JobException("Creating the input splits caused an error: " +t.getMessage(), t);
}
finishedSubtasks = new boolean[parallelism];
}
简要介绍下其构建逻辑:
依据对应的 JobVetex 的并发生成对应个数的 ExecutionVertex,一个 ExecutionVertex 代表一个 ExecutionJobVertex 的并发子 task
设置 SlotSharingGroup 和 CoLocationGroup,这两个组件是 flink 运行时任务调度的核心抽象,会约束 flink 调度 task 的策略,在 flink 任务调度算法 一节会详细介绍
将原来 JobVertex 的中间结果 IntermediateDataSet 转化为 IntermediateResult,后者在前者的基础上加入了 当前正在运行的 producer 信息,是真正关于运行时中间数据的抽象
如果对应的 job 节点是数据源节点,会获取其 InputSplitSource,InputSplitSource 控制了数据源并发子 task 和生产的 InputSplit 的对应关系,一个 InputSplit 代表一个数据源分片,对于 flink streaming 来说,InputSplitSource 就是一个 InputFormat,对应一个输入源 task
执行计划节点 ExecutionJobVertex 的连接
构建完节点后通过连接生成执行计划 DAG【见ExecutionGraph attachJobGraph 方法】,connectToPredecessors 是连接执行节点的核心逻辑:
//ExecutionJobGraph
public void connectToPredecessors(Map<IntermediateDataSetID,IntermediateResult> intermediateDataSets) throws JobException {
List<JobEdge> inputs = jobVertex.getInputs();
...
for (int num = 0; num < inputs.size(); num++) {
JobEdge edge = inputs.get(num);
...
// fetch the intermediate result via ID. if it does not exist, then it either has not been created, or the order
// in which this method is called for the job vertices is not a topological order
IntermediateResult ires =intermediateDataSets.get(edge.getSourceId());
if (ires == null) {
throw new JobException("Cannot connect this job graph to the previous graph. No previous intermediate result found for ID "
+ edge.getSourceId());
}
this.inputs.add(ires);
int consumerIndex = ires.registerConsumer();
for (int i = 0; i < parallelism; i++) {
ExecutionVertex ev = taskVertices[i];
ev.connectSource(num, ires, edge, consumerIndex);
}
}
}
简要概括逻辑如下:
设置输入 IntermediateResult
将自己注册到 IntermediateResult,目前一个 IntermediateResult 只支持一个 消费 ExecutionJobVertex 节点
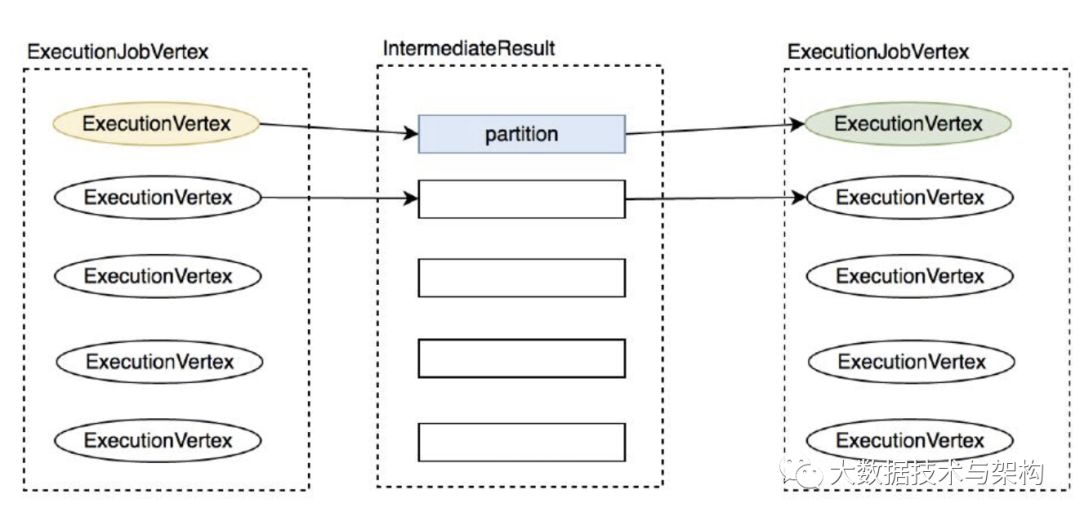
设置并发子 task ExecutionVertex 和中间结果 IntermediateResult 的连接关系,通过 ExecutionVertex 的 connectSource 方法设置 ExecutionVertex 的连接策略,策略一共两种: POINT_WISE ALL_TO_ALL 前者上游 partition 与下游 consumers 之间是一对多关系,后者是 all to all 关系,这里会将 ExecutionEdge 创建出来并添加 consumer 为此 edge【partition在 new ExecutionVertex时创建出来,由 ExecutionVertex 构造器可知一个 ExecutionVertex 生产一个 partition,partition number 就是 sub task index】
执行节点子任务 ExecutionVertex
先看一下 ExecutionVertex 的创建过程:
public ExecutionVertex(
ExecutionJobVertex jobVertex,
int subTaskIndex,
IntermediateResult[] producedDataSets,
FiniteDuration timeout,
long createTimestamp) {
this.jobVertex = jobVertex;
this.subTaskIndex = subTaskIndex;
this.resultPartitions = new LinkedHashMap<IntermediateResultPartitionID,IntermediateResultPartition>(producedDataSets.length, 1);
for (IntermediateResult result : producedDataSets) {
IntermediateResultPartition irp = newIntermediateResultPartition(result, this, subTaskIndex);
result.setPartition(subTaskIndex, irp);
resultPartitions.put(irp.getPartitionId(), irp);
}
this.inputEdges = newExecutionEdge[jobVertex.getJobVertex().getInputs().size()][];
this.priorExecutions = new CopyOnWriteArrayList<Execution>();
this.currentExecution = new Execution(
getExecutionGraph().getExecutionContext(),
this,
0,
createTimestamp,
timeout);
// create a co-location scheduling hint, if necessary
CoLocationGroup clg = jobVertex.getCoLocationGroup();
if (clg != null) {
this.locationConstraint = clg.getLocationConstraint(subTaskIndex);
}
else {
this.locationConstraint = null;
}
this.timeout = timeout;
}
逻辑总结如下:
依据对应的 ExecutionJobGraph 生成的中间数据集 IntermediateResult 的个数生成一定个数的 partition,这里是一个 IntermediateResult 输出一个 partition
生成 Execution
配置资源相关
下面重点介绍下其连接上游 ExecutionVertex 的过程:
connectSource 是连接的核心逻辑,逻辑如下:
//ExecutionVertex
public void connectSource(int inputNumber, IntermediateResult source,JobEdge edge, int consumerNumber) {
final DistributionPattern pattern = edge.getDistributionPattern();
final IntermediateResultPartition[] sourcePartitions =source.getPartitions();
ExecutionEdge[] edges;
switch (pattern) {
case POINTWISE:
edges = connectPointwise(sourcePartitions, inputNumber);
break;
case ALL_TO_ALL:
edges = connectAllToAll(sourcePartitions, inputNumber);
break;
default:
throw new RuntimeException("Unrecognized distribution pattern.");
}
this.inputEdges[inputNumber] = edges;
// add the consumers to the source
// for now (until the receiver initiated handshake is in place), we need to register the
// edges as the execution graph
for (ExecutionEdge ee : edges) {
ee.getSource().addConsumer(ee, consumerNumber);
}
}
逻辑总结如下:
获取 JobEdge 的数据分发策略:如果非 shuffle 操作就是 DistributionPattern.POINTWISE 否则是 DistributionPattern.ALL_TO_ALL具体见代码:
//StreamingJobGraphGenerator
StreamPartitioner<?> partitioner = edge.getPartitioner();
if (partitioner instanceof ForwardPartitioner) {
downStreamVertex.connectNewDataSetAsInput(
headVertex,
DistributionPattern.POINTWISE,
ResultPartitionType.PIPELINED,
true);
} else if (partitioner instanceof RescalePartitioner){
downStreamVertex.connectNewDataSetAsInput(
headVertex,
DistributionPattern.POINTWISE,
ResultPartitionType.PIPELINED,
true);
} else {
downStreamVertex.connectNewDataSetAsInput(
headVertex,
DistributionPattern.ALL_TO_ALL,
ResultPartitionType.PIPELINED,
true);
}
按照不同的分发策略连接上游
DistributionPattern.ALL_TO_ALL 就是简单的全连接,这里就不介绍了,只介绍DistributionPattern.POINTWISE 策略。
该策略连接 execution vertex 与上游的 partitions,会先获取上游的 partition 数与 此 ExecutionJobVertex 的并发度,如果两者并发度相等,则是 一对一 连接:

如果 partition 数小于 并发数 ,子 task 只会连接一个上游 partition,具体关系如下图:
如果 partition 数大于并发数,子 task 会连接多个上游 partition,具体见下图:
到这里运行时执行计划 ExecutionGraph 的生成就介绍完了,下节将先介绍 JobManager 的核心组件。
以上是关于Flink从入门到放弃之源码解析系列-第2章 Flink执行计划生成的主要内容,如果未能解决你的问题,请参考以下文章