万字长文:Service Mesh · Istio · 以实践入门
Posted 云技术
tags:
篇首语:本文由小常识网(cha138.com)小编为大家整理,主要介绍了万字长文:Service Mesh · Istio · 以实践入门相关的知识,希望对你有一定的参考价值。
Photo @ Jez Timms
文 | 三辰
本文不是 Istio 的全部,但是希望入门仅此一篇就够。
概念
围绕云原生(CN)的概念,给人一种知识大爆炸的感觉,但假如你深入了解每一个概念的细节,你会发现它和你很近,甚至就是你手里每天做的事情。
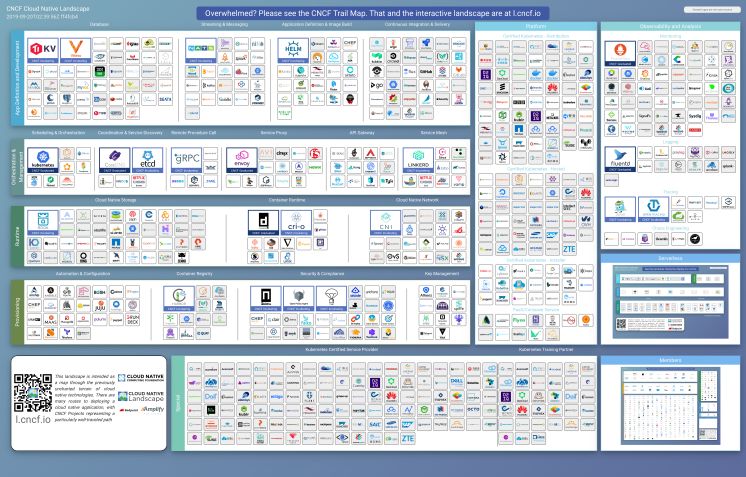
图片来源:https://landscape.cncf.io/
服务网格
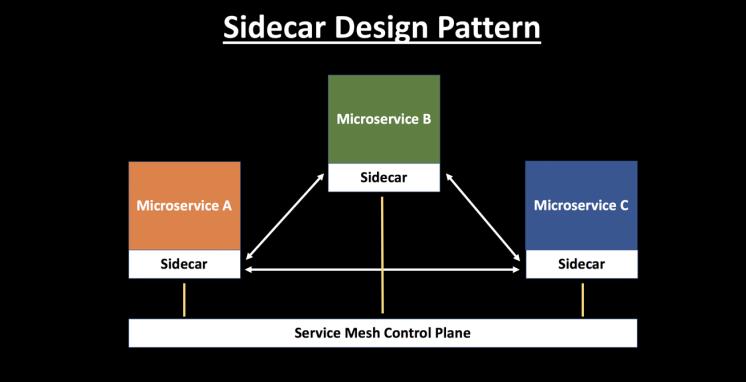
历史

原始的应用程序--图片来源于网络
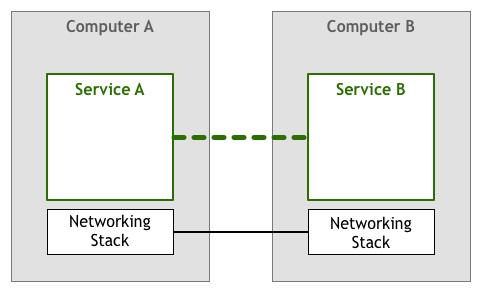
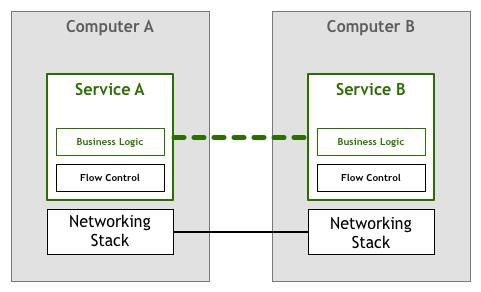
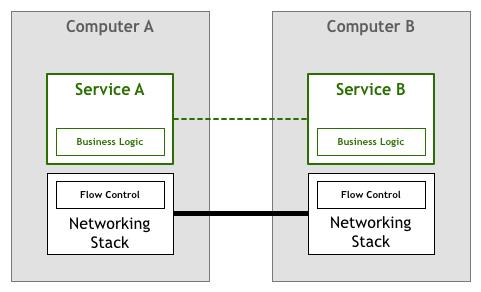
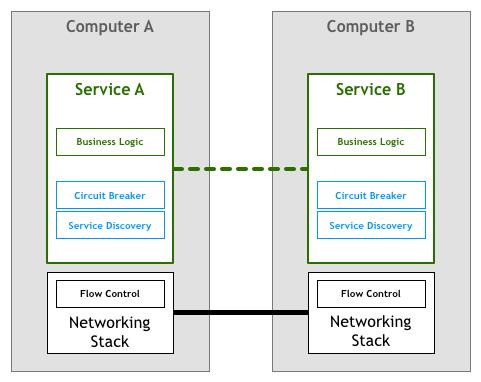
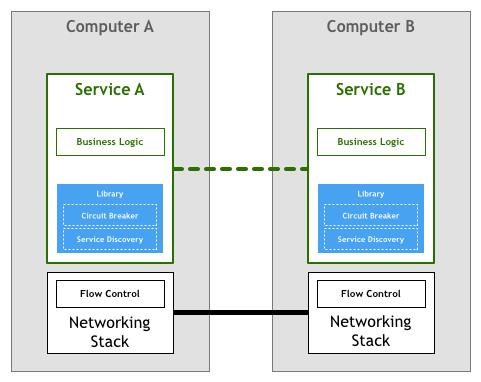
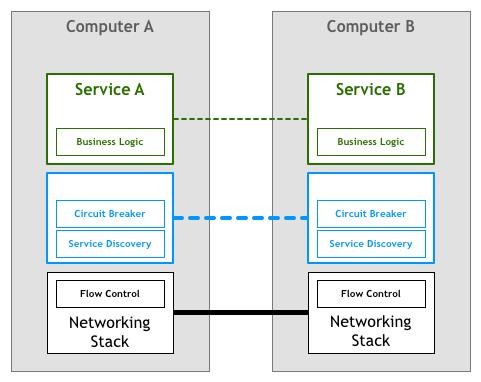
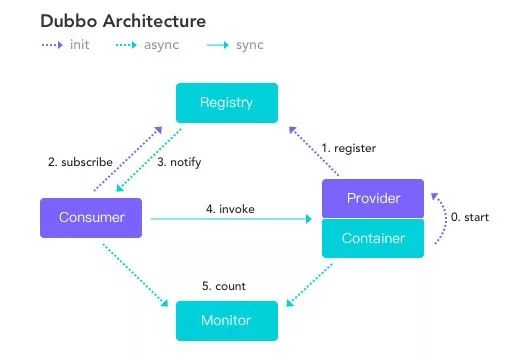
图片来源于网络
Consumer 与 Provider 就是微服务互相调用的一种解决方案。
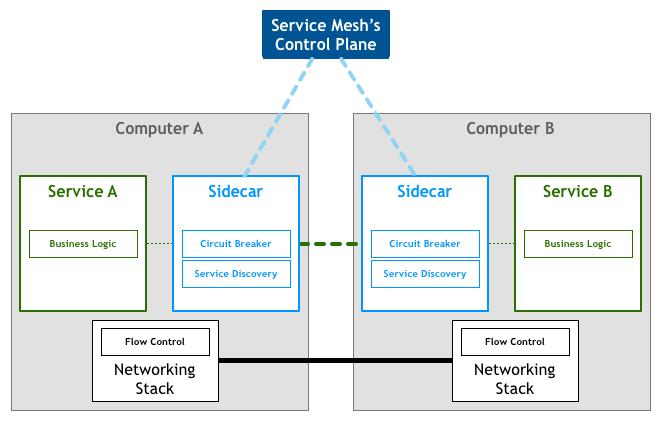
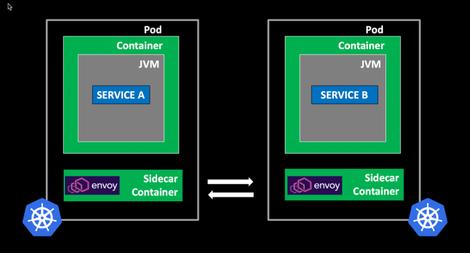
以下是微服务集群基于Sidecar互相通讯的简化场景:
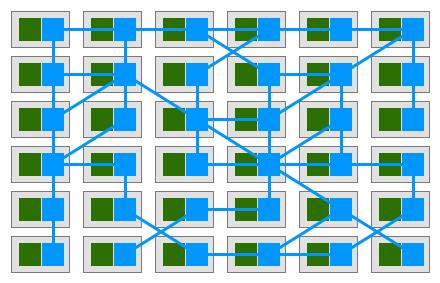
图片来源于网络
Service Mesh 是 Kubernetes 支撑微服务能力拼图的最后一块
Istio 和 Envoy
Istio,第一个字母是(ai)。
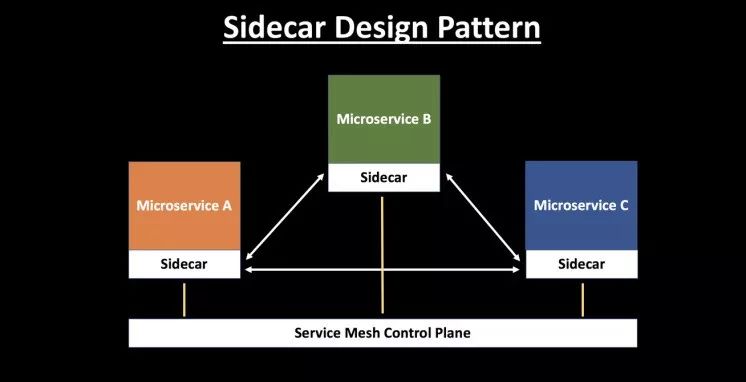
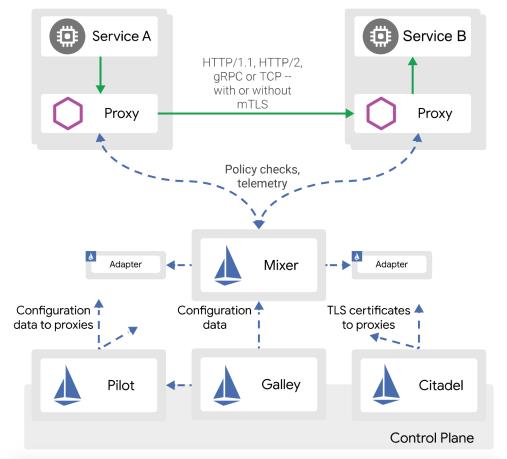
Istio基于Envoy实现Service Mesh数据平面--图片来源于网络

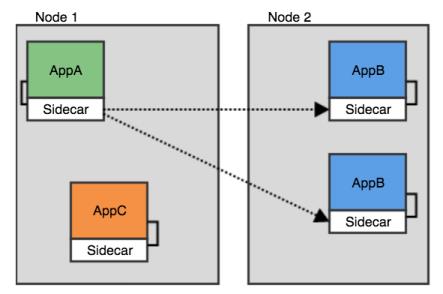
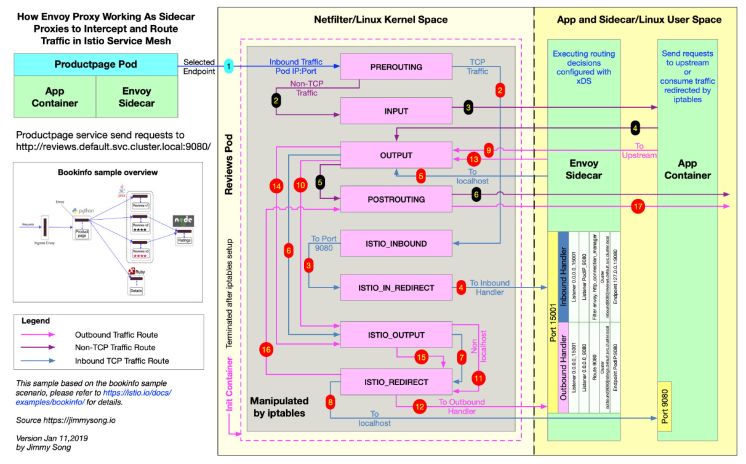
Sidecar注入
小结
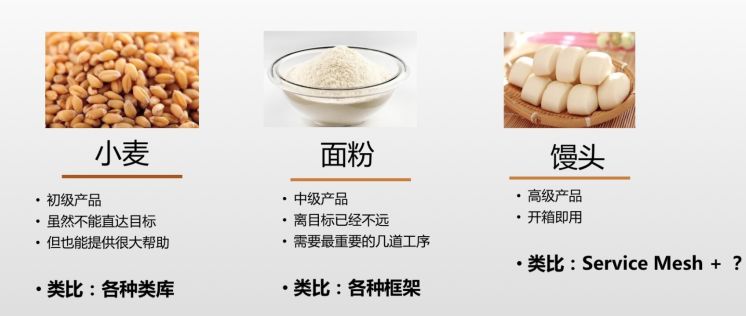
所以我们打算卖什么?
实践
准备工作
如果是本地测试,Docker-Desktop也可以启动一个单机的k8s集群
curl -sL "https://github.com/istio/istio/releases/download/1.4.2/istio-1.4.2-osx.tar.gz" | tar xz从 1.4.0 版本开始,不再使用 helm 来安装 Istio
# helm工具$ brew install kubernetes-helm
安装Istio
首先确认 kubectl 连接的正确的 k8s 集群。
istioctl
安装
cd istio-1.4.2# 安装istioctlcp bin/istioctl /usr/local/bin/ # 也可以加一下PATH# (可选)先查看配置文件istioctl manifest generate --set profile=demo > istio.demo.yaml# 安装istioistioctl manifest apply --set profile=demo## 以下是旧版本istio的helm安装方式 ### 创建istio专属的namespacekubectl create namespace istio-system# 通过helm初始化istiohelm template install/kubernetes/helm/istio-init --name istio-init --namespace istio-system | kubectl apply -f -# 通过helm安装istio的所有组件helm template install/kubernetes/helm/istio --name istio --namespace istio-system | kubectl apply -f -
## 以下是旧版本istio的helm安装方式 ### 创建istio专属的namespacekubectl create namespace istio-system# 通过helm初始化istiohelm template install/kubernetes/helm/istio-init --name istio-init --namespace istio-system | kubectl apply -f -# 通过helm安装istio的所有组件helm template install/kubernetes/helm/istio --name istio --namespace istio-system | kubectl apply -f -
$ kubectl get crds | grep 'istio.io' | wc -l23
如果是阿里云ACS集群,安装完Istio后,会有对应的一个SLB被创建出来,转发到Istio提供的虚拟服务器组
示例:Hello World
cd samples/hello-world
注入
istioctl kube-inject -f helloworld.yaml -o helloworld-istio.yaml实际上就是通过脚本修改了原文件,增加了:
分析
apiVersion: v1kind: Servicemetadata:name: helloworldlabels:app: helloworldspec:ports:- port: 5000name: httpselector:app: helloworld---apiVersion: apps/v1kind: Deploymentmetadata:creationTimestamp: nulllabels:version: v1name: helloworld-v1spec:replicas: 1selector:matchLabels:app: helloworldversion: v1strategy: {}template:metadata:labels:app: helloworldversion: v1spec:containers:- image: docker.io/istio/examples-helloworld-v1imagePullPolicy: IfNotPresentname: helloworldports:- containerPort: 5000resources:requests:cpu: 100m---apiVersion: apps/v1kind: Deploymentmetadata:creationTimestamp: nulllabels:version: v2name: helloworld-v2spec:replicas: 1selector:matchLabels:app: helloworldversion: v2strategy: {}template:metadata:labels:app: helloworldversion: v2spec:containers:- image: docker.io/istio/examples-helloworld-v2imagePullPolicy: IfNotPresentname: helloworldports:- containerPort: 5000resources:requests:cpu: 100m
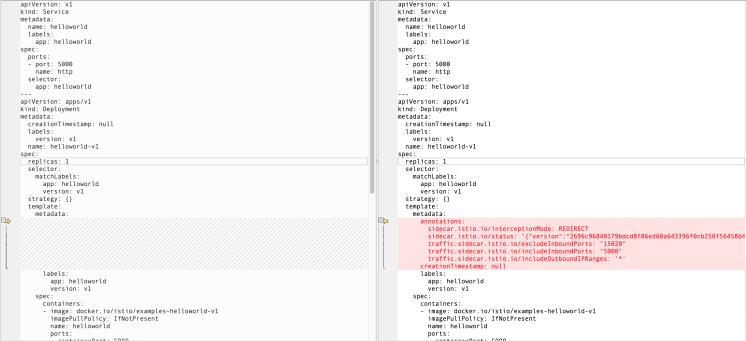
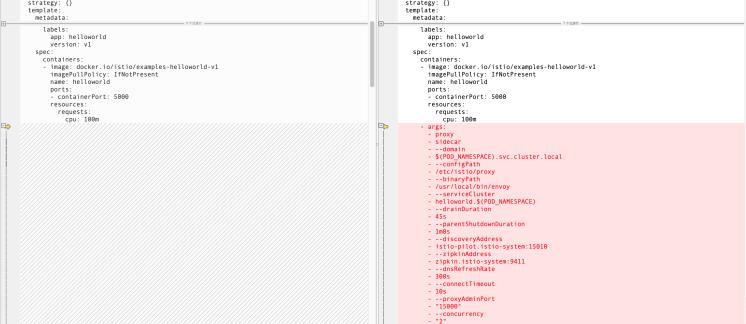
- args:- proxy- sidecar- ...env:- name: POD_NAMEvalueFrom:fieldRef:fieldPath: metadata.name- ...image: docker.io/istio/proxyv2:1.3.2imagePullPolicy: IfNotPresentname: istio-proxyports:- containerPort: 15090name: http-envoy-promprotocol: TCPreadinessProbe:failureThreshold: 30httpGet:path: /healthz/readyport: 15020initialDelaySeconds: 1periodSeconds: 2resources:limits:cpu: "2"memory: 1Girequests:cpu: 100mmemory: 128MisecurityContext:readOnlyRootFilesystem: truerunAsUser: 1337volumeMounts:- mountPath: /etc/istio/proxyname: istio-envoy- mountPath: /etc/certs/name: istio-certsreadOnly: true
镜像名 docker.io/istio/proxyv2:1.3.2 。
initContainers:- args:- -p- "15001"- -z- "15006"- -u- "1337"- -m- REDIRECT- -i- '*'- -x- ""- -b- '*'- -d- "15020"image: docker.io/istio/proxy_init:1.3.2imagePullPolicy: IfNotPresentname: istio-initresources:limits:cpu: 100mmemory: 50Mirequests:cpu: 10mmemory: 10MisecurityContext:capabilities:add:- NET_ADMINrunAsNonRoot: falserunAsUser: 0volumes:- emptyDir:medium: Memoryname: istio-envoy- name: istio-certssecret:optional: truesecretName: istio.default
$ kubectl apply -f helloworld-istio.yamlservice/helloworld createddeployment.apps/helloworld-v1 createddeployment.apps/helloworld-v2 created$ kubectl get deployments.apps -o wideNAME READY UP-TO-DATE AVAILABLE AGE CONTAINERS IMAGES SELECTORhelloworld-v1 1/1 1 1 20m helloworld,istio-proxy docker.io/istio/examples-helloworld-v1,docker.io/istio/proxyv2:1.3.2 app=helloworld,version=v1helloworld-v2 1/1 1 1 20m helloworld,istio-proxy docker.io/istio/examples-helloworld-v2,docker.io/istio/proxyv2:1.3.2 app=helloworld,version=v2并启用一个简单的gateway来监听,便于我们访问测试页面$ kubectl apply -f helloworld-gateway.yamlgateway.networking.istio.io/helloworld-gateway createdvirtualservice.networking.istio.io/helloworld created部署完成之后,我们就可以通过gateway访问hello服务了:$ curl "localhost/hello"Hello version: v2, instance: helloworld-v2-7768c66796-hlsl5$ curl "localhost/hello"Hello version: v2, instance: helloworld-v2-7768c66796-hlsl5$ curl "localhost/hello"Hello version: v1, instance: helloworld-v1-57bdc65497-js7cm
深入探索
流量控制 - 切流
$ kubectl get gw helloworld-gateway -o yamlapiVersion: networking.istio.io/v1alpha3kind: Gatewaymetadata:name: helloworld-gatewayspec:selector:istio: ingressgateway # use istio default controllerservers:- port:number: 80name: httpprotocol: HTTPhosts:- "*"$ kubectl get vs helloworld -o yamlapiVersion: networking.istio.io/v1alpha3kind: VirtualServicemetadata:name: helloworldspec:hosts:- "*"gateways:- helloworld-gatewayhttp:- match:- uri:exact: /helloroute:- destination:host: helloworld # short for helloworld.${namespace}.svc.cluster.localport:number: 5000
apiVersion: networking.istio.io/v1alpha3kind: VirtualServicemetadata:name: helloworldspec:hosts:- "*"gateways:- helloworld-gatewayhttp:- match:- uri:exact: /helloroute:- destination:host: helloworld.default.svc.cluster.localsubset: v1weight: 0- destination:host: helloworld.default.svc.cluster.localsubset: v2weight: 100
apiVersion: networking.istio.io/v1alpha3kind: DestinationRulemetadata:name: helloworld-destinationspec:host: helloworld.default.svc.cluster.localsubsets:- name: v1labels:version: v1- name: v2labels:version: v2
$ kubectl apply -f helloworld-gateway.yamlgateway.networking.istio.io/helloworld-gateway unchangedvirtualservice.networking.istio.io/helloworld configureddestinationrule.networking.istio.io/helloworld-destination created
$ while true;do sleep 0.05 ;curl localhost/hello;doneHello version: v2, instance: helloworld-v2-76d6cbd4d-tgsq6Hello version: v2, instance: helloworld-v2-76d6cbd4d-tgsq6Hello version: v2, instance: helloworld-v2-76d6cbd4d-tgsq6Hello version: v2, instance: helloworld-v2-76d6cbd4d-tgsq6Hello version: v2, instance: helloworld-v2-76d6cbd4d-tgsq6Hello version: v2, instance: helloworld-v2-76d6cbd4d-tgsq6Hello version: v2, instance: helloworld-v2-76d6cbd4d-tgsq6Hello version: v2, instance: helloworld-v2-76d6cbd4d-tgsq6Hello version: v2, instance: helloworld-v2-76d6cbd4d-tgsq6Hello version: v2, instance: helloworld-v2-76d6cbd4d-tgsq6Hello version: v2, instance: helloworld-v2-76d6cbd4d-tgsq6Hello version: v2, instance: helloworld-v2-76d6cbd4d-tgsq6Hello version: v2, instance: helloworld-v2-76d6cbd4d-tgsq6Hello version: v2, instance: helloworld-v2-76d6cbd4d-tgsq6Hello version: v2, instance: helloworld-v2-76d6cbd4d-tgsq6Hello version: v2, instance: helloworld-v2-76d6cbd4d-tgsq6Hello version: v2, instance: helloworld-v2-76d6cbd4d-tgsq6Hello version: v2, instance: helloworld-v2-76d6cbd4d-tgsq6Hello version: v2, instance: helloworld-v2-76d6cbd4d-tgsq6Hello version: v2, instance: helloworld-v2-76d6cbd4d-tgsq6Hello version: v2, instance: helloworld-v2-76d6cbd4d-tgsq6
Gateway
VirtualService
DestinationRule
示例:Bookinfo
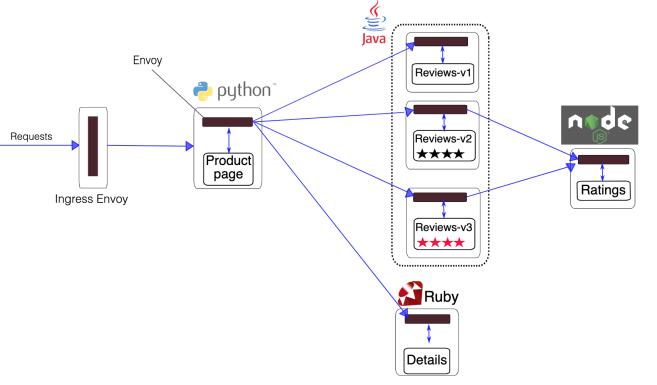
$ cd samples/bookinfo注入
$ kubectl label namespace default istio-injection=enabled部署
$ kubectl apply -f platform/kube/bookinfo.yamlservice/details createdserviceaccount/bookinfo-details createddeployment.apps/details-v1 createdservice/ratings createdserviceaccount/bookinfo-ratings createddeployment.apps/ratings-v1 createdservice/reviews createdserviceaccount/bookinfo-reviews createddeployment.apps/reviews-v1 createddeployment.apps/reviews-v2 createddeployment.apps/reviews-v3 createdservice/productpage createdserviceaccount/bookinfo-productpage createddeployment.apps/productpage-v1 created
$ kubectl apply -f networking/bookinfo-gateway.yamlgateway.networking.istio.io/bookinfo-gateway createdvirtualservice.networking.istio.io/bookinfo created


流量控制 - 网络可见性
$ kubectl run --image centos:7 -it probe# 请求productpage服务上的接口[root@probe-5577ddd7b9-rbmh7 /]# curl -sL http://productpage:9080 | grep -o "<title>.*</title>"<title>Simple Bookstore App</title>$ kubectl exec -it $(kubectl get pod -l run=probe -o jsonpath='{..metadata.name}') -c probe -- curl www.baidu.com | grep -o "<title>.*</title>"<title>百度一下,你就知道</title>
Sidecar
$ kubectl get configmap istio -n istio-system -o yaml | sed 's/mode: ALLOW_ANY/mode: REGISTRY_ONLY/g' | kubectl replace -n istio-system -f -configmap "istio" replaced$ kubectl get configmap istio -n istio-system -o yaml | grep -n1 -m1 "mode: REGISTRY_ONLY"67- outboundTrafficPolicy:68: mode: REGISTRY_ONLY
$ kubectl apply -f - <<EOFapiVersion: networking.istio.io/v1alpha3kind: Sidecarmetadata:name: defaultnamespace: istio-systemspec:egress:- hosts:- "./*"- "istio-system/*"EOFsidecar.networking.istio.io/default configured
每个namespace只允许一个无 workloadSelector 的配置 rootNamespace中无 workloadSelector 的配置是全局的,影响所有namespace,默认的rootNamespace=istio-system
egress
这里需要等待一会生效,或者直接销毁重新部署一个测试容器
$ kubectl exec -it $(kubectl get pod -l run=probe -o jsonpath='{..metadata.name}') -c probe -- curl -v www.baidu.com* About to connect() to www.baidu.com port 80 (#0)* Trying 220.181.38.150...* Connected to www.baidu.com (220.181.38.150) port 80 (#0)> GET / HTTP/1.1> User-Agent: curl/7.29.0> Host: www.baidu.com> Accept: */*>* Recv failure: Connection reset by peer* Closing connection 0curl: (56) Recv failure: Connection reset by peercommand terminated with exit code 56
效果是:外网已经访问不通。
apiVersion: networking.istio.io/v1alpha3kind: ServiceEntrymetadata:name: baiduspec:hosts:- www.baidu.comports:- number: 80name: httpprotocol: HTTPresolution: DNSlocation: MESH_EXTERNAL---apiVersion: networking.istio.io/v1alpha3kind: Sidecarmetadata:name: defaultspec:egress:- hosts:- "./www.baidu.com"port:number: 80protocol: HTTPname: http
$ kubectl exec -it $(kubectl get pod -l run=probe -o jsonpath='{..metadata.name}') -c probe -- curl -v www.baidu.com* About to connect() to www.baidu.com port 80 (#0)* Trying 220.181.38.150...* Connected to www.baidu.com (220.181.38.150) port 80 (#0)> GET / HTTP/1.1> User-Agent: curl/7.29.0> Host: www.baidu.com> Accept: */*>< HTTP/1.1 200 OK< accept-ranges: bytes< cache-control: private, no-cache, no-store, proxy-revalidate, no-transform< content-length: 2381< content-type: text/html< date: Tue, 15 Oct 2019 07:45:33 GMT< etag: "588604c8-94d"< last-modified: Mon, 23 Jan 2017 13:27:36 GMT< pragma: no-cache< server: envoy< set-cookie: BDORZ=27315; max-age=86400; domain=.baidu.com; path=/< x-envoy-upstream-service-time: 21
$ kubectl exec -it $(kubectl get pod -l run=probe -o jsonpath='{..metadata.name}') -c probe -- curl productpage:9080curl: (56) Recv failure: Connection reset by peercommand terminated with exit code 56配置上ServiceEntryapiVersion: networking.istio.io/v1alpha3kind: Sidecarmetadata:name: defaultspec:egress:- hosts:- "./www.baidu.com"- "./productpage.default.svc.cluster.local" # 这里必须用长名称---apiVersion: networking.istio.io/v1alpha3kind: ServiceEntrymetadata:name: baiduspec:hosts:- www.baidu.comresolution: DNSlocation: MESH_EXTERNAL---apiVersion: networking.istio.io/v1alpha3kind: ServiceEntrymetadata:name: productpagespec:hosts:- productpageresolution: DNSlocation: MESH_EXTERNAL
$ kubectl exec -it $(kubectl get pod -l run=probe -o jsonpath='{..metadata.name}') -c probe -- curl productpage:9080 | grep -o "<title>.*</title>"<title>Simple Bookstore App</title>
需要留意的是,不带workloadSelector的(不指定特定容器的)Sidecar配置只能有一个,所以规则都需要写在一起。
ingress
apiVersion: networking.istio.io/v1alpha3kind: Sidecarmetadata:name: productpage-sidecarspec:workloadSelector:labels:app: productpageingress:- port:number: 9080protocol: HTTPdefaultEndpoint: 127.0.0.1:10080egress:- hosts:- "*/*"
这个配置的效果是让 productpage 应用的容器收到 9080 端口的 HTTP 请求时,转发到容器内的10080端口。
$ kubectl exec -it $(kubectl get pod -l run=probe -o jsonpath='{..metadata.name}') -c probe -- curl -s productpage:9080upstream connect error or disconnect/reset before headers. reset reason: connection failure
小结
概述
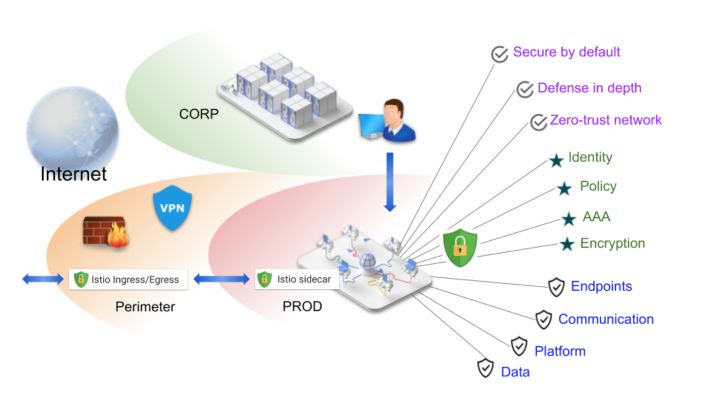
策略(Policy)
TLS
认证(Authentication)与鉴权(Authorization)
认证(Authentication)
示例:配置Policy
准备环境:
#!/bin/bashkubectl create ns fookubectl apply -f <(istioctl kube-inject -f samples/httpbin/httpbin.yaml) -n fookubectl apply -f <(istioctl kube-inject -f samples/sleep/sleep.yaml) -n fookubectl create ns barkubectl apply -f <(istioctl kube-inject -f samples/httpbin/httpbin.yaml) -n barkubectl apply -f <(istioctl kube-inject -f samples/sleep/sleep.yaml) -n barkubectl create ns legacykubectl apply -f samples/httpbin/httpbin.yaml -n legacykubectl apply -f samples/sleep/sleep.yaml -n legacy
#!/bin/bashfor from in "foo" "bar" "legacy"; do for to in "foo" "bar" "legacy"; do kubectl exec $(kubectl get pod -l app=sleep -n ${from} -o jsonpath={.items..metadata.name}) -c sleep -n ${from} -- curl "http://httpbin.${to}:8000/ip" -s -o /dev/null -w "sleep.${from} to httpbin.${to}: %{http_code}
"; done; done$ ./check.shsleep.foo to httpbin.foo: 200sleep.foo to httpbin.bar: 200sleep.foo to httpbin.legacy: 200sleep.bar to httpbin.foo: 200sleep.bar to httpbin.bar: 200sleep.bar to httpbin.legacy: 200sleep.legacy to httpbin.foo: 200sleep.legacy to httpbin.bar: 200sleep.legacy to httpbin.legacy: 200
打开TLS:
$ kubectl apply -f - <<EOFapiVersion: "authentication.istio.io/v1alpha1"kind: "MeshPolicy"metadata:name: "default"spec:peers:- mtls: {}EOF
$ ./check.shsleep.foo to httpbin.foo: 503sleep.foo to httpbin.bar: 503sleep.foo to httpbin.legacy: 200sleep.bar to httpbin.foo: 503sleep.bar to httpbin.bar: 503sleep.bar to httpbin.legacy: 200sleep.legacy to httpbin.foo: 000command terminated with exit code 56sleep.legacy to httpbin.bar: 000command terminated with exit code 56sleep.legacy to httpbin.legacy: 200
配置托管的 mTLS 能力
kubectl apply -f - <<EOFapiVersion: "networking.istio.io/v1alpha3"kind: "DestinationRule"metadata:name: "default"namespace: "istio-system"spec:host: "*.local"trafficPolicy:tls:mode: ISTIO_MUTUALEOF
$ ./check.shsleep.foo to httpbin.foo: 200sleep.foo to httpbin.bar: 200sleep.foo to httpbin.legacy: 503sleep.bar to httpbin.foo: 200sleep.bar to httpbin.bar: 200sleep.bar to httpbin.legacy: 503sleep.legacy to httpbin.foo: 000command terminated with exit code 56sleep.legacy to httpbin.bar: 000command terminated with exit code 56sleep.legacy to httpbin.legacy: 200
sleep.foo to httpbin.bar: 503apiVersion: networking.istio.io/v1alpha3kind: Sidecarmetadata:name: defaultnamespace: istio-systemspec:egress:- hosts:- ./* # <--- istio-system/*
分析
ns=legacy中的行为仍然不变
鉴权(Authorization)
不是必要前提 有一部分鉴权规则是不依赖mTLS的,但是很少。
apiVersion: security.istio.io/v1beta1kind: AuthorizationPolicymetadata:name: deny-allnamespace: foospec:
apiVersion: security.istio.io/v1beta1kind: AuthorizationPolicymetadata:name: deny-allnamespace: foospec:rules:- from:- source:namespaces:- "istio-system"
其它
参考文档
-
Istio官方文档 https://istio.io/docs/ -
Istio Handbook https://www.servicemesher.com/istio-handbook/concepts-and-principle/what-is-service-mesh.html -
Pattern Service Mesh https://philcalcado.com/2017/08/03/pattern_service_mesh.html
作者信息:
↓↓ 点击"阅读原文" 【加入云技术社区】
相关阅读:
更多文章请关注
文章好看点这里[在看] 以上是关于万字长文:Service Mesh · Istio · 以实践入门的主要内容,如果未能解决你的问题,请参考以下文章