Flask模板
Posted Flask学习笔记
tags:
篇首语:本文由小常识网(cha138.com)小编为大家整理,主要介绍了Flask模板相关的知识,希望对你有一定的参考价值。
高考加油
jinja2模板
1.介绍
jinja2:
让前端开发者和后端开发者工作分离
减少flask项目代码的耦合性,页面逻辑放在模板中,业务逻辑放在视图函数中,将页面逻辑和业务逻辑解耦有利于代码的维护
提供了控件语句,继承等高级功能,减少开发的复杂度
Mako:
从性能上看和Jinja2相近
有大型网站使用,有成功案例
有名的web框架支持,pylons和pyramid这两个web框架内置模板的Mako
支持模板中几乎原生的python语法的代码,对python工程师比较友好,开发效率高
自带完整的缓存系统。提供了非常友好的扩展接口,很容易切换成其他的缓存系统
2.导入模板
支持两种导入模式。
默认导入:默认指定为网站根目录下的
templates目录指定模板目录:在初始化时使用
app=Flask(__name__,templete='~/temp/')来指定目录。现在演示导入模板的不同:
 T1 ---文件夹
 |--templates 文件夹,默认目录
   |-- index.html
 |--app.py   运行文件

 T2 ---文件夹
 |--my_templates 文件夹,默认目录
   |-- index.html
 |--app.py   运行文件
 # 直接导入文件

 from flask import Flask,render_template
 # 导入render_template 模板渲染文件

 app = Flask(__name__)


 @app.route('/')
 def index():
 return render_template('index.html')


 if __name__ == '__main__':
 app.run(debug=True)
# 指定目录渲染模板
from flask import Flask,render_template
# 导入render_template 模板渲染文件
app = Flask(__name__, template_folder='./my_template')
@app.route('/')
def index():
return '首页'
@app.route('/login/')
def login():
# render 渲染
return render_template('login.html') # ./my_template/login.html
if __name__ == '__main__':
app.run(debug=True)
html文件<!-- 目录为 ./my_template/login.html-->
<!DOCTYPE html>
<html lang="en">
<head>
<meta charset="UTF-8">
<title>登录页面</title>
</head>
<body>
<div id="box">
<input type="button" name="" value="user">
<input type="text" value= "">
<input type="button" value="passwd">
<input type="text" value= "">
<input type="button" value="submit">
</div>
</body>
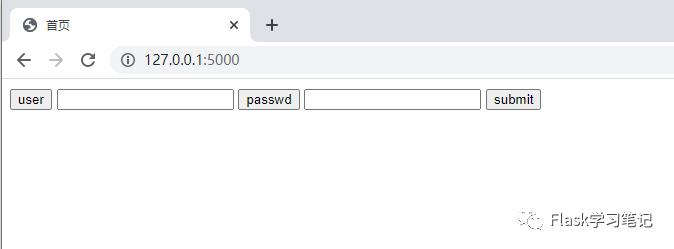
</html>访问得到的结果都是相同的。
3.render_template() 传递多个参数
语法:
 render_template(template_name_or_list, **context)
  :param template_name_or_list: the name of the template to be
                               rendered, or an iterable with template names
                               the first one existing will be rendered
  :param context: the variables that should be available in the
                 context of the template.(变量被应用在上下文,也就是前端html中)
在前端
html中,文件中使用{{ 变量名 }}来获取传递的参数
jinja2语法中{{ }}代表了print()函数变量的访问可以使用
.运算符,也可以使用下标运算符[]效果是一样的。{{ foo.bar }} == {{ foo['bar'] }}举个例子来说:
render_template渲染前端页面的同时,也能和前端页面通信。#!/usr/bin/env python
# coding = utf-8
from flask import Flask,render_template
app = Flask('__name__')
# 路由
@app.route('/')
def index():
return 'index page'
@app.route('/login/')
def login():
user_information = {
'Jack': '123',
'Ben': '123',
'Administrator': {
'admin': '456',
'bob': '789'}
}
return render_template('login.html', info = "VIP", **user_information)
if __name__ == '__main__':
app.run(debug=True)
templateslogin.html<!DOCTYPE html>
<html>
<head>
<title>login</title>
</head>
<body>
<div>
<tr>
<td>用户名:</td>
<td><input type="text" name=""></td>
</tr>
<tr>
<td>密码:</td>
<td><input type="text" name=""></td>
</tr>
<tr>
<td><input type="submit" name=""></td>
</tr>
</div>
<div>
<tr>
<td>欢迎您 {{ info }} </td>
{{ Administrator['admin'] }}
{{ Administrator.bob }}
</tr>
</div>
</body>
</html>访问网页:
4.在模板中使用url_for
jinja2语法:{% %} 用于执行诸如 for 循环或者赋值语句
{{ }} 用来把表达式打印在模板上
url_for():作用于一个函数,返回html路径。场景:比如在首页中有登录的跳转页面,为了后期代码的可维护性,跳转的所有
url都使用url_for()统一转换。这样,登录页面更换目录,也不必更改所有的代码。#!/usr/bin/env python
# coding = utf-8
from flask import Flask
from flask import render_template, url_for
app = Flask(__name__)
@app.route('/')
def index():
login_url = url_for('login')
return render_template('index.html', url_info = login_url)
@app.route('/login/')
def login():
return 'Successful'
if __name__ == '__main__':
"""指定端口:port ,指定ip:host"""
app.run(debug=True, host='192.168.0.101',port = 8080)
templates/index.html<!DOCTYPE html>
<html>
<head>
<title>index</title>
</head>
<body>
<div>
<span>首页</span>
<span> <a href=" {{ url_info }} ">登录</a> </span>
</div>
</body>
</html>
5.版本控制
注意,是在项目根目录中做控制。
 /d/Project/project1 (master)
 $ ls
 __pycache__/  app.py*  app1.py*  app2.py*  app3.py*  app4.py*  app5.py  config.py  T1/  T2/  T3/  T4/
 (learnpy)
 $ git add .
 $ git commit -m "add jinji2语法.v1.007"
以上是关于Flask模板的主要内容,如果未能解决你的问题,请参考以下文章
