pytest测试框架(三)
Posted
tags:
篇首语:本文由小常识网(cha138.com)小编为大家整理,主要介绍了pytest测试框架(三)相关的知识,希望对你有一定的参考价值。
参考技术A fixture是pytest特有的功能,它以装饰器形式定义在函数上面, 在编写测试函数的时候,可以将被fixture装饰的函数的名字做为测试函数的参数,运行测试脚本时,执行测试函数时就会自动传入被fixture装饰的函数的返回值。运行结果如下:
conftest.py内容如下:
test_fixture1.py内容如下:
运行结果如下:
右键运行如下:
运行如下:
运行如下:
运行如下:
运行如下:
运行如下:
pytest.fixture(autouse=False) 的autouse参数默认为False, 不会自动执行;设置为True时,当前运行的所有测试函数在运行前都会执行fixture函数
运行如下:
pytest.mark下提供了标记装饰器,除了之前我们使用的pytest.mark.usefixtures()装饰器以外,还有一些常用的标记装饰器
运行如下:
使用场景: 根据特定条件、不执行标识的测试函数
运行效果如下:
使用场景: 根据特定条件、不执行标识的测试函数
运行效果如下:
--- argnames:参数名, 以逗号分隔的字符串,表示一个或多个参数名称,或参数字符串的列表/元组. 参数名为几个,就会运行几次。
--- argvalues:
----参数对应值,类型必须为 list
----当参数为一个时,参数格式:[value1,value2,...]
----当参数个数大于一个时,格式为: [(param_value1,param_value2),...]
运行效果如下
python pytest测试框架介绍三
之前介绍了pytest以xUnit形式来写用例,下面来介绍pytest特有的方式来写用例
1、pytest fixture实例1
代码如下
from __future__ import print_function
import pytest

@pytest.fixture(scope=‘module‘)
def resource_a_setup(request):
    print(‘\\nresources_a_setup()‘)
    def resource_a_teardown():
        print(‘\\nresources_a_teardown()‘)
    request.addfinalizer(resource_a_teardown)

def test_1_that_needs_resource_a(resource_a_setup):
    print(‘test_1_that_needs_resource_a()‘)

def test_2_that_does_not():
    print(‘\\ntest_2_that_does_not()‘)

def test_3_that_does(resource_a_setup):
    print(‘\\ntest_3_that_does()‘)
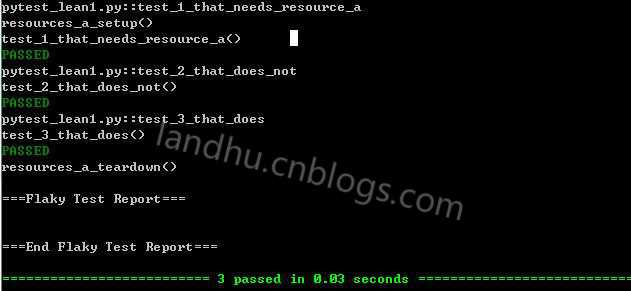
使用-s -v运行查看详情如下

这里使用的了pytest的特有的模式来写用例,使用的方式是scope方式,scope支持多种,后面会介绍
这里还使用了pytest的addfinalizer内置功能,具体可参见官网,用处是:在最后一个测试项目中调用teardown
2、pytest fixture实例2
代码如下
from __future__ import print_function
import pytest

@pytest.fixture()
def resource_a():
    print(‘\\nresources_a() "setup"‘)

def test_1_that_needs_resource_a(resource_a):
    print(‘test_1_that_needs_resource_a()‘)

def test_2_that_does_not():
    print(‘\\ntest_2_that_does_not()‘)

def test_3_that_does(resource_a):
    print(‘test_3_that_does()‘)
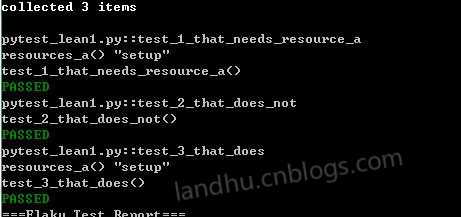
这是最简单的一个例子,结果如下

可以看出测试用例继承了用pytest.fixture的函数后,都执行了setup的功能,默认的pytest.fixture是function
3、使用pytest.fixture的几种方法
在写用例时,有几种方法使用pytest.fixture来形成框架,
方法一:
就是上面提到的这种方法,如下
pytest.fixture()
def before():
    print(‘\\nbefore each test‘)

def test_1(before):
    print(‘test_1()‘)

def test_2(before):
    print(‘test_2()‘)
方法二:使用fixture修饰
@pytest.fixture()
def before():
    print(‘\\nbefore each test‘)


@pytest.mark.usefixtures("before")
def test_1():
    print(‘test_1()‘)

@pytest.mark.usefixtures("before")
def test_2():
    print(‘test_2()‘)
标红的就是修饰器
4、fixture scope的范围参数
之前使用@pytest.fixture(scope=‘module‘)来定义框架,scope的参数有以下几种
- function 每一个用例都执行
- class 每个类执行
- module 每个模块执行(函数形式的用例)
- session 每个session只运行一次,在自动化测试时,登录步骤可以使用该session
如下一个用module例子
@pytest.fixture(scope=‘module‘)
def resource_a():
    print(‘\\nresources_a() "setup"‘)

def test_1_that_needs_resource_a(resource_a):
    print(‘test_1_that_needs_resource_a()‘)

def test_2_that_does_not():
    print(‘\\ntest_2_that_does_not()‘)

def test_3_that_does(resource_a):
    print(‘test_3_that_does()‘)
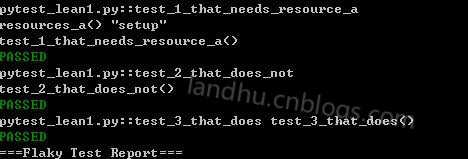
即使我们在每个用例都继承了resource_a,但在实际测试中,所有用例只执行了一次resource_a

这时,你可能会问,为什么只这setup功能,没有teardown功能,要teardown怎么写,方法如下:
def cheese_db(request):
    .....

    def teardown():
        print(‘\\n[teardown] cheese_db finalizer, disconnect from db‘)
    request.addfinalizer(teardown)
这里使用的还是之前介绍的request.addfinalizer功能,函数名字可以任意取,不一定要teardown
5、带参数的fixture
这里就不介绍了,看官方文档吧
6、多种fixture scope结合使用
看代码,如下
@pytest.fixture(scope="module")
def foo(request):
    print(‘\\nfoo setup - module fixture‘)
    def fin():
        print(‘foo teardown - module fixture‘)
    request.addfinalizer(fin)

@pytest.fixture()
def bar(request):
    print(‘bar setup - function fixture‘)
    def fin():
        print(‘bar teardown - function fixture‘)
    request.addfinalizer(fin)

@pytest.fixture()
def baz(request):
    print(‘baz setup - function fixture‘)
    def fin():
        print(‘baz teardown - function fixture‘)
    request.addfinalizer(fin)

def test_one(foo, bar, baz):
    print(‘in test_one()‘)

def test_two(foo, bar, baz):
    print(‘in test_two()‘)
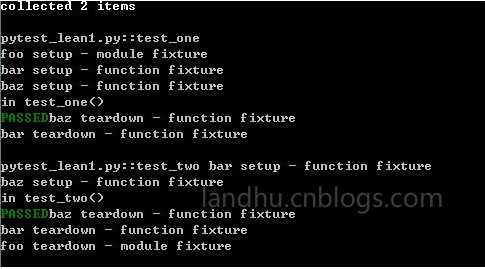
测试结果如下

pytest还有很有用的yield功能,后续再介绍
以上是关于pytest测试框架(三)的主要内容,如果未能解决你的问题,请参考以下文章