nginx部署支持rtmp协议-CCTV直播项目实现
Posted 蜜蜂点滴
tags:
篇首语:本文由小常识网(cha138.com)小编为大家整理,主要介绍了nginx部署支持rtmp协议-CCTV直播项目实现相关的知识,希望对你有一定的参考价值。
第一步:安装纯净系统
第二步:#ssh root@172.16.1.7 #<==检查ssh是否可用
第三步:#yum install -y wget #<==需要下载软件
第四步:更改数据源
#cd /etc/yum.repos.d/
#mv CentOS-Base.repo ./CentOS-Base.repo.backup
#curl -o /etc/yum.repos.d/CentOS-Base.repo http://mirrors.aliyun.com/repo/CentOS-7.repo
并更新源,建立缓存:
#yum update -y
#yum all yum makecache
第五步:安装工具
#yum install git gcc make pcre-devel openssl-devel
git ;
gcc 编译器;
vi/vim 文本编辑器 g环境 k环境;
make源码编译安装 makefile文件 编译你当前改变的文件 更新文件;
make install 可执行文件/相当于Windows下的exe,指定的目录中;
/usr/local/nginx/sbin/;
openssl ssh服务 加密 免密登录;
第六步:建立一个目录 源码编译安装 /usr/local/或/application
#cd /usr/local/
第七步:下载nginx-rtmp-module 安装Nginx的rtmp协议的扩展
#git clone git://github.com/arut/nginx-rtmp-module.git
或
#git clone https://github.com/arut/nginx-rtmp-module.git
#wget http://nginx.org/download/nginx-1.15.0.tar.gz
第八步:解压
#tar xzf nginx-1.15.0.tar.gz
第九步:进入到Nginx目录里进行配置
#cd ./nginx-1.15.0/
#./configure --with-http_ssl_module --add-module=../nginx-rtmp-module
第十步:编译源码并安装
建立在Makefile文件基础上。
#cat Makefile
#make && make install
第十一步:验证是否成功
查看版本:
#./usr/local/nginx/sbin/nginx -V
直接启动:
#./usr/local/nginx/sbin/nginx
#./usr/local/nginx/sbin/nginx

80端口被占用
调错:
Apache2.0阿帕奇 web服务 80端口
有效的验证通过80端口:
浏览器的方式访问 Nginx欢迎页面 表示成功,

否则,就需要改Nginx的默认端口80 改为8080 9090等等。
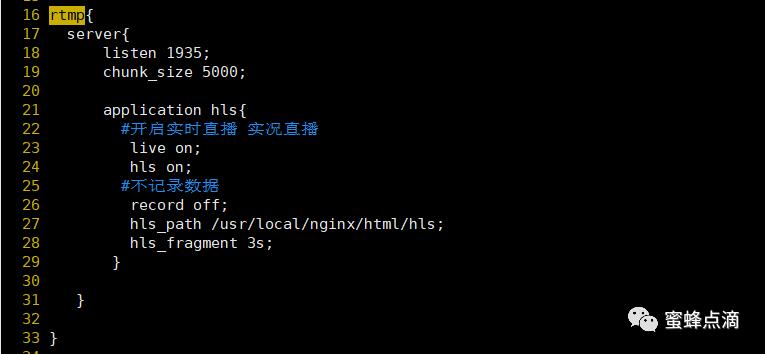
第十二步:修改Nginx的conf文件 配置rtmp端口默认1935端口
#vim nginx.conf
##↓编辑nginx.conf↓##
rtmp{
server{
listen 1935;
chunk_size 5000;
application hls{
#开启实时直播 实况直播
live on;
hls on;
#不记录数据
record off;
hls_path /usr/local/nginx/html/hls;
hls_fragment 3s;
}
}
}
##↑编辑nginx.conf↑##

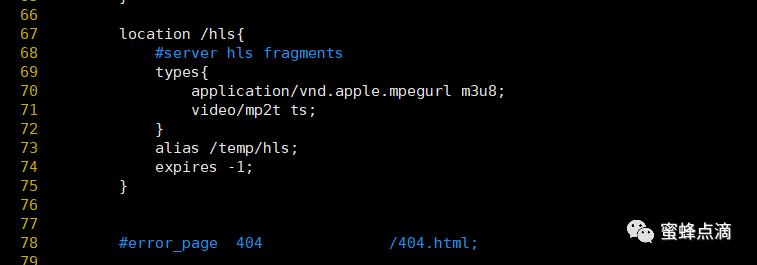
第十三步:配置????
##↓编辑nginx.conf↓##
location /hls{
#server hls fragments
types{
application/vnd.apple.mpegurl m3u8;
video/mp2t ts;
}
alias /temp/hls;
expires -1;
}
##↑编辑nginx.conf↑##

停止Nginx服务:#/usr/local/nginx/sbin/nginx -s stop
启动并加装配置文件:#/usr/local/nginx/sbin/nginx -c /usr/local/nginx/conf/nginx.conf
验证:#/usr/local/nginx/sbin/nginx
第十四步:如何推流
1、OBS软件推流 Mac Linux Windows版(非专业人士)
官网下载Windows版的OBS软件。

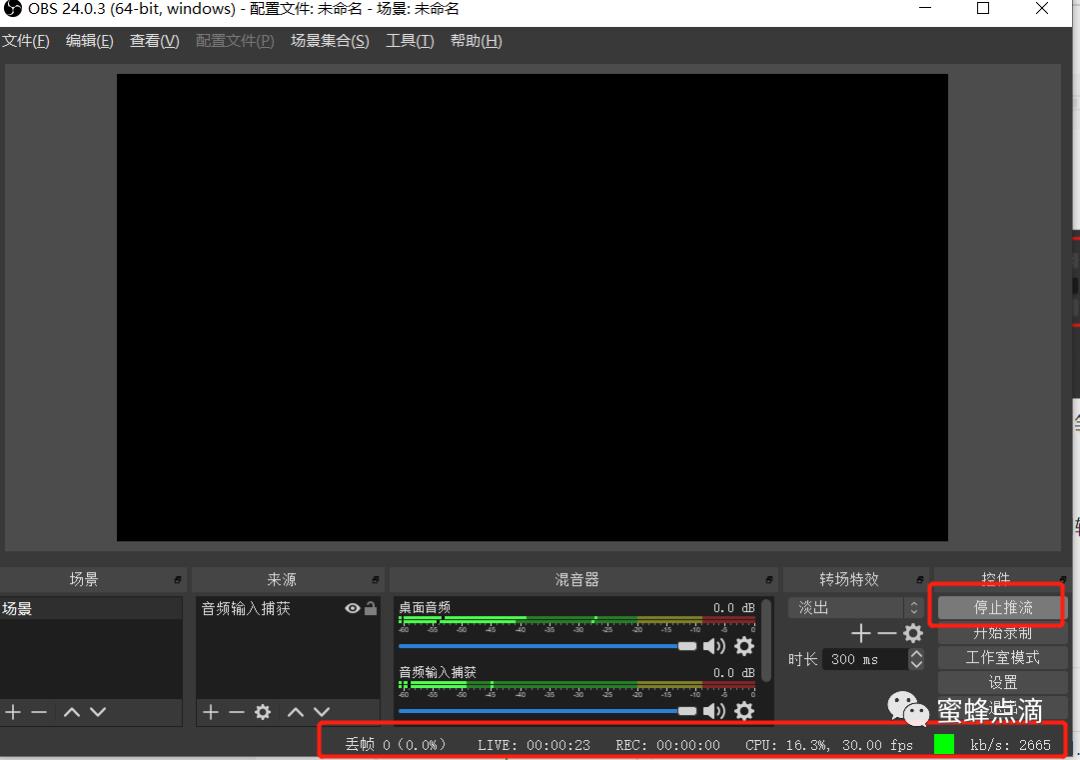
OBS推流:

推流成功:
苹果电脑等设备可以访问:http://服务器IP/hls/串流密钥输入的内容.m3u8;(IP后面是否需要加上端口,请用苹果设备测试)。
2、FFmpeg音频视频处理的库Mac Linux Windows android ios等(开发者)
第十五步:VLC视频播放 拉流,Windows实现播放
写代码:
#vim /usr/local/nginx/html/play.html
##↓play.html↓##
<!DOCTYPE html>
<html lang="en">
<head>
<meta charset="UTF-8">
<meta name="viewport" content="width=device-width, initial-scale=1.0">
<meta http-equiv="X-UA-Compatible" content="ie=edge">
<title>PC HLS video</title>
<link href="http://cdn.bootcss.com/video.js/6.0.0-RC.5/alt/video-js-cdn.min.css" rel="stylesheet">
</head>
<body>
<h1>PC 端播放 HLS(<code>.m3u8</code>) 视频</h1>
<p>借助 video.js 和 videojs-contrib-hls</p>
<p>由于 videojs-contrib-hls 需要通过 XHR 来获取解析 m3u8 文件, 因此会遭遇跨域问题, 请设置浏览器运行跨域</p>
<video id="hls-video" width="300" height="200" class="video-js vjs-default-skin"
playsinline webkit-playsinline
autoplay controls preload="auto"
x-webkit-airplay="true" x5-video-player-fullscreen="true" x5-video-player-typ="h5">
<!-- 直播的视频源 -->
<source type="application/x-mpegURL">
<!-- 点播的视频源 -->
<!--<source type="application/x-mpegURL">-->
</video>
<script ></script>
<!-- PC 端浏览器不支持播放 hls 文件(m3u8), 需要 videojs-contrib-hls 来给我们解码 -->
<script ></script>
<script>
// XMLHttpRequest cannot load http://xxx/video.m3u8. No 'Access-Control-Allow-Origin' header is present on the requested resource. Origin 'http://192.168.198.98:8000' is therefore not allowed access.
// 由于 videojs-contrib-hls 需要通过 XHR 来获取解析 m3u8 文件, 因此会遭遇跨域问题, 请设置浏览器运行跨域
var player = videojs('hls-video');
player.play();
</script>
</body>
</html>
##↑play.html↑##
测试:浏览器输入http://服务器IP/play.html
CCTV直播成功。
以上是关于nginx部署支持rtmp协议-CCTV直播项目实现的主要内容,如果未能解决你的问题,请参考以下文章