如何设计一个短小精悍可拓展的RPC框架?(含实现代码)
Posted 石杉的架构笔记
tags:
篇首语:本文由小常识网(cha138.com)小编为大家整理,主要介绍了如何设计一个短小精悍可拓展的RPC框架?(含实现代码)相关的知识,希望对你有一定的参考价值。
扫描下方海报二维码,试听课程:

感谢王码农同学的技术分享
简介
如果大家对RPC有一些了解的话,或多或者都会听到过一些大名鼎鼎的RPC框架,比如Dobbo、gRPC。但是大部分人对于他们底层的实现原理其实不甚了解。
有一种比较好的学习方式:就是如果你想要了解一个框架的原理,你可以尝试去写一个简易版的框架出来,就比如如果你想理解Spring IOC的思想,最好的方式就是自己实现一个小型的IOC容器,自己慢慢体会。
所以本文尝试带领大家去设计一个小型的RPC框架,同时对于框架会保持一些拓展点。
通过阅读本文,你可以收获:
理解RPC框架最核心的理念
学习在设计框架的时候,如何保持拓展性
本文会依赖一些组件,他们是实现RPC框架必要的一些知识,文中会尽量降低这些知识带来的障碍。但是,最好期望读者有以下知识基础:
Zookeeper基本入门
Netty基本入门
RPC框架应该长什么样子
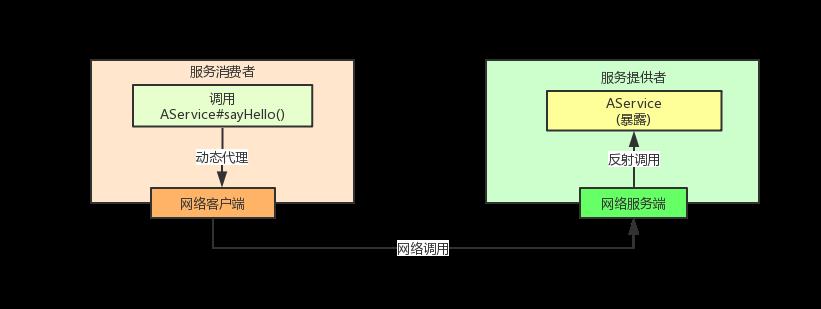
我们首先来看一下:一个RPC框架是什么东西?
我们最直观的感觉就是:
那他们是如何做到的呢?
其实啊,当我们的服务消费者调用某个RPC接口的方法之后,它的底层会通过动态代理,然后经过网络调用,去到服务提供者的机器上,然后执行对应的方法。
接着方法的结果通过网络传输返回到服务消费者那里,然后就可以拿到结果了。
整个过程如下图:
那么这个时候,可能有人会问了:服务消费者怎么知道服务提供者在哪台机器的哪个端口呢?
这个时候,就需要“注册中心”登场了,具体来说是这样子的:
服务提供者在启动的时候,将自己应用所在机器的信息提交到注册中心上面。
服务消费者在启动的时候,将需要消费的接口所在机器的信息抓回来
这样一来,服务消费者就有了一份服务提供者所在的机器列表了

“服务消费者”拿到了“服务提供者”的机器列表就可以通过网络请求来发起请求了。
网络客户端,我们应该采用什么呢?有几种选择:
使用JDK原生BIO(也就是ServerSocket那一套)。阻塞式IO方法,无法支撑高并发。
使用JDK原生NIO(Selector、SelectionKey那一套)。非阻塞式IO,可以支持高并发,但是自己实现复杂,需要处理各种网络问题。
使用大名鼎鼎的NIO框架Netty,天然支持高并发,封装好,API易用。
作为一个有追求的程序员,我们要求开发出来的框架要求支持高并发、又要求简单、还要快。当然是选择Netty来实现了,使用Netty的一些很基本的API就能满足我们的需求。
网络协议定义
当然了,既然我们要使用网络传输数据。我们首先要定义一套网络协议出来。
你可能又要问了,啥叫网络协议?
网络协议,通俗理解,意思就是说我们的客户端发送的数据应该长什么样子,服务端可以去解析出来知道要做什么事情。话不多说,上代码:
假设我们现在服务提供者有两个类:
// com.study.rpc.test.producer.HelloService
public interface HelloService {

    String sayHello(TestBean testBean);
}

// com.study.rpc.test.producer.TestBean
public class TestBean {

    private String name;
    private Integer age;

    public TestBean(String name, Integer age) {
        this.name = name;
        this.age = age;
    }
    // getter setter
}
现在我要调用HelloService.sayHello(TestBean testBean)这个方法
作为“服务消费者”,应该怎么定义我们的请求,从而让服务端知道我是要调用这个方法呢?
这需要我们将这个接口信息产生一个唯一的标识: 这个标识会记录了接口名、具体是那个方法、然后具体参数是什么!
然后将这些信息组织起来发送给服务端,我这里的方式是将信息保存为一个JSON格式的字符串来传输。
比如上面的接口我们传输的数据大概是这样的:
{
 "interfaces": "interface=com.study.rpc.test.producer.HelloService&method=sayHello&
 parameter=com.study.rpc.test.producer.TestBean",
 "requestId": "3",
 "parameter": {
 "com.study.rpc.test.producer.TestBean": {
 "age": 20,
 "name": "张三"
 }
 }
}
嗯,我这里用一个JSON来标识这次调用是调用哪个接口的哪个方法,其中interface标识了唯一的类,parameter标识了里面具体有哪些参数, 其中key就是参数的类全限定名,value就是这个类的JSON信息。
可能看到这里,大家可能有意见了: 数据不一定用JSON格式传输啊,而且使用JSON也不一定性能最高啊。
你使用JDK的Serializable配合Netty的ObjectDecoder来实现,这当然也可以,其实这里是一个拓展点,我们应该要提供多种序列化方式来供用户选择
但是这里选择了JSON的原因是因为它比较直观,对于写文章来说比较合理。
开发服务提供者
嗯,搞定了网络协议之后,我们开始开发“服务提供者”了。对于服务提供者,因为我们这里是写一个简单版本的RPC框架,为了保持简洁。
我们不会引入类似Spring之类的容器框架,所以我们需要定义一个服务提供者的配置类,它用于定义这个服务提供者是什么接口,然后它具体的实例对象是什么:
public class ServiceConfig


    {


 public Class

     type;


 public T
     instance;


 public ServiceConfig(Class

      type, T instance) {

 this.type =
      type;
 this.instance =
      instance;
 }


 public Class

       getType() {

 return
       type;
 }


 public void setType(Class

        type) {

 this.type =
        type;
 }


 public T getInstance() {

 return
        instance;
 }


 public void setInstance(T instance) {

 this.instance =
        instance;
 }

}
有了这个东西之后,我们就知道需要暴露哪些接口了。
为了框架有一个统一的入口,我定义了一个类叫做ApplicationContext,可以认为这是一个应用程序上下文,他的构造函数,接收2个参数,代码如下:
public ApplicationContext(String registryUrl, List

     serviceConfigs)
    {
 // 1. 保存需要暴露的接口配置
 this.serviceConfigs = serviceConfigs == null ? new ArrayList<>() : serviceConfigs;

 // step 2: 实例化注册中心
 initRegistry(registryUrl);

 // step 3: 将接口注册到注册中心,从注册中心获取接口,初始化服务接口列表
 RegistryInfo registryInfo = null;
 InetAddress addr = InetAddress.getLocalHost();
 String hostname = addr.getHostName();
 String hostAddress = addr.getHostAddress();
 registryInfo = new RegistryInfo(hostname, hostAddress, port);
 doRegistry(registryInfo);


 // step 4:初始化Netty服务器,接受到请求,直接打到服务提供者的service方法中
 if (!this.serviceConfigs.isEmpty()) {
 // 需要暴露接口才暴露
 nettyServer = new NettyServer(this.serviceConfigs, interfaceMethods);
 nettyServer.init(port);
 }
}
注册中心设计
这里分为几个步骤,首先保存了接口配置,接着初始化注册中心,因为注册中心可能会提供多种来供用户选择,所以这里需要定义一个注册中心的接口:
public interface Registry {
    /**
 * 将生产者接口注册到注册中心
 *
 * @param clazz 类
 * @param registryInfo 本机的注册信息
 */
    void register(Class clazz, RegistryInfo registryInfo) throws Exception;
}
这里我们提供一个注册的方法,这个方法的语义是将clazz对应的接口注册到注册中心。接收两个参数,一个是接口的class对象,另一个是注册信息,
里面包含了本机的一些基本信息,如下:
public class RegistryInfo {

    private String hostname;
    private String ip;
    private Integer port;

    public RegistryInfo(String hostname, String ip, Integer port) {
        this.hostname = hostname;
        this.ip = ip;
        this.port = port;
    }
    // getter setter
}
好了,定义好注册中心,回到之前的实例化注册中心的地方,代码如下:
/**
 * 注册中心
 */
private Registry registry;

private void initRegistry(String registryUrl) {
 if (registryUrl.startsWith("zookeeper://")) {
 registryUrl = registryUrl.substring(12);
 registry = new ZookeeperRegistry(registryUrl);
 } else if (registryUrl.startsWith("multicast://")) {
 registry = new MulticastRegistry(registryUrl);
 }
}
这里逻辑也非常简单,就是根据url的schema来判断是那个注册中心
注册中心这里实现了2个实现类,分别使用zookeeper作为注册中心,另外一个是使用广播的方式作为注册中心。
广播注册中心这里仅仅是做个示范,内部没有实现。我们主要是实现了zookeeper的注册中心。
(当然了,如果有兴趣,可以实现更多的注册中心供用户选择,比如redis之类的,这里只是为了保持“拓展点”)
那么实例化完注册中心之后,回到上面的代码:
注册服务提供者
// step 3: 将接口注册到注册中心,从注册中心获取接口,初始化服务接口列表
RegistryInfo registryInfo = null;
InetAddress addr = InetAddress.getLocalHost();
String hostname = addr.getHostName();
String hostAddress = addr.getHostAddress();
registryInfo = new RegistryInfo(hostname, hostAddress, port);
doRegistry(registryInfo);
这里逻辑很简单,就是获取本机的的基本信息构造成RegistryInfo,然后调用了doRegistry方法:
/**
 * 接口方法对应method对象
 */
private Map

     interfaceMethods =
    new ConcurrentHashMap<>
    ();


    private void
    do
    Registry(RegistryInfo registryInfo) throws Exception {

 for (ServiceConfig config : serviceConfigs) {

 Class
    type = config.get
    Type();

 registry.register(
    type, registryInfo);

 Method
    [] declaredMethods =
    type.get
    DeclaredMethods();

 for (Method
    method : declaredMethods) {

 String identify =
    InvokeUtils.build
    InterfaceMethodIdentify(type, method);

 interfaceMethods.put(identify,
    method);

 }

 }

}
这里做了2件事情:
将接口注册到注册中心中
对于每一个接口的每一个方法,生成一个唯一标识,保存在interfaceMethods集合中
下面分别分析这两件事情,首先是注册方法:
因为我们用到了zookeeper,为了方便,引入了zookeeper的客户端框架curator
<dependency>
 <groupId>org.apache.curatorgroupId>
 <artifactId>curator-recipesartifactId>
 <version>2.3.0version>
dependency>
接着看代码:
zookeeper注册中心在初始化的时候,会建立好连接。然后注册的时候,针对clazz接口的每一个方法,都会生成一个唯一标识
这里使用了InvokeUtils.buildInterfaceMethodIdentify方法:
public static String buildInterfaceMethodIdentify(Class clazz, Method method) {
 Map<String, String> map = new LinkedHashMap<>();
 map.put("interface", clazz.getName());
 map.put("method", method.getName());
 Parameter[] parameters = method.getParameters();
 if (parameters.length > 0) {
 StringBuilder param = new StringBuilder();
 for (int i = 0; i < parameters.length; i++) {
 Parameter p = parameters[i];
 param.append(p.getType().getName());
 if (i < parameters.length - 1) {
 param.append(",");
 }
 }
 map.put("parameter", param.toString());
 }
 return map2String(map);
}

public static String map2String(Map<String, String> map) {
 StringBuilder sb = new StringBuilder();
 Iterator<map.entry<string, <="" span="">String>> iterator = map.entrySet().iterator();
 while (iterator.hasNext()) {
 Map.Entry<String, String> entry = iterator.next();
 sb.append(entry.getKey() + "=" + entry.getValue());
 if (iterator.hasNext()) {
 sb.append("&");
 }
 }
 return sb.toString();
}
其实就是对接口的方法使用他们的限定名和参数来组成一个唯一的标识,比如 HelloService#sayHello(TestBean)生成的大概是这样的:
interface=com.study.rpc.test.producer.HelloService&method=sayHello&
parameter=com.study.rpc.test.producer.TestBean
接下来的逻辑就简单了,在Zookeeper中的/myRPC路径下面建立临时节点,节点名称为我们上面的接口方法唯一标识,数据内容为机器信息。
之所以采用临时节点是因为:如果机器宕机了,连接断开之后,消费者可以通过zookeeper的watcher机制感知到
大概看起来是这样的:
 /myRPC/interface=com.study.rpc.test.producer.HelloService&method=sayHello&
 parameter=com.study.rpc.test.producer.TestBean
 [
 {
 "hostname":peer1,
 "port":8080
 },
 {
 "hostname":peer2,
 "port":8081
 }
 ]
通过这样的方式,在服务消费的时候就可以拿到这样的注册信息,然后知道可以调用那台机器的那个端口。
好了,注册中心弄完了之后,我们回到前面说的注册方法做的第二件事情,我们将每一个接口方法标识的方法放入了一个map中:
/**
 * 接口方法对应method对象
 */
private Map<String, Method> interfaceMethods = new ConcurrentHashMap<>();
这个的原因是因为,我们在收到网络请求的时候,需要调用反射的方式调用method对象,所以存起来。
启动网络服务端接受请求
接下来我们就可以看第四步了:
// step 4:初始化Netty服务器,接受到请求,直接打到服务提供者的service方法中
if (!this.serviceConfigs.isEmpty()) {
 // 需要暴露接口才暴露
 nettyServer = new NettyServer(this.serviceConfigs, interfaceMethods);
 nettyServer.init(port);
}
因为这里使用Netty来做的所以需要引入Netty的依赖:
<dependency>
 <groupId>io.nettygroupId>
 <artifactId>netty-allartifactId>
 <version>4.1.30.Finalversion>
dependency>
接着来分析:
public class NettyServer {

 /**
 * 负责调用方法的handler
 */
 private RpcInvokeHandler rpcInvokeHandler;

 public NettyServer(List

     serverConfigs, Map

      interfaceMethods)

     throws InterruptedException {
 this.rpcInvokeHandler = new RpcInvokeHandler(serverConfigs, interfaceMethods);
 }

 public int init(int port) throws Exception {
 EventLoopGroup bossGroup = new NioEventLoopGroup();
 EventLoopGroup workerGroup = new NioEventLoopGroup();
 ServerBootstrap b = new ServerBootstrap();
 b.group(bossGroup, workerGroup)
 .channel(NioserverSocketChannel.class)
 .option(ChannelOption.SO_BACKLOG, 1024)
 .childHandler(new ChannelInitializer

      ()
     {
 @Override
 protected void initChannel(SocketChannel ch) throws Exception {
 ByteBuf delimiter = Unpooled.copiedBuffer("$$");
 // 设置按照分隔符“&&”来切分消息,单条消息限制为 1MB
 ch.pipeline().addLast(new DelimiterBasedFrameDecoder(1024 * 1024, delimiter));
 ch.pipeline().addLast(new StringDecoder());
 ch.pipeline().addLast().addLast(rpcInvokeHandler);
 }
 });
 ChannelFuture sync = b.bind(port).sync();
 System.out.println("启动NettyService,端口为:" + port);
 return port;
 }
}
这部分主要的都是netty的api,我们不做过多的说明,就简单的说一下:
我们通过“&&”作为标识符号来区分两条信息,然后一条信息的最大长度为1MB
所有逻辑都在RpcInvokeHandler中,这里面传进去了配置的服务接口实例,以及服务接口实例每个接口方法唯一标识对应的Method对象的Map集合。
public class RpcInvokeHandler extends ChannelInboundHandlerAdapter {
/**
* 接口方法唯一标识对应的Method对象
*/
private Map<String, Method> interfaceMethods;
/**
* 接口对应的实现类
*/
private Map<class, Object> interfaceToInstance;
/**
* 线程池,随意写的,不要吐槽
*/
private ThreadPoolExecutor threadPoolExecutor = new ThreadPoolExecutor(10,
50, 60, TimeUnit.SECONDS, new LinkedBlockingQueue<>(100),
new ThreadFactory() {
AtomicInteger m = new AtomicInteger(0);
@Override
public Thread newThread(Runnable r) {
return new Thread(r, "IO-thread-" + m.incrementAndGet());
}
});
public RpcInvokeHandler(ListserviceConfigList,
Map< String, Method> interfaceMethods) {
this.interfaceToInstance = new ConcurrentHashMap<>();
this.interfaceMethods = interfaceMethods;
for (ServiceConfig config : serviceConfigList) {
interfaceToInstance.put(config.getType(), config.getInstance());
}
}
@Override
public void channelRead(ChannelHandlerContext ctx, Object msg) throws Exception {
try {
String message = ( String) msg;
// 这里拿到的是一串JSON数据,解析为Request对象,
// 事实上这里解析网络数据,可以用序列化方式,定一个接口,可以实现JSON格式序列化,或者其他序列化
// 但是demo版本就算了。
System.out. println( "接收到消息:" + msg);
RpcRequest request = RpcRequest.parse(message, ctx);
threadPoolExecutor.execute( new RpcInvokeTask(request));
} finally {
ReferenceCountUtil.release(msg);
}
}
@Override
public void channelReadComplete(ChannelHandlerContext ctx) throws Exception {
ctx.flush();
}
@Override
public void exceptionCaught(ChannelHandlerContext ctx, Throwable cause) throws Exception {
System.out. println( "发生了异常..." + cause);
cause.printStackTrace();
ctx.close();
}
public class RpcInvokeTask implements Runnable {
private RpcRequest rpcRequest;
RpcInvokeTask(RpcRequest rpcRequest) {
this.rpcRequest = rpcRequest;
}
@Override
public void run() {
try {
/*
* 数据大概是这样子的
* {"interfaces":"interface=com.study.rpc.test.producer.HelloService&method=sayHello¶meter=com
* .study.rpc.test.producer.TestBean","requestId":"3","parameter":{"com.study.rpc.test.producer
* .TestBean":{"age":20,"name":"张三"}}}
*/
// 这里希望能拿到每一个服务对象的每一个接口的特定声明
String interfaceIdentity = rpcRequest.getInterfaceIdentity();
Method method = interfaceMethods. get(interfaceIdentity);
Map< String, String> map = string2Map(interfaceIdentity);
String interfaceName = map. get( "interface");
Class interfaceClass = Class.forName(interfaceName);
Object o = interfaceToInstance. get(interfaceClass);
String parameterString = map. get( "parameter");
Object result;
if (parameterString != null) {
String[] parameterTypeClass = parameterString. split( ",");
Map< String, Object> parameterMap = rpcRequest.getParameterMap();
Object[] parameterInstance = new Object[parameterTypeClass.length];
for ( int i = 0; i < parameterTypeClass.length; i++) {
String parameterClazz = parameterTypeClass[i];
parameterInstance[i] = parameterMap. get(parameterClazz);
}
result = method.invoke(o, parameterInstance);
} else {
result = method.invoke(o);
}
// 写回响应
ChannelHandlerContext ctx = rpcRequest.getCtx();
String requestId = rpcRequest.getRequestId();
RpcResponse response = RpcResponse.create( JSONObject.toJSONString(result), interfaceIdentity,
requestId);
String s = JSONObject.toJSONString(response) + "$$";
ByteBuf byteBuf = Unpooled.copiedBuffer(s.getBytes());
ctx.writeAndFlush(byteBuf);
System.out. println( "响应给客户端:" + s);
} catch (Exception e) {
e.printStackTrace();
}
}
public static Map< String, String> string2Map( String str) {
String[] split = str. split( "&");
Map< String, String> map = new HashMap<>( 16);
for ( String s : split) {
String[] split1 = s. split( "=");
map.put(split1[ 0], split1[ 1]);
}
return map;
}
}
}
这里说明一下上面的逻辑:
channelRead方法用于接收消息,接收到的就是我们前面分析的那个JSON格式的数据,接着我们将消息解析成RpcRequest
public class RpcRequest {

 private String interfaceIdentity;

 private Map<String, Object> parameterMap = new HashMap<>();

 private ChannelHandlerContext ctx;

 private String requestId;

 public static RpcRequest parse(String message, ChannelHandlerContext ctx) throws ClassNotFoundException {
 /*
 * {
 * "interfaces":"interface=com.study.rpc.test.producer.HelloService&method=sayHello2¶meter=java.lang
 * .String,com.study.rpc.test.producer.TestBean",
 * "parameter":{
 * "java.lang.String":"haha",
 * "com.study.rpc.test.producer.TestBean":{
 * "name":"小王",
 * "age":20
 * }
 * }
 * }
 */
 JSONObject jsonObject = JSONObject.parseObject(message);
 String interfaces = jsonObject.getString("interfaces");

 JSONObject parameter = jsonObject.getJSONObject("parameter");
 Set<String> strings = parameter.keySet();
 RpcRequest request = new RpcRequest();
 request.setInterfaceIdentity(interfaces);
 Map<String, Object> parameterMap = new HashMap<>(16);

 String requestId = jsonObject.getString("requestId");

 for (String key : strings) {
 if (key.equals("java.lang.String")) {
 parameterMap.put(key, parameter.getString(key));
 } else {
 Class clazz = Class.forName(key);
 Object object = parameter.getObject(key, clazz);
 parameterMap.put(key, object);
 }
 }
 request.setParameterMap(parameterMap);
 request.setCtx(ctx);
 request.setRequestId(requestId);
 return request;
 }
}
接着从request中解析出来需要调用的接口,然后通过反射调用对应的接口,得到结果后我们将响应封装成PrcResponse写回给客户端:
public class RpcResponse {

 private String result;

 private String interfaceMethodIdentify;

 private String requestId;

 public String getResult() {
 return result;
 }

 public void setResult(String result) {
 this.result = result;
 }

 public static RpcResponse create(String result, String interfaceMethodIdentify, String requestId) {
 RpcResponse response = new RpcResponse();
 response.setResult(result);
 response.setInterfaceMethodIdentify(interfaceMethodIdentify);
 response.setRequestId(requestId);
 return response;
 }
}
里面包含了请求的结果JSON串,接口方法唯一标识,请求ID。数据大概看起来这个样子:
{"interfaceMethodIdentify":"interface=com.study.rpc.test.producer.HelloService&method=sayHello&
parameter=com.study.rpc.test.producer.TestBean","requestId":"3",
"result":""牛逼,我收到了消息:TestBean{name='张三', age=20}""}
通过这样的信息,客户端就可以通过响应结果解析出来。
测试服务提供者
既然我们代码写完了,现在需要测试一把:
首先我们先写一个HelloService的实现类出来:
public class HelloServiceImpl implements HelloService {

 @Override
 public String sayHello(TestBean testBean) {
 return "牛逼,我收到了消息:" + testBean;
 }
}
接着编写服务提供者代码:
public class TestProducer {
public static void main(String[] args) throws Exception {
String connectionString = "zookeeper://localhost1:2181,localhost2:2181,localhost3:2181";
HelloService service = new HelloServiceImpl();
ServiceConfigconfig = new ServiceConfig<>(HelloService.class, service);
ListserviceConfigList = new ArrayList<>();
serviceConfigList. add(config);
ApplicationContext ctx = new ApplicationContext(connectionString, serviceConfigList,
null, 50071);
}
}
接着启动起来,看到日志:
Zookeeper Client初始化完毕......
注册到注册中心,路径为:【/myRPC/interface=com.study.rpc.test.producer.HelloService&
method=sayHello¶meter=com.study.rpc.test.producer.TestBean】
信息为:RegistryInfo{hostname='localhost', ip='192.168.16.7', port=50071}
启动NettyService,端口为:50071
这个时候,我们期望用NettyClient发送请求:
{
 "interfaces": "interface=com.study.rpc.test.producer.HelloService&
 method=sayHello¶meter=com.study.rpc.test.producer.TestBean",
 "requestId": "3",
 "parameter": {
 "com.study.rpc.test.producer.TestBean": {
 "age": 20,
 "name": "张三"
 }
 }
}
得到的响应应该是:
{"interfaceMethodIdentify":"interface=com.study.rpc.test.producer.HelloService&method=sayHello&
parameter=com.study.rpc.test.producer.TestBean","requestId":"3",
"result":""牛逼,我收到了消息:TestBean{name='张三', age=20}""}
那么,可以编写一个测试程序(这个程序仅仅用于中间测试用,读者不必理解):
public class NettyClient {
 public static void main(String[] args) {
 EventLoopGroup group = new NioEventLoopGroup();
 try {
 Bootstrap b = new Bootstrap();
 b.group(group)
 .channel(NioSocketChannel.class)
 .option(ChannelOption.TCP_NODELAY, true)
 .handler(new ChannelInitializer

    () {

 @Override

 protected void init
    Channel(SocketChannel ch) throws Exception {

 ch.pipeline
    ().add
    Last(new StringDecoder());

 ch.pipeline
    ().add
    Last(new NettyClientHandler());

 }

 });

 ChannelFuture sync = b.connect(
    "127.0.0.1",
    50071).sync
    ();

 sync.channel
    ().close
    Future().sync
    ();

 } catch (Exception e) {

 e.print
    StackTrace();

 } finally {

 group.shutdown
    Gracefully();

 }

 }


    private static
    class NettyClientHandler extends ChannelInboundHandlerAdapter {


 @Override

 public void channel
    Active(ChannelHandlerContext ctx) throws Exception {

 JSONObject jsonObject =
    new
    JSONObject();

 jsonObject.put(
    "interfaces",
    "interface=com.study.rpc.test.producer" +


    ".HelloService&method=sayHello¶meter=com.study.rpc.test.producer.TestBean");

 JSONObject param =
    new
    JSONObject();

 JSONObject bean =
    new
    JSONObject();

 bean.put(
    "age",
    20);

 bean.put(
    "name",
    "张三");

 param.put(
    "com.study.rpc.test.producer.TestBean", bean);

 jsonObject.put(
    "parameter", param);

 jsonObject.put(
    "requestId",
    3);


    System.out.println(
    "发送给服务端JSON为:" + jsonObject.
    to
    JSONString());

 String msg = jsonObject.
    to
    JSONString() +
    "$$";

 ByteBuf byteBuf =
    Unpooled.buffer(msg.get
    Bytes().length);

 byteBuf.write
    Bytes(msg.getBytes());

 ctx.write
    AndFlush(byteBuf);

 }


 @Override

 public void channel
    Read(ChannelHandlerContext ctx, Object msg) throws Exception {


    System.out.println(
    "收到消息:" + msg);

 }

 }

}
启动之后,看到控制台输出:
发送给服务端JSON为:{"interfaces":"interface=com.study.rpc.test.producer.HelloService&method=sayHello&
parameter=com.study.rpc.test.producer.TestBean","requestId":3,
"parameter":{"com.study.rpc.test.producer.TestBean":{"name":"张三","age":20}}}

收到消息:{"interfaceMethodIdentify":"interface=com.study.rpc.test.producer.HelloService&
method=sayHello¶meter=com.study.rpc.test.producer.TestBean","requestId":"3",
"result":""牛逼,我收到了消息:TestBean{name='张三', age=20}""}
bingo,完美实现了RPC的服务提供者。接下来我们只需要实现服务消费者就完成了。
开发服务消费者
服务消费者是同样的处理,我们同样要定义一个消费者的配置:
public class ReferenceConfig{
private Classtype;
public ReferenceConfig(Classtype) {
this.type = type;
}
public ClassgetType() {
return type;
}
public void setType(Classtype) {
this.type = type;
}
}
然后我们是统一入口,在ApplicationContext中修改代码:
public ApplicationContext(String registryUrl, ListserviceConfigs,
ListreferenceConfigs, int port) throws Exception {
// step 1: 保存服务提供者和消费者
this.serviceConfigs = serviceConfigs == null ? new ArrayList<>() : serviceConfigs;
this.referenceConfigs = referenceConfigs == null ? new ArrayList<>() : referenceConfigs;
// ....
}
private void doRegistry(RegistryInfo registryInfo) throws Exception {
for (ServiceConfig config : serviceConfigs) {
Class type = config.getType();
registry. register(type, registryInfo);
Method[] declaredMethods = type.getDeclaredMethods();
for (Method method : declaredMethods) {
String identify = InvokeUtils.buildInterfaceMethodIdentify(type, method);
interfaceMethods. put(identify, method);
}
}
for (ReferenceConfig config : referenceConfigs) {
ListregistryInfos = registry.fetchRegistry( config.getType());
if (registryInfos != null) {
interfacesMethodRegistryList. put( config.getType(), registryInfos);
initChannel(registryInfos);
}
}
}
在注册的时候,我们需要将需要消费的接口,通过注册中心抓取出来,所以注册中心要增加一个接口方法:
public interface Registry {

 /**
 * 将生产者接口注册到注册中心
 *
 * @param clazz 类
 * @param registryInfo 本机的注册信息
 */
 void register(Class clazz, RegistryInfo registryInfo) throws Exception;

 /**
 * 为服务提供者抓取注册表
 *
 * @param clazz 类
 * @return 服务提供者所在的机器列表
 */
 List

     fetchRegistry
     (Class clazz)
     throws Exception
    ;
}
获取服务提供者的机器列表
具体在Zookeeper中的实现如下:
@Override
public List

     fetch
    Registry(Class clazz) throws Exception {

 Method
    [] declaredMethods = clazz.get
    DeclaredMethods();

 List

      registryInfos = null;

 for (Method
     method : declaredMethods) {

 String key =
     InvokeUtils.build
     InterfaceMethodIdentify(clazz, method);

 String path =
     "/myRPC/" + key;

 Stat stat = client.check
     Exists()

 .for
     Path(path);


     if (stat
      == null) {


     // 这里可以添加watcher来监听变化,这里简化了,没有做这个事情


     System.out.println(
     "警告:无法找到服务接口:" + path);

 continue;

 }


     if (registryInfos
      == null) {

 byte
     []
     bytes = client.get
     Data().for
     Path(path);

 String data =
     new
     String(bytes, StandardCharsets.UTF_8);

 registryInfos =
     JSONArray.parse
     Array(data, RegistryInfo.class);

 }

 }

 return registryInfos;

}
其实就是去zookeeper获取节点中的数据,得到接口所在的机器信息,获取到的注册信息诸侯,就会调用以下代码:
我们会针对每一个唯一的RegistryInfo建立一个连接,然后有这样一段代码:
client.setMessageCallback(message -> {
 // 这里收单服务端返回的消息,先压入队列
 RpcResponse response = JSONObject.parseObject(message, RpcResponse.class);
 responses.offer(response);
 synchronized (ApplicationContext.this) {
 ApplicationContext.this.notifyAll();
 }
});
设置一个callback,用于收到消息的时候,回调这里的代码,这部分我们后面再分析。
然后在client.getCtx()的时候,同步阻塞直到连接完成,建立好连接后通过,NettyClient的代码如下:
public class NettyClient {

 private ChannelHandlerContext ctx;

 private MessageCallback messageCallback;

 public NettyClient(String ip, Integer port) {
 EventLoopGroup group = new NioEventLoopGroup();
 try {
 Bootstrap b = new Bootstrap();
 b.group(group)
 .channel(NioSocketChannel.class)
 .option(ChannelOption.TCP_NODELAY, true)
 .handler(new ChannelInitializer

     () {


    @Override


    protected void initChannel(SocketChannel ch) throws Exception {

 ByteBuf delimiter = Unpooled.copiedBuffer(
    "$$".getBytes());


    // 设置按照分隔符“&&”来切分消息,单条消息限制为 1MB

 ch.pipeline().addLast(
    new DelimiterBasedFrameDecoder(
    1024 *
    1024, delimiter));

 ch.pipeline().addLast(
    new StringDecoder());

 ch.pipeline().addLast(
    new NettyClientHandler());

 }

 });

 ChannelFuture sync = b.connect(ip, port).sync();

 }
    catch (Exception e) {

 e.printStackTrace();

 }

 }


    public void setMessageCallback(MessageCallback callback) {


    this.messageCallback = callback;

 }


    public ChannelHandlerContext getCtx() throws InterruptedException {

 System.out.println(
    "等待连接成功...");


    if (ctx ==
    null) {


    synchronized (
    this) {

 wait();

 }

 }


    return ctx;

 }


    private
    class NettyClientHandler extends ChannelInboundHandlerAdapter {


    @Override


    public void channelRead(ChannelHandlerContext ctx, Object msg) throws Exception {


    try {

 String message = (String) msg;


    if (messageCallback !=
    null) {

 messageCallback.onMessage(message);

 }

 }
    finally {

 ReferenceCountUtil.release(msg);

 }

 }


    @Override


    public void channelActive(ChannelHandlerContext ctx) throws Exception {

 NettyClient.
    this.ctx = ctx;

 System.out.println(
    "连接成功:" + ctx);


    synchronized (NettyClient.
    this) {

 NettyClient.
    this.notifyAll();

 }

 }


    @Override


    public void channelReadComplete(ChannelHandlerContext ctx) throws Exception {

 ctx.flush();

 }


    @Override


    public void exceptionCaught(ChannelHandlerContext ctx, Throwable cause) throws Exception {

 cause.printStackTrace();

 }

 }


    public
    interface MessageCallback {


    void onMessage(String message);

 }

}
这里主要是用了wait()和notifyAll()来实现同步阻塞等待连接建立。
建立好连接后,我们保存到集合中:
// 等待连接建立
ChannelHandlerContext ctx = client.getCtx();
channels.put(info, ctx);
发送请求
好了,到了这里我们为每一个需要消费的接口建立了网络连接,接下来要做的事情就是提供一个接口给用户获取服务提供者实例:
我把这个方法写在ApplicationContext中:
这里主要是通过动态代理来实现的,首先通过class来获取对应的机器列表,接着通过loadBalancer来选择一个机器。这个LoaderBalance是一个接口:
public interface LoadBalancer {

 /**
 * 选择一个生产者
 *
 * @param registryInfos 生产者列表
 * @return 选中的生产者
 */
 RegistryInfo choose(List

     registryInfos);


}
在ApplicationContext初始化的时候可以选择不同的实现,我这里主要实现了一个简单的随机算法(后续可以拓展为其他的,比如RoundRobin之类的):
public class RandomLoadbalancer implements LoadBalancer {
 @Override
 public RegistryInfo choose(List

       registryInfos)
      {
 Random random = new Random();
 int index = random.nextInt(registryInfos.size());
 return registryInfos.get(index);
 }
}
接着构造接口方法的唯一标识identify,还有一个requestId。
为什么需要一个requestId呢?
这是因为我们在处理响应的时候,需要找到某个响应是对应的哪个请求,但是仅仅使用identify是不行的
因为我们同一个应用程序中可能会有多个线程同时调用同一个接口的同一个方法,这样的identify是相同的。
所以我们需要用 identify + requestId的方式来判断,reqeustId是一个自增的LongAddr。服务端在响应的时候会将requestId返回。
接着我们构造了一个Invoker,把它放入inProgressInvoker的集合中。调用了其invoke方法:
Invoker invoker = new DefaultInvoker(method.getReturnType(), ctx, requestId, identify);
inProgressInvoker.put(identify + "#" + requestId, invoker);
// 阻塞等待结果
return invoker.invoke(args);


public class DefaultInvoker

     implements Invoker

      {


     private ChannelHandlerContext ctx;


     private String requestId;


     private String identify;


     private Class

       returnType;


      private T result;


      DefaultInvoker(Class

        returnType, ChannelHandlerContext
        ctx, String
        requestId, String
        identify)
        {

 this.returnType = returnType;

 this.ctx = ctx;

 this.requestId = requestId;

 this.identify = identify;

 }


 @
      SuppressWarnings("unckecked")

 @Override

 public T invoke(Object
      [] args) {

 JSONObject jsonObject =
      new
      JSONObject();

 jsonObject.put(
      "interfaces", identify);

 JSONObject param =
      new
      JSONObject();


      if (args != null) {

 for (Object obj : args) {

 param.put(obj.get
      Class().get
      Name(), obj);

 }

 }

 jsonObject.put(
      "parameter", param);

 jsonObject.put(
      "requestId", requestId);


      System.out.println(
      "发送给服务端JSON为:" + jsonObject.
      to
      JSONString());

 String msg = jsonObject.
      to
      JSONString() +
      "$$";

 ByteBuf byteBuf =
      Unpooled.buffer(msg.get
      Bytes().length);

 byteBuf.write
      Bytes(msg.getBytes());

 ctx.write
      AndFlush(byteBuf);

 wait
      ForResult();

 return result;

 }


 @Override

 public void set
      Result(String result) {

 synchronized (this) {

 this.result =
      JSONObject.parse
      Object(result, returnType);

 notify
      All();

 }

 }


      private void wait
      ForResult() {

 synchronized (this) {


      try {

 wait
      ();

 } catch (InterruptedException e) {

 e.print
      StackTrace();

 }

 }

 }

}
我们可以看到调用Invoker的invoke方法之后,会运行到waitForResult()这里,这里已经把请求通过网络发送出去了,但是就会被卡住。
这是因为我们的网络请求的结果不是同步返回的,有可能是客户端同时发起很多个请求,所以我们不可能在这里让他同步阻塞等待的。
接受响应
那么对于服务消费者而言,把请求发送出去但是卡住了,这个时候当服务端处理完之后,会把消息返回给客户端。返回的入口在
NettyClient的onChannelRead中:
@Override
public void channelRead(ChannelHandlerContext ctx, Object msg) throws Exception {
 try {
 String message = (String) msg;
 if (messageCallback != null) {
 messageCallback.onMessage(message);
 }
 } finally {
 ReferenceCountUtil.release(msg);
 }
}
这里通过callback回调出去。是否还记的我们在初始化NettyClient的时候,会设置一个callback?
/**
* 响应队列
*/
private ConcurrentLinkedQueueresponses = new ConcurrentLinkedQueue<>();
client.setMessageCallback(message -> {
// 这里收单服务端返回的消息,先压入队列
RpcResponse response = JSONObject.parseObject(message, RpcResponse. class);
responses.offer(response);
synchronized (ApplicationContext. this) {
ApplicationContext. this.notifyAll();
}
});
这里接受消息之后,解析成为一个RpcResponse对象,然后压入responses队列中,这样我们就把所有的请求响应放入队列中。
但是这样一来,我们应该怎么把响应结果返回给调用的地方呢?
我们可以这样做:起一个或多个后台线程,然后从队列中拿出响应,然后根据响应从我们之前保存的inProcessInvoker中找出对应的Invoker,然后把结果返回回去
public ApplicationContext(....){

 //.....

 // step 5:启动处理响应的processor
 initProcessor();

}

private void initProcessor() {
 // 事实上,这里可以通过配置文件读取,启动多少个processor
 int num = 3;
 processors = new ResponseProcessor[num];
 for (int i = 0; i < 3; i++) {
 processors[i] = createProcessor(i);
 }
}

/**
 * 处理响应的线程
 */
private class ResponseProcessor extends Thread {
 @Override
 public void run() {
 System.out.println("启动响应处理线程:" + getName());
 while (true) {
 // 多个线程在这里获取响应,只有一个成功
 RpcResponse response = responses.poll();
 if (response == null) {
 try {
 synchronized (ApplicationContext.this) {
 // 如果没有响应,先休眠
 ApplicationContext.this.wait();
 }
 } catch (InterruptedException e) {
 e.printStackTrace();
 }
 } else {
 System.out.println("收到一个响应:" + response);
 String interfaceMethodIdentify = response.getInterfaceMethodIdentify();
 String requestId = response.getRequestId();
 String key = interfaceMethodIdentify + "#" + requestId;
 Invoker invoker = inProgressInvoker.remove(key);
 invoker.setResult(response.getResult());
 }
 }
 }
}
这里面如果从队列中拿不到数据,就会调用wait()方法等待
这里需要注意的是,在callbak中获取到响应的时候我们是会调用notifyAll()来唤醒这里的线程的:
responses.offer(response);
synchronized (ApplicationContext.this) {
 ApplicationContext.this.notifyAll();
}
这里被唤醒之后,就会有多个线程去争抢那个响应,因为队列是线程安全的,所以这里多个线程可以获取到响应结果。
接着拿到结果之后,通过identify + requestId构造成唯一的请求标识,从inProgressInvoker中获取对应的invoker,然后通过setResult将结果设置进去:
String key = interfaceMethodIdentify + "#" + requestId;
Invoker invoker = inProgressInvoker.remove(key);
invoker.setResult(response.getResult());


@Override
public void setResult(String result) {
 synchronized (this) {
 this.result = JSONObject.parseObject(result, returnType);
 notifyAll();
 }
}
这里设置进去之后,就会将结果用json反序列化成为用户需要的结果,然后调用其notifyAll方法唤醒invoke方法被阻塞的线程:
 @SuppressWarnings("unckecked")
 @Override
 public T invoke(Object[] args) {
 JSONObject jsonObject = new JSONObject();
 jsonObject.put("interfaces", identify);
 JSONObject param = new JSONObject();
 if (args != null) {
 for (Object obj : args) {
 param.put(obj.getClass().getName(), obj);
 }
 }
 jsonObject.put("parameter", param);
 jsonObject.put("requestId", requestId);
 System.out.println("发送给服务端JSON为:" + jsonObject.toJSONString());
 String msg = jsonObject.toJSONString() + NettyServer.DELIMITER;
 ByteBuf byteBuf = Unpooled.buffer(msg.getBytes().length);
 byteBuf.writeBytes(msg.getBytes());
 ctx.writeAndFlush(byteBuf);
 // 这里被唤醒
 waitForResult();
 return result;
 }
然后就可以返回结果了,返回的结果就会返回给用户了。
整体测试
到了这里我们的生产者和消费者的代码都写完了,我们来整体测试一遍。生产者的代码是和之前的一致的:
public class TestProducer {
public static void main(String[] args) throws Exception {
String connectionString = "zookeeper://localhost1:2181,localhost2:2182,localhost3:2181";
HelloService service = new HelloServiceImpl();
ServiceConfigconfig = new ServiceConfig<>(HelloService.class, service);
ListserviceConfigList = new ArrayList<>();
serviceConfigList. add(config);
ApplicationContext ctx = new ApplicationContext(connectionString, serviceConfigList, null, 50071);
}
}
消费者测试代码:
public class TestConsumer {

 public static void main(String[] args) throws Exception {
 String connectionString = "zookeeper://localhost1:2181,localhost2:2182,localhost3:2181";
 ReferenceConfig

     config =
    new ReferenceConfig<>(
    HelloService.
    class);

 ApplicationContext ctx =
    new
    ApplicationContext(connectionString, null, Collections.singletonList(config),


    50070);

 HelloService helloService = ctx.get
    Service(HelloService.class);


    System.out.println(
    "sayHello(TestBean)结果为:" + helloService.say
    Hello(new TestBean("张三", 20)));

 }

}
接着启动生产者,然后启动消费者:
生产者得到的日志如下:
Zookeeper Client初始化完毕......
注册到注册中心,路径为:【/myRPC/interface=com.study.rpc.test.producer.HelloService&
method=sayHello¶meter=com.study.rpc.test.producer.TestBean】
信息为:RegistryInfo{hostname='localhost', ip='192.168.16.7', port=50071}
启动NettyService,端口为:50071
启动响应处理线程:Response-processor-0
启动响应处理线程:Response-processor-2
启动响应处理线程:Response-processor-1
接收到消息:{"interfaces":"interface=com.study.rpc.test.producer.HelloService&
method=sayHello¶meter=com.study.rpc.test.producer.TestBean","requestId":"1",
"parameter":{"com.study.rpc.test.producer.TestBean":{"age":20,"name":"张三"}}}

响应给客户端:{"interfaceMethodIdentify":"interface=com.study.rpc.test.producer.HelloService&
method=sayHello¶meter=com.study.rpc.test.producer.TestBean","requestId":"1",
"result":""牛逼,我收到了消息:TestBean{name='张三', age=20}""}
消费者得到的日志为:
Zookeeper Client初始化完毕......
开始建立连接:192.168.16.7, 50071
等待连接成功...
启动响应处理线程:Response-processor-1
启动响应处理线程:Response-processor-0
启动响应处理线程:Response-processor-2
连接成功:ChannelHandlerContext(NettyClient$NettyClientHandler#0,
[id: 0xb7a59701, L:/192.168.16.7:58354 - R:/192.168.16.7:50071])

发送给服务端JSON为:{"interfaces":"interface=com.study.rpc.test.producer.HelloService&
method=sayHello¶meter=com.study.rpc.test.producer.TestBean","requestId":"1",
"parameter":{"com.study.rpc.test.producer.TestBean":{"age":20,"name":"张三"}}}

收到一个响应:RpcResponse{result='"牛逼,我收到了消息:TestBean{name='张三', age=20}"',
interfaceMethodIdentify='interface=com.study.rpc.test.producer.HelloService&
method=sayHello¶meter=com.study.rpc.test.producer.TestBean', requestId='1'}
sayHello(TestBean)结果为:牛逼,我收到了消息:TestBean{name='张三', age=20}
总结
通过完成这个RPC框架,大家应该会大致对RPC的实现原理有个感性的认识,这里总结一下特性:
支持多种注册中心,可配置(虽然只实现了zookeeper,但是我们拓展是非常简单的)
支持负载均衡
当然了还有非常多的不足之处,这是无可否认的,随意写出来的框架和工业级使用的框架比较还是不一样
我这里列举一些不完美的地方把(有兴趣的可以搞搞):
实现序列化框架的拓展,多种序列化供用户选择
网络请求错误处理,这里实现非常简陋,健壮性很差
注册中心不支持故障感知和自动恢复
调用监控,性能指标
加油。
END
如有收获,请划至底部,点击“在看”,谢谢!
BAT架构经验倾囊相授
以上是关于如何设计一个短小精悍可拓展的RPC框架?(含实现代码)的主要内容,如果未能解决你的问题,请参考以下文章