用Openresty结合lua提高应用本地缓存效率
Posted 运维讲堂
tags:
篇首语:本文由小常识网(cha138.com)小编为大家整理,主要介绍了用Openresty结合lua提高应用本地缓存效率相关的知识,希望对你有一定的参考价值。
原先架构模式
对与用户请求,lvs起到负载均衡的作用,将每个用户的请求通过一定的算法分摊到后台的nginx集群中某台nginx上.nginx的请求再通过数据服务层获取相应的数据.从大部分的应用上来看是没有任何问题的,但如果我们nginx集群中的应用在从数据层服务中获取数据后,再返回给用户请求后,再将其保存到本地缓存,下次请求便可以直接从本地缓存中取了,看似都挺好,但你有没有想到相同的请求,经过lvs分摊可能会分推到nginx1,nginx2,nginx3,那么是不是nginx2与nginx3还是需要再从数据服务层中获取一遍,再缓存到本地,这肯定是不合适的,所以我们需要在其前端加一层,此层作为分发层,起到相同的请求,只落到某一台nginx应用层上,这样第1次请求需要与数据服务层交互,其它请求,在缓存不到期时,都应该访问缓存中的数据,这样就提高了本地缓存的效率了.
改变后的架构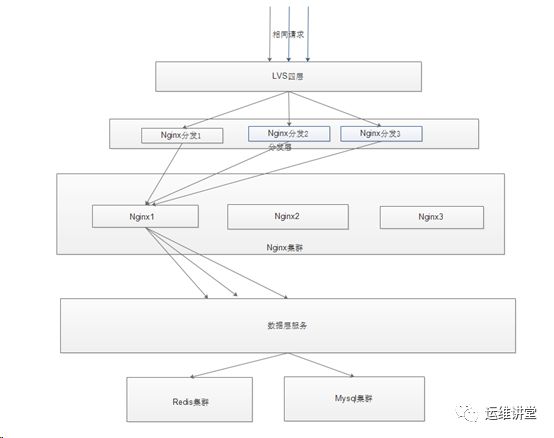
看到没,对与相同的请求,经过Nginx分发层都会转发到相同的nginx集群中的nginx1这台应用中,这样我们第1个请求,需要通过数据服务层获取数据,对与后面2个请求,仅需要通过本地缓存便可以了.这样大大提高了本地缓存使用的效率了.
在这个改变的架构中,我们使用了nginx分发层来解决这样的问题.对与此nginx分发层,我们使用的是openresty+lua来实现的.
分发层做了3个项目,分别是/distribute01,/distribute02,/distribute03
应用层做了3个项目,分别是/app01,/app02,/app03
数据服务层1个项目,是/dsl
这里拿创建分发层01项目为例
首先创建此项目的相关目录
mkdir /distribute01&&mkdir /distribute01/conf && mkdir /distribute01/conf/vhost.d&&mkdir /distribute01/logs&& mkdir /distribute01/lua&& mkdir /distribute01/lualib
编写nginx.conf配置文件
worker_processes auto;
error_loglogs/error.log;
events {
worker_connections1024;
}
http {
lua_package_path'${prefix}lualib/?.lua;;';
lua_package_cpath'${prefix}lualib/?.so;;';
include vhost.d/*.conf;
}
编写vhost.d/distribute01.conf
server {
listen 8000;
server_name www.opdevos.com;
location / {
default_type 'text/html';
lua_code_cache off;
content_by_lua_file/distribute01/lua/distribute.lua;
}
}
编写/distribute01/lua/distribute.lua;
localcjson = require "cjson"

local ret = {name="opdevos",project="distribute01"}

ngx.say(cjson.encode(ret))
最后目录结构
[root@docker_luadistribute01]# tree -L 2
.
├── conf —存储nginx相关配置文件
│ ├── nginx.conf
│ └── vhost.d
├── logs —存储日志
├── lua —存储lua业务逻辑
│ └──distribute.lua
└── lualib —存储第三方lua库或者自己写的模块
├── cjson.so
├── ngx
├── rds
├── redis
├── resty
└── utils
启动nginx
/opt/openresty/nginx/sbin/nginx-p /distribute01/
停止nginx
/opt/openresty/nginx/sbin/nginx-p /distribute01/ -s stop
平滑重启nginx
/opt/openresty/nginx/sbin/nginx-p /distribute01/ -s reload
测试: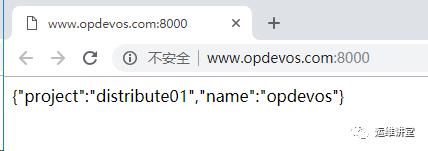
将openresty的第三方库copy到/distribute01/lualib此目录下.
cp –r/opt/openresty/lualib/* /distribute01/lualib
以下表格是我们需要在虚拟机里创建的相关项目,项目的目录相关制作见上面的例子.
名称 |
端口 |
项目名 |
分发层1 |
8000 |
distribute01 |
分发层2 |
8001 |
distribute01 |
分发层3 |
8002 |
distribute02 |
应用层1 |
4000 |
app01 |
应用层2 |
4001 |
app02 |
应用层3 |
4001 |
app03 |
数据服务层 |
3000 |
dsl |
最后为了管理这些项目的方便写了一个nginx.sh脚本.
#!/usr/bin/env bash
action=$1
function start_nginx()
{
nginx -p /distribute01/
nginx -p /distribute02/
nginx -p /distribute03/
nginx -p /app01/
nginx -p /app02/
nginx -p /app03/
nginx -p /dsl/
}
function stop_nginx()
{
nginx -p /distribute01/ -s stop
nginx -p /distribute02/ -s stop
nginx -p /distribute03/ -s stop
nginx -p /app01/ -s stop
nginx -p /app02/ -s stop
nginx -p /app03/ -s stop
nginx -p /dsl/ -s stop
}
if [ "$action" =="restart" ];then
stop_nginx
start_nginx
elif [ "$action" =="stop" ];then
stop_nginx
else
start_nginx
fi
大家只要传stop参数便会停止所有项目,若传restart便会重启项目,若啥也不传,则会启动相关项目.
接下来,让我们进入正式的开发中吧。先来实现分发层,此层以productID进行hash,来决定请求进入那个app应用服务器中.
我们先来指定固定的请求格式:
http://www.opdevos.com:8000/?productid=111&shopid=222
本篇先来实现分发层那块应用的开发吧.
vi /etc/distribute01/distribute.lua
--分发层,从url获取到的指定参数productid进行模计算,将计算好的数据选取后端的真实应用服务器
local http = require "resty.http"

--http://www.opdevos.com:8000/?productid=111&shopid=222
local args = ngx.req.get_uri_args()
local product_id =args["productid"]
local shop_id = args["shopid"]

local servers={"127.0.0.1:4000",”127.0.0.1:4001“,”127.0.0.1:4002”}
local len = #servers
local hash =ngx.crc32_long(product_id)%len+1
local backend ="http://"..servers[hash]

local req_path="/?productid="..product_id.."&shopid="..shop_id

local httpc = http.new()
local resp,err = httpc:request_uri(backend,{
         method= "GET",
         path= req_path
         })

--错误异常处理
if not resp then
         ngx.status= ngx.HTTP_BAD_REQUEST
         ngx.say("request error:", err)
         returnngx.exit(ngx.status)
end

ngx.status = resp.status

ngx.say(resp.body)
至此分发服务器1部署完毕,对与分发服务器2,3这两台代码部署参考分发服务器1.
为了测试验证,我们需要简单部署下各应用层的代码.
app01应用
app.lua
local cjson = require “cjson”
local res ={app=”app01”,layer=”app”}
ngx.say(cjson.encode(res))
app02应用
app.lua
local cjson = require “cjson”
local res = {app=”app02”,layer=”app”}
ngx.say(cjson.encode(res))
app03应用
app.lua
local cjson = require “cjson”
local res = {app=”app03”,layer=”app”}
ngx.say(cjson.encode(res))
访问测试:


落在三台分发层的相同请求都被请求到app01上了.这也就实现了当productid一致的时候,请求都会落到相同的后端应用服务器上,那么我们只需要将后端应用服务器做好本地缓存,那么自然便会提高本地缓存的效率.
接下来,我们再来实现应用层与服务层这块.
应用层我们将使用ngx lua的第三方模块html template来解析一个html文件.
cd /app01/lualib/resty
wget https://raw.githubusercontent.com/bungle/lua-resty-template/master/lib/resty/template.lua
mkdir /app01/lualib/resty/html
cd /app01/lualib/resty/html
wget https://raw.githubusercontent.com/bungle/lua-resty-template/master/lib/resty/template/html.lua
2.创建html模板位置及编写htmltemplates模板代码
创建模板路径
mkdir /app01/templates
编写模板代码– product.html
vi /app01/templates/product.html
<!DOCTYPE html>
<html>
<head>
<meta charset="UTF-8">
<title>商品详情页</title>
</head>
<body>
来自哪个应用: {* appName*}<br/>
产品信息来源: {* product_from*}<br/>
商店信息来源: {* shop_from*}<br/>
商品id: {* productId *}<br/>
商品名称: {* productName *}<br/>
商品图片列表: {* productPictureList *}<br/>
商品规格: {* productSpecification *}<br/>
商品售后服务: {* productService *}<br/>
商品颜色: {* productColor *}<br/>
商品大小: {* productSize *}<br/>
店铺id: {* shopId *}<br/>
店铺名称: {* shopName *}<br/>
店铺等级: {* shopLevel *}<br/>
店铺好评率: {* shopRate*}<br/>
</body>
</html>
定义nginx本地缓存
vi /app01/conf/nginx.conf
在http模块里面加上以下内容.
lua_shared_dict app_dict 10m; 声明一个20M的app_dict共享内存,供存取数据.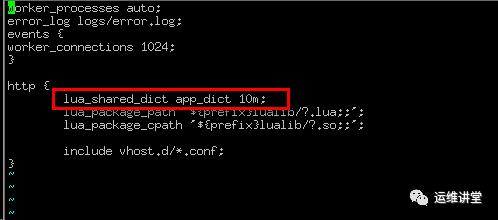
在app01项目中配置template路径信息
vi /app01/conf/vhost.d/app01.conf
set $template_location”/templates”;
set $template_root”/app01/templates”;
实现应用层代码逻辑.
vi /app01/lua/app.lua
local http = require "resty.http"
local template = require"resty.template"
local cjson = require "cjson"

local app_dict=ngx.shared.app_dict

local args = ngx.req.get_uri_args()
local product_id =args["productid"]
local shop_id = args["shopid"]

local product_key = "productid_"..product_id
local shop_key ="shopid_"..shop_id

--产品请求path
local product_req_path ="/?productid="..product_id
--商店请求path
local shop_req_path ="/?shopid="..shop_id

--先从本地缓存取产品数据,若没有,则向数据服务层发送请求
local product_cache =app_dict:get(product_key)
local product_desc=""
local shop_desc=""
if not product_cache then
       local httpc = http.new()
       local resp,err = httpc:request_uri("http://127.0.0.1:3000",{
                method = "GET",
                path = product_req_path
               })

       --错误异常处理
       if not resp then
                ngx.status =ngx.HTTP_BAD_REQUEST
                ngx.say("requesterror:", err)
                return ngx.exit(ngx.status)
       end
       product_cache = resp.body
       app_dict:set(product_key,product_cache,10)
       ngx.status = resp.status
       product_desc="app01应用_产品_从数据服务层获取"

else
       product_desc="app01应用_产品_从本地缓存获取"
end

--先从本地缓存取商店数据,若没有,则向数据服务层发送请求
local shop_cache = app_dict:get(shop_key)
if not shop_cache then
       local httpc = http.new()
       local resp,err = httpc:request_uri("http://127.0.0.1:3000",{
                method = "GET",
                path = shop_req_path
                })

       --错误异常处理
       if not resp then
                ngx.status =ngx.HTTP_BAD_REQUEST
                ngx.say("requesterror:", err)
                return ngx.exit(ngx.status)
       end
       shop_cache = resp.body
       app_dict:set(shop_key,shop_cache,10)
       ngx.status = resp.status
       shop_desc="app01应用_商店_从数据服务层获取"


else
       shop_desc="app01应用_商店_从本地缓存获取"
end

local product_cache_json =cjson.decode(product_cache)
local shop_cache_json =cjson.decode(shop_cache)

local context={
         appName = "app01",
         product_from=product_desc,
         shop_from=shop_desc,
         productId = product_cache_json.id,
     productName = product_cache_json.name,
     productPrice = product_cache_json.price,
     productPictureList = product_cache_json.pictureList,
     productSecification = product_cache_json.secification,
     productService = product_cache_json.service,
     productColor = product_cache_json.color,
     productSize = product_cache_json.size,
     shopId = shop_cache_json.id,
     shopName = shop_cache_json.name,
     shopLevel = shop_cache_json.level,
     shopRate = shop_cache_json.rate

}
template.render("product.html",context)
到此app01应用已经布署好了.那么app02,app03参照app01即可.
因应用层需要访问后端的服务层,而后端的服务器业务逻辑应该是先从redis中读取数据,若没有再从mysql读取.不过,在这里省略了,详情可以看我写的” Openresty基与RBAC访问控制”这里面使用的就是这种业务逻辑.
故对与服务层dsl.lua代码如下.
vi /dsl/lua/dsl.lua
--模拟数据,此部分省略从redis或者mysql获取
local cjson = require "cjson"
local args = ngx.req.get_uri_args()
local product_id =args["productid"]
local shop_id = args["shopid"]

if product_id then
       local product_info ={id=product_id,name="Iphone6s",price="5999.0",pictureList="",secification="",service="1Year",color="white",size=18}
       ngx.say(cjson.encode(product_info))
end

if shop_id then
       local shop_info = {id=shop_id,name="小三洋百货",level="11L",rate=""}
       ngx.say(cjson.encode(shop_info))
end
到此,应用层与服务层相关的业务逻辑都开发完毕,下面就是测试阶段了.
从分发服务器1访问
第1次访问(红框内的数据表示,此次访问的应用来自app01,并且访问数据是从后端服务层获取的,并没有从本地缓存获取)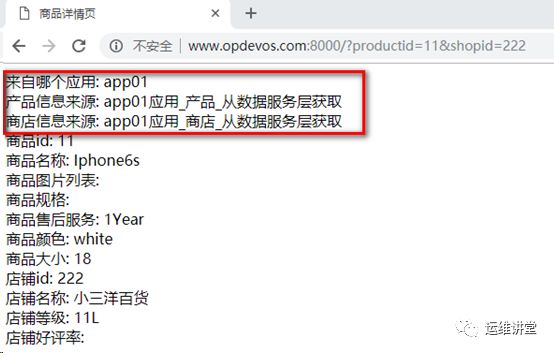
第2次访问(红框内的数据表示,此次访问的应用来自app01,并且访问的数据是从app01本地缓存中获取)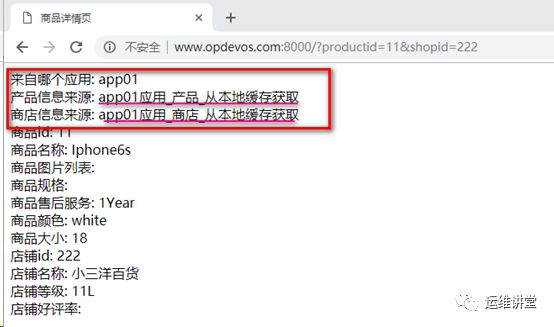
接着测试分发服务器2访问与分发服务器3访问,在10秒内访问,结果都是从缓存内获取数据的,那么也就是说相同的请求参数,第1次访问需要通过服务层获取,后期的请求在缓存未失效前访问的数据都是从本地缓存获取的.这样就大大提高效率了.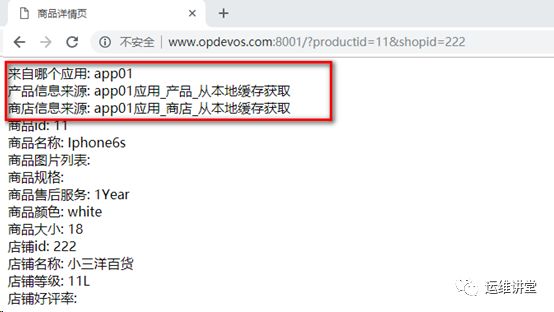
通过openresty结合lua程序可以很好的解决因请求均摊而造成的本地缓存利用率低下的问题,通过本篇也能为大家拓展眼界与思路,能更好完成业务需求.
以上是关于用Openresty结合lua提高应用本地缓存效率的主要内容,如果未能解决你的问题,请参考以下文章