微信上传电脑图片拽出来怎么成clipboard?
Posted
tags:
篇首语:本文由小常识网(cha138.com)小编为大家整理,主要介绍了微信上传电脑图片拽出来怎么成clipboard?相关的知识,希望对你有一定的参考价值。
参考技术A 微信上传电脑图片的话载出来了吗怎么会来说的话这个要载过来说的话你自己的话就是把他的那个号码的话连接起来就可以了 参考技术B 一般情况下的话,我觉得微信上传电脑图片转出来,如果说想要进行行程的话,这个可以直接就是退出来以后,从这个个人中心里面进行一下使用就可以了,性价比也是非常高的「新组件√」微信小程序图片拖拽排序探索
图片上传组件是一个组件库目前来看必不可少的功能了。笔者近日给自己开源的toy工具库也添加了这一功能。相比原生和大部分组件库来说,它不仅支持长按提示删除,还能够支持图片的拖拽排序,很是nice!
(也是为了毕设时身边同学能够更快上手小程序,更加将中心侧重于逻辑和设计😜)
GitHub地址:https://github.com/1314mxc/yunUI#img,欢迎使用、查看和star!
小程序专栏地址(所有的组件设计也都在里面):小程序的浪潮·初探
本文我将继续介绍组件的设计思路:
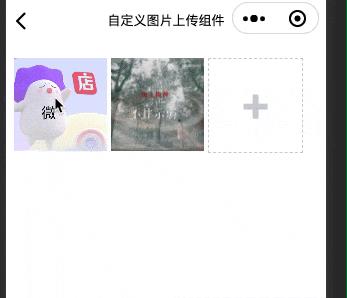
首先来看效果
对于组件内部来说。笔者提供了一个参数去让开发者决定是否应该在场景中支持拖动排序。这里略去这些无关代码。
拖拽排序功能使用了微信小程序提供的movable-area组件(标签,但小程序也是封装了HTML,所以以原生组件代称)。它相当于提供了一个可滑动区域,在此区域内的movable-view组件内容可以任意排列。其效果就相当于window中的“桌面图标非对齐”效果 —— 记住这个描述,它和下面的内容联系紧密!
其中主要的两个参数是:
- x:定义x轴方向的偏移,如果x的值不在可移动范围内,会自动移动到可移动范围;改变x的值会触发动画;
- y:定义y轴方向的偏移,如果y的值不在可移动范围内,会自动移动到可移动范围;改变y的值会触发动画;
嗯,可以知道,其内部是通过 js 触发的动画。而且可能是requestAnimeFrame API。
组件设计
知道了所用标签,接下来就该正式开发了。但是你会发现,这里其实有两种使用方式:
- 对每个元素使用movable-view包裹,让他们可以随意拖拽位置:
<view class="container">
    <movable-area style="width: 100%;height: auto;">
        <view class="image-list">
            <!-- 显示图片 -->
            <block wx:if="yMovable">
                <movable-view x="x" y="y" direction="all" inertia damping="5000" friction="1" disabled="disabled" wx:for="images" wx:key="item.index">
                    <view class="image-wrap image-bg (images.length > 2) ? 'image-flex' : ''" id="item.index" data-index='index' bindlongpress='onShowMenu' bindtouchstart='touchs' bindtouchend='touchend' bindtouchmove='touchm'>
                        <image class="image" src="item.img" mode="aspectFill" bind:tap="onPreviewImage" data-imgsrc="item.img"></image>
                        <i class="iconfont icon-delete" wx:if="showMenuImg" bind:tap="onDelImage" data-index="index"></i>
                    </view>
                </movable-view>
            </block>

            <!-- 选择图片 -->
            <view class="image-wrap selectphoto" bind:tap="onChooseImage" hidden="!selectPhoto">
                <i class="iconfont icon-jiashang"></i>
            </view>
        </view>
    </movable-area>
</view>
- 图片只是展示;单独设置一个元素,在长按图片时显示,其值为当前选中的图片,拖拽的是这个元素,到达目标位置后消失,图片列表重新排序。
<view class="container">
    <movable-area style="width: 100%;height: auto;">
        <view class="image-list">
            <!-- 显示图片 -->
            <block wx:if="yMovable">
                <block wx:for="images" wx:key="item.index">
                    <view class="image-wrap image-bg (images.length > 2) ? 'image-flex' : ''" id="item.index" data-index='index' bindlongpress='onShowMenu' bindtouchstart='touchs' bindtouchend='touchend' bindtouchmove='touchm'>
                        <image class="image" src="item.img" mode="aspectFill" bind:tap="onPreviewImage" data-imgsrc="item.img"></image>
                        <i class="iconfont icon-delete" wx:if="showMenuImg" bind:tap="onDelImage" data-index="index"></i>
                    </view>
                </block>
                <movable-view x="x" y="y" direction="all" inertia damping="5000" friction="1" disabled="disabled">
                    <view class='image-wrap image-check' style="z-index: 3;" hidden='hidden'>
                        <image class="image" src="doubleImg" mode="aspectFill"></image>
                    </view>
                </movable-view>
            </block>

            <!-- 选择图片 -->
            <view class="image-wrap selectphoto" bind:tap="onChooseImage" hidden="!selectPhoto">
                <i class="iconfont icon-jiashang"></i>
            </view>
        </view>
    </movable-area>
</view>
第一种方式的优势在于:可以有更加“真实”的效果。这里的真实意为重新排列时也有滑动的动画效果。但是带来的性能损耗也是极大的,你只能尽力调控各种数据来让显示更加“跟手”一些。但是基于此,你可以通过js计算达到像QQ空间那样的实时排列效果!
第二种方式的优势在于:性能开销相对小一些。但展示效果更像web而非APP(这两个的区别你应该是知道的)。
当前版本中,笔者采用的是第二种方式。其关键 js 代码如下:
const MAX_IMG_NUM=9;
Component(
  /**
   * 组件的属性列表
   */
  properties:
    yMovable:
      type:Boolean,
      value:false
    ,
  ,


  /**
   * 组件的初始数据
   */
  data:
    images:[],
    selectPhoto:true,
    showMenuImg: false,
    flag: false,
    hidden:true,
    x:0,
    y:0,
    disabled: true,
    elements:[],
    doubleImg: ""
  ,

  /**
   * 组件的方法列表
   */
  methods:
  	//长按事件
    onShowMenu(e)
        const detail = e.currentTarget;
        if(!this.data.showMenuImg)
          // 使手机振动15ms
          wx.vibrateShort();

        this.setData(
            showMenuImg: true
        )
        if(this.properties.yMovable)
            this.setData(
                x: detail.offsetLeft+5,
                y: detail.offsetTop,
                hidden: false,
                flag:true,
                doubleImg: this.data.images[detail.dataset.index].img
            )

    ,
    //触摸开始
    touchs:function(e)
        this.setData(
          beginIndex:e.currentTarget.dataset.index
        )
    ,
    //触摸结束
    touchend:function(e)
        if (!this.data.flag)
          return;

        const x = e.changedTouches[0].pageX
        const y = e.changedTouches[0].pageY
        const list = this.data.elements;
        let data = this.data.images
        for(var j = 0; j<list.length; j++)
          const item = list[j];
          if(x>item.left && x<item.right && y>item.top && y<item.bottom)
            const endIndex = item.dataset.index;
            const beginIndex = this.data.beginIndex;
            //向后移动
            if (beginIndex < endIndex)
              let tem = data[beginIndex];
              for (let i = beginIndex; i < endIndex; i++)
                data[i] = data[i + 1]

              data[endIndex] = tem;

            //向前移动
            if (beginIndex > endIndex)
              let tem = data[beginIndex];
              for (let i = beginIndex; i > endIndex; i--)
                data[i] = data[i - 1]

              data[endIndex] = tem;


            this.setData(
                images: data
            )
            this.initImg(this.triggerMsg(data, "sort-img"))


        this.setData(
          hidden: true,
          flag: false
        )
    ,
    //滑动
    touchm:function(e)
        if(this.data.flag)
          const x = e.touches[0].pageX
          const y = e.touches[0].pageY
          this.setData(
            x: x - 75,
            y: y - 45
          )

    ,

    //选择图片
    onChooseImage()
        let images = this.data.images;
        let imageLen = images.length;
        let max=MAX_IMG_NUM-imageLen;
        wx.chooseImage(
          count:max,
          sizeType:['original','compressed'],
          sourceType:['album','camera'],
          success: (res) =>
            max-=res.tempFilePaths.length;
            let _images = images.map(item =>
                return item.img
            )
            images = _images.concat(res.tempFilePaths)
            for(let i=0;i<images.length;i++)
                images[i] =
                    img: images[i],
                    index: i+1


            this.setData(
              selectPhoto:max<=0?false:true,
              images,
              showMenuImg: false
            )
            this.triggerMsg(images, "choose-img")
            if(this.properties.yMovable)
                this.initImg()

          ,
          fail:(res)=>

        )
    ,

	// 初始化位置信息
    initImg(fn=function())
        let query = wx.createSelectorQuery().in(this);
        let nodesRef = query.selectAll(".image-bg");
        nodesRef.fields(
            dataset: true,
            rect:true
        ,(result)=>
            this.setData(
                elements: result;
                fn();
            )
        ).exec()
    ,

    //删除
    onDelImage(event)
        let images = this.data.images;
        images.splice(event.target.dataset.index,1)
        this.setData(
          images
        )
        this.initImg(this.triggerMsg(images, "delete-img"))
        if(images.length== MAX_IMG_NUM-1)
          this.setData(
            selectPhoto:true
          )

    ,

    triggerMsg(images, key)
      this.triggerEvent('chooseImg',
        images: images.map(item =>
            return item.img
        ),
        key: key
      )
    ,

)
上面代码中最重要的就是initImg函数的这段代码!它用来获取wxml节点的相关属性!fields API的参数及默认值有:
id:false,//是否返回节点id
rect:fasle,//是否返回节点布局位置
dataset: true,//返回数据集
size: true,//返回宽高
scrollOffset: true,//返回 scrollLeft,scrollTop
properties: ['scrollX', 'scrollY'],//监听属性名
computedStyle: ['margin', 'backgroundColor']//此处返回指定要返回的样式名
这个API的调用是后面定位的关键,它必须放在获取到图片数组之后执行(不管同步还是异步的)。也是第二种方法和第一种方法的区别之处 —— 第一种方法是纯 js 计算实时位置。所以它需要在结束后进行排序。
这时候问题就来了:像本文这种场景,同时有 x 和 y 两个方向的位置,sort将会极其复杂,而且sort本身的性能将会被内部繁杂的代码死死拖住。这就是上面说第一种方法性能问题的原因所在。
但是本文这种方法将sort简化为当前拖动元素和目标位置图片两个物体的四个方向判断,也就是经典“小球撞墙”临界问题。这也是其优势所在。
另一个需要注意的地方就是 touchm函数中的setData。这里面进行的是拖拽元素位置改变,也就是“跟手率”(我自己编的)。可以对此数值进行微调来让效果更加nice一些。
使用方式
首先在json文件中进行组件引入:
  "usingComponents":
    "y-img":"/components/yImg/index"
然后再wxml中:
<view class="container">
<y-img bind:chooseImg="chooseImg"></y-img>
<!--或:-->
<y-img yMovable bind:chooseImg=