CSS 火焰?不在话下
Posted 前端教程
tags:
篇首语:本文由小常识网(cha138.com)小编为大家整理,主要介绍了CSS 火焰?不在话下相关的知识,希望对你有一定的参考价值。
每天前端开发干货第一时间送达!
https://github.com/chokcoco/iCSS/issues/62
今天的小技巧是使用纯 CSS 生成火焰,逼真一点的火焰。
嗯,长什么样子?在 CodePen 上输入关键字 CSS Fire,能找到这样的:
或者这样的:
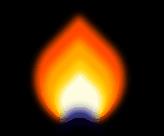
我们希望,仅仅使用 CSS ,效果能再更进一步吗?能不能是这样子:
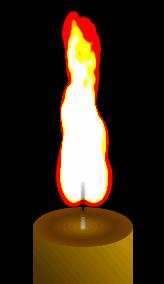
如何实现
嗯,我们需要使用 filter + mix-blend-mode 的组合来完成。
很多 CSS 华而不实的效果都是 filter + mix-blend-mode,很有意思,但是业务中根本用不上,当然多了解了解总没坏处。
如上图,整个蜡烛的骨架, 除去火焰的部分很简单,掠过不讲。主要来看看火焰这一块如何生成,并且如何赋予动画效果。
Step 1: filter blur && filter contrast
模糊滤镜叠加对比度滤镜产生的融合效果。
单独将两个滤镜拿出来,它们的作用分别是:
filter: blur():给图像设置高斯模糊效果。
filter: contrast():调整图像的对比度。
但是,当他们“合体”的时候,产生了奇妙的融合现象。
先来看一个简单的例子:
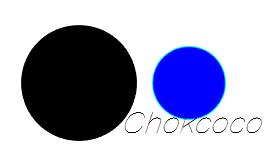
仔细看两圆相交的过程,在边与边接触的时候,会产生一种边界融合的效果,通过对比度滤镜把高斯模糊的模糊边缘给干掉,利用高斯模糊实现融合效果。
利用上述 filter blur & filter contrast,我们要先生成一个类似火焰形状的三角形。(略去过程)
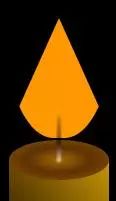
父元素添加 filter: blur(5px) contrast(20),会变成这样:
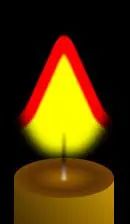
Step 2: 火焰粒子动画
看着已经有点样子了,接下来是火焰动画,我们先去掉父元素的 filter: blur(5px) contrast(20) ,然后继续 。
这里也是利用了 filter 的融合效果,我们在上述火焰中,利用 SASS 随机均匀分布大量大小不一的圆形棕色 div ,隐匿在火焰三角内部,大概是这样:
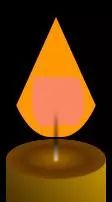
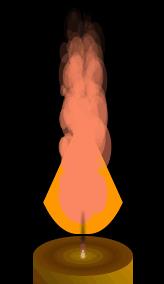
接下来,我们再利用 SASS,给中间每个小圆赋予一个从下往上逐渐消失的动画,并且均匀赋予不同的 animation-delay,看起来会是这样:
OK,最重要的一步,我们再把父元素的 filter: blur(5px) contrast(20) 打开,神奇的火焰效果就出来了:
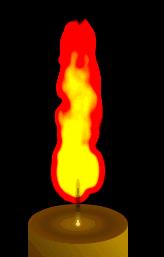
Step 3: mix-blend-mode 润色
当然,上述效果已经很不错了。经过各种尝试,调整参数,最后我发现加上 mix-blend-mode: screen 混合模式,效果更好,得到头图上面的最终效果如下:

源码:https://codepen.io/Chokcoco/pen/jJJbmz
div.g-candle
 div.g-body
 div.g-fire-box
 div.g-fire
 -for(var i=0; i<200; i++)
div.g-ball$count: 200;
html, body{
height: 100%;
background: #000;
overflow: hidden;
// filter: blur(1px) contrast(5);
}
.g-candle {
position: aboslute;
width: 400px;
margin: 0 auto;
height: 400px;
}
.g-body {
position: relative;
width: 100px;
height: 300px;
margin: 280px auto;
// border: 1px solid #fff;
background: linear-gradient(230deg, #ca9800, #573903, black 70%);
z-index: 1;
&::before {
position: absolute;
content: "";
width: 100px;
height: 40px;
border-radius: 50%;
// border: 1px solid #fff;
box-sizing: border-box;
top: -20px;
background: radial-gradient(#a46800, #5c3104 45%, #905602 100%);
}
&::after {
position: absolute;
content: "";
width: 4px;
height: 48px;
background: #fff;
left: 50%;
top: -22px;
transform: translate(-50%, -50%);
border-radius: 50% 50% 0 0;
background: linear-gradient(180deg, rgba(0, 0, 0, .3) 0%, rgba(0, 0, 0, .8) 60%, #fff);
opacity: .7;
filter: blur(1px);
}
}
.g-fire-box {
position: absolute;
top: 97px;
left: 50%;
width: 80px;
height: 200px;
transform: translate(-50%, -50%);
filter: blur(2px) contrast(20);
}
.g-fire {
position: absolute;
top: 30px;
left: 50%;
border-radius: 45%;
box-sizing: border-box;
border: 120px solid #000;
border-bottom: 120px solid transparent;
transform: translate(-50%, 0) scaleX(.45);
background-color: #761b00;
// filter: blur(20px) contrast(30);
}
.g-ball {
position: absolute;
top: 60px;
transform: translate(0, 0);
background: #fa8763;
border-radius: 50%;
z-index: -1;
mix-blend-mode: screen;
}
@for $i from 0 to $count {
.g-ball:nth-child(#{$i}) {
$width: #{random(50)}px;
width: $width;
height: $width;
left: calc(#{(random(70))}px - 55px);
}
.g-ball:nth-child(#{$i}) {
animation: movetop 1s linear -#{random(3000)/1000}s infinite;
}
}
@keyframes movetop {
0% {
transform: translate(0, 0);
}
20% {
transform: translate(0, 0);
}
87.7% {
transform: translate(0, -170px);
opacity: 0;
}
100% {
transform: translate(0, -170px);
opacity: 0;
}
}另外一些效果
当然,掌握了这种方法后,这种生成火焰的技巧也可以迁移到其他效果去。下图是我鼓捣到另外一个小 Demo,当 hover 到元素的时候,产生火焰效果:

源码:https://codepen.io/Chokcoco/pen/aMRPjR
div.g-btn
 -for(var i=0; i<200; i++)
div.g-ball$count: 200;
html, body{
height: 100%;
background: #000;
overflow: hidden;
filter: blur(2px) contrast(25);
}
.g-btn {
position: relative;
width: 200px;
height: 200px;
margin: 130px auto;
cursor: pointer;
// background: deeppink;
// border-radius: 48% 45% 48% 46%;
// animation: rotate 5s infinite linear;
&::before {
content: "";
position: absolute;
top: 0;
left: 0;
right: 0;
bottom: 0;
// background: linear-gradient(135deg, deeppink, red);
background: #dc8165;
border-radius: 48% 45% 48% 46%;
animation: rotate 5s infinite linear;
z-index: 0;
// opacity: .5;
}
&::after {
content: "Hover";
position: absolute;
top: 0;
left: 0;
right: 0;
bottom: 0;
z-index: 1;
line-height: 200px;
text-align: center;
color: #000;
font-size: 48px;
}
}
.g-ball {
position: absolute;
top: 50px;
transform: translate(0, 0);
background: #fa8763;
border-radius: 50%;
z-index: -1;
mix-blend-mode: screen;
}
@for $i from 0 to $count {
.g-ball:nth-child(#{$i}) {
$width: #{random(60)}px;
width: $width;
height: $width;
left: calc(#{(random(100))}px + 30px);
}
.g-btn:hover .g-ball:nth-child(#{$i}) {
animation: movetop .6s linear #{random(2000)/1000}s;
}
}
@keyframes movetop {
0% {
transform: translate(0, 0);
}
100% {
transform: translate(0, -180px);
opacity: 0;
}
}
@keyframes rotate {
0% {
transform: rotate(0deg);
}
100% {
transform: rotate(360deg);
}
}嗯,这些其实都是对滤镜及混合模式的一些搭配运用。按照惯例,肯定有人会留言喷了,整这些花里胡哨的有什么用,性能又不好,业务中敢上不把你的腿给打骨折。
于我而言,虚心接受各种批评质疑及各种不同的观点,当然我是觉得搞技术一方面是实用,另一方面是兴趣使然,自娱自乐。希望喷子绕道~
回到正题,了解了这种黏糊糊湿答答的技巧后,还可以折腾出其他很多有意思的效果,当然可能需要更多的去尝试,如下面使用一个标签实现的滴水效果:
源码:https://codepen.io/Chokcoco/pen/gZVjJw
<div>MAGICCSS</div>html,
body {
width: 100%;
height: 100%;
overflow: hidden;
background: #000;
filter: blur(3px) contrast(10);
}
div {
position: relative;
width: 640px;
height: 106px;
color: #fff;
font-size: 124px;
text-align: center;
margin: 100px auto;
border-bottom: 10px solid #fff;
transform: skewY(5deg);
&::before {
position: absolute;
content: "";
bottom : -20px;
width: 10px;
height: 20px;
border-radius: 50%;
background: #fff;
transform: translate(0, 0);
animation: move 7.5s ease-in-out infinite;
}
&::after {
position: absolute;
content: "";
left: 0;
bottom : -20px;
width: 10px;
height: 20px;
border-radius: 50%;
background: #fff;
transform: translate(0, 0);
animation: move 7.5s ease-in-out 1s infinite;
}
}
@keyframes move {
80% {
bottom : -30px;
transform: translate(623px, 0);
} 93% {
transform: translate(623px, 3px);
opacity: 1;
}100% {
transform: translate(623px, 150px);
opacity: 0;
}
}值得注意的细节点
动画虽然美好,但是具体使用的过程中,仍然有一些需要注意的地方:
CSS 滤镜可以给同个元素同时定义多个,例如 filter: blur(5px) contrast(150%) brightness(1.5) ,但是滤镜的先后顺序不同产生的效果也是不一样的;
也就是说,使用 filter: blur(5px) contrast(150%) brightness(1.5) 和 filter: brightness(1.5) contrast(150%) blur(5px) 处理同一张图片,得到的效果是不一样的,原因在于滤镜的色值处理算法对图片处理的先后顺序。
滤镜动画需要大量的计算,不断的重绘页面,属于非常消耗性能的动画,使用时要注意使用场景。记得开启硬件加速及合理使用分层技术;
blur() 混合 contrast() 滤镜效果,设置不同的颜色会产生不同的效果,这个颜色叠加的具体算法暂时没有找到很具体的规则细则,使用时比较好的方法是多尝试不同颜色,观察取最好的效果;
细心的读者会发现上述效果都是基于黑色底色进行的,动手尝试将底色改为白色,效果会大打折扣。
最后
本文只是简单的介绍了整个思路过程,许多 CSS 代码细节,调试过程没有展现出来。主要几个 CSS 属性默认大家已经掌握了大概,阅读后可以自行去了解补充更多细节:
filter
mix-blend-mode
好了,本文到此结束,希望对你有帮助 :)
觉得本文对你有帮助?请分享给更多人
关注「前端教程」,一起提升前端技能!
好文章,我 在看❤️
以上是关于CSS 火焰?不在话下的主要内容,如果未能解决你的问题,请参考以下文章