css3 伪类
Posted 冰山工作室
tags:
篇首语:本文由小常识网(cha138.com)小编为大家整理,主要介绍了css3 伪类相关的知识,希望对你有一定的参考价值。
今天开始讲 css3 中一个比较重要部分 css 伪类。
css3 伪类
伪类是什么可以称做"幽灵类",它是选择器的一种。
1、结构伪类
伪类大多数都是结构上的,即它们指代文档中的标记结构。
首先强调,伪类始终指代所依附的元素而不是后代元素。以元素做为首要选择,这些我们在后面会详细说明。
1-选择根元素
:root 伪类选择文档的根元素。
在 html 中,根元素就是 html,只有 xml 语言中,会有所不同。
:root 权重高于 html 选择器。
2-选择空元素
:empty 伪类可以选择没有任何子代的元素,甚至连文本节点也没有(如果元素内有空格或回车符除外)。
用于判断子元素为组件模块是否有效。而本元素样式含有 margin,padding 等影响页面布局的样式。
如果组件无效为空,作为组件的盒子样式也变为无效。
<style>.empty:empty{display:none;}</style><div class="empty" style="margin-top:20px;padding:20px;border:20px green solid;background:red"><templates v-if="false">组件</templates></div>
3-选择唯一的子元素
它选择的元素是相对父元素的唯一子元素。
:only-child 与:only-of-type,他们的用法一样。
:only-child 与:only-of-type 都是选择唯一子元素,区别在于:only-child 是父元素的唯一元素,:only-of-type 是父元素下同胞中唯一的元素。
从他们的后缀单词的字面意思可以理解。
type 表示类型,一类元素,比如都是 p 元素或者 div 元素。child 表示子元素,没有什么限制。
后面介绍的伪类选择器后缀是 child,of-type 意思都是一样的。
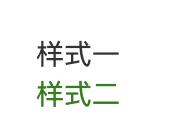
<div class="only"><p>样式一</p><div>样式二</div></div>
.only p:only-child{color:red;}.only div:only-of-type{color:green;}

4-选择第一个和最后一个子元素
:first-child 与 first-of-type
:last-child 与 last-of-type
:only-child 和:only-of-type 可以用其它方法实现。
:only-child{style}//等于:first-child:last-child{style}
:only-of-type{style}//等于:first-of-type:last-of-type{style}
5-选择每第 n 个子元素或某种元素
:nth-child(an+b)与:nth-of-type(an+b) 首先查找当前所有匹配的兄弟元素,
:nth-last-child(an+b)与:nth-last-of-type(an+b) 他们的用法跟上面一样,不过顺序是倒序开始。
nth-child(n) n 为 an+b a,b 的意思
a 表示每次循环中包括几种样式,b 表示指定的样式在循环中所在的位置。
4n+4 的写法可以写成 4n
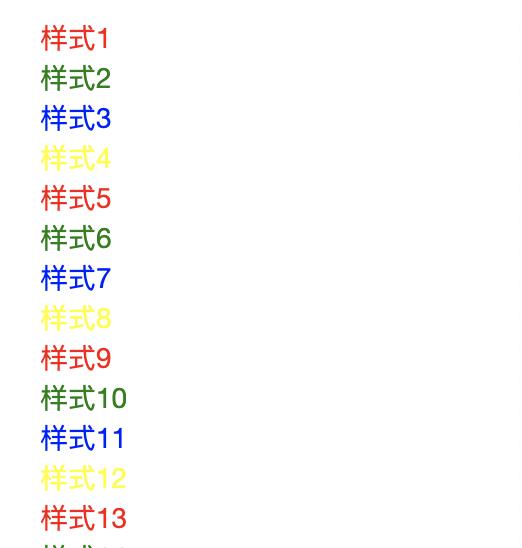
<ul><li>样式1</li><li>样式2</li><li>样式3</li><li>样式4</li><li>样式5</li>。。。<li>样式20</li></ul>
li:nth-child(4n+1){color:red}li:nth-child(4n+2){color:green}li:nth-child(4n+3){color:blue}li:nth-child(4n){color:yellow}

2、否定伪类
:not()选择不匹配的东西
列表导航优化代码
<ul><li>首页</li><li>新闻</li><li>关于</li><li>分享</li><li>联系</li></ul>
li{border-bottom:1px solid blue}li:last-child{border-bottom:0;}
利用:not()属性
li:not(:last-child){border-bottom:1px solid blue}
:not()伪类不能嵌套,可以串联使用。
3、伪元素选择符
:before 与:after 在元素之前或之后插入某些内容。
伪元素要配合 content 属性一起使用。
content 属性可以直接利用 attr 获取元素的属性。
img:after{content:attr(alt);}
这里会有一个被问到最多的问题,那就是伪类与伪元素的区别。
伪类
字面意思假的类。伪类其实是弥补了 CSS 选择器的不足,用来更方便地获取信息。它是一种选择器。
伪元素
字面意思假的元素。伪元素本质上是创建了一个虚拟容器(元素),我们可以在其中添加内容或样式。
伪元素单冒号与双冒号的区别。
比如 :before 与::before
二者写法是等效的,都表示伪元素。
:before 是 CSS2 的写法,::before 是 CSS3 的写法。
:before 的兼容性比::before 兼容性好,但是 H5 开发中建议使用::before
input,img,iframe 等一些单标签不支持伪元素。
这几个标签是不支持类似 img::before 这样使用。
要想要标签支持伪元素,需要这个元素是要可以插入内容的,也就是说这个元素要是一个容器。而 input,img,iframe 等元素都不能包含其他元素,所以不能通过伪元素插入内容。
4、综合实例
分页
<template><div class="page flex-container center margint20"><div pageName="上一页"></div><p v-for="($index,item) in 5" v-text="$index" :page="$index === 3 && 'current'"></p><div pageName="下一页"></div></div></template><style>.page{.current{background: red;color:white;}&>*{border:1px solid red;margin:0 5px;}text-align: center;font-size: 12px;color:red;&>div{width:60px;height:30px;line-height: 30px;border:1px red solid;&:first-of-type{border-radius:30px 2px 2px 30px;&:after{content:'上一页'}}&:last-of-type{border-radius:2px 30px 30px 2px;&:after{content:'下一页'}}}&>p{border-radius:2px;width:30px;height:30px;line-height: 30px;&[page='current']{@extend .current;}&:only-of-type{@extend .current;// @at-root .page>div{// display:none;// }}}&>*:hover{@extend .current;}}</style>
时间树
<template><div class="timeTree margint50"><div class="times" v-for="item in 3"><div class="clearfix"><div><img src="../../assets/bingshanbear.svg" width="30" alt=""></div><div><h1>标题</h1><p class="text-dark">内容</p></div></div></div></div></template><style>.timeTree{position: relative;&:before,&:after{position:absolute;content: '';width:40px;height:40px;z-index: 1;left: 50%;margin-left: -20px;}&:before{top: -30px;background: url('../../assets/start.svg') no-repeat;background-size: 100% auto;}&:after{bottom:10px;background: url('../../assets/end.svg') no-repeat;background-size: 100% auto;}&:after{}.times{position:relative;padding:50px;&:after,&:before{position:absolute;content: '';width:50%;height:100%;border:10px solid currentColor;top:0;}&:before{border-width:20px;}&:nth-of-type(odd){.clearfix div:first-child{float:left;}.clearfix div:last-child{float:right;}&:after,&:before{left:0;border-top-left-radius:50px;border-bottom-left-radius:50px;border-right:0;}}&:nth-of-type(even){.clearfix div:first-child{float:right;}.clearfix div:last-child{float:left;}&:after,&:before{right:0;border-top-right-radius:50px;border-bottom-right-radius:50px;border-left:0;}}&:not(:first-of-type){margin-top:-20px;}&:nth-of-type(1){color:rgba(255,0,0,.5);}&:nth-of-type(2){color:rgba(0,0,255,.5);}&:nth-of-type(3){color:rgba(0,128,0,.5);}&:nth-of-type(4){color:rgba(255,165,0,.5);}}}</style>
本示例采用 cmui 样式库,有兴趣可以访问下载[1]
参考资料
本示例采用cmui样式库,有兴趣可以访问下载: https://github.com/tgoufe/CyanMapleDesign
以上是关于css3 伪类的主要内容,如果未能解决你的问题,请参考以下文章