Linux运维:基于虚拟主机的HAProxy负载均衡系统配置实例
Posted 计算机与网络安全
tags:
篇首语:本文由小常识网(cha138.com)小编为大家整理,主要介绍了Linux运维:基于虚拟主机的HAProxy负载均衡系统配置实例相关的知识,希望对你有一定的参考价值。
一次性付费进群,长期免费索取教程,没有付费教程。
ID:Computer-network
本文通过一个具体的实例详细讲解和演示HAProxy下虚拟的实现过程以及HAProxy是如何实现和故障转移的。
1、通过HAProxy的ACL规则配置虚拟主机
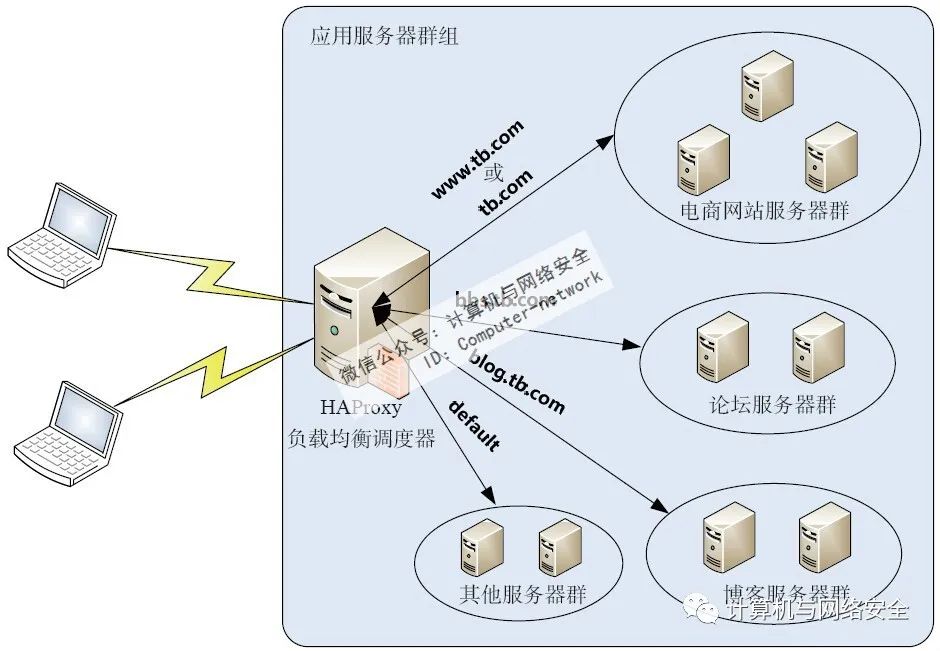
下面通过HAProxy的ACL功能配置一套基于虚拟的系统,这里的环境为CentOS release 6.3,HAProxy版本为haproxy-1.4.24,要实现的功能如图1所示。

图1 基于虚拟主机的HAPro y应用实例
本实例有一个电商网站群、一个论坛群、一个博客群和默认群,4个群都由多台组成,而4个群又组成了一个应用群组,在每个群的前端有一个基于HAProxy的调度器,整个应用架构要实现的功能为:当客户端通过域名www.tb.com或tb.com访问时,HAProxy将请求提交到电商网站群,进而实现电商网站的;当客户端通过域名bbs.tb.com访问时就将请求调度到论坛群,实现论坛的;当客户端通过blog.tb.com访问时则将请求调度到博客群中,实现博客的;如果客户端通过除上面三种方式外的任意方式请求服务时,就将请求调度到缺省群。
要实现上述功能,如果使用四层的LVS器,则需要一个代理配合LVS器才能实现,而通过HAProxy实现时,仅需要一个HAProxy负载调度器再结合ACL规则即可轻松实现。
(1)配置HAProxy
HAProxy的安装非常简单,这里直接进入HAProxy的配置过程,配置好的文件内容如下:
global
log 127.0.0.1 local0 info
maxconn 4096
user nobody
group nobody
daemon
nbproc 1
pidfile /usr/local/haproxy/logs/haproxy.pid
defaults
mode http
retries 3
timeout connect 5s
timeout client 30s
timeout server 30s
timeout check 2s
listen admin_stats
bind 0.0.0.0:19088
mode http
log 127.0.0.1 local0 err
stats refresh 30s
stats uri /haproxy-status
stats realm welcome login Haproxy
stats auth admin:xxxxxx
stats auth admin1:xxxxxx
stats hide-version
stats admin if TRUE
frontend www
bind *:80
mode http
option httplog
option forwardfor
log global
acl host_www hdr_reg(host) -i ^(www.tb.com|tb.com)
acl host_bbs hdr_dom(host) -i bbs.tb.com
acl host_blog hdr_beg(host) -i blog.
use_backend server_www if host_www
use_backend server_bbs if host_bbs
use_backend server_blog if host_blog
default_backend server_default
backend server_default
mode http
option redispatch
option abortonclose
balance roundrobin
cookie SERVERID
option httpchk GET /check_status.html
server default1 192.168.88.90:8000 cookie default1 weight 3 check inter 2000 rise 2 fall 3
server default2 192.168.88.91:8000 cookie default2 weight 3 check inter 2000 rise 2 fall 3
backend server_www
mode http
option redispatch
option abortonclose
balance source
cookie SERVERID
option httpchk GET /check_status.jsp
server www1 192.168.88.80:80 cookie www1 weight 6 check inter 2000 rise 2 fall 3
server www2 192.168.88.81:80 cookie www2 weight 6 check inter 2000 rise 2 fall 3
server www3 192.168.88.82:80 cookie www3 weight 6 check inter 2000 rise 2 fall 3
backend server_bbs
mode http
option redispatch
option abortonclose
balance source
cookie SERVERID
option httpchk GET /check_status.php
server bbs1 192.168.88.83:8080 cookie bbs1 weight 8 check inter 2000 rise 2 fall 3
server bbs2 192.168.88.84:8090 cookie bbs2 weight 8 check inter 2000 rise 2 fall 3
backend server_blog
mode http
option redispatch
option abortonclose
balance roundrobin
cookie SERVERID
option httpchk GET /check_blog.php
server blog1 192.168.88.85:80 cookie blog1 weight 5 check inter 2000 rise 2 fall 3
server blog2 192.168.88.86:80 cookie blog2 weight 5 check inter 2000 rise 2 fall 3
这里重点看一下HAProxy配置文件中frontend部分中关于ACL配置部分的内容,这个是实现虚拟的核心配置部分。另外,这个配置文件定义了server_www、server_bbs、server_blog、server_default4个backend,分别对应上面的4个群,对于server_www群和server_bbs群,采用了基于请求源IP的,其他两个群均采用基于权重进行轮叫调度的。这也是根据应用的特点而定的。每个backend中都定义了httpchk的检测方式,因此要保证这里指定的URL页面是可访问到的。
为了验证的功能,这里需要将后端真实做一个访问标记,这个架构一共加入了9台后端真实,共分为四组,这里将server_www的三台后端默认的页面设置如下:
[root@www1 app]# echo "This is www1 192.168.88.80" > /var/www/html/index.html
[root@www2 app]# echo "This is www2 192.168.88.81" > /var/www/html/index.html
[root@www3 app]# echo "This is www3 192.168.88.82" > /var/www/html/index.html
同理,将server_bbs的两台后端默认的页面设置如下:
[root@bbs1 app]# echo "This is bbs1 192.168.88.83" > /var/www/html/index.html
[root@bbs2 app]# echo "This is bbs2 192.168.88.84" > /var/www/html/index.html
接着,将server_blog的两台后端默认的页面设置如下:
[root@blog1 app]# echo "This is bbs1 192.168.88.85" > /var/www/html/index.html
[root@blog2 app]# echo "This is bbs2 192.168.88.86" > /var/www/html/index.html
最后,将server_default的两台后端默认的页面设置如下:
[root@default1 app]# echo "This is default1 192.168.88.90" > /var/www/html/index.html
[root@default2 app]# echo "This is default2 192.168.88.91" > /var/www/html/index.html
这样就为接下来的测试做好了准备。
(2)启动HAProxy
HAProxy安装完成后,会在安装根目录的sbin目录下生成一个可执行的二进制文件haproxy,对HAProxy的启动、关闭、重启等维护操作都是通过这个二进制文件实现的,执行“haproxy -h”命令即可得到此文件的用法。
haproxy [ -f <配置文件> ] [ -vdVD ] [ -n 最大并发连接总数 ] [ -N 默认的连接数 ]
haproxy常用的参数以及含义如表1所示。
表1 haproxy常用参数及含义
介绍完HAProxy常用的参数后,下面开始启动HAProxy,操作如下:
[root@haproxy-server haproxy]# /usr/local/haproxy/sbin/haproxy -f /usr/local/haproxy/conf/haproxy.cfg
如果要关闭HAProxy,执行如下命令即可:
[root@haproxy-server haproxy]# killall -9 haproxy
如果要平滑重启HAProxy,可执行如下命令:
[root@haproxy-server haproxy]# /usr/local/haproxy/sbin/haproxy -f /usr/local/haproxy/conf/haproxy.cfg -st `cat /usr/local/haproxy/logs/haproxy.pid`
有时候为了管理和维护方便,也可以把HAProxy的启动与关闭写成一个独立的脚本,这里给出一个例子,脚本内容如下:
#!/bin/bash
#config:/usr/local/haproxy/conf/haproxy.cfg
#pidfile:/usr/local/haproxy/logs/haproxy.pid
#Source function library
. /etc/rc.d/init.d/functions
#Source networking configuration
. /etc/sysconfig/network
#Check that networking is up
[ "$NETWORKING" = "no" ] && exit 0
config="/usr/local/haproxy/conf/haproxy.cfg"
exec="/usr/local/haproxy/sbin/haproxy"
prog=$(basename $exec)
[ -e /etc/sysconfig/$prog ] && . /etc/sysconfig/$prog
lockfile=/var/lock/subsys/haproxy
check() {
$exec -c -V -f $config
}
start() {
$exec -c -V -f $config
if [ $? -ne 0 ];then
echo "Erros in configuration file, check with $prog check."
return 1
fi
echo -n $"Starting $prog:"
#start it up here, usually something like "daemon $exec"
daemon $exec -D -f $config -p /usr/local/haproxy/logs/$prog.pid
retval=$?
echo
[ $retval -eq 0 ] && touch $lockfile
return $retval
}
stop() {
echo -n "Stopping $prog:"
# stop it here, often "killproc $prog"
killproc $prog
retval=$?
echo
[ $retval -eq 0 ] && rm -f $lockfile
return $retval
}
restart() {
$exec -c -q -f $config
if [ $? -ne 0 ];then
echo "Errors in configuration file, check with $prog check."
return 1
fi
stop
start
}
reload() {
$exec -c -q -f $config
if [ $? -ne 0 ];then
echo "Errors in configuration file, check with $prog check."
return 1
fi
echo -n $"Reloading $prog:"
$exec -D -f $config -p /usr/local/haproxy/logs/$prog.pid -sf $(cat /usr/local/haproxy/logs/$prog.pid)
retval=$?
echo
return $retval
}
force_reload() {
restart
}
fdr_status() {
status $prog
}
case $1 in
start|stop|restart|reload)
$1
;;
force-reload)
force_reload
;;
checkconfig)
check
;;
status)
fdr_status
;;
condrestart|try-restart)
[ ! -f $lockfile ] || restart
;;
*)
echo $"Usage: $0 {start|stop|status|checkconfig|restart|try-restart|reload|force_reload}"
exit 2
esac
将此脚本命名为haproxy,放在系统的/etc/init.d/目录下,下面是此脚本的用法:
[root@haproxy-server logs]# /etc/init.d/haproxy Usage:/etc/init.d/haproxy {start|stop|status|checkconfig|restart|try-restart reload|force-reload}
HAProxy启动后,就可以测试HAProxy所实现的各种功能了。
2、测试HAProxy实现虚拟主机和负载均衡功能
首先通过不同IP的客户端以www.tb.com或者tb.com域名访问网站,如果HAProxy运行正常,并且ACL规则设置正确,server_www的三台后端默认的页面信息将会依次出现,这说明HAProxy对电商网站实现了,同时,不会出现其他后端的默认页面信息,说明ACL规则生效,实现虚拟功能。
同理,当通过不同IP的客户端以bbs.tb.com访问网站时,server_bbs的两台后端默认的页面信息将轮换出现。这表示实现了论坛的功能,同时,不会出现其他后端的默认页面信息,说明ACL规则生效,实现虚拟功能。
用同样的方法可以验证blog.tb.com是否实现了虚拟功能以及功能。最后,当通过HAProxy的IP或者其他方式访问时,访问请求将被调度到server_default指定的两台后端真实上。
3、测试HAProxy的故障转移功能
测试HAProxy的故障转移功能也非常简单,这里假定将server_www组的一台后端192.168.88.82的httpd服务停止,那么当通过www.tb.com或者tb.com域名访问网站时,这个失效的节点将不会被访问到,因为当httpd服务被停止后,HAProxy通过httpchk方式将立刻检测到此节点无法返回数据,从而屏蔽此节点对外提供服务的功能,这样就实现了故障转移功能。通过类似的方法可以测试其他节点的应用。
4、使用HAProxy的Web监控平台
虽然HAProxy实现了服务的故障转移功能,但是在或者服务出现故障的时候,并不能发出通知告知人员,这对于及时性要求很高的业务系统来说,是非常不便的。不过,HAProxy似乎也考虑到了这一点,在新的版本中HAProxy推出了一个基于的监控平台,通过这个平台可以查看此集群系统所有后端的运行状态,在后端服务或出现故障时,监控页面会通过不同的颜色来展示故障信息,这在很大程度上解决了后端故障报警的问题,人员可通过监控这个页面来第一时间发现节点故障,进而修复故障,如图2所示。
图2 HAProxy的Web监控页面
在这个监控页面中,详细记录了HAProxy中配置的frontend、backend等信息。在backend中有各台后端真实的运行状态,正常情况下,所有后端都以浅绿色展示,当某台后端出现故障时,将以深橙色显示。其实每种颜色代表什么状态,在上面这个图中都有详细说明。
在这个监控页面中,还可以执行关闭自动刷新、隐藏故障状态的节点、手动刷新、导出数据为CSV文件等各种操作。在新版的HAProxy中,又增加了对backend后端节点的管理功能,例如,可以在页面下执行Disable、Enable、Soft Stop、Soft Start等对后端节点的管理操作。这个功能在后端节点升级、故障维护时非常有用。
ID:Computer-network
【推荐书籍】
以上是关于Linux运维:基于虚拟主机的HAProxy负载均衡系统配置实例的主要内容,如果未能解决你的问题,请参考以下文章