单片机怎么通过串口把变量int i的值传送到pc端显示
Posted
tags:
篇首语:本文由小常识网(cha138.com)小编为大家整理,主要介绍了单片机怎么通过串口把变量int i的值传送到pc端显示相关的知识,希望对你有一定的参考价值。
参考技术A unsigned char ii;ii = i;//取i低8位
......//发送
i >>=8;
ii = i;//取i高8位
......//发送
PC端软件如果自己编写,可以轻松的显示i的值。如果用一些现成的串口小软件,那只能分成两个字节显示了。 参考技术B #include <AT89X51.h>
#define uchar unsigned char
#define uint unsigned int
main()
uchar i;
uint j;
SCON= 0x40; //串口方式1
PCON=0; //SMOD=0
REN=1; //允许接收
TMOD= 0x20; //定时器1定时方式2
TH1= 0xe6; //12MHz 1200波特率
TL1= 0xe6;
TR1= 1; //启动定时器
while(1)
i=0;
while(trdata[i]!=0x00)
SBUF=trdata[i];
while(TI==0);
TI=0;
i++;
for (j=0;j<50000;j++);
i=0;
while(trdata1[i]!=0x00)
SBUF=trdata1[i];
while(TI==0);
TI=0;
i++;
for (j=0;j<50000;j++);
本回答被提问者采纳 参考技术C 先把INT型数据拆开,高8位和低8位。
或先发i 的高8位,再发低8位,PC端收到后组合起来就可以了。
PIC32单片机端C语言serial bootloader和PC端C#语言bootloader串口通信程序
今天介绍下我新完成的为Microchip的32位单片机PIC32MZ2048ECH144开发的UART bootloader程序。整个工程分两部分,第一部分是单片机端用XC32编译的bootloader程序PhsBoot_v5.0,另一部分是PC端用C#编译的bootloader通讯程序PhsLoader_v5.0。两者之间采用固定的协定通信合作,如下。
<STX><CMD><ADDRL><ADDRH><ADDRU><ADDRM><LEN><DATA>...<DATA><ETX>
STX - Start of packet indicator
ETX - End of packet indicator
LEN - The length of true data
DATA - General data 16 bytes, only first LEN of datas are true
CMD - Base command
ADDR - Address up to 32 bits ( ADDRL , ADDRH , ADDRH, ADDRM)
具体有以下Base command:
RD-VER: 0x00 -- Read Version Information (最终版本未实现)
RD_MEM: 0x01 -- Read Program Memory (最终版本未实现)
ER_MEM: 0x03 -- Erase Program Memory
WR_MEM: 0x02 -- Write Program Memory
WR_CFG: 0x04 -- Write Configuration Registers (最终版本未实现)
PhsLoader_v5.0
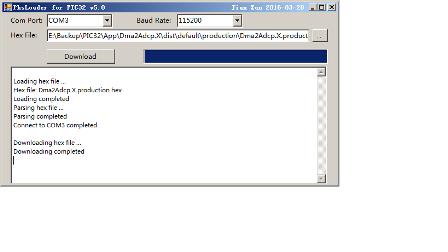
PhsLoader_v5.0是PC端的程序,负责打开串口,加载应用程序hex文件,并按照上面介绍的协定进行组包然后发送出去。PhsLoader_v5.0是用C#开发的包含UI的程序,UI如下图。

PhsLoader_v5.0 的主要实现代码如下
 private void btnLoad_Click(object sender, EventArgs e)
        {
            btnDownload.Enabled = false;
            textBoxStatus.AppendText("\r\nLoading hex file ...\r\n");
            OpenFileDialog openDialog = new OpenFileDialog();
            openDialog.Filter = "Hex files (*.hex)|*.hex";
            if (openDialog.ShowDialog() == DialogResult.OK)
            {
                textBoxFile.Text = openDialog.FileName;
                string[] pathArray = textBoxFile.Text.Split(‘\\‘);
                int pathDeep = pathArray.Count();
                textBoxStatus.AppendText("Hex file: " + pathArray[pathDeep - 1] + "\r\n");
                textBoxStatus.AppendText("Loading completed\r\n");
                HexParse loaderParse = new HexParse();
                textBoxStatus.AppendText("Parsing hex file ...\r\n");
                if (loaderParse.IsHexFile(textBoxFile.Text))
                {
                    btnDownload.Enabled = true;
                    loaderLines = loaderParse.HexLines;
                    textBoxStatus.AppendText("Parsing completed\r\n");
                }
                else
                {
                    textBoxStatus.ForeColor = Color.Red;
                    textBoxStatus.AppendText("Parsing failed\r\n");
                    textBoxStatus.ForeColor = Color.Black;
                }
            }
            else
            {
                textBoxStatus.ForeColor = Color.Red;
                textBoxStatus.AppendText("Loading failed\r\n\r\n");
                textBoxStatus.ForeColor = Color.Black;
            }
        }

        private void btnDownload_Click(object sender, EventArgs e)
        {
            btnDownload.Enabled = false;

            if (!this.connect())
            {
                btnDownload.Enabled = true;
                return;
            }

            try
            {
                loaderReader = new StreamReader(textBoxFile.Text);

            }
            catch (Exception ex)
            {
                Debug.WriteLine("Error: " + ex.Message);
                textBoxStatus.ForeColor = Color.Red;
                textBoxStatus.AppendText("Read hex file unsuccessfully\r\n");
                textBoxStatus.ForeColor = Color.Black;
                loaderReader.Close();
                loaderSerial.Close();
                btnDownload.Enabled = true;
                return;
            }

            loaderFrame = new SerialFrame();
            if (!erase())
            {
                textBoxStatus.ForeColor = Color.Red;
                textBoxStatus.AppendText("Erase unsuccessfully\r\n");
                textBoxStatus.ForeColor = Color.Black;
                loaderReader.Close();
                loaderSerial.Close();
                btnDownload.Enabled = true;
                return;
            }

            pBarLoading.Refresh();
            pBarLoading.Visible = true;
            pBarLoading.Value = 0;
            pBarLoading.Maximum = loaderLines;
            pBarLoading.Step = 1;

            string recordLine;
            loaderUpperAddr = 0;
            bool isNextLineUserID = false;
            bool isNextLineConfigBits = false;
            textBoxStatus.AppendText("\r\nDownloading hex file ...\r\n");
            try
            {
                while (loaderReader.Peek() >= 0)
                {
                    pBarLoading.PerformStep();
                    recordLine = loaderReader.ReadLine();
                    //if (recordLine.Contains(USER_ID_TOKEN) == true)
                    //{
                    //    isNextLineUserID = true;
                    //    continue;
                    //}
                    //else if (recordLine.Contains(CONFIG_BITS_TOKEN) == true)
                    //{
                    //    isNextLineConfigBits = true;
                    //    continue;
                    //}
                    if (recordLine.Contains(EXTEND_TOKEN) == true)
                    {
                        if (recordLine.Contains(USER_ID_TOKEN) == true)
                        {
                            isNextLineUserID = true;
                            continue;
                        }
                        else if (recordLine.Contains(CONFIG_BITS_TOKEN) == true)
                        {
                            const int ADDR_U_START_INDEX = 9;
                            const int ADDR_U_LENGTH = 4;
                            string addrU = recordLine.Substring(ADDR_U_START_INDEX, ADDR_U_LENGTH);
                            loaderUpperAddr = Convert.ToInt32(addrU, 16) << 16;
                            isNextLineConfigBits = true;
                            continue;
                        }
                        else if (recordLine.Contains(DSPIC_CONFIG_BITS_TOKEN) == true)
                        {
                            const int ADDR_U_START_INDEX = 9;
                            const int ADDR_U_LENGTH = 4;
                            string addrU = recordLine.Substring(ADDR_U_START_INDEX, ADDR_U_LENGTH);
                            loaderUpperAddr = Convert.ToInt32(addrU, 16) << 16;
                            isNextLineConfigBits = true;
                            continue;
                        }
                        else if (recordLine.Contains(PIC32_CONFIG_BITS_TOKEN) == true)
                        {
                            const int ADDR_U_START_INDEX = 9;
                            const int ADDR_U_LENGTH = 4;
                            string addrU = recordLine.Substring(ADDR_U_START_INDEX, ADDR_U_LENGTH);
                            loaderUpperAddr = Convert.ToInt32(addrU, 16) << 16;
                            isNextLineConfigBits = true;
                            continue;
                        }
                        else
                        {
                            const int ADDR_U_START_INDEX = 9;
                            const int ADDR_U_LENGTH = 4;
                            string addrU = recordLine.Substring(ADDR_U_START_INDEX, ADDR_U_LENGTH);
                            loaderUpperAddr = Convert.ToInt32(addrU, 16) << 16;
                            continue;
                        }
                    }
                    else if (recordLine.Contains(END_OF_HEX_FILE_TOKEN) == true)
                    {
                        break;
                    }
                    if (isNextLineUserID)
                    {
                        isNextLineUserID = false;
                        // do nothing;
                    }
                    else if (isNextLineConfigBits)
                    {
                        //if (!DownloadConfigLine(recordLine))
                        //{
                        //    Debug.WriteLine("Error found during configuration bits programming");
                        //    loaderReader.Close();
                        //    loaderSerial.Close();
                        //    btnDownload.Enabled = true;
                        //    return;
                        //}
                        DownloadConfigLine(recordLine);
                        isNextLineConfigBits = false;
                    }
                    else
                    {
                        if (!DownloadDataLine(recordLine))
                        {
                            Debug.WriteLine("Error found during data programming");
                            loaderReader.Close();
                            loaderSerial.Close();
                            btnDownload.Enabled = true;
                            return;
                        }
                        //DownloadDataLine(recordLine);
                    }
                }
            }
            catch (Exception ex)
            {
                Debug.WriteLine("Error: " + ex.Message);
                textBoxStatus.ForeColor = Color.Red;
                textBoxStatus.AppendText("Downloading failed\r\n");
                textBoxStatus.ForeColor = Color.Black;
                loaderSerial.Close();
                loaderReader.Close();
                btnDownload.Enabled = true;
                return;
            }
            textBoxStatus.AppendText("Downloading completed\r\n");

            if (!run())
            {
                textBoxStatus.ForeColor = Color.Red;
                textBoxStatus.AppendText("Jump to Application unsuccessfully\r\n");
                textBoxStatus.ForeColor = Color.Black;
                loaderReader.Close();
                loaderSerial.Close();
                btnDownload.Enabled = true;
                return;
            }
            loaderSerial.Close();
            loaderReader.Close();
            btnDownload.Enabled = true;
        }
PhsBoot_v5.0
PhsBoot_v5.0是PIC32单片机端程序,放置在程序存储器中,放置的位置和我上一款PIC32 bootloader(HyperBootloader_PIC32)一样。所以他们的linker script也使用一样的。PhsBoot_v5.0主要功能是接收PhsLoader_v5.0发送过来的数据包,按照通信协定进行解包,分离出其中的地址和数据,并将数据按照PIC32的烧写时序烧录到对应的地址中。PhsBoot_v5.0 是用XC32开发的,主要的实现代码如下。
        if (lineReceived)
        {
            if ((frameBuffer[0] == STX) && (frameBuffer[BUFFER_MAX-1] == ETX))
            {
                switch (frameBuffer[CMD_INDEX])
                {
                case WR_MEM:
                    SourceAddr.byte.LB = frameBuffer[ADDRL_INDEX];
                    SourceAddr.byte.HB = frameBuffer[ADDRH_INDEX];
                    SourceAddr.byte.UB = frameBuffer[ADDRU_INDEX];
                    SourceAddr.byte.MB = frameBuffer[ADDRM_INDEX];
                    if ((SourceAddr.word.HW == 0x1fc0))
                    {
                        SendResponse();
                        break;
                    }
                    int ix;
                    for (ix=0;ix<frameBuffer[LEN_INDEX];)
                    {
                        pData.byte.LB = frameBuffer[LEN_INDEX+1+ix++];
                        pData.byte.HB = frameBuffer[LEN_INDEX+1+ix++];
                        pData.byte.UB = frameBuffer[LEN_INDEX+1+ix++];
                        pData.byte.MB = frameBuffer[LEN_INDEX+1+ix++];
                        NVMWriteWord(SourceAddr.Val, pData.Val);
                        SourceAddr.Val += 4;
                    }
                    //Uart_Putc(0x55);      //for debug
                    SendResponse();
                    break;
                case WR_CFG:
                    //WriteWordMem(CM_WORD_WRITE);
                    //Uart_Putc(0x00);     // for debug
                    SendResponse();
                    break;
                case ER_MEM:
                    //EraseMem();
                    for (EraseAddr.Val = ERASE_FLASH_BASE_ADDRESS; EraseAddr.Val < ERASE_FLASH_END_ADDRESS;)
                    {
                        NVMErasePage(EraseAddr.Val);
                        EraseAddr.Val += PAGE_SIZE;
                    }
                    //Uart_Putc(0xaa);      // for debug
                    SendResponse();
                    break;
                case RUN_APP:
                    //Uart_Putc(0xff);      // for debug
                    SendResponse();
                    TRISCSET = 0x2000; // RC13 Input
                    LATCCLR = 0x6000;  // Clear LATC
                    IPC28CLR = 0x1F00; // Clear IPC28
                    LATHCLR = (1<<0);
                    TRISHSET = (1<<0);
                    CoreT_DelayMs(10);
                    U1MODE = 0x0;
                    U1STA = 0x0;
                    (*((void(*)(void))USER_APP_RESET_ADDRESS))();
                default:
                    break;
                }
            }
            lineReceived = 0;
            lineBytes = 0;
            readBytes = 0;
        }
如何使用PhsLoader_v5.0和PhsBoot_v5.0
1. 使用XC32编译PhsBoot_v5.0(编译前,需先修改linker script)。
2. 使用pickit3烧录PhsBoot_v5.0的Hex文件到目标板中。
3. 拔除pickit3烧录器
4. 连接目标板与PC的串口,打开PhsLoader_v5.0,选择COM端口,BAUD RATE。
5. 点击PhsLoader_v5.0用户界面上的“.."按钮加载需要烧录的应用程序Hex文件(编译前,需先修改linker script)
6. 重启目标板,等到LED1 灯亮了,立刻在PhsLoader_v4.0界面上点击Download按钮。如果超时未点击Download按钮,会自动跳转到上次烧录的应用程序中去。
7. 烧录完毕,再次重启目标板, 6秒后目标板开始正常运行应用程序。
之后每次更新应用程序,只需重复步骤 4 ~ 7 就可以了。注意,整个烧录过程未能实现Configuration Bits的烧写,所以需要保持应用程序的Configuration Bits和Bootloader的Configuration Bits一致。
以上是关于单片机怎么通过串口把变量int i的值传送到pc端显示的主要内容,如果未能解决你的问题,请参考以下文章