在linux 修改vnc密码,出现Couldn't open /root/.vnc/passwd for writing,怎样解决?
Posted
tags:
篇首语:本文由小常识网(cha138.com)小编为大家整理,主要介绍了在linux 修改vnc密码,出现Couldn't open /root/.vnc/passwd for writing,怎样解决?相关的知识,希望对你有一定的参考价值。
把vnc启动的所有桌面号都kill掉重新启动vncserver看能启动吗
然后再输入vncpasswd更改密码追问
vnc是能启动的,但我只是想更改vncpasswd,因为原本的密码太弱了。
追答那你试试按我的命令操作行不行吧
使用root用户登录
cd ~
chmod -R 750 .vnc/*
chattr -i -a ./vnc/*
然后试下!
这个命令会对业务有影响吗?因为这是生产中的系统。。。
追答那你先执行
cd ~
lsattr .vnc/passwd
看一下有没有a或者i之类的参数
如果有的话就执行
chattr -i -a .vnc/passwd
然后更改密码 更改完之后执行
chattr +i .vnc/passwd
估计这是管理员为了防止别人更改vnc的密码手动加上了隐藏属性
+a 内容不能删除或修改 +i 不能被修改、删除、改名和设置链接
没有i的话怎么做呢?直接运行之前的命令么?
追答你看他的提示 是passwc
输入lsattr .vnc/passwc试试
我已经在root下的了。
追答vncpasswd root
??
Couldn't open root for writing
但我已经在root下输入vncpasswd的了
自己到那个目录下对文件操作是一样的。
Linux ❀ 配置使用VNC Viewer访问Linux系统的图形化界面
1、安装RPM包
需要实现准备好一台Linux系统,并安装图形化界面;
#先备份掉centos自带的yum源配置文件
[root@localhost ~]# mkdir /etc/yum.repos.d/back/
[root@localhost ~]# mv /etc/yum.repos.d/*.repo /etc/yum.repos.d/back/
#配置本地yum源文件
[root@localhost ~]# cat /etc/yum.repos.d/base.repo
[base]
name=base
baseurl=file:///mnt
gpgcheck=0
enable=1
#挂载对应的镜像或光盘
[root@localhost ~]# mount /dev/sr0 /mnt
#清理并本地缓存yum源
[root@localhost ~]# yum clean all
[root@localhost ~]# yum makecache
#安装VMC RPM服务包
[root@localhost ~]# yum -y install tigervnc tigervnc-server
2、创建VNC连接密码
[root@localhost yum.repos.d]# vncserver

You will require a password to access your desktops.

Password:[此处配置登录密码]
Verify:[此处确认配置的密码]

New 'localhost.localdomain:1 (root)' desktop is localhost.localdomain:1

Creating default startup script /root/.vnc/xstartup
Starting applications specified in /root/.vnc/xstartup
Log file is /root/.vnc/localhost.localdomain:1.log
3、修改配置文件
[root@localhost ~]# cat /root/.vnc/xstartup
#!/bin/sh

unset SESSION_MANAGER
unset DBUS_SESSION_BUS_ADDRESS
exec /etc/X11/xinit/xinitrc
[ -x /etc/vnc/xstartup ] && exec /etc/vnc/xstartup
[ -r HOME/.Xresources
xsetroot -solid grey
vncconfig -iconic &
xterm -geometry 80x24+10+10 -ls -title "$VNCDESKTOP Desktop"&
gnome-session &
# Assume either Gnome or KDE will be started by default when installed
# We want to kill the session automatically in this case when user logs out. In case you modify
# /etc/X11/xinit/Xclients or ~/.Xclients yourself to achieve a different result, then you should
# be responsible to modify below code to avoid that your session will be automatically killed
if [ -e /usr/bin/gnome-session -o -e /usr/bin/startkde ]; then
    vncserver -kill $DISPLAY
fi
4、开启VNC服务
[root@localhost ~]# vncserver :1
A VNC server is already running as :1
#查看对应的服务端口
[root@localhost ~]# netstat -tulp | grep 590*
tcp        0      0 0.0.0.0:5901            0.0.0.0:*               LISTEN      5440/Xvnc
tcp6       0      0 [::]:5901               [::]:*                  LISTEN      5440/Xvnc
5、防火墙配置
[root@localhost ~]# systemctl stop firewalld
[root@localhost ~]# systemctl disable firewalld
Removed symlink /etc/systemd/system/dbus-org.fedoraproject.FirewallD1.service.
Removed symlink /etc/systemd/system/basic.target.wants/firewalld.service.

#firewalld放通策略
[root@localhost ~]# firewall-cmd --permanent --add-port=5901/tcp
success
[root@localhost ~]# firewall-cmd --reload
success

#iptables防火墙放通策略
[root@localhost ~]# iptables -A INPUT -p tcp --dport 5900 -j ACCEPT
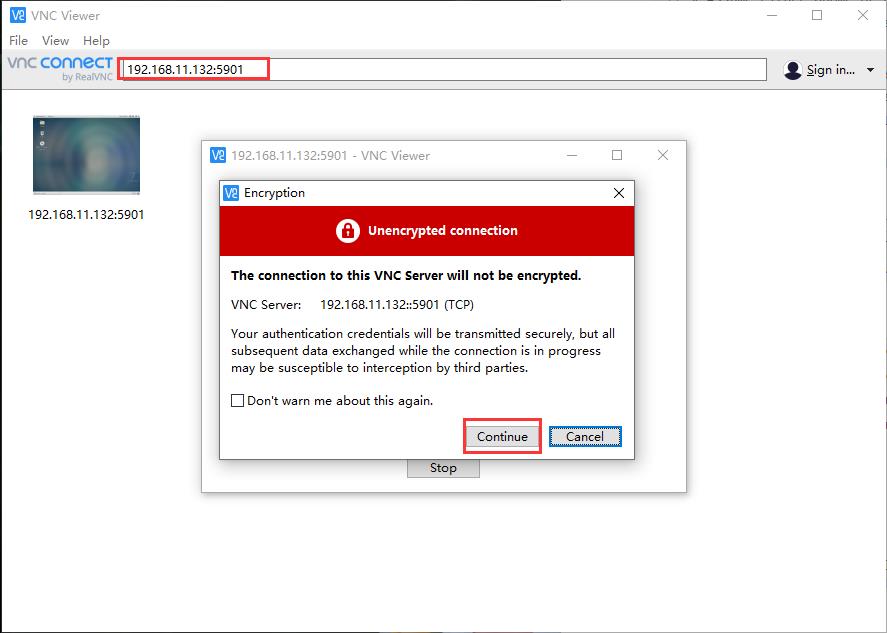
6、VNC连接图形化界面
登录密码为第二节设置的密码,无用户名,直接可以登录即可完成操作。
VNC Viewer下载地址:https://www.realvnc.com/en/connect/download/viewer/

7、查看VNC登录日志
[root@localhost ~]# cat ./.vnc/localhost.localdomain\\:1.log

Xvnc TigerVNC 1.3.1 - built Nov 16 2016 13:38:44
Copyright (C) 1999-2011 TigerVNC Team and many others (see README.txt)
See http://www.tigervnc.org for information on TigerVNC.
Underlying X server release 11702000, The X.Org Foundation


Mon Sep 27 20:46:37 2021
 vncext:      VNC extension running!
 vncext:      Listening for VNC connections on all interface(s), port 5901
 vncext:      created VNC server for screen 0
gnome-session-is-accelerated: llvmpipe detected.

Mon Sep 27 20:53:28 2021
 Connections: accepted: 192.168.11.1::62957
 SConnection: Client needs protocol version 3.8
 SConnection: Client requests security type VncAuth(2)

Mon Sep 27 20:53:32 2021
 VNCSConnST:  Server default pixel format depth 24 (32bpp) little-endian rgb888
 VNCSConnST:  Client pixel format depth 6 (8bpp) rgb222

Mon Sep 27 20:53:33 2021
 VNCSConnST:  Client pixel format depth 24 (32bpp) little-endian rgb888

Mon Sep 27 20:57:20 2021
 Connections: closed: 192.168.11.1::62957 (Clean disconnection)
 SMsgWriter:  framebuffer updates 60
 SMsgWriter:    raw rects 1, bytes 16396
 SMsgWriter:    hextile rects 41, bytes 2211277
 SMsgWriter:    ZRLE rects 6, bytes 247006
 SMsgWriter:    raw bytes equivalent 14901944, compression ratio 6.021768

Mon Sep 27 21:07:31 2021
 Connections: accepted: 192.168.11.1::63841
 SConnection: Client needs protocol version 3.8
 SConnection: Client requests security type VncAuth(2)

Mon Sep 27 21:07:52 2021
 VNCSConnST:  Server default pixel format depth 24 (32bpp) little-endian rgb888

Mon Sep 27 21:07:53 2021
 VNCSConnST:  Client pixel format depth 6 (8bpp) rgb222
 VNCSConnST:  Client pixel format depth 24 (32bpp) little-endian rgb888

Mon Sep 27 21:07:57 2021
 Connections: closed: 192.168.11.1::63841 (Clean disconnection)
 SMsgWriter:  framebuffer updates 5
 SMsgWriter:    raw rects 1, bytes 16396
 SMsgWriter:    ZRLE rects 5, bytes 21316
 SMsgWriter:    raw bytes equivalent 7094560, compression ratio 188.124735
以上是关于在linux 修改vnc密码,出现Couldn't open /root/.vnc/passwd for writing,怎样解决?的主要内容,如果未能解决你的问题,请参考以下文章