猫眼数据加密问题研究图像识别
Posted 程序开发院
tags:
篇首语:本文由小常识网(cha138.com)小编为大家整理,主要介绍了猫眼数据加密问题研究图像识别相关的知识,希望对你有一定的参考价值。
1. 介绍
最近同学在完成一个课题时,在对猫眼评分票房进行数据爬取时,遇到了问题,与我探讨了关于猫眼数据加密问题。在对网页源代码进行阅读后发现,与58同城、携程等加密方式一致,都是通过woff文件,在前端进行画图渲染,得到图形。前端界面并不知其数值。
所以在对问题进行分析后,提出了基于图像识别以及机器学习的方式,构建相关模型,进行数据识别分类。
2. 分析
首先找到加密数据所在位置。如图:

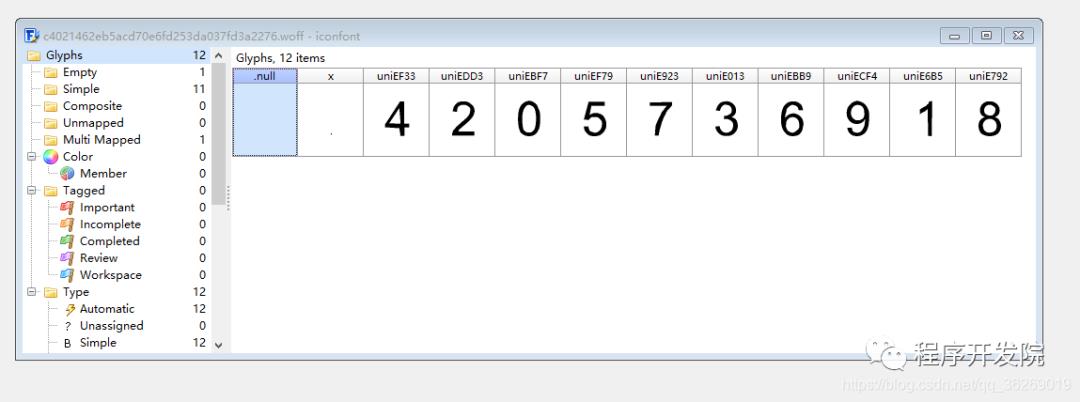
通过FontCreator对woff文件进行了分析:

通过对woff文件的重新渲染,我们就可以很清晰的看到被加密数值。检查 与页面渲染一致。
那么通过让程序识别woff文件就能对数据进行提取了,但对woff文件进行转xml分析后发现,并不是每个数值的构图一致,为存在偏差,暂且不能这样进行识别。(后面将介绍如何通过机器学习,使用这种方式解决问题)
3. 图像识别
那通过xml分析不能解决问题,那如何识别呢?
其实,最简单的方式就是,人怎么识别就让机器怎么识别。让机器自动去识别每一个数字,那么在对应的woff文件中,那么问题就能解决。
3.1 获取图片
首先的获取woff中每一个数字生成图片
import requests
import os
from fontTools.ttLib import TTFont
from fontTools import ttLib
from fontTools.pens.basePen import BasePen
from reportlab.graphics.shapes import Path
from reportlab.lib import colors
from reportlab.graphics import renderPM
from reportlab.graphics.shapes import Group, Drawing, scale

class ReportLabPen(BasePen):

    """A pen for drawing onto a reportlab.graphics.shapes.Path object."""

    def __init__(self, glyphSet, path=None):
        BasePen.__init__(self, glyphSet)
        if path is None:
            path = Path()
        self.path = path

    def _moveTo(self, p):
        (x,y) = p
        self.path.moveTo(x,y)

    def _lineTo(self, p):
        (x,y) = p
        self.path.lineTo(x,y)

    def _curveToOne(self, p1, p2, p3):
        (x1,y1) = p1
        (x2,y2) = p2
        (x3,y3) = p3
        self.path.curveTo(x1, y1, x2, y2, x3, y3)

    def _closePath(self):
        self.path.closePath()


class WoffAndImg:

    def __init__(self, url):
        self.__url = url
        self.__create_path()
        self.__get_woff()
        self.__woffToImage()


    def __create_path(self):
        name = self.__url.split('/')[-1]
        filedir = 'woff_img/'+ name.replace('.woff','')
        if not os.path.exists(filedir):
            os.mkdir(filedir)
        self.__woffPath = filedir + '/' + name
        imagespath = filedir + '/images'
        if not os.path.exists(imagespath):
            os.mkdir(imagespath)
        self.__imgPath = imagespath + '/'

    def get_imagedir(self):
        return self.__imgPath

    def __get_woff(self):
        text = requests.get(self.__url).content
        with open(self.__woffPath,'wb') as f:
            f.write(text)
            f.close()

    def __woffToImage(self,fmt="png"):
        font = TTFont(self.__woffPath)
        gs = font.getGlyphSet()
        glyphNames = font.getGlyphNames()
        glyphNames.remove('glyph00000')
        glyphNames.remove('x')

        for i in glyphNames:
            if i[0] == '.':#跳过'.notdef', '.null'
                continue

            g = gs[i]
            pen = ReportLabPen(gs, Path(fillColor=colors.black, strokeWidth=1))
            g.draw(pen)
            w, h = g.width, g.width
            g = Group(pen.path)
            g.translate(w, h*1.5)

            d = Drawing(w*3, h*4.5)
            d.add(g)
            imageFile = self.__imgPath+"/"+i+".png"
            renderPM.drawToFile(d, imageFile, fmt)

if __name__ == "__main__":
    url = 'http://vfile.meituan.net/colorstone/dfba174e6f8d42a8bd26ee39cafcd6df2276.woff'
    test = WoffAndImg(url)
    print(test.get_imagedir())
可生成如下文件:

在这里我们就得到了,woff文件中的图片,那么下一步就是识别图片,并构建字典集。
3.2 数字识别
数字识别使用的python的一个pytesseract库,具体使用另行百度。上代码:
import os
from PIL import Image
import pytesseract
import re

class NumInImg:

    def __init__(self, imgPath):
        self.__imgPath = imgPath

    def run(self):
        result_dit = {}
        img_dit = self.__get_imgList()
        for img in img_dit:
            temp_img = chr(eval(img.replace('uni','0x').lower()))
            result_dit[temp_img] = self.__recognize(img_dit[img])
        text = str(result_dit)
        txt_path = self.__imgPath.replace('images/','dict.txt')
        with open(txt_path,'w',encoding='utf-8') as f:
            f.write(text)
            f.close()
        return result_dit

    def __get_imgList(self):
        img_dit = {}
        for root, dirs, files in os.walk(self.__imgPath):
            for file in files:
                # print(file.split('.'))
                img_dit[file.split('.')[0]] = root + file
        return img_dit

    def __recognize(self, path):
        image = Image.open(path)
        image = image.resize((800,1200))
        text = pytesseract.image_to_string(image, lang='eng', config='--psm 9 --oem 8 -c tessedit_char_whitelist=0123456789')

        return text


if __name__ == "__main__":
    ni = NumInImg('woff_img/dfba174e6f8d42a8bd26ee39cafcd6df2276/images/')
    print(ni.run())
通过该执行方法类,可得到对应的字典集。当然这里对字典集进行了保存,因为后面机器学习中将会用到这些数据。
图片数字已经识别,下一步就是与爬虫进行结合实现自动化数据提取。
3.3 爬虫程序
这里的爬虫,我采用的是selenium,这种方式不容易被检测。当然爬虫这里可以按需求选着对应的爬取方式。
from selenium import webdriver
from selenium.webdriver.chrome.options import Options
import time
import random
import re
from css_process.get_woff_Image import WoffAndImg
from css_process.get_num_from_img import NumInImg


class SpiderCatEye:

 def __init__(self, url):
  chrome_options = Options()
  chrome_options.add_argument('--disable-gpu')
  chrome_options.add_argument('--no-sandbox')
  self.__driver = webdriver.Chrome(chrome_options=chrome_options,executable_path='chromedriver_win32/chromedriver.exe')
  self.__url = url

 def run(self):
  self.__driver.get(self.__url)
  self.__wait_time()
  self.__spider_page()
  self.__quit()

 def __spider_page(self):
  while True:
   dl = self.__driver.find_element_by_xpath('//div[@class="movies-list"]/dl[@class="movie-list"]')
   dds = dl.find_elements_by_xpath('//dd')
   for dd in dds:
    dd.click()
    time.sleep(2)
    _lastWindow = self.__driver.window_handles[-1]
    self.__driver.switch_to.window(_lastWindow)
    self.__get_info()
    self.__wait_time(timeNum=15)
    self.__driver.close()
    _lastWindow = self.__driver.window_handles[-1]
    self.__driver.switch_to.window(_lastWindow)
   self.__driver.find_element_by_link_text('下一页').click()


 def __get_info(self):
  woff_rule = r'//vfile.meituan.net/colorstone/.*?.woff'
  woff_url = []
  woff_url = re.findall(woff_rule,self.__driver.page_source)
  if woff_url != []:
   url = 'http:' + woff_url[0]
   wai = WoffAndImg(url)
   imgdir = wai.get_imagedir()
   ni = NumInImg(imgdir)
   css_passwd = ni.run()

   title = self.__driver.find_element_by_xpath('//div[@class="movie-brief-container"]/h1[@class="name"]').text

   info_num = list(self.__driver.find_element_by_xpath('//div[@class="movie-index"]/div[@class="movie-index-content score normal-score"]/span').text)
   for index in range(len(info_num)):
    if info_num[index].lower() in [key for key in css_passwd]:
     info_num[index] = css_passwd[info_num[index].lower()]
   res_info_num = ''.join(info_num)


   if len(self.__driver.find_elements_by_xpath('//div[@class="movie-index"]/div[@class="movie-index-content score normal-score"]/div[@class="index-right"]/span[@class="score-num"]')) > 0:
    score_num = list(self.__driver.find_element_by_xpath('//div[@class="movie-index"]/div[@class="movie-index-content score normal-score"]/div[@class="index-right"]/span').text)
    for index in range(len(score_num)):
     if score_num[index].lower() in [key for key in css_passwd]:
      score_num[index] = css_passwd[score_num[index].lower()]
    res_score_num = ''.join(score_num)
   else:
    res_score_num = ''

   if len(self.__driver.find_elements_by_xpath('//div[@class="movie-index"]/div[@class="movie-index-content box"]/span[@class="no-info"]')) > 0:
    res_box_office = ''
   else:
    box_office = list(self.__driver.find_element_by_xpath('//div[@class="movie-index"]/div[@class="movie-index-content box"]/span[1]').text)
    box_office_unit = self.__driver.find_element_by_xpath('//div[@class="movie-index"]/div[@class="movie-index-content box"]/span[2]').text
    for index in range(len(box_office)):
     if box_office[index].lower() in [key for key in css_passwd]:
      box_office[index] = css_passwd[box_office[index].lower()]
    res_box_office = ''.join(box_office) + box_office_unit

   text = '{0}={1}={2}={3}
'.format(title,res_info_num,res_score_num,res_box_office)
   with open('shuju.txt','a',encoding='utf-8') as f:
    f.write(text)
    f.close()


 def __wait_time(self, timeNum = 10):
  timeNum = random.randint(timeNum-5,timeNum+5)
  time.sleep(timeNum)

 def __quit(self):
  self.__driver.quit()
当然,在main函数中执行即可。最后爬虫数据如下:
4. 总结
第一眼看到这种加密方式时,第一印象就是采用图像识别,在对xml文件进行分析后发现,其实在拥有大量数据做支撑时可采用分类模型去解决这个问题,这样的速度会更高于图像识别。(补充一句,大多数网站会检测请求数量,所以于selenium的定时比起来,这点速度并不算什么)。
通过对woff文件分析得到加密数据后,对网页数据的替换,以及数据生成存库都变得简单了。
下一节,将探讨如何利用机器学习构建分类模型,实现图像识别。这里上面所保存的数据都将成为我们的训练数据以及测试数据。利用深度学习为猫眼woff加密构建模型
以上是关于猫眼数据加密问题研究图像识别的主要内容,如果未能解决你的问题,请参考以下文章