Python+scrapy爬虫:手绘验证码识别
Posted Python圈子
tags:
篇首语:本文由小常识网(cha138.com)小编为大家整理,主要介绍了Python+scrapy爬虫:手绘验证码识别相关的知识,希望对你有一定的参考价值。
一、介绍
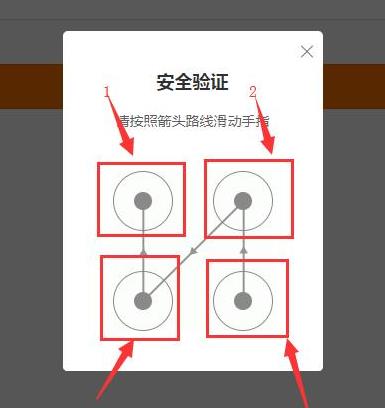
今天主要介绍的是微博客户端在登录时出现的四宫格手绘验证码,不多说直接看看验证码长成什么样。

二、思路
1、由于微博上的手绘验证码只有四个宫格,且每个宫格之间都有有向线段连接,所以我们可以判断四个宫格不同方向的验证码一共有24种,
我们将四个宫格进行标号,得到的结果如下:

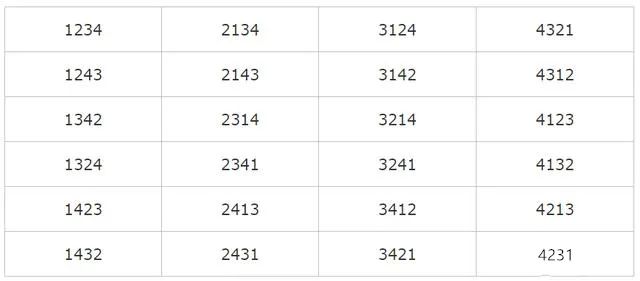
则我们可以排列出24种不同的手绘方向的验证码,分别为一下24种

2、我们通过获取到微博客户端的24种手绘验证码后需要进行模板匹配,这样通过全图匹配的方式进行滑动。
三、代码实现
1、首先是要通过微博移动端(https://passport.weibo.cn/signin/login) 批量获取手绘验证码,但是这个验证码不一定出现,
只有在账号存在风险或者频繁登录的时候才会出现。获取手绘验证码的代码如下:
注意:需要将模拟浏览器所以元素(用户名框,密码框)加载完了才能发送用户名和密码,否则报错
# -*- coding:utf-8 -*-import timefrom io import BytesIOfrom PIL import Imagefrom selenium import webdriverfrom selenium.webdriver.common.by import Byfrom selenium.common.exceptions import TimeoutExceptionfrom selenium.webdriver.support.ui import WebDriverWaitfrom selenium.webdriver.support import expected_conditions as ECclassCrackWeiboSlide():def__init__(self):self.url = "https://passport.weibo.cn/signin/login?entry=mweibo&r=https://m.weibo.cn/"self.browser = webdriver.Chrome(r"D:chromedriver.exe")self.browser.maximize_window()self.wait = WebDriverWait(self.browser,5)def__del__(self):self.browser.close()defopen(self):# 打开模拟浏览器self.browser.get(self.url)# 获取用户名元素username = self.wait.until(EC.presence_of_element_located((By.XPATH,'//*[@id="loginName"]')))# 获取密码框元素password = self.wait.until(EC.presence_of_element_located((By.XPATH,'//*[@id="loginPassword"]')))# 获取登录按钮元素submit = self.wait.until(EC.element_to_be_clickable((By.XPATH,'//*[@id="loginAction"]')))# 提交数据并登录username.send_keys("15612345678")password.send_keys("xxxxxxxxxxxx")submit.click()defget_image(self,name = "captcha.png"):try:# 获取验证码图片元素img = self.wait.until(EC.presence_of_element_located((By.CLASS_NAME,"patt-shadow")))time.sleep(1)# 获取验证码图片所在的位置location = img.location# 获取验证码图片的大小size = img.sizetop = location["y"] # 上bottom = location["y"] + size["height"] # 下left = location["x"] # 左right = location["x"] + size["width"] # 右print("验证码的位置:", left, top, right, bottom)# 将当前窗口进行截屏screenshot = self.browser.get_screenshot_as_png()# 读取截图screenshot = Image.open(BytesIO(screenshot))# 剪切九宫格图片验证码captcha = screenshot.crop((left, top, right, bottom))# 将剪切的九宫格验证码保存到指定位置captcha.save(name)print("微博登录验证码保存完成!!!")return captchaexcept TimeoutException:print("没有出现验证码!!")# 回调打开模拟浏览器函数self.open()defmain(self):count = 1while True:# 调用打开模拟浏览器函数self.open()# 调用获取验证码图片函数self.get_image(str(count) + ".png")count += 1if __name__ == '__main__':crack = CrackWeiboSlide()crack.main()
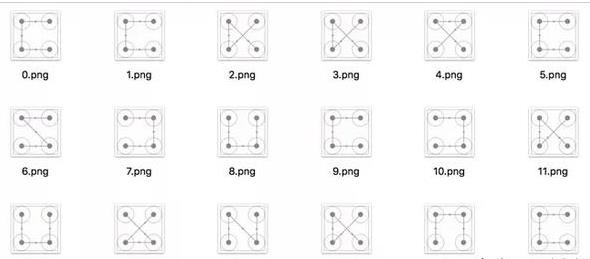
得到的24种手绘验证码,同时需要对这些手绘验证码根据上边的编号进行命名


上图就是我们需要的模板,接下来我们进行遍历模板匹配即可
2、模板匹配
通过遍历手绘验证码模板进行匹配
import osimport timefrom io import BytesIOfrom PIL import Imagefrom selenium import webdriverfrom selenium.webdriver import ActionChainsfrom selenium.webdriver.common.by import Byfrom selenium.common.exceptions import TimeoutExceptionfrom selenium.webdriver.support.ui import WebDriverWaitfrom selenium.webdriver.support import expected_conditions as ECclassCrackWeiboSlide():def__init__(self):self.url = "https://passport.weibo.cn/signin/login?entry=mweibo&r=https://m.weibo.cn/"self.browser = webdriver.Chrome(r"D:chromedriver.exe")self.browser.maximize_window()self.wait = WebDriverWait(self.browser,5)def__del__(self):self.browser.close()defopen(self):# 打开模拟浏览器self.browser.get(self.url)# 获取用户名元素username = self.wait.until(EC.presence_of_element_located((By.XPATH,'//*[@id="loginName"]')))# 获取密码框元素password = self.wait.until(EC.presence_of_element_located((By.XPATH,'//*[@id="loginPassword"]')))# 获取登录按钮元素submit = self.wait.until(EC.element_to_be_clickable((By.XPATH,'//*[@id="loginAction"]')))# 提交数据并登录username.send_keys("15612345678")password.send_keys("xxxxxxxxxxxx")submit.click()defget_image(self,name = "captcha.png"):try:# 获取验证码图片元素img = self.wait.until(EC.presence_of_element_located((By.CLASS_NAME,"patt-shadow")))time.sleep(1)# 获取验证码图片所在的位置location = img.location# 获取验证码图片的大小size = img.sizetop = location["y"] # 上bottom = location["y"] + size["height"] # 下left = location["x"] # 左right = location["x"] + size["width"] # 右print("验证码的位置:", left, top, right, bottom)# 将当前窗口进行截屏screenshot = self.browser.get_screenshot_as_png()# 读取截图screenshot = Image.open(BytesIO(screenshot))# 剪切九宫格图片验证码captcha = screenshot.crop((left, top, right, bottom))# 将剪切的九宫格验证码保存到指定位置captcha.save(name)print("微博登录验证码保存完成!!!")# 返回微博移动端的验证码图片return captchaexcept TimeoutException:print("没有出现验证码!!")# 回调打开模拟浏览器函数self.open()defis_pixel_equal(self,image,template,i,j):# 取出两张图片的像素点pixel1 = image.load()[i,j] # 移动客户端获取的验证码pixel2 = template.load()[i,j] # 模板文件里的验证码threshold = 20 # 阈值pix_r = abs(pixel1[0] - pixel2[0]) # Rpix_g = abs(pixel1[1] - pixel2[1]) # Gpix_b = abs(pixel1[2] - pixel2[2]) # Bif (pix_r< threshold) and (pix_g< threshold ) and (pix_b< threshold) :return Trueelse:return Falsedefsame_image(self,image,template):""":param image: 微博移动端获取的验证码图片:param template: 通过模板文件获取的验证码图片"""threshold = 0.99 # 相似度阈值count = 0# 遍历微博移动端获取的验证码图片的宽度和高度for i in range(image.width):for j in range(image.height):# 判断两张图片的像素是否相等if self.is_pixel_equal(image,template,i,j):count += 1result = float(count)/(image.width*image.height)if result >threshold:print("匹配成功!!!")return Trueelse:return Falsedefdetect_image(self,image):# 遍历手绘验证码模板文件内的所有验证码图片for template_name in os.listdir(r"D:photo emplates"):print("正在匹配",template_name)# 打开验证码图片template = Image.open(r"D:photo emplates{}".format(template_name))if self.same_image(image,template):# 返回这张图片的顺序,如4—>3—>1—>2numbers = [int(number) for number in list(template_name.split(".")[0])]print("按照顺序进行拖动",numbers)return numbersdefmove(self,numbers):# 获得四个按点circles = self.browser.find_element_by_css_selector('.patt-wrap .patt-circ')dx = dy = 0# 由于是四个宫格,所以需要循环四次for index in range(4):circle = circles[numbers[index] - 1]# 如果是第一次循环if index == 0:# 点击第一个点action = ActionChains(self.browser).move_to_element_with_offset(circle,circle.size["width"]/2,circle.size['height']/2)action.click_and_hold().perform()else:# 小幅度移动次数times = 30# 拖动for i in range(times):ActionChains(self.browser).move_by_offset(dx/times,dy/times).perform()time.sleep(1/times)# 如果是最后一次循环if index == 3:# 松开鼠标ActionChains(self.browser).release().perform()else:# 计算下一次偏移dx = circles[numbers[index + 1] - 1].location['x'] - circle.location['x']dy = circles[numbers[index + 1] - 1].location['y'] - circle.location['y']defmain(self):# 调用打开模拟浏览器函数self.open()image = self.get_image("captcha.png") # 微博移动端的验证码图片numbers = self.detect_image(image)self.move(numbers)time.sleep(10)print('识别结束')if __name__ == '__main__':crack = CrackWeiboSlide()crack.main()
四、识别结果
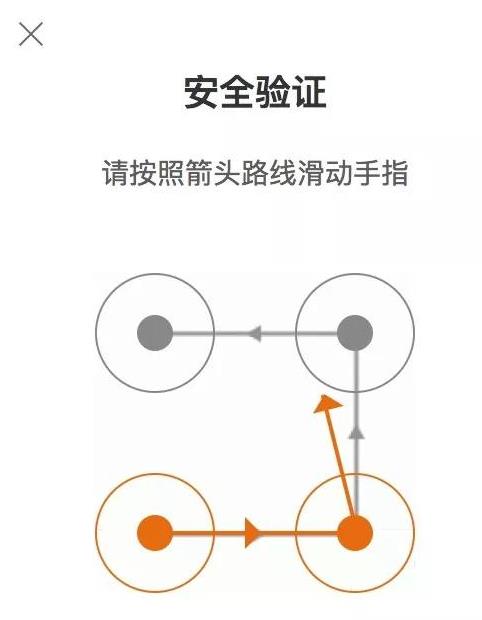
通过循环四次后绘出四条方向,最终得到效果图

- END -
文源网络,仅供学习之用,如有侵权,联系删除。
◆
◆
◆
以上是关于Python+scrapy爬虫:手绘验证码识别的主要内容,如果未能解决你的问题,请参考以下文章