CentOS7多网卡绑定之team
Posted ULinux
tags:
篇首语:本文由小常识网(cha138.com)小编为大家整理,主要介绍了CentOS7多网卡绑定之team相关的知识,希望对你有一定的参考价值。
本文以通过nmcli配置,以常用的activebakup为例。
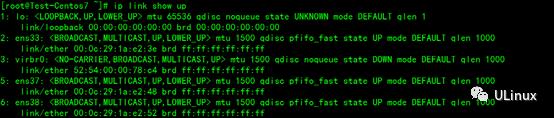
一、查看当前网卡
# ip -olink show up | awk -F': ' '{print $2}'
二、创建 team网络组
# nmcliconnection add type team con-name team-0 ifname team0 config'{"runner":{"name":"activebackup"}}'


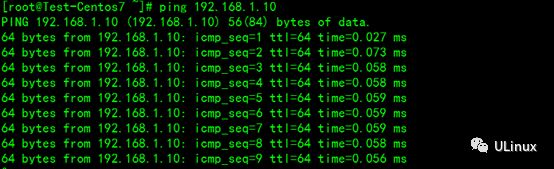
2.1 team配置IP
# nmcliconnection modify team-0 ipv4.addresses 192.168.1.10/24 ipv4.gateway192.168.1.1 ipv4.method manual
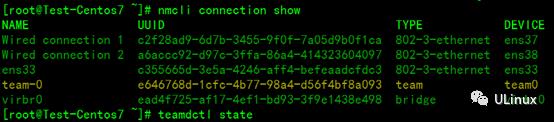
# nmcli connection show

说明:team0为刚才创建的设备,team为表示为网络组设备,其它表示两张网卡的配置被nmcli工具识别。
2.2 查看Teamguanli 方式
nmcli connection show team-0 | grep -A 4 '^ipv4.method'

2.3 查看配置文件是否自动生成
ls -l /etc/sysconfig/network-scripts/ifcfg-team0

2.4 将指定以太网网卡设备加入team0组成网路组
# nmcli connection add con-name team0-ens37type team-slave autoconnect no ifname ens37 master team-0
# nmcli connection add con-name team0-ens38type team-slave autoconnect no ifname ens38 master team-0

查看设备连接列表
nmcli connection show
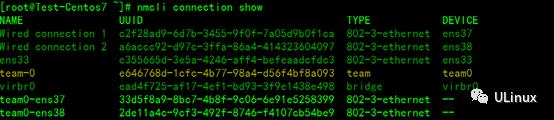
说明:这里发现好像ens37、ens38并未成功绑定到team0组中,这是因为,nmcli工具定义的机制,同一设备只能绑定在同一个配置中,也就是读取指定配置文件(ifcfg- ens37、ifcfg- ens38)中配置。因此这时,可以断开ens37、ens38原本的链接配置。
激活team0网络组成员
#断开原本的ens37链接
# nmcli devicedisconnect ens37
#启用team0-ens37网络组设备
# nmcli connectionup team0-ens37
#断开原本的ens38链接
# nmcli devicedisconnect ens38
#启用team0-ens38网络组设备
# nmcli connectionup team0-ens38
# nmcli connectionshow
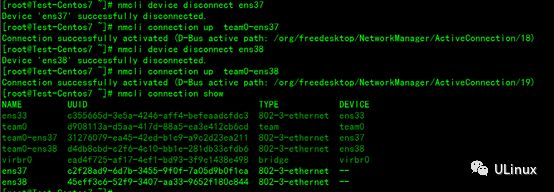
说明:此时ens37和ens38都已经本识别成了team0中的成员设备了,而以前的默认网卡配置以及与网卡失去了绑定关系。
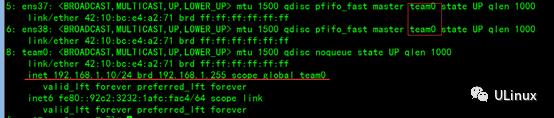

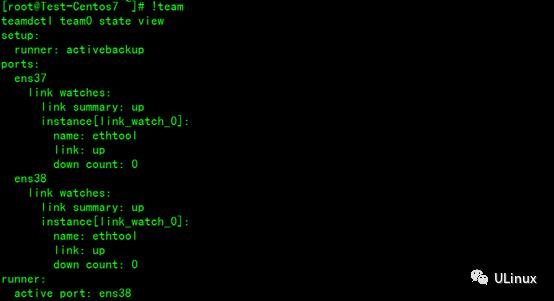
查看team状态:
# teamdctl team0 state
配置文件:
以上是关于CentOS7多网卡绑定之team的主要内容,如果未能解决你的问题,请参考以下文章