JDK源码分析-FutureTask
Posted WriteOnRead
tags:
篇首语:本文由小常识网(cha138.com)小编为大家整理,主要介绍了JDK源码分析-FutureTask相关的知识,希望对你有一定的参考价值。
概述
FutureTask 是一个可取消的、异步执行任务的类,它的继承结构如下:
它实现了 RunnableFuture 接口,而该接口又继承了 Runnable 接口和 Future 接口,因此 FutureTask 也具有这两个接口所定义的特征。FutureTask 的主要功能:
1. 异步执行任务,并且任务只执行一次;
2. 监控任务是否完成、取消任务;
3. 获取任务执行结果。
下面分析其代码实现。
代码分析
分析 FutureTask 的代码之前,先看下它实现的接口。RunnableFuture 接口定义如下:
public interface RunnableFuture<V> extends Runnable, Future<V> {/*** Sets this Future to the result of its computation* unless it has been cancelled.*/void run();}
RunnableFuture 接口继承了 Runnable 接口和 Future 接口,而 Runnable 接口只有一个 run 方法,这里不再赘述。下面分析 Future 接口。
Future 接口
Future 接口方法定义如下:
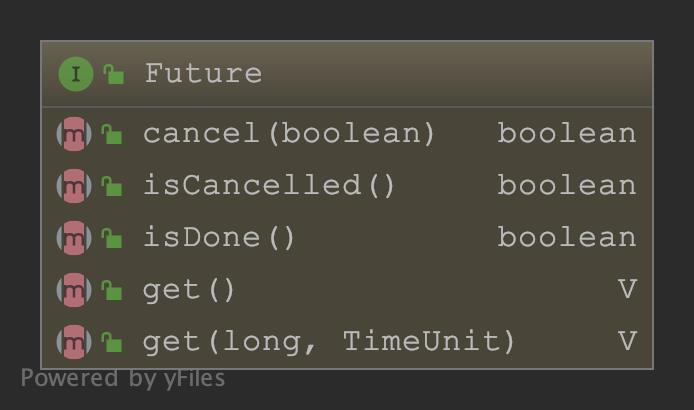
主要方法分析:
/** 尝试取消执行任务。若任务已完成、已取消,或者由于其他某些原因无法取消,则尝试失败。* 若成功,且调用该方法时任务未启动,则此任务不会再运行;* 若任务已启动,则根据参数 mayInterruptIfRunning 决定是否中断该任务。*/boolean cancel(boolean mayInterruptIfRunning);// 若该任务正常结束之前被取消,则返回 trueboolean isCancelled();/** 若该任务已完成,则返回 true* 这里的“完成”,可能是由于正常终止、异常,或者取消,这些情况都返回 true*/boolean isDone();// 等待计算完成(如果需要),然后获取结果V get() throws InterruptedException, ExecutionException;// 如果需要,最多等待计算完成的给定时间,然后检索其结果(如果可用)// PS: 该方法与前者的区别在于加了超时等待V get(long timeout, TimeUnit unit)throws InterruptedException, ExecutionException, TimeoutException;
FutureTask 代码分析
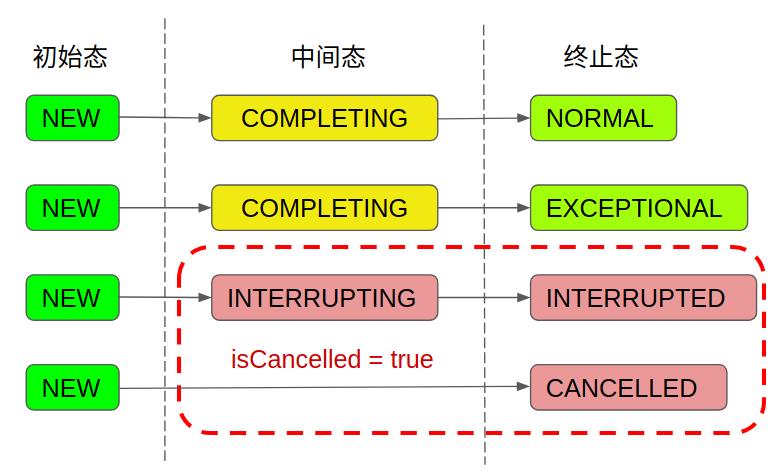
任务的状态变量:
// 任务的状态private volatile int state;private static final int NEW = 0;private static final int COMPLETING = 1;private static final int NORMAL = 2;private static final int EXCEPTIONAL = 3;private static final int CANCELLED = 4;private static final int INTERRUPTING = 5;private static final int INTERRUPTED = 6;
其中 state 表示任务的状态,总共有 7 种,它们之间的状态转换可能有以下 4 种情况:
1. 任务执行正常:NEW -> COMPLETING -> NORMAL
2. 任务执行异常:NEW -> COMPLETING -> EXCEPTIONAL
3. 任务取消:NEW -> CANCELLED
4. 任务中断:NEW -> INTERRUPTING -> INTERRUPTED
示意图:
在分析其他成员变量之前,先看一个内部嵌套类 WaitNode:
static final class WaitNode {volatile Thread thread;volatile WaitNode next;WaitNode() { thread = Thread.currentThread(); }}
代码比较简单,就是对 Thread 的封装,可以理解为单链表的节点。
其他成员变量:
/** The underlying callable; nulled out after running */// 提交的任务private Callable<V> callable;/** The result to return or exception to throw from get() */// get() 方法返回的结果(或者异常)private Object outcome; // non-volatile, protected by state reads/writes/** The thread running the callable; CASed during run() */// 执行任务的线程private volatile Thread runner;/** Treiber stack of waiting threads */// 等待线程的 Treiber 栈private volatile WaitNode waiters;
其中 waiters 是一个 Treiber 栈,简单来说,就是由单链表组成的线程安全的栈,如图所示:
构造器
// 创建一个 FutureTask 对象,在运行时将执行给定的 Callablepublic FutureTask(Callable<V> callable) {if (callable == null)throw new NullPointerException();this.callable = callable;this.state = NEW; // ensure visibility of callable}// 创建一个 FutureTask,在运行时执行给定的 Runnable,// 并安排 get 将在成功完成时返回给定的结果public FutureTask(Runnable runnable, V result) {this.callable = Executors.callable(runnable, result);this.state = NEW; // ensure visibility of callable}
这两个构造器分别传入 Callable 对象和 Runnable 对象(适配为 Callable 对象),然后将其状态初始化为 NEW。
run: 执行任务
public void run() {// 使用 CAS 进行并发控制,防止任务被执行多次if (state != NEW ||!UNSAFE.compareAndSwapObject(this, runnerOffset,null, Thread.currentThread()))return;try {Callable<V> c = callable;if (c != null && state == NEW) {V result;boolean ran;try {// 调用 Callable 的 call 方法执行任务result = c.call();ran = true;} catch (Throwable ex) {// 异常处理result = null;ran = false;setException(ex);}// 正常处理if (ran)set(result);}} finally {// runner must be non-null until state is settled to// prevent concurrent calls to run()runner = null;// state must be re-read after nulling runner to prevent// leaked interruptsint s = state;// 线程被中断if (s >= INTERRUPTING)handlePossibleCancellationInterrupt(s);}}
set & setException: 更新状态值,唤醒栈中等待的线程
protected void set(V v) {// CAS 将 state 修改为 COMPLETING,该状态是一个中间状态if (UNSAFE.compareAndSwapInt(this, stateOffset, NEW, COMPLETING)) {outcome = v; // 输出结果赋值// 将 state 更新为 NORMALUNSAFE.putOrderedInt(this, stateOffset, NORMAL); // final statefinishCompletion();}}protected void setException(Throwable t) {// CAS 将 state 修改为 COMPLETING,该状态是一个中间状态if (UNSAFE.compareAndSwapInt(this, stateOffset, NEW, COMPLETING)) {outcome = t; // 输出结果赋值// 将 state 更新为 EXCEPTIONALUNSAFE.putOrderedInt(this, stateOffset, EXCEPTIONAL); // final statefinishCompletion();}}
这两个方法的操作类似,都是更新 state 的值并给返回结果 outcome 赋值,然后执行结束操作 finishCompletion 方法:
private void finishCompletion() {// assert state > COMPLETING;for (WaitNode q; (q = waiters) != null;) {// 将 waiters 置空if (UNSAFE.compareAndSwapObject(this, waitersOffset, q, null)) {for (;;) {Thread t = q.thread;if (t != null) {q.thread = null;// 唤醒 WaitNode 封装的线程LockSupport.unpark(t);}WaitNode next = q.next;if (next == null)break;q.next = null; // unlink to help gcq = next;}break;}}done();callable = null; // to reduce footprint}
finishCompletion 方法的作用就是唤醒栈中所有等待的线程,并清空栈。其中的 done 方法实现为空:
protected void done() { }子类可以重写该方法实现回调功能。
get: 获取执行结果
// 获取执行结果(阻塞式)public V get() throws InterruptedException, ExecutionException {int s = state;// 若任务未执行完,则等待它执行完成if (s <= COMPLETING)// 任务未完成s = awaitDone(false, 0L);// 封装返回结果return report(s);}// 获取执行结果(有超时等待)public V get(long timeout, TimeUnit unit)throws InterruptedException, ExecutionException, TimeoutException {if (unit == null)throw new NullPointerException();int s = state;if (s <= COMPLETING &&(s = awaitDone(true, unit.toNanos(timeout))) <= COMPLETING)throw new TimeoutException();return report(s);}
这两个方法都是获取任务执行的结果,原理也基本一样,区别在于后者有超时等待(超时会抛出 TimeoutException 异常)。
awaitDone: 等待任务执行完成
// Awaits completion or aborts on interrupt or timeout.private int awaitDone(boolean timed, long nanos)throws InterruptedException {final long deadline = timed ? System.nanoTime() + nanos : 0L;WaitNode q = null;boolean queued = false;for (;;) {// 响应线程中断if (Thread.interrupted()) {removeWaiter(q);throw new InterruptedException();}int s = state;// s > COMPLETING 表示任务已执行完成(包括正常执行、异常等状态)// 则返回对应的状态值if (s > COMPLETING) {if (q != null)q.thread = null;return s;}// s == COMPLETING 是一个中间状态,表示任务尚未完成// 这里让出 CPU 时间片else if (s == COMPLETING) // cannot time out yetThread.yield();// 执行到这里,表示 s == NEW,将当前线程封装为一个 WaitNode 节点else if (q == null)q = new WaitNode();// 这里表示 q 并未入栈,CAS 方式将当 WaitNode 入栈else if (!queued)queued = UNSAFE.compareAndSwapObject(this, waitersOffset,q.next = waiters, q);// 有超时的情况else if (timed) {nanos = deadline - System.nanoTime();if (nanos <= 0L) {removeWaiter(q);return state;}LockSupport.parkNanos(this, nanos);}// 将当前线程挂起elseLockSupport.park(this);}}
该方法的主要判断步骤如下:
1. 若线程被中断,则响应中断;
2. 若任务已完成,则返回状态值;
3. 若任务正在执行,则让出 CPU 时间片;
4. 若任务未执行,则将当前线程封装为 WaitNode 节点;
5. 若 WaitNode 未入栈,则执行入栈;
6. 若已入栈,则将线程挂起。
以上步骤是循环执行的,其实该方法的主要作用就是:当任务执行完成时,返回状态值;否则将当前线程挂起。
removeWaiter: 移除栈中的节点
private void removeWaiter(WaitNode node) {if (node != null) {node.thread = null;retry:for (;;) { // restart on removeWaiter racefor (WaitNode pred = null, q = waiters, s; q != null; q = s) {s = q.next;if (q.thread != null)pred = q;else if (pred != null) {pred.next = s;if (pred.thread == null) // check for racecontinue retry;}else if (!UNSAFE.compareAndSwapObject(this, waitersOffset, q, s))continue retry;}break;}}}
report 方法:封装返回结果
private V report(int s) throws ExecutionException {Object x = outcome; // 输出结果赋值// 正常结束if (s == NORMAL)return (V)x;// 取消if (s >= CANCELLED)throw new CancellationException();// 执行异常throw new ExecutionException((Throwable)x);}
该方法就是对返回结果的包装,无论是正常结束或是抛出异常。
cancel: 取消任务
public boolean cancel(boolean mayInterruptIfRunning) {if (!(state == NEW &&UNSAFE.compareAndSwapInt(this, stateOffset, NEW,mayInterruptIfRunning ? INTERRUPTING : CANCELLED)))return false;try { // in case call to interrupt throws exceptionif (mayInterruptIfRunning) {try {// 若允许中断,则尝试中断线程Thread t = runner;if (t != null)t.interrupt();} finally { // final stateUNSAFE.putOrderedInt(this, stateOffset, INTERRUPTED);}}} finally {finishCompletion();}return true;}
场景举例
FutureTask 适合多线程执行一些耗时的操作,然后获取执行结果。下面结合线程池简单分析其用法,示例代码如下(仅供参考):
public class FutureTaskTest {public static void main(String[] args) throws Exception {ExecutorService executorService = Executors.newFixedThreadPool(5);List<FutureTask<Integer>> taskList = new ArrayList<>();for (int i = 0; i < 10; i++) {int finalI = i;FutureTask<Integer> futureTask = new FutureTask<>(() -> {// 模拟耗时任务TimeUnit.SECONDS.sleep(finalI * 2);System.out.println(Thread.currentThread().getName() + " 计算中……");return finalI * finalI;});taskList.add(futureTask);executorService.submit(futureTask); // 提交到线程池}System.out.println("任务全部提交,主线程做其他操作");// 获取执行结果for (FutureTask<Integer> futureTask : taskList) {Integer result = futureTask.get();System.out.println("result-->" + result);}// 关闭线程池executorService.shutdown();}}
小结
FutureTask 是一个封装任务(Runnable 或 Callable)的类,可以异步执行任务,并获取执行结果,适用于耗时操作场景。
参考链接:
http://www.hchstudio.cn/article/2017/2b8f/
https://segmentfault.com/a/1190000016572591
https://www.jianshu.com/p/43dab9b7c25b
以上是关于JDK源码分析-FutureTask的主要内容,如果未能解决你的问题,请参考以下文章
JDK1.8 FutureTask源码解读(Future模式)