Nacos系列第三篇- Nacos之Spring Boot Config
Posted 毕来生
tags:
篇首语:本文由小常识网(cha138.com)小编为大家整理,主要介绍了Nacos系列第三篇- Nacos之Spring Boot Config相关的知识,希望对你有一定的参考价值。
你的关注意义重大!
微信:878799579
前言
个人比较看好Spring Cloud Alibaba家族。此系列以Nacos为主题,从Spring、Spring boot、Spring Cloud多个方面逐步进行演示,源码解读。目前来看官方文档还有待完善。网络上除了官网外缺少Nacos系列文章。都是零零散散的知识点。如此系列文章哪里写的有不周全,错误之处。欢迎大家指正。谢谢。
第一篇 :
第二篇 : 【Nacos系列第二篇】-Nacos之Spring Boot Discovery。
因大家在工作中逐步以Spring boot、Spring Cloud为主进行开发。我们接下来会以这两个为核心演示详解。
Nacos架构图
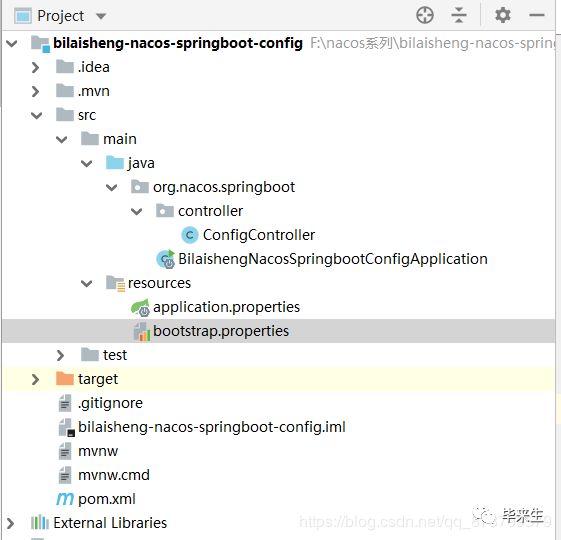
工程结构
上面说了那么多,现在先来看一下我们的Spring boot Nacos config工程结构(Windows下演示)
Spring Boot版本:2.1.2.RELEASE

准备工作
1、启动Nacos(Demo演示环境为Windows下)
2、访问 http://127.0.0.1:8848/nacos/index.html#/configurationManagement?dataId=&group=&appName=&namespace= 进入Nacos配置管理页面
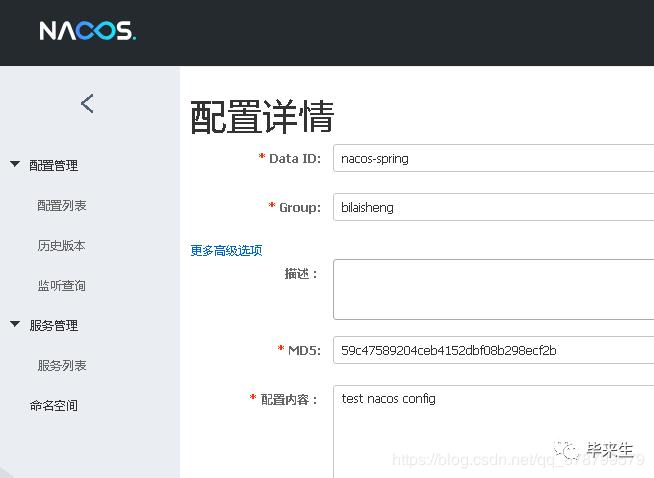
3、点击左侧配置管理->配置列表(右侧有一个加号。添加对应信息),如下图


以上就是我们要做的准备工作啦。
获取ConfigService方法
1、通过@NacosInjected注解获取
  @NacosInjected


  ConfigService configService;
2、通过NacosFactory传入Properties获取
ConfigService configService = NacosFactory.createConfigService(properties);
3、通过NacosFactory传入ServerAddr获取
ConfigService configService = NacosFactory.createConfigService(serverAddr);
以上方式均是为反射获取,NacosFactory创建ConfigService实际上也是调用 ConfigFactory.createConfigService实现的
      /**


       * Create config


       *


       * @param properties


       *            init param


       * @return config


       * @throws NacosException


       *             Exception


       */


      public static ConfigService createConfigService(Properties properties) throws NacosException {


          return ConfigFactory.createConfigService(properties);


      }
附上创建ConfigService源码
      /**


       * Create Config


       *


       * @param ServerAddr


       *            serverlist


       * @return Config


       * @throws NacosException


       *             Exception


       */


      public static ConfigService createConfigService(String serverAddr) throws NacosException {


          Properties properties = new Properties();


          properties.put(PropertyKeyConst.SERVER_ADDR, serverAddr);


          try {


              Class<?> driverImplClass = Class.forName("com.alibaba.nacos.client.config.NacosConfigService");


              Constructor constructor = driverImplClass.getConstructor(Properties.class);


              ConfigService vendorImpl = (ConfigService) constructor.newInstance(properties);


              return vendorImpl;


          } catch (Throwable e) {


              throw new NacosException(-400, e.getMessage());


          }


      }
代码演示
附上与普通创建的Spring boot工程不同点(以下演示为通过配置管理代码示例中相同获取方式)
ConfigController(新增)
  package org.nacos.springboot.controller;


  import com.alibaba.nacos.api.NacosFactory;


  import com.alibaba.nacos.api.PropertyKeyConst;


  import com.alibaba.nacos.api.config.ConfigService;


  import com.alibaba.nacos.api.config.listener.Listener;


  import com.alibaba.nacos.api.exception.NacosException;


  import org.springframework.stereotype.Controller;


  import org.springframework.web.bind.annotation.RequestMapping;


  import org.springframework.web.bind.annotation.ResponseBody;


  import java.util.HashMap;


  import java.util.Map;


  import java.util.Properties;


  import java.util.concurrent.Executor;


  /**


   * @author bilaisheng


   * @wechat: 878799579


   * @date 2019/01/15 19:34


   * @description  Test Nacos Config


   */


  @Controller


  @RequestMapping("config")


  public class ConfigController {


      /**


       * @author : bilaisheng


       * @wechat: 878799579


       * @date : 2019/01/15 19:45


       * @return Map


       * @throws NacosException


       * @throws InterruptedException


       */


      @ResponseBody


      @RequestMapping("/get")


      public Map getConfig() throws NacosException, InterruptedException {


          // 用以演示用,页面返回数据展示


          Map map = new HashMap();


          String serverAddr = "localhost";


          String dataId = "nacos-spring";


          String group = "bilaisheng";


          Properties properties = new Properties();


          properties.put(PropertyKeyConst.SERVER_ADDR, serverAddr);


          // 创建ConfigService,此处通过Properties方式进行创建,另一种演示serviceaddr获取configService.


          // 原理上都是通过 ConfigFactory.createConfigService()去进行创建


          ConfigService configService = NacosFactory.createConfigService(properties);


          // ConfigService configService = NacosFactory.createConfigService(serverAddr);


          String content = configService.getConfig(dataId, group, 5000);


          System.out.println("config : " + content);


          map.put("content", content);


          // 添加Listener,用以演示receive获取数据结果


          configService.addListener(dataId, group, new Listener() {


              @Override


              public void receiveConfigInfo(String configInfo) {


                  System.out.println("recieve : " + configInfo);


              }


              @Override


              public Executor getExecutor() {


                  return null;


              }


          });


          // 推送config。将原有dataid中信息替换。


          boolean isPublishOk = configService.publishConfig(dataId, group, "publish config content");


          System.out.println("isPublishOk : " + isPublishOk);


          map.put("isPublishOk", isPublishOk);


          Thread.sleep(3000);


          content = configService.getConfig(dataId, group, 5000);


          System.out.println("Thread sleep 3000ms : " + content);


          map.put("Thread sleep 3000ms : ", content);


          // 删除指定dataid , group 配置


          boolean isRemoveOk = configService.removeConfig(dataId, group);


          System.out.println("remove " + dataId + "config is " + isRemoveOk);


          Thread.sleep(3000);


          content = configService.getConfig(dataId, group, 5000);


          System.out.println("content after 5000ms "+content);


          Thread.sleep(3000);


          return map;


      }


  }
application.properties
nacos.config.server-addr=127.0.0.1:8848
pom.xml
  <dependency>


      <groupId>org.springframework.boot</groupId>


      <artifactId>spring-boot-starter-web</artifactId>


  </dependency>


  <dependency>


      <groupId>com.alibaba.boot</groupId>


      <artifactId>nacos-config-spring-boot-starter</artifactId>


      <version>0.2.1</version>


  </dependency>
上述内容就是我们在创建好Spring Boot工程结构后增加/调整内容。
演示步骤
1、启动 BilaishengNacosSpringbootConfigApplication
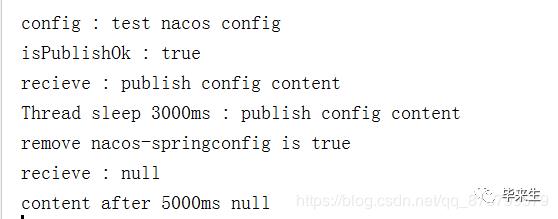
2、调用 http://localhost:8080/config/get,此时控制台出现

页面出现
以上就是我们Spring Boot Config的一个Demo例子
喜欢就关注我吧
以上是关于Nacos系列第三篇- Nacos之Spring Boot Config的主要内容,如果未能解决你的问题,请参考以下文章