Nacos_04|nacos-名称空间切换
Posted 接引之书
tags:
篇首语:本文由小常识网(cha138.com)小编为大家整理,主要介绍了Nacos_04|nacos-名称空间切换相关的知识,希望对你有一定的参考价值。
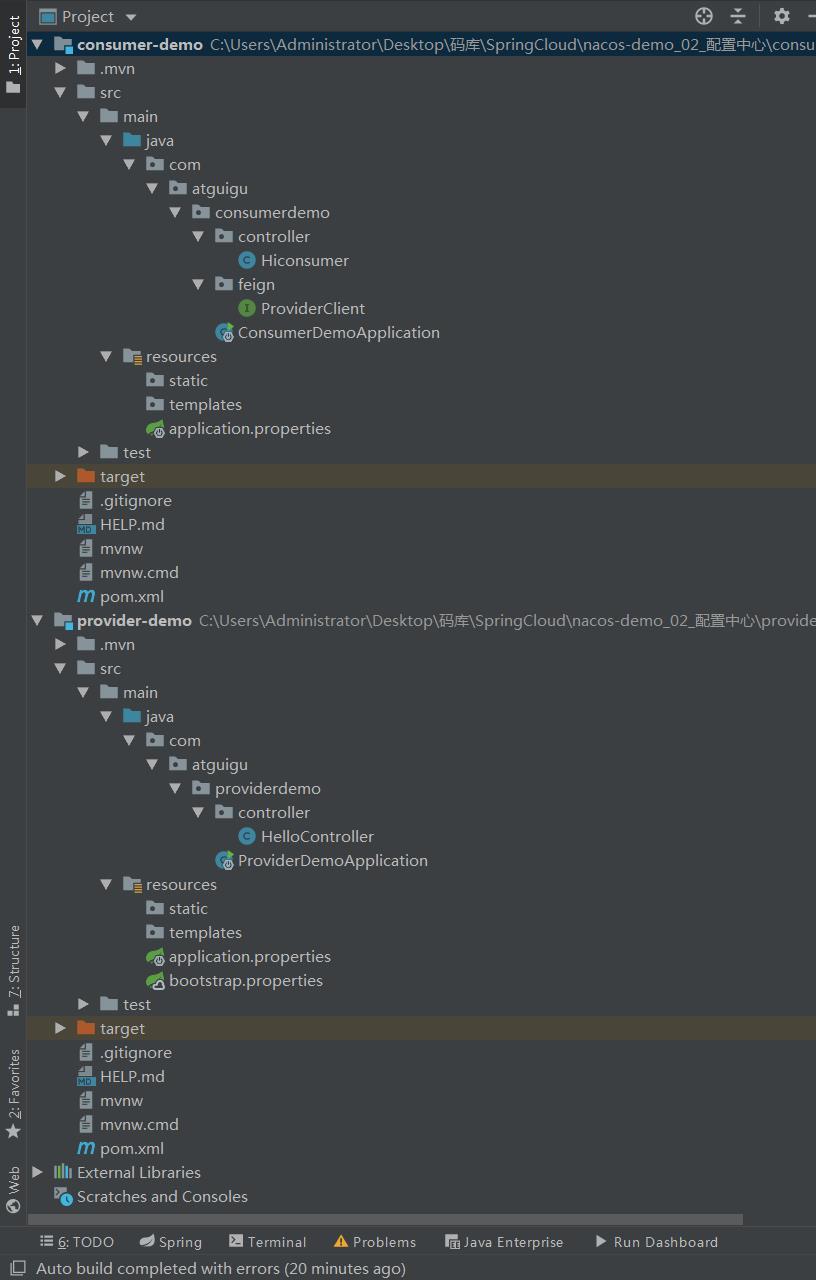
Maven3.6
Tomcat8.5

消费者


    package com.atguigu.consumerdemo.controller;

    import com.atguigu.consumerdemo.feign.ProviderClient;
    import org.springframework.beans.factory.annotation.Autowired;
    import org.springframework.web.bind.annotation.GetMapping;
    import org.springframework.web.bind.annotation.RestController;

    @RestController
    public class Hiconsumer {

        @Autowired
        private ProviderClient providerClient;

        @GetMapping("/hi")
        public String hi(){
            String hello = this.providerClient.hello();
            return "hi consumer,========="+hello;
        }
    }

    package com.atguigu.consumerdemo.feign;

    import org.springframework.cloud.openfeign.FeignClient;
    import org.springframework.web.bind.annotation.GetMapping;


    /**
     * OpenFeign用法:
     * 1.这是方法是一个接口;
     * 2.注解括号里面的名字是提供者的服务名;
     * 3.想调用哪个方法,就从提供者里面复制过来就行,不用复制实现;
     * 4.然后在自己(消费者)的方法调用实现;
     */
    @FeignClient("service-provider")
    public interface ProviderClient {

        @GetMapping("/hello")
        public String hello();
    }

    package com.atguigu.consumerdemo;

    import org.springframework.boot.SpringApplication;
    import org.springframework.boot.autoconfigure.SpringBootApplication;
    import org.springframework.cloud.openfeign.EnableFeignClients;

    @SpringBootApplication
    //@EnableDiscoveryClient      这个注解,在消费者这边是可以省略的
    @EnableFeignClients
    public class ConsumerDemoApplication {

        public static void main(String[] args) {
            SpringApplication.run(ConsumerDemoApplication.class, args);
        }

    }


    server.port=8080
    spring.application.name=service-consumer

    ### Nacos注册中心端口号
    spring.cloud.nacos.discovery.server-addr=127.0.0.1:8848

    <?xml version="1.0" encoding="UTF-8"?>
    <project xmlns="http://maven.apache.org/POM/4.0.0" xmlns:xsi="http://www.w3.org/2001/XMLSchema-instance"
             xsi:schemaLocation="http://maven.apache.org/POM/4.0.0 https://maven.apache.org/xsd/maven-4.0.0.xsd">
        <modelVersion>4.0.0</modelVersion>
        <parent>
            <groupId>org.springframework.boot</groupId>
            <artifactId>spring-boot-starter-parent</artifactId>
            <version>2.2.6.RELEASE</version>
            <relativePath/> <!-- lookup parent from repository -->
        </parent>
        <groupId>com.atguigu</groupId>
        <artifactId>consumer-demo</artifactId>
        <version>0.0.1-SNAPSHOT</version>
        <name>consumer-demo</name>
        <description>Demo project for Spring Boot</description>

        <properties>
            <java.version>1.8</java.version>
        </properties>

        <dependencies>
            <dependency>
                <groupId>org.springframework.boot</groupId>
                <artifactId>spring-boot-starter-web</artifactId>
            </dependency>

            <!--nacos服务中心-->
            <dependency>
                <groupId>org.springframework.cloud</groupId>
                <artifactId>spring-cloud-starter-alibaba-nacos-discovery</artifactId>
                <version>0.2.2.RELEASE</version>
            </dependency>

            <!--openfeign,因为它是原生的,在springcloud里面已经有版本号,(注:这是消费者引入)-->
            <dependency>
                <groupId>org.springframework.cloud</groupId>
                <artifactId>spring-cloud-starter-openfeign</artifactId>
            </dependency>
            <!--热部署-->
            <dependency>
                <groupId>org.springframework.boot</groupId>
                <artifactId>spring-boot-devtools</artifactId>
                <scope>runtime</scope>
                <optional>true</optional>
            </dependency>
            <dependency>
                <groupId>org.springframework.boot</groupId>
                <artifactId>spring-boot-starter-test</artifactId>
                <scope>test</scope>
                <exclusions>
                    <exclusion>
                        <groupId>org.junit.vintage</groupId>
                        <artifactId>junit-vintage-engine</artifactId>
                    </exclusion>
                </exclusions>
            </dependency>
        </dependencies>
        <!-- SpringCloud的依赖 -->
        <dependencyManagement>
            <dependencies>
                <!--spring cloud Hoxton.SR1-->
                <dependency>
                    <groupId>org.springframework.cloud</groupId>
                    <artifactId>spring-cloud-dependencies</artifactId>
                    <version>Hoxton.SR1</version>
                    <type>pom</type>
                    <scope>import</scope>
                </dependency>
            </dependencies>
        </dependencyManagement>

        <build>
            <plugins>
                <plugin>
                    <groupId>org.springframework.boot</groupId>
                    <artifactId>spring-boot-maven-plugin</artifactId>
                </plugin>
            </plugins>
        </build>

    </project>

提供者


    package com.atguigu.providerdemo.controller;

    import org.springframework.beans.factory.annotation.Value;
    import org.springframework.web.bind.annotation.GetMapping;
    import org.springframework.web.bind.annotation.RestController;

    @RestController
    public class HelloController {

        @Value("${myName}")
        private String myName;

        @GetMapping("/hello")
        public String hello(){
            return "hello"+myName;
        }
    }

    package com.atguigu.providerdemo;

    import org.springframework.boot.SpringApplication;
    import org.springframework.boot.autoconfigure.SpringBootApplication;
    import org.springframework.cloud.client.discovery.EnableDiscoveryClient;


    @SpringBootApplication
    @EnableDiscoveryClient
    public class ProviderDemoApplication {

        public static void main(String[] args) {
            SpringApplication.run(ProviderDemoApplication.class, args);
        }

    }


    server.port=8070

    ### Nacos注册中心端口号
    spring.cloud.nacos.discovery.server-addr=127.0.0.1:8848

    ### bootstrap.properties这配置文件被读取的优先级比application.properties要高
    spring.cloud.nacos.config.server-addr=127.0.0.1:8848

    ### 如果是设置配置中心,那么这行配置就不能放在application.properties里面,放在这里,这是要先读取,才能被Data Id扫到
    spring.application.name=service-provider


    # .1
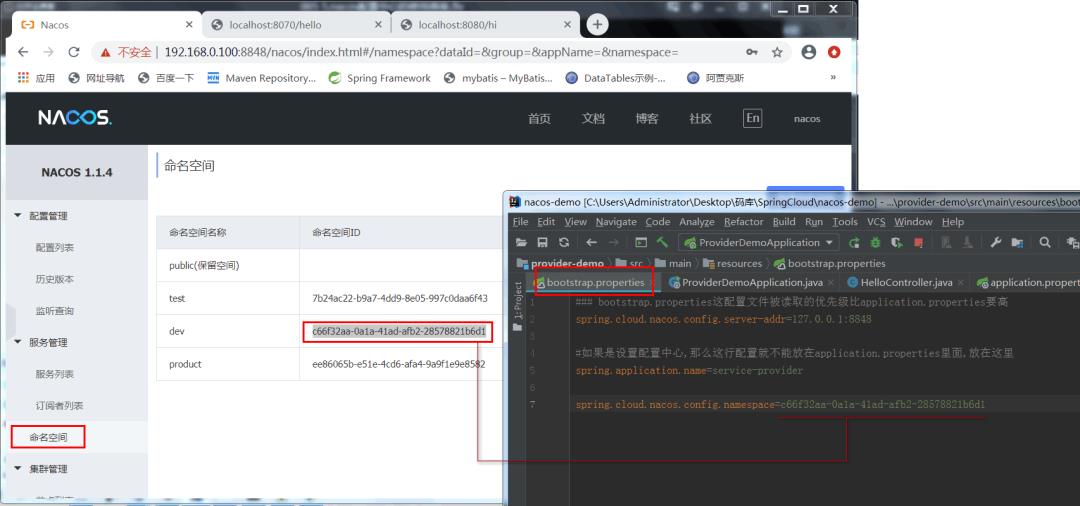
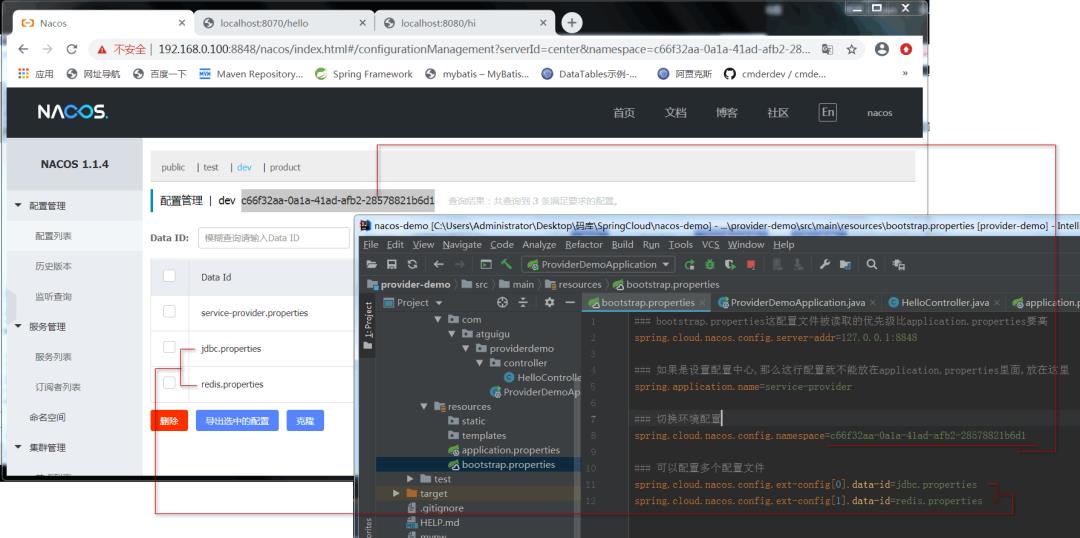
    ### 切换环境配置
    spring.cloud.nacos.config.namespace=c66f32aa-0a1a-41ad-afb2-28578821b6d1

    # .2
    ### 可以配置多个环境配置
    # 开启动态刷新配置,配置下面这行代码之后,就可以不用重启服务器也能实现数据刷新;
    spring.cloud.nacos.config.ext-config[0].refresh=true
    spring.cloud.nacos.config.ext-config[0].data-id=jdbc.properties

    spring.cloud.nacos.config.ext-config[1].refresh=true
    spring.cloud.nacos.config.ext-config[1].data-id=redis.properties

    <?xml version="1.0" encoding="UTF-8"?>
    <project xmlns="http://maven.apache.org/POM/4.0.0" xmlns:xsi="http://www.w3.org/2001/XMLSchema-instance"
             xsi:schemaLocation="http://maven.apache.org/POM/4.0.0 https://maven.apache.org/xsd/maven-4.0.0.xsd">
        <modelVersion>4.0.0</modelVersion>

        <parent>
            <groupId>org.springframework.boot</groupId>
            <artifactId>spring-boot-starter-parent</artifactId>
            <version>2.2.6.RELEASE</version>
            <relativePath/> <!-- 如果要用2.2.x版本的springboot,那么SpringCloud就要用H版本,否则可能会有版本问题出现 -->
        </parent>
        <groupId>com.atguigu</groupId>
        <artifactId>provider-demo</artifactId>
        <version>0.0.1-SNAPSHOT</version>
        <name>provider-demo</name>
        <description>Demo project for Spring Boot</description>

        <properties>
            <java.version>1.8</java.version>
        </properties>

        <dependencies>
            <dependency>
                <groupId>org.springframework.boot</groupId>
                <artifactId>spring-boot-starter-web</artifactId>
            </dependency>

            <!--
            nacos服务中心,
            注意:版本 0.2.x.RELEASE 对应的是 Spring Boot 2.x 版本,版本 0.1.x.RELEASE 对应的是 Spring Boot 1.x 版本。
            -->
            <dependency>
                <groupId>org.springframework.cloud</groupId>
                <artifactId>spring-cloud-starter-alibaba-nacos-discovery</artifactId>
                <version>0.2.2.RELEASE</version>
            </dependency>
            <!--热部署-->
            <dependency>
                <groupId>org.springframework.boot</groupId>
                <artifactId>spring-boot-devtools</artifactId>
                <scope>runtime</scope>
                <optional>true</optional>
            </dependency>
            <dependency>
                <groupId>org.springframework.boot</groupId>
                <artifactId>spring-boot-starter-test</artifactId>
                <scope>test</scope>
                <exclusions>
                    <exclusion>
                        <groupId>org.junit.vintage</groupId>
                        <artifactId>junit-vintage-engine</artifactId>
                    </exclusion>
                </exclusions>
            </dependency>
            <dependency>
                <groupId>org.springframework.cloud</groupId>
                <artifactId>spring-cloud-commons</artifactId>
                <version>2.2.1.RELEASE</version>
                <scope>compile</scope>
            </dependency>
        </dependencies>
        <!-- SpringCloud的依赖 -->
        <dependencyManagement>
            <dependencies>
                <!--spring cloud Hoxton.SR1-->
                <dependency>
                    <groupId>org.springframework.cloud</groupId>
                    <artifactId>spring-cloud-dependencies</artifactId>
                    <version>Hoxton.SR1</version>
                    <type>pom</type>
                    <scope>import</scope>
                </dependency>
            </dependencies>
        </dependencyManagement>

        <build>
            <plugins>
                <plugin>
                    <groupId>org.springframework.boot</groupId>
                    <artifactId>spring-boot-maven-plugin</artifactId>
                </plugin>
            </plugins>
        </build>

    </project>
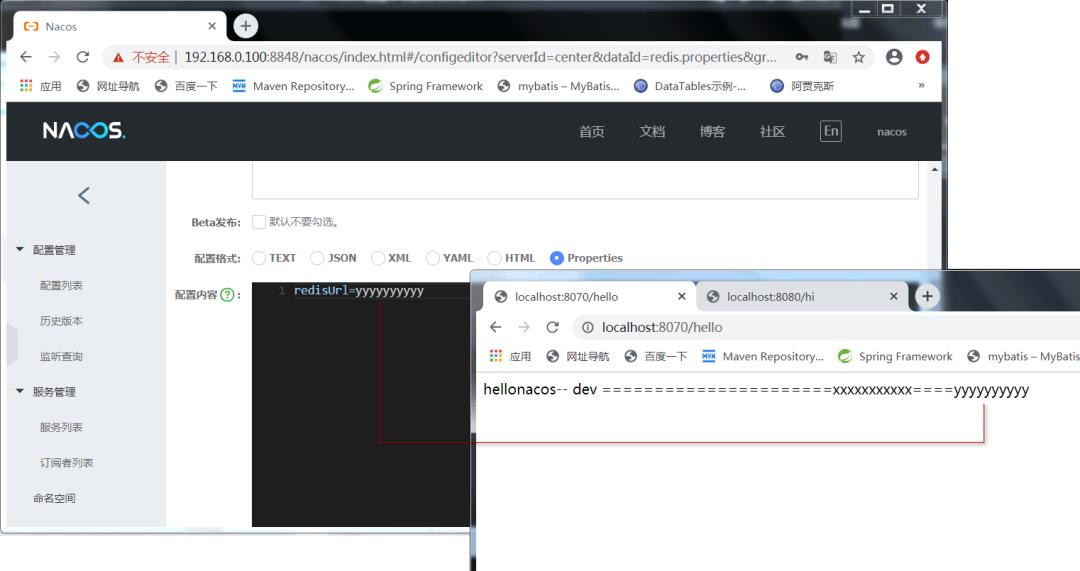
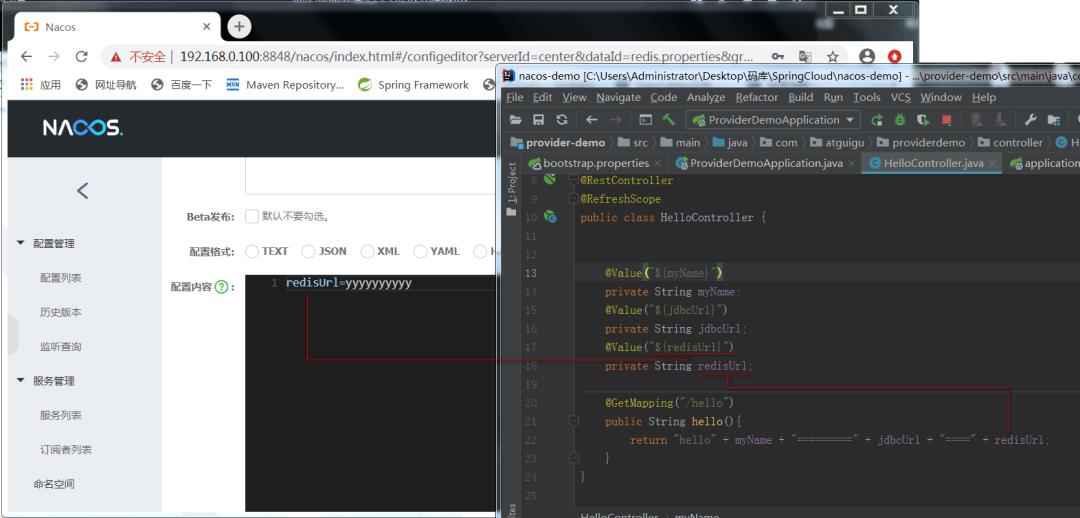
上下滑动,可查看更多▲
目录大纲 Directory outline
以上是关于Nacos_04|nacos-名称空间切换的主要内容,如果未能解决你的问题,请参考以下文章
05 nacos standalone 模式下 直接在数据库增加了一份 名称空间 + 配置, 客户端获取不到配置