Redis+Tomcat+Nginx集群实现Session共享,Tomcat Session共享
Posted Java知音
tags:
篇首语:本文由小常识网(cha138.com)小编为大家整理,主要介绍了Redis+Tomcat+Nginx集群实现Session共享,Tomcat Session共享相关的知识,希望对你有一定的参考价值。
链接:www.cnblogs.com/fanshuyao
一、Session共享使用tomcat-cluster-redis-session-manager插件实现
该插件支持Tomcat7、Tomcat8、Tomcat9
或者直接在附件中下载(版本为2.0.2,2017-11-27日前最新版本)
http://dl.iteye.com/topics/download/d9fffd9d-84dd-385b-b10e-6376eaf0c815
这里有是一个只支持Tomcat7的,不支持tomcat8,暂时不见新的维护:
https://github.com/jcoleman/tomcat-redis-session-manager
二、tomcat-cluster-redis-session-manager详解
1、解压后的文件如下:
conf目录下有一个redis-data-cache.properties :
Redis的配置文件
#-- Redis data-cache configuration

#- redis hosts ex: 127.0.0.1:6379, 127.0.0.2:6379, 127.0.0.2:6380, ....
redis.hosts=127.0.0.1:6379

#- redis password (for stand-alone mode)
#redis.password=

#- set true to enable redis cluster mode
redis.cluster.enabled=false

#- redis database (default 0)
#redis.database=0

#- redis connection timeout (default 2000)
#redis.timeout=2000
ib目录下有4个jar包,如下:
commons-logging-1.2.jar
commons-pool2-2.4.2.jar
jedis-2.9.0.jar
tomcat-cluster-redis-session-manager-2.0.1.jar
三、使用方法:
压缩文件中有使用方法,见readMe.txt 文件:
第一步:
1. Move the downloaded jars to tomcat/lib directory
        * tomcat/lib/
就是把lib目录下的Jar包全复制到tomcat/lib目录下
(一般来说tomcat是集群,至少有2个tomcat,所以先配置好一个tomcat,复制完文件后,再将tomcat文件重新复制一份,这样省事,但需要修改tomcat相应的端口)
第二步:
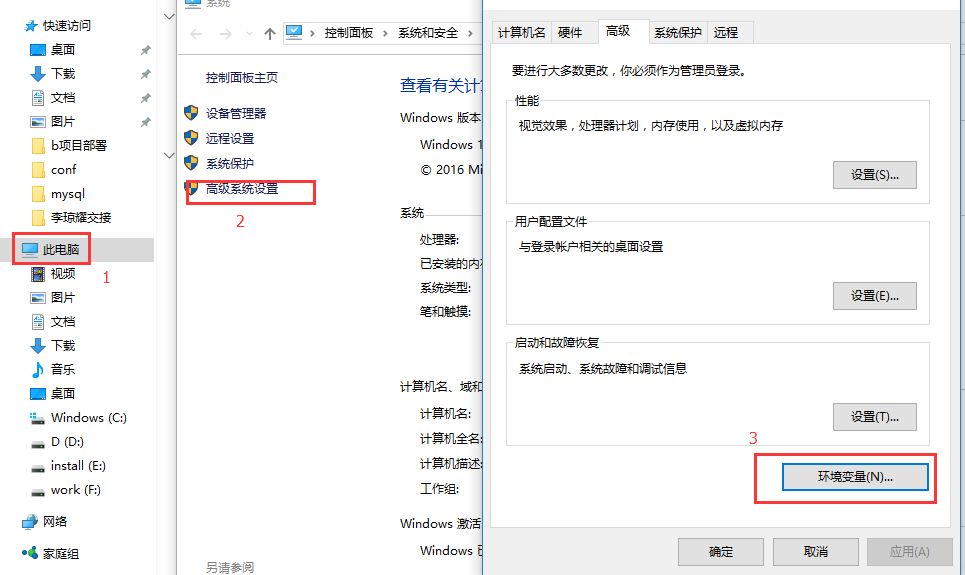
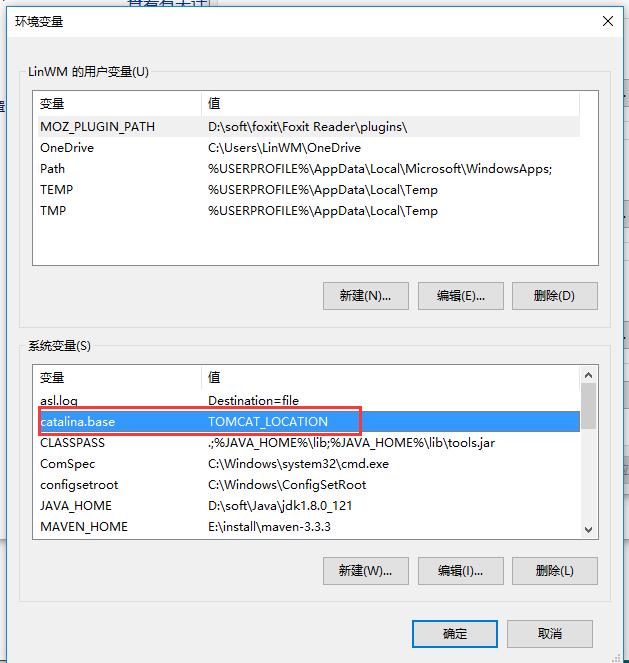
2. Add tomcat system property "catalina.base"
        * catalina.base="TOMCAT_LOCATION"
就是配置一个环境变量,和Jdk配置的环境变量一样,需要配置一个catalina.base的环境变量,值为TOMCAT_LOCATION
如下:


第三步:
3. Extract downloaded package (tomcat-cluster-redis-session-manager.zip) to configure Redis credentials in redis-data-cache.properties file and move the file to tomcat/conf directory
        * tomcat/conf/redis-data-cache.properties
把conf目录下的配置文件redis-data-cache.properties复制到tomcat/conf/目录下
第四步:
4. Add the below two lines in tomcat/conf/context.xml
        <Valve className="tomcat.request.session.redis.SessionHandlerValve" />
        <Manager className="tomcat.request.session.redis.SessionManager" />
在tomcat/conf/目录下的context.xml文件,加上相应的配置,如下:
<?xml version="1.0" encoding="UTF-8"?>

<!--
  Licensed to the Apache Software Foundation (ASF) under one or more
  contributor license agreements.  See the NOTICE file distributed with
  this work for additional information regarding copyright ownership.
  The ASF licenses this file to You under the Apache License, Version 2.0
  (the "License"); you may not use this file except in compliance with
  the License.  You may obtain a copy of the License at

      http://www.apache.org/licenses/LICENSE-2.0

  Unless required by applicable law or agreed to in writing, software
  distributed under the License is distributed on an "AS IS" BASIS,
  WITHOUT WARRANTIES OR CONDITIONS OF ANY KIND, either express or implied.
  See the License for the specific language governing permissions and
  limitations under the License.
--><!-- The contents of this file will be loaded for each web application --><Context>

    <!-- Default set of monitored resources. If one of these changes, the    -->
    <!-- web application will be reloaded.                                   -->
    <WatchedResource>WEB-INF/web.xml</WatchedResource>
    <WatchedResource>${catalina.base}/conf/web.xml</WatchedResource>

    <!-- Uncomment this to disable session persistence across Tomcat restarts -->
    <!--
    <Manager pathname="" />
    -->

    <!-- Uncomment this to enable Comet connection tacking (provides events
         on session expiration as well as webapp lifecycle) -->
    <!--
    <Valve className="org.apache.catalina.valves.CometConnectionManagerValve" />
    -->
    <Valve className="tomcat.request.session.redis.SessionHandlerValve"/>
    <Manager className="tomcat.request.session.redis.SessionManager"/>

</Context>
第五步:
5. Verify the session expiration time (minutes) in tomcat/conf/web.xml
        <session-config>
            <session-timeout>60<session-timeout>
        <session-config>
修改session的过期时间,默认是30分钟,可以不需要此步骤。
session集群的配置至此结束。
四、nginx集群
1、下载Nignx:
http://nginx.org/en/download.html
本人练习时使用windows,所以下载的windows版本:
http://nginx.org/download/nginx-1.13.7.zip
2、下载后解压:D:soft ginx-1.12.2
(之前使用的是1.12.2的版本,现在最新版是1.13.7,但都一样,附件中有1.12.2版本提供下载)
3、修改Nginx配置文件nginx.conf
进入conf目录(D:soft ginx-1.12.2conf),找到nginx.conf配置文件,打开编辑:
3.1在http{……}里加上upstream,如下:
upstream myTomcatCluster{# tomcatCluster和proxy_pass保持一样
        #解决session的问题
        #ip_hash;#加上这个,解决Session每次访问页面都不一样,加上就一样了。

        #这里是tomcat的地址,weight越大,访问机率越大。
        server 127.0.0.1:9300 weight=1 fail_timeout=5s max_fails=1;
        server 127.0.0.1:9400 weight=1 fail_timeout=5s max_fails=1;
    }
weight 表示权重,权重越大,访问到的机率越大。
3.2、修改location / {……}
默认是这个的:
location / {
            root   html;
            index  index.html index.htm;
        }
修改成这样:
location / {
            #root   html;
        proxy_pass http://myTomcatCluster;
            #index  index.html index.htm;
        proxy_set_header Host $host;
            proxy_set_header X-Real-IP $remote_addr;
            proxy_set_header X-Forwarded-For $proxy_add_x_forwarded_for;
            proxy_connect_timeout       1;
            proxy_read_timeout          1;
            proxy_send_timeout          1;
        }
最简单的配置就是:
location / {
     proxy_pass http://myTomcatCluster;
}
myTomcatCluster 对应upstream后的命名。
下面的配置可以解决2个Tomcat服务器集群,当一台服务器挂掉(宕机)后,请求变得很慢的问题。
(Tomcat集群一台服务器挂掉后请求变慢解决方案)
proxy_connect_timeout       1;
proxy_read_timeout          1;
proxy_send_timeout          1;
3.3、启动Nginx服务器
使用Windows命令行启动
(1)进入D盘:d:
(2)进入D:soft ginx-1.12.2目录:
cd D:softnginx-1.12.2
(3)启动服务: (启动一闪而过,但打开进程管理器能看到是已经启动的)
start nginx
关闭服务的命令:nginx -s stop
重新加载的命令:nginx -s reload,修改配置文件后,可以使用该命令直接加载,不需要重启。
五、测试集群:
1、tomcat准备
将已经配置好的一个tomcat复制一份,修改端口,然后再修改一下tomcat的配置文件(server.xml)
我的一个tomcat在:
D:softapache-tomcat-8.0.45-9300conf
另一个是:
D:softapache-tomcat-8.0.45-9400conf
修改:
<Engine defaultHost="localhost" name="Catalina">
其中tomcat 9300端口的修改如下:
<Engine defaultHost="localhost" jvmRoute="jvm9300" name="Catalina">
tomcat 9400端口的修改如下:
<Engine defaultHost="localhost" jvmRoute="jvm9400" name="Catalina">
2、项目准备:
新建立一个web项目,然后新建立一个index.jsp的文件,如下:
<%@ page language="java" contentType="text/html; charset=UTF-8"
    pageEncoding="UTF-8"%>
<!DOCTYPE html PUBLIC "-//W3C//DTD HTML 4.01 Transitional//EN" "http://www.w3.org/TR/html4/loose.dtd">
<html>
<head>
<meta http-equiv="Content-Type" content="text/html; charset=UTF-8">
<title>首页redis-session</title>
</head>
<body>
    <div>tomcat 集群测试</div>
    <div>
        <%
          //HttpSession session = request.getSession(true);
          System.out.println(session.getId());
          out.println("<br> SESSION ID:" + session.getId()+"<br>");
        %>
    </div>
</body>
</html>
主要是在打印页面输出sessionId的信息:
out.println("<br> SESSION ID:" + session.getId()+"<br>");
然后把这个项目分别部署到9300、9400端口的2个tomcat中,分别启动,记得也启动Nginx和redis哦
tomcat 集群测试

SESSION ID:B837ECA85B47081EAA2FEFCD7E579CD2.jvm9400
无论怎么刷新访问(打开新的标签页也是(非新窗口))的都是jvm9400,也就是端口号为9400的tomcat
后缀.jvm9400就是前面配置的:
<Engine defaultHost="localhost" jvmRoute="jvm9400" name="Catalina">
打开新的隐身窗口访问:
tomcat 集群测试

SESSION ID:83BBA58F4EB7B2EFF90AE05D4A0629FD.jvm9300
这时访问的是端口号为9300的tomcat,通过后缀.jvm9300判断知道。
新窗口每次访问的是都是tomcat9300,session也不会变。
在访问后缀为.jvm9400时,把端口9400的tomcat关掉,再次刷新访问,sessionId一样不变,由此可见,2个tomcat的sessionId是共享的。
使用Redis实现session共享的好处就是,把session管理放在redis中,如果服务器重启或挂机,sessionId保存在redis中,下次重启后一样生效,避免sessionId失效,同样redis最好也做集群,避免redis重启或挂机。
结束了。
点击图片加入Spring交流群
↓↓↓
看完本文有收获?请转发分享给更多人
以上是关于Redis+Tomcat+Nginx集群实现Session共享,Tomcat Session共享的主要内容,如果未能解决你的问题,请参考以下文章