开发者说丨 Apollo 源码分析:Perception 如何启动?
Posted Apollo开发者社区
tags:
篇首语:本文由小常识网(cha138.com)小编为大家整理,主要介绍了开发者说丨 Apollo 源码分析:Perception 如何启动?相关的知识,希望对你有一定的参考价值。
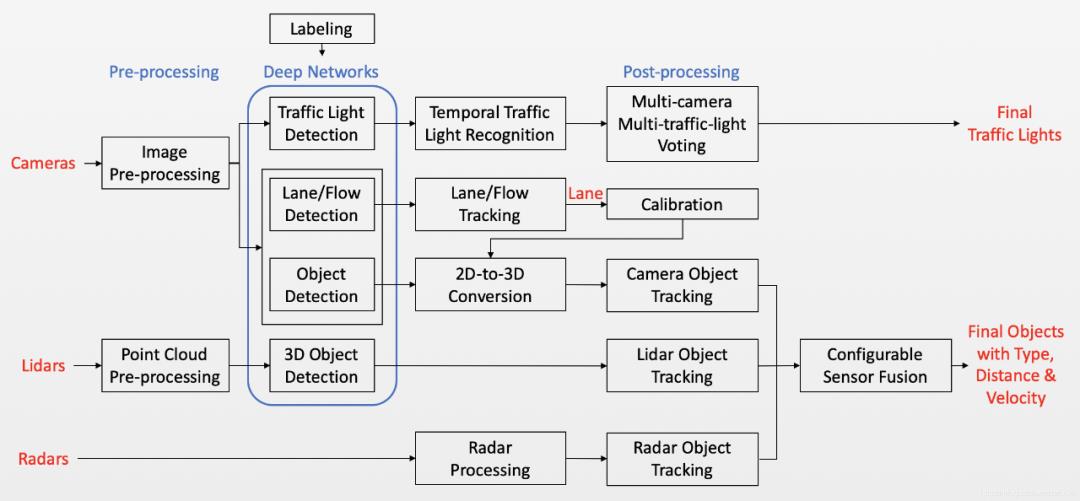
Perception系统是以多种sensor的数据,以及高精度地图的信息作为输入,经过一系列的计算及处理,对自动驾驶车的周围的环境精确感知。能够为下游模块提供丰富的信息,包括障碍物的位置、形状、类别及速度信息,也包括对一些特殊场景的语义理解(包括施工区域,交通信号灯及交通路牌等)。
下面是由社区开发者—Frank909提供的文章,对Perception如何启动进行详细讲解,这篇文章将给刚接触自动驾驶的开发者们带来一些帮助。
-
Perception 的入口在哪里? -
Perception 如何启动?


CyberRT 就是 Apollo 中的一套基础框架,是面向组件(component)的。组件呈现高度的模块化。
玩过 ROS 的同学应该对此类东西不陌生,CyberRT 和 ROS 类似,实际上 Apollo 最初也是用的 ROS1,后来因为时延问题得不到满足,所以自行开发了一个类似的,但性能更好。
回到组件问题,Perception 也是组件,之前的文章有介绍,它接收传感器的数据,然后输出障碍物的 3D 信息。

-
设置组件文件结构 -
实现组件类 -
设置配置文件 -
启动组件

按照 Apollo 官方文档提示,一个 component 相关的文档有这几个:
Header file: common_component_example.hSource file: common_component_example.ccBuild file: BUILDDAG dependency file: common.dagLaunch file: common.launch
apollo/modules/perception/onboard/component
它的两个相关文件是:
-
detection_component.h -
detection_component.cc detection_component.h
   namespace apollo {


   namespace perception {


   namespace onboard {


   class DetectionComponent : public cyber::Component<drivers::PointCloud> {


    public:


    DetectionComponent() = default;


    virtual ~DetectionComponent() = default;


    bool Init() override;


    bool Proc(const std::shared_ptr<drivers::PointCloud>& message) override;


    private:


    static std::atomic<uint32_t> seq_num_;


    std::string sensor_name_;


    // bool enable_hdmap_ = true;


    float lidar_query_tf_offset_ = 20.0f;


    std::string lidar2novatel_tf2_child_frame_id_;


    std::string output_channel_name_;


    base::SensorInfo sensor_info_;


    TransformWrapper lidar2world_trans_;


    std::unique_ptr<lidar::LidarObstacleDetection> detector_;


    std::shared_ptr<apollo::cyber::Writer<LidarFrameMessage>> writer_;


   };


   CYBER_REGISTER_COMPONENT(DetectionComponent);


   } // namespace onboard


   } // namespace perception


   }

   bool DetectionComponent::Init() {


    LidarDetectionComponentConfig comp_config;


    if (!GetProtoConfig(&comp_config)) {


    return false;


    }


    ADEBUG << "Lidar Component Configs: " << comp_config.DebugString();


    output_channel_name_ = comp_config.output_channel_name();


    sensor_name_ = comp_config.sensor_name();


    lidar2novatel_tf2_child_frame_id_ =


    comp_config.lidar2novatel_tf2_child_frame_id();


    lidar_query_tf_offset_ =


    static_cast<float>(comp_config.lidar_query_tf_offset());


    // enable_hdmap_ = comp_config.enable_hdmap();


    writer_ = node_->CreateWriter<LidarFrameMessage>(output_channel_name_);


    if (!InitAlgorithmPlugin()) {


    AERROR << "Failed to init detection component algorithm plugin.";


    return false;


    }


    return true;


   }


   bool DetectionComponent::Proc(


    const std::shared_ptr<drivers::PointCloud>& message) {


    AINFO << std::setprecision(16)


    << "Enter detection component, message timestamp: "


    << message->measurement_time()


    << " current timestamp: " << Clock::NowInSeconds();


    auto out_message = std::make_shared<LidarFrameMessage>();


    bool status = InternalProc(message, out_message);


    if (status) {


    writer_->Write(out_message);


    AINFO << "Send lidar detect output message.";


    }


    return status;


   }
nit 和 Proc 是组件两个核心方法。
apollo/modules/perception/onboard/component/BUILD
BUILD 文件定义了 perception 中所有的 component 如 camera,radar,lidar 等的信息,本文只关注 Detection。
   cc_library(


    name = "detection_component",


    srcs = ["detection_component.cc"],


    hdrs = ["detection_component.h"],


    deps = [


    ":lidar_inner_component_messages",


    "//cyber/time:clock",


    "//modules/common/util:string_util",


    "//modules/perception/common/sensor_manager",


    "//modules/perception/lib/registerer",


    "//modules/perception/lidar/app:lidar_obstacle_detection",


    "//modules/perception/lidar/common",


    "//modules/perception/onboard/common_flags",


    "//modules/perception/onboard/proto:lidar_component_config_cc_proto",


    "//modules/perception/onboard/transform_wrapper",


    "@eigen",


    ],


   )
-
DAG -
Launch
DAG 定义了模块的依赖关系。
Launch 文件定义了模块的启动。
先看 Launch 文件。
apollo/modules/perception/production/launch/perception_all.launch
   <cyber>


    <desc>cyber modules list config</desc>


    <version>1.0.0</version>


    <!-- sample module config, and the files should have relative path like


    ./bin/cyber_launch


    ./bin/mainboard


    ./conf/dag_streaming_0.conf -->


    <module>


    <name>perception</name>


    <dag_conf>/apollo/modules/perception/production/dag/dag_streaming_perception.dag</dag_conf>


    <!-- if not set, use default process -->


    <process_name>perception</process_name>


    <version>1.0.0</version>


    </module>


    <module>


    <name>perception_camera</name>


    <dag_conf>/apollo/modules/perception/production/dag/dag_streaming_perception_camera.dag</dag_conf>


    <!-- if not set, use default process -->


    <process_name>perception</process_name>


    <version>1.0.0</version>


    </module>


    <module>


    <name>perception_traffic_light</name>


    <dag_conf>/apollo/modules/perception/production/dag/dag_streaming_perception_trafficlights.dag</dag_conf>


    <!-- if not set, use default process -->


    <process_name>perception_trafficlights</process_name>


    <version>1.0.0</version>


    </module>


    <module>


    <name>motion_service</name>


    <dag_conf>/apollo/modules/perception/production/dag/dag_motion_service.dag</dag_conf>


    <!-- if not set, use default process -->


    <process_name>motion_service</process_name>


    <version>1.0.0</version>


    </module>


   </cyber>
我们可以发现 Perception 模块中的 dag 路径:
<dag_conf>/apollo/modules/perception/production/dag/dag_streaming_perception.dag</dag_conf>它里面的内容长什么样子呢?
module_config {module_library : "/apollo/bazel-bin/modules/perception/onboard/component/libperception_component_lidar.so"components {class_name : "DetectionComponent"config {name: "Velodyne128Detection"config_file_path: "/apollo/modules/perception/production/conf/perception/lidar/velodyne128_detection_conf.pb.txt"flag_file_path: "/apollo/modules/perception/production/conf/perception/perception_common.flag"readers {channel: "/apollo/sensor/lidar128/compensator/PointCloud2"}}}components {class_name : "RecognitionComponent"config {name: "RecognitionComponent"config_file_path: "/apollo/modules/perception/production/conf/perception/lidar/recognition_conf.pb.txt"readers {channel: "/perception/inner/DetectionObjects"}}}components {class_name: "RadarDetectionComponent"config {name: "FrontRadarDetection"config_file_path: "/apollo/modules/perception/production/conf/perception/radar/front_radar_component_conf.pb.txt"readers {channel: "/apollo/sensor/radar/front"}}}components {class_name: "RadarDetectionComponent"config {name: "RearRadarDetection"config_file_path: "/apollo/modules/perception/production/conf/perception/radar/rear_radar_component_conf.pb.txt"readers {channel: "/apollo/sensor/radar/rear"}}}components {class_name: "FusionComponent"config {name: "SensorFusion"config_file_path: "/apollo/modules/perception/production/conf/perception/fusion/fusion_component_conf.pb.txt"readers {channel: "/perception/inner/PrefusedObjects"}}}}module_config {module_library : "/apollo/bazel-bin/modules/v2x/fusion/apps/libv2x_fusion_component.so"components {class_name : "V2XFusionComponent"config {name : "v2x_fusion"flag_file_path : "/apollo/modules/v2x/conf/v2x_fusion_tracker.conf"readers: [{channel: "/perception/vehicle/obstacles"}]}}}
我们发现了 DetectionComponent 的身影,看它的配置参数是 Velodyne 128 线激光雷达的配置文件,确实可以看到 Apollo 是以 Lidar 为主。

定义了一个 component 相关的文档后,就可以启动了。
命令:
cyber_launch start apollo/modules/perception/production/launch/perception_all.launch
自此,我们就发现了在 Apollo 中启动 perception 一个组件的整个代码过程。
总结
因为 Perception 这个模块非常庞大,涉及到 Camera、Radar、Lidar 3 种类型的传感器,针对各个传感器的数据处理和模型处理会产生 10 多个任务,每个任务都被设计成了组件。
直接去阅读相关的代码会非常容易让自己迷失在代码森林中,所以,本文先讲解一下 CyberRT 这个基础框架 Component 的配置机制,熟悉基础套路后,以后再去学习相应组件时,查询代码就变得非常容易。

*CSDN
https://blog.csdn.net/briblue/article/details/111598755
https://mp.weixin.qq.com/s/hlsBBc9p4kc3SuwGnGqnZw
以上是"Apollo 源码分析:Perception 如何启动?"的全部内容,更多话题讨论、技术交流可以扫描下方二维码添加『Apollo小哥哥』为好友,进开发者交流群。


更多关于开发套件的参数信息
请点击下方文章链接查看
长按识别下方二维码
登记购买套件


更多关于开发套件的参数信息
请点击下方文章链接查看
长按识别下方二维码
登记购买套件

以上是关于开发者说丨 Apollo 源码分析:Perception 如何启动?的主要内容,如果未能解决你的问题,请参考以下文章