设计模式系列——组合模式
Posted 花括号MC
tags:
篇首语:本文由小常识网(cha138.com)小编为大家整理,主要介绍了设计模式系列——组合模式相关的知识,希望对你有一定的参考价值。
原创:花括号MC(微信公众号:huakuohao-mc)。关注JAVA基础编程及大数据,注重经验分享及个人成长。
组合模式经常用于树形组织结构,比如人事组织关系。CEO下面有经理,经理下面有总监,总监下面有组长,组长下面有组员。而对这些对象的操作都是一样的,比如添加,删除,查询下级组织等等。简单来说就是对于整体的所有对象的操作方式和单一个体的操作方式是一致的。
举个例子
通过组合模式实现一个公司的组织结构遍历。
先来看一下UML图:
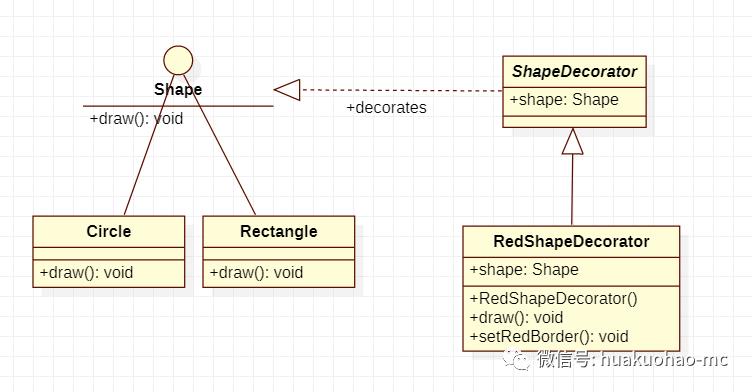
再来看一下代码具体实现
//基本员工类,包含姓名,部门,薪水等属性
//有增加员工删除员工等操作
public class Employee

    private String name;
    private String dept;
    private int salary;
    private List<Employee> subordinates;

    public Employee(String name, String dept, int salary)
        this.name = name;
        this.dept = dept;
        this.salary = salary;
        subordinates = new ArrayList<Employee>();


    public void add(Employee e)
        subordinates.add(e);


    public void remove(Employee e)
        subordinates.remove(e);


    public List<Employee> getSubordinates()
        return subordinates;


    public String toString()
        return ("Employee :[ Name : " + name + ", dept : " + dept + ", salary :" + salary+" ]");
客户端这样使用Employee类实现公司组织结构
public class CompositePatternDemo

    public static void main(String[] args)

        Employee CEO = new Employee("John","CEO", 30000);

        Employee headSales = new Employee("Robert", "Head Sales", 20000);

        Employee headMarketing = new Employee("Michel", "Head Marketing", 20000);

        Employee clerk1 = new Employee("Laura", "Marketing", 10000);
        Employee clerk2 = new Employee("Rob","Sales", 10000);

        Employee salesExecutive1 = new Employee("Richard","Sales", 10000);
        Employee salesExecutive2 = new Employee("Rob","Sales", 10000);

        CEO.add(headSales);
        CEO.add(headMarketing);

        headSales.add(salesExecutive1);
        headSales.add(salesExecutive2);

        headMarketing.add(clerk1);
        headMarketing.add(clerk2);

        //print all employees of the organization
        System.out.println(CEO);
总结
组合模式是结构模式之一,可以灵活的实现部分和整体的层级关系,前提是部分和整体的操作方式都是一致的。就像例子中体现的那样。
本文参考 https://www.tutorialspoint.com/design_pattern/composite_pattern.htm
推荐阅读
1. Java并发编程那些事儿(十)——最后的总结
2. 程序员应该掌握的常用网络问题定位工具
3. Awk这件上古神兵你会用了吗
4. 手把手教你搭建一套ELK日志搜索运维平台
·END·

[js高手之路]设计模式系列课程-组合模式+寄生组合继承实战新闻列表
所谓组合模式,就是把一堆结构分解出来,组成在一起,现实中很多这样的例子,如:
1、肯德基套餐就是一种组合模式, 比如鸡腿堡套餐,一般是是由一个鸡腿堡,一包薯条,一杯可乐等组成的
2、组装的台式机同理,由主板,电源,内存条,显卡, 机箱,显示器,外设等组成的
把一个成型的产品组成部件,分成一个个独立的部件,这种方式可以做出很多灵活的产品,这就是组合模式的优势
比如:家用台式机电脑,要求配置比较低, 这个时候只需要主板+电源+内存条+机箱+显示器+外设就可以了,不需要配置独立显卡
鸡腿堡+鸡翅+紫薯+可乐可以配置出另外一种套餐。
而在我们的前端领域,经常要接触的就是排版,通过不同的html结构+css样式组合成不用绚丽多彩的网页,我们也可以通过组合模式来完成的,
有人可能要问,为什么要用js来生成,直接写html和css不是很省事吗?是的,但是用组合模式做成不同的套餐(模块),是不是可以非常快的生成出不同的模板呢? 大大提高网页编写的速度?
本文我们来实战一个最基本的列表新闻模块,看看怎么使用组合模式?先看下要做出来的效果:
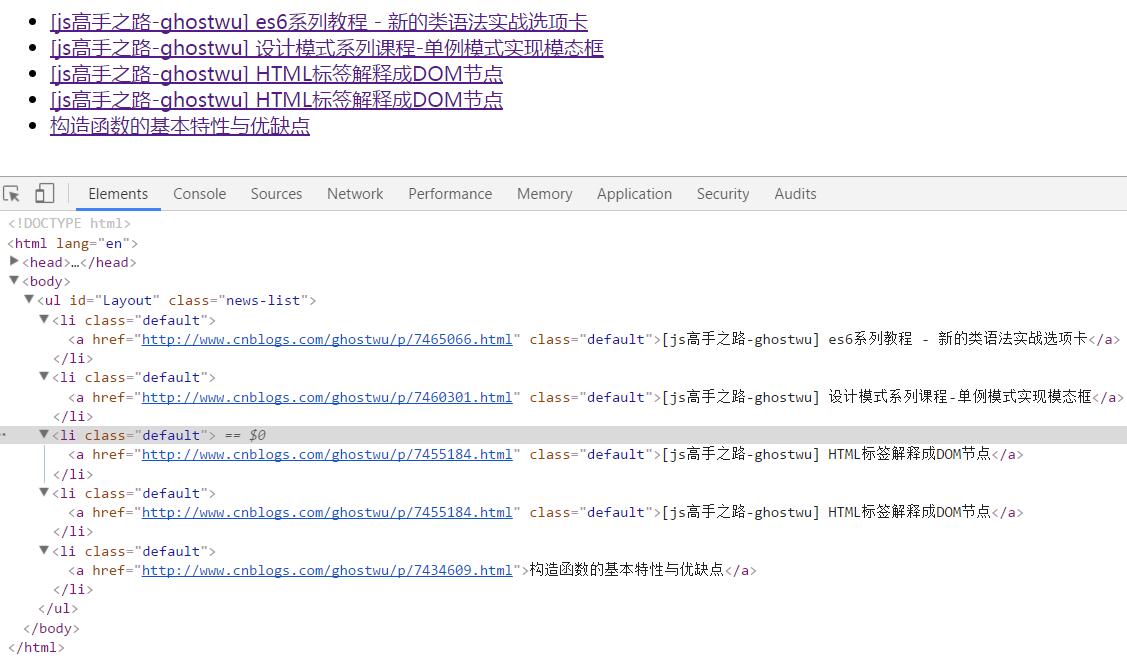
这个是一个无序列表加一个a标签,非常简单的套餐(模块)
1、首先,我们定义父类,2个属性,3个方法
 1 /***************父类开始***********************/
 2 var Layout = function () {
 3     this.children = [];
 4     this.element = null;
 5 }
 6 Layout.prototype = {
 7     init: function () {
 8         throw new Error(\'该方法需要重写\');
 9     },
10     add: function () {
11         throw new Error(\'该方法需要重写\');
12     },
13     getElement: function () {
14         throw new Error(\'该方法需要重写\');
15     }
16 }
17 /***************父类结束***********************/
this.element用来存储当前的元素,this.children用来存储当前元素下面的子元素
init方法:用来初始化元素的标签,属性,样式
add方法:把子节点添加在父节点下面
getElement: 获取当前的节点
2、这里我们需要用到寄生组合继承
 1 function object(o) {
 2     var G = function () {
 3     };
 4     G.prototype = o;
 5     return new G();
 6 }
 7 function inheritPrototype(subObj, superObj) {
 8     var proObj = object(superObj.prototype); //复制父类superObj的原型对象
 9     proObj.constructor = subObj; //constructor指向子类构造函数
10     subObj.prototype = proObj; //再把这个对象给子类的原型对象
11 }
3,由于这个新闻模块最外层是ul,所以我们要封装一个生成ul元素的容器类
 1 /***************列表容器类开始***********************/
 2 var UlContainer = function (id, parent) {
 3     Layout.call(this);
 4     this.id = id;
 5     this.parent = parent;
 6     this.init();
 7 }
 8 inheritPrototype(UlContainer, Layout);
 9 UlContainer.prototype.init = function () {
10     this.element = document.createElement("ul");
11     this.element.id = this.id;
12     this.element.className = \'news-list\';
13 }
14 UlContainer.prototype.add = function (child) {
15     this.children.push(child);
16     this.element.appendChild(child.getElement());
17     return this;
18 }
19 UlContainer.prototype.getElement = function () {
20     return this.element;
21 }
22 UlContainer.prototype.show = function () {
23     this.parent.appendChild(this.element);
24 }
25 /***************列表容器类结束***********************/
采用寄生组合继承,把父类的方法重写,父类的属性通过子类的借用构造函数复制到子类实例上,新增了一个show方法,这个方法的目的就是,把最终的模板显示出来
4、生成li元素
 1 /***************列表项li开始***********************/
 2 var LiTag = function (cName) {
 3     Layout.call(this);
 4     this.className = cName || \'\';
 5     this.init();
 6 }
 7 inheritPrototype(LiTag, Layout);
 8 LiTag.prototype.init = function () {
 9     this.element = document.createElement("li");
10     this.element.className = this.className;
11 }
12 LiTag.prototype.add = function (child) {
13     this.children.push(child);
14     this.element.appendChild(child.getElement());
15     return this;
16 }
17 LiTag.prototype.getElement = function () {
18     return this.element;
19 }
20 /***************列表项li结束***********************/
5、生成图片与a标签组合的方式
 1 /***************图片新闻开始*******************/
 2 var ImageMsg = function (url, href, cName) {
 3     Layout.call(this);
 4     this.url = url || \'\';
 5     this.href = href || \'#\';
 6     this.className = cName || \'default\';
 7     this.init();
 8 }
 9 inheritPrototype(ImageMsg, Layout);
10 ImageMsg.prototype.init = function () {
11     this.element = document.createElement("a");
12     var oImg = new Image();
13     oImg.src = this.url;
14     this.element.appendChild(oImg);
15     this.element.className = \'img-Layout \' + this.className;
16     this.element.href = this.href;
17 }
18 ImageMsg.prototype.add = function () {
19 }
20 ImageMsg.prototype.getElement = function () {
21     return this.element;
22 }
23 /***************图片新闻结束*******************/
6,生成单纯的a标签和内容这种组合
 1 /***************简单新闻开始*******************/
 2 var ATag = function (text, href, cName) {
 3     Layout.call(this);
 4     this.href = href || \'#\';
 5     this.className = cName || \'default\';
 6     this.text = text || \'\';
 7     this.init();
 8 }
 9 inheritPrototype(ATag, Layout);
10 ATag.prototype.init = function () {
11     this.element = document.createElement("a");
12     this.element.href = this.href;
13     this.element.innerHTML = this.text;
14 }
15 ATag.prototype.add = function () {
16 }
17 ATag.prototype.getElement = function () {
18     return this.element;
19 }
20 /***************简单新闻结束*******************/
7,生成带分类的新闻标题
 1 /***************分类新闻开始*******************/
 2 var TypeMsg = function (text, href, type, cName, pos) {
 3     Layout.call(this);
 4     this.text = text || \'\';
 5     this.href = href || \'#\';
 6     this.type = type || \'\';
 7     this.pos = pos || \'left\';
 8     this.className = cName || \'\';
 9     this.init();
10 }
11 inheritPrototype(TypeMsg, Layout);
12 TypeMsg.prototype.init = function () {
13     this.element = document.createElement("a");
14     if (this.pos === \'left\') {
15         this.element.innerHTML = \'[\' + this.type + \'] \' + this.text;
16     } else {
17         this.element.innerHTML = this.text + \' [\' + this.type + \']\';
18     }
19     this.element.href = this.href;
20     this.element.className = this.className;
21 }
22 TypeMsg.prototype.add = function () {
23 }
24 TypeMsg.prototype.getElement = function () {
25     return this.element;
26 }
27 /***************分类新闻结束*******************/
8、大功告成,开始调用生成最后的模块
 1 window.onload = function () {
 2     var oUlContainer = new UlContainer(\'Layout\', document.body);
 3     oUlContainer.add(
 4         new LiTag(\'default\').add(
 5             new TypeMsg(\'es6系列教程 - 新的类语法实战选项卡\', \'http://www.cnblogs.com/ghostwu/p/7465066.html\', \'js高手之路-ghostwu\', \'default\', \'left\')
 6         )
 7     ).add(
 8         new LiTag(\'default\').add(
 9             new TypeMsg(\'设计模式系列课程-单例模式实现模态框\', \'http://www.cnblogs.com/ghostwu/p/7460301.html\', \'js高手之路-ghostwu\', \'default\', \'left\')
10         )
11     ).add(
12         new LiTag(\'default\').add(
13             new TypeMsg(\'HTML标签解释成DOM节点\', \'http://www.cnblogs.com/ghostwu/p/7455184.html\', \'js高手之路-ghostwu\', \'default\', \'left\')
14         )
15     ).add(
16         new LiTag(\'default\').add(
17             new TypeMsg(\'HTML标签解释成DOM节点\', \'http://www.cnblogs.com/ghostwu/p/7455184.html\', \'js高手之路-ghostwu\', \'default\', \'left\')
18         )
19     ).add(
20         new LiTag(\'default\').add(
21             new ATag(\'构造函数的基本特性与优缺点\', \'http://www.cnblogs.com/ghostwu/p/7434609.html\', \'js高手之路-ghostwu\' )
22         )
23     ).show();
24 }
以上是关于设计模式系列——组合模式的主要内容,如果未能解决你的问题,请参考以下文章