数据采集与融合技术 实验3
Posted paulncle
tags:
篇首语:本文由小常识网(cha138.com)小编为大家整理,主要介绍了数据采集与融合技术 实验3相关的知识,希望对你有一定的参考价值。
作业①:
-
要求:指定一个网站,爬取这个网站中的所有的所有图片,例如中国气象网(http://www.weather.com.cn)。分别使用单线程和多线程的方式爬取。(限定爬取图片数量为学号后3位)
-
输出信息:
将下载的Url信息在控制台输出,并将下载的图片存储在images子文件夹中,并给出截图
1)、中国气象网图片爬取
- 单线程爬取图片
-1.设置起始url和请求头,并用requests库进行解析
start_url = "http://www.weather.com.cn"
header = {
    "User-Agent": "Mozilla/5.0 (Windows NT 10.0; Win64; x64) AppleWebKit/537.36 (Khtml, like Gecko) Chrome/94.0.4606.71 Safari/537.36 Edg/94.0.992.38"}
# 用requests库解析url
r = requests.get(start_url, headers=header)
r.raise_for_status()
r.encoding = r.apparent_encoding
data = r.text
用BeautifulSoup方法解析data
soup = BeautifulSoup(data, "html.parser")
# select查询出带href属性的a结点
a = soup.select("a[href]")
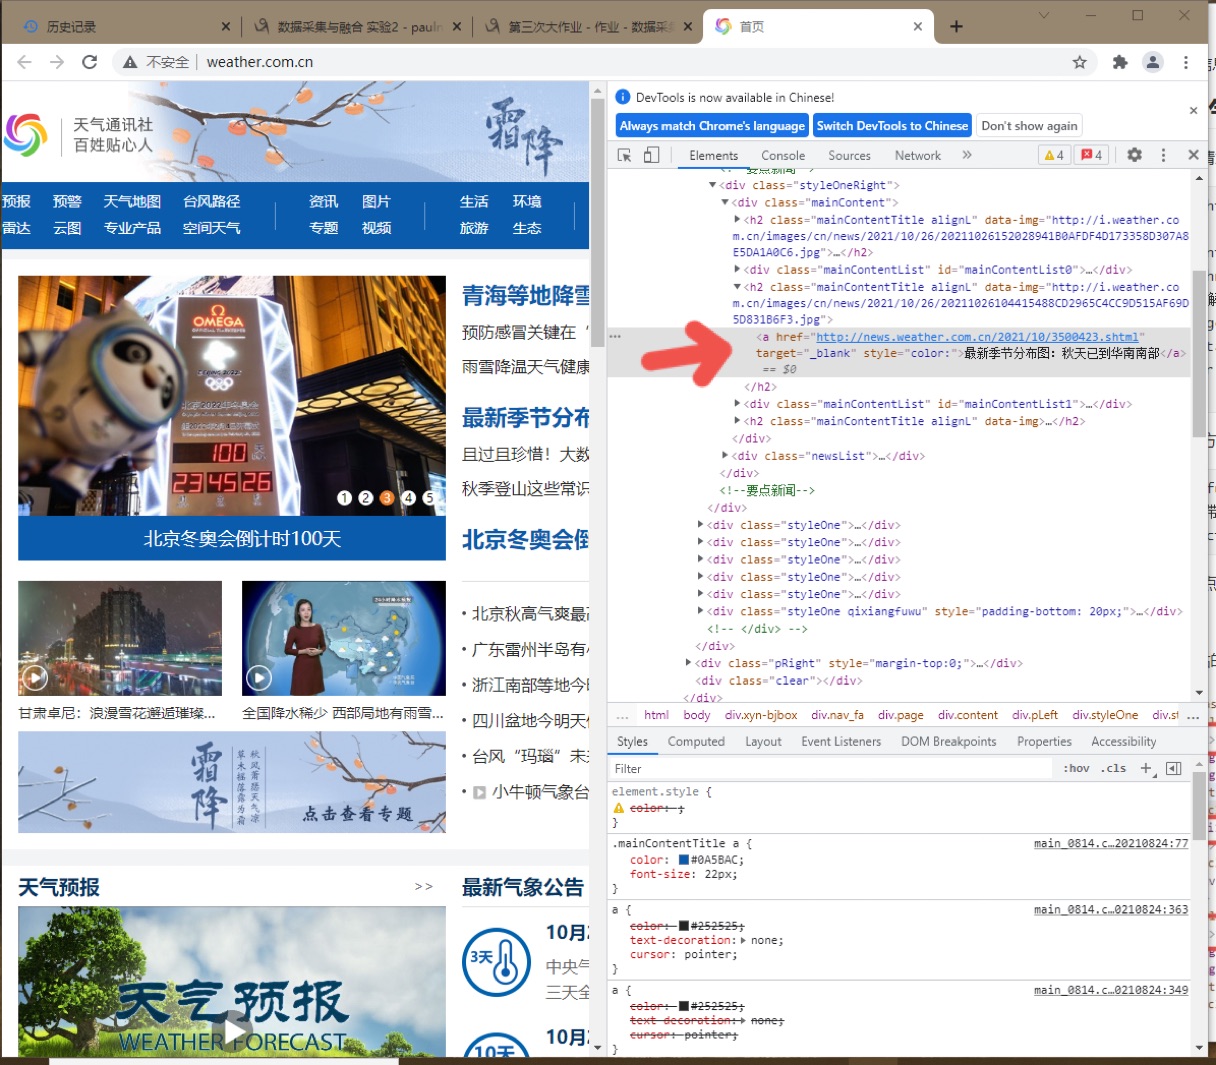
其中经检查,a结点的href属性包含页面中的链接信息,如图:
-2.利用Beautifulsoup匹配出链接存入列表中后,设置函数进入链接利用正则表达式匹配出链接下所有的src数据
其中匹配src的函数代码如下
def searchsrc(link):
    header = {
        "User-Agent": "Mozilla/5.0 (Windows NT 10.0; Win64; x64) AppleWebKit/537.36 (KHTML, like Gecko) Chrome/94.0.4606.71 Safari/537.36 Edg/94.0.992.38"}
    # request方法解析link
    r = requests.get(link, headers=header)
    r.raise_for_status()
    r.encoding = r.apparent_encoding
    data = r.text
    soup = BeautifulSoup(data, "html.parser")
    title = soup.select("img")
    # 正则匹配src地址
    reg = r\'.+?src="(\\S+)"\'
    srclist = []
    for i in title:
        src = re.findall(reg, str(i))
        srclist.append(src[0]) if src else ""
    return srclist
-3.编写Download函数对爬取出的src进行下载
    def download(link):
    global num
    file = "E:/pics/" + "No." + str(num+1) + ".jpg"  # file指先在指定文件夹里建立相关的文件夹才能爬取成功
    print("第" + str(num+1) + "张爬取成功")
    num += 1
    urllib.request.urlretrieve(url=link, filename=file)
-4.在最后的调用中对爬取数量进行限制
for link in links:
    # 设置爬取数量
    if num >= 413:
        break
    try:
        pics = searchsrc(link)
        for i in pics:
            download(i)
            if num >= 413:
                break
    except Exception as err:
        print(err)
控制台输出url结果如下:

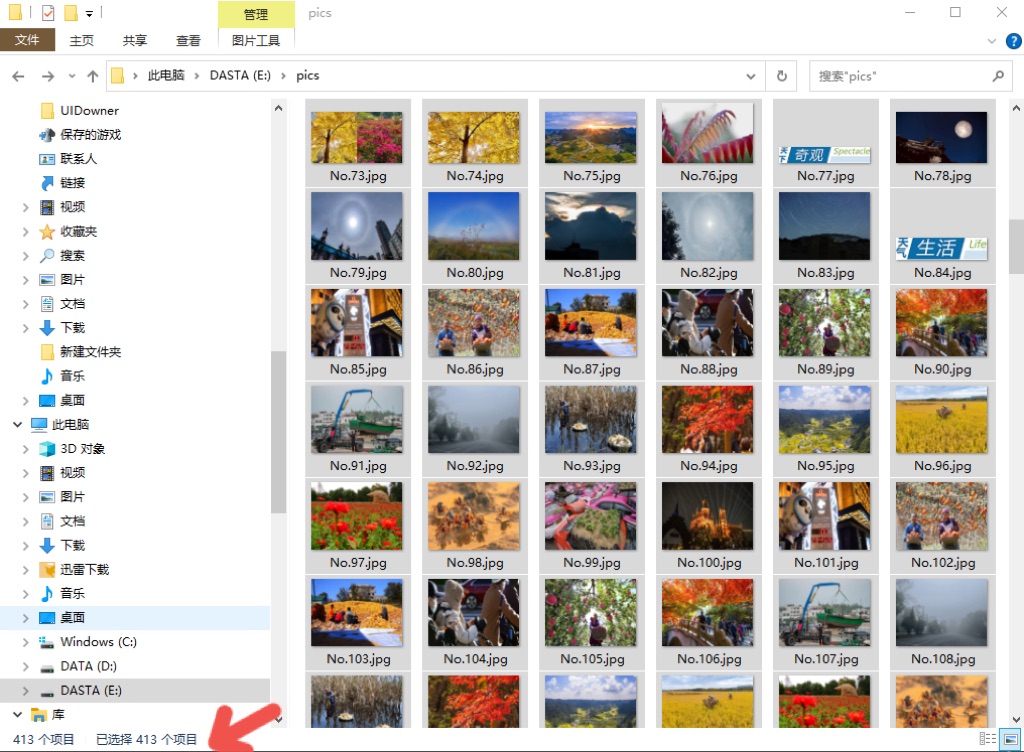
最后在文件夹中查看结果如下:
- 多线程爬取图片
-首先在单线程代码上修改为多线程。在控制台输出报错:远程主机中断连接,排查后发现应该是页面中的部分链接爬取失败。
-使用书上的代码,并将爬取链接的方式又beautifulsoup改为用正则匹配,这样过滤掉了一些有问题的链接
其中在主函数中设置线程,匹配src地址:
for image in images:
    try:
        src=image["src"]
        url=urllib.request.urljoin(start_url,src)
        # print(url)
        if url not in urls:
            # 设置if判断过滤.cn结尾的地址
            if not str(url).endswith(\'.cn\'):
                if count == 413:
                    break
                # print(url)
                count = count+1
                # 调用threading类设置target为download函数
                T=threading.Thread(target=download,args=(url,count))
                # 设置线程为后台线程
                T.setDaemon(False)
                T.start()
                # 在threads队列中加入线程
                threads.append(T)
在download函数中写入本地文件:
def download(url,count):
    try:
        # 提取出图片结尾,如:.jpg,.png等
        if(url[len(url)-4]=="."):
            ext=url[len(url)-4:]
        else:
            ext=""
        req=urllib.request.Request(url,headers=headers)
        data=urllib.request.urlopen(req,timeout=100)
        data=data.read()
        # 写入本地文件
        fobj=open("E:\\images\\\\"+str(count)+ext,"wb")
        fobj.write(data)
        fobj.close()
        print("downloaded "+str(count)+ext+"from "+str(url)+"\\n")
    except Exception as err:
        print(err)
正则匹配过滤页面中链接(爬取前20个链接):
a = \'<a href="(.*?)" \'
links = re.findall(re.compile(a), str(soup))
# 遍历links过滤出url地址
for i in range(len(links)):
    if i < 20:
        links1.append(links[i]) if links[i] != "javascript:void(0);" else ""
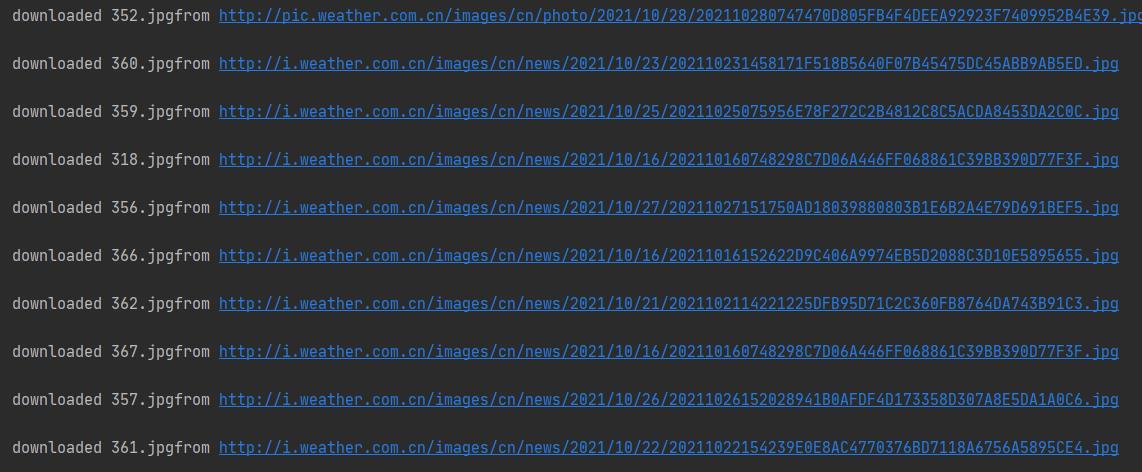
控制台输出结果如下:
文件夹中结果如下:

2)、心得体会
作业1的单线程较为简单,和之前做过的作业类似,很快就完成了。对多线程的使用还是不够熟练,期间调试遇到了很多问题,其中在爬取时出现主机强迫关闭连接的报错信息:

最后发现是所爬取的页面图片总数不足,修改爬取链接的数量后解决
作业②:
-
要求:使用scrapy框架复现作业①。
-
输出信息:
同作业①
1)、scrapy复现
-1.编写items.py,settings.py
items.py:
设置需传递给管道类的item
src = scrapy.Field()
name = scrapy.Field()
settings.py:
解除限制:
ROBOTSTXT_OBEY = False
打开pipeline:
ITEM_PIPELINES = {
    \'weatherpics.pipelines.WeatherpicsPipeline\':300,
}
-2.myspider.py
parse函数:
在parse函数中对www.weather.com.cn页面中的各个链接进行提取
a = soup.select("a[href]")
        item = WeatherpicsItem()
        links = []
        for link in a:
            links.append(link["href"]) if link["href"] != \'javascript:void(0)\' else ""
如作业1中,编写searchsrc函数,利用正则表达式对各个页面中所包含的src地址进行提取:
def searchsrc(self,link):
    header = {
        "User-Agent": "Mozilla/5.0 (Windows NT 10.0; Win64; x64) AppleWebKit/537.36 (KHTML, like Gecko) Chrome/94.0.4606.71 Safari/537.36 Edg/94.0.992.38"}
    r = requests.get(link, headers=header)
    r.raise_for_status()
    r.encoding = r.apparent_encoding
    data = r.text
    soup = BeautifulSoup(data, "html.parser")
    title = soup.select("img")
    reg = r\'.+?src="(\\S+)"\'
    srclist = []
    for i in title:
        src = re.findall(reg, str(i))
        srclist.append(src[0]) if src else ""
    return srclist
最后在parse函数中调用,并传递给pipeline:
for link in links:
    if num >= 413:
        break
    try:
        pics = self.searchsrc(link)
        for i in pics:
            item[\'src\'] = i
            item[\'name\'] = "E:/wtpics/" + "No." + str(num+1) + ".jpg"
            num += 1
            if num > 413:
                break
            yield item
-3.pipeline.py
在pipeline.py中调用urlretrieve方法进行图片下载保存
    def process_item(self, item, spider):
        link = item[\'src\']
        file = item[\'name\']
        urlretrieve(url=link, filename=file)
        print(str(file)+" download completed.")
        return item
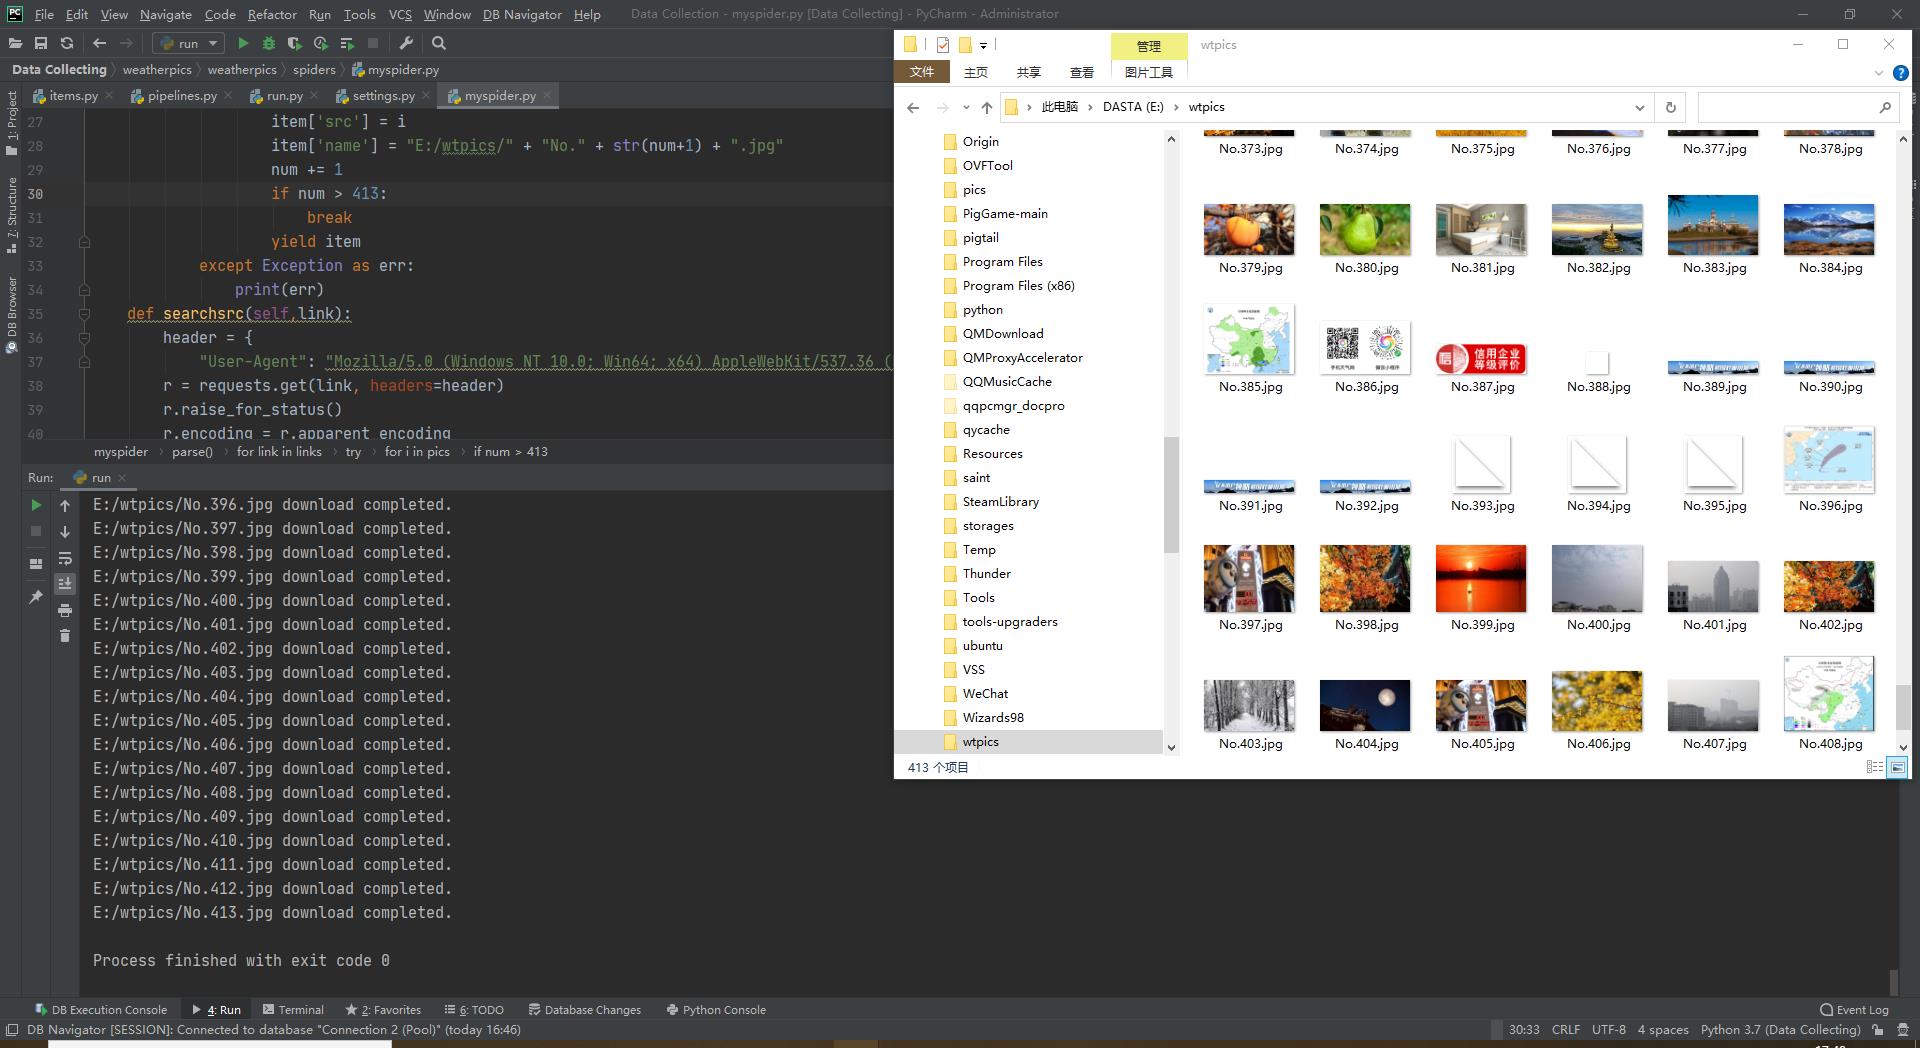
结果如下:
2)、心得体会
在作业2上主要考察的是对scrapy框架的熟练运用,解决起来也比较顺利,在pipeline中下载图片时一开始是想要用pipeline自带的方法imagepipeline进行下载,但是发现其控制台输出信息较为混乱,最后还是用了熟悉的urlretrieve进行下载。
作业③:
-
要求:爬取豆瓣电影数据使用scrapy和xpath,并将内容存储到数据库,同时将图片存储在
imgs路径下。
-
输出信息:
序号 电影名称 导演 演员 简介 电影评分 电影封面 1 肖申克的救赎 弗兰克·德拉邦特 蒂姆·罗宾斯 希望让人自由 9.7 ./imgs/xsk.jpg 2...
1)、豆瓣电影榜单爬取
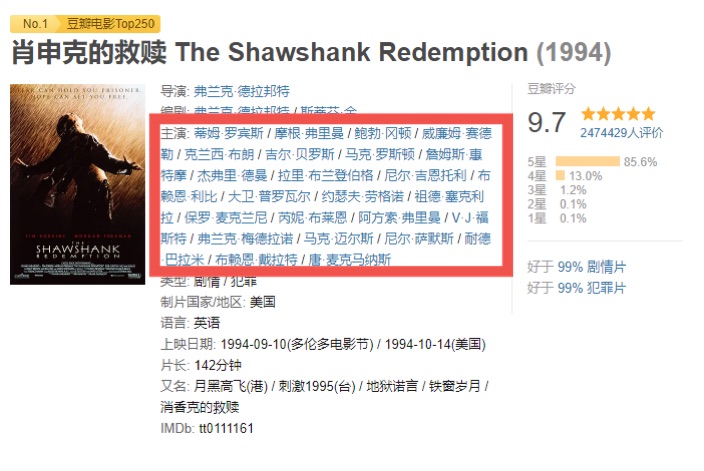
-1.查看网页,发现排行页面显示主演信息不全(以及部分导演信息)

于是考虑进入每个电影的链接中,爬取出完整的演员信息
-2.编写settings类,items类
在settings类中先打开管道
ITEM_PIPELINES = {
\'douban.pipelines.DoubanPipeline\': 300,
}
解除限制:
ROBOTSTXT_OBEY = False
item类:
title = scrapy.Field()
score = scrapy.Field()
content = scrapy.Field()
rank = scrapy.Field()
src = scrapy.Field()
director = scrapy.Field()
actors = scrapy.Field()
-3.编写myspider.py
parse函数:
解析html
dammit = UnicodeDammit(response.body, ["utf-8", "gbk"])
            data = dammit.unicode_markup
            selector = scrapy.Selector(text=data)
在排行榜页面,爬取简介,电影名称和进入详细信息页面的链接
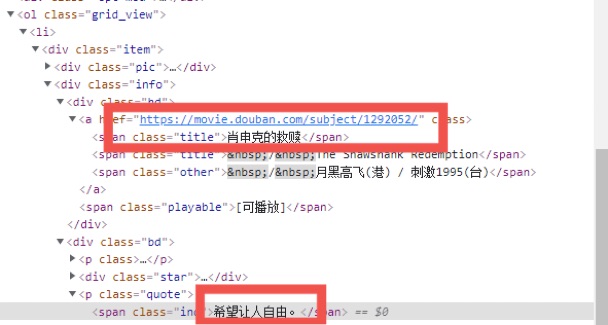
如图,需爬取的数据都在class=\'item\'下,对该结点进行遍历:
for li in selector.xpath("//div[@class=\'item\']"):
    item[\'title\'] = li.xpath("./div[@class=\'info\']/"
            "div[@class=\'hd\']/a/span[@class=\'title\']/text()").extract_first()
    item[\'content\'] = li.xpath("./div[@class=\'info\']/div[@class=\'bd\']/p[position()=2]/span/text()").extract_first()
    # xpath提取出每个电影的后续链接
    link = li.xpath("./div[@class=\'info\']/div[@class=\'hd\']/a/@href").extract_first()
    # 设置request请求头
爬取到link之后用requests方法解析该链接的html(老师说再用scrapy解析会比较复杂):
header = {
    \'user-agent\': \'Mozilla/5.0 (Windows NT 10.0; Win64; x64) AppleWebKit/537.36 (KHTML, like Gecko) Chrome/95.0.4638.54 Safari/537.36 Edg/95.0.1020.30\',
}
r = requests.get(link, headers=header)
r.raise_for_status()
# 设置解码格式为utf8防止出现乱码
r.encoding = \'utf8\'
没有设置r.encoding为\'utf8\'时,爬取会出现乱码
其中需爬取的演员,导演等内容均在div[info]的span结点下,利用xpath进行爬取,并赋值给item:
在网页检查需爬取数据:
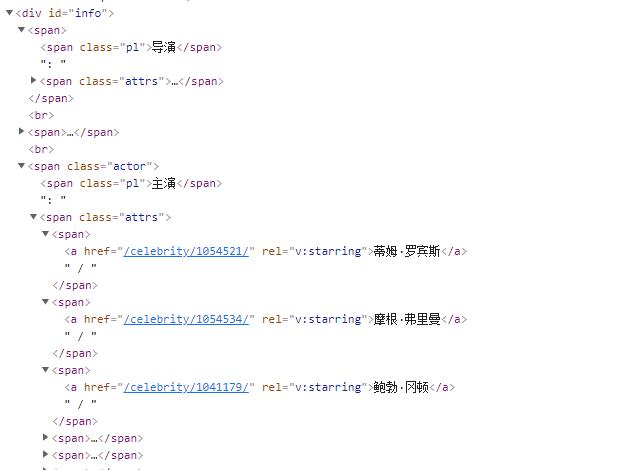
dir = info.xpath(
    "./span[@class=\'pl\']/following-sibling::span[1]/a[@rel=\'v:directedBy\']/text()").extract()
item[\'director\'] = "/".join(dir)
actor = info.xpath(
    "./span[@class=\'pl\']/following-sibling::span[1]/a[@rel=\'v:starring\']/text()").extract()
item[\'actors\'] = "/".join(actor)
item[\'score\'] = selector2.xpath("//strong[@class=\'ll rating_num\']/text()").extract_first()
item[\'src\'] = selector2.xpath("//a[@class=\'nbgnbg\']/img/@src").extract_first()
item[\'rank\'] = selector2.xpath("//span[@class=\'top250-no\']/text()").extract_first().split(".")[1]
yield item
在parse函数的最后设置翻页处理:
page = selector.xpath("//div[@class=\'paginator\']/span[@class=\'thispage\']/following-sibling::a[1]/@href").extract_first()
link_nextpage = "https://movie.douban.com/top250"+page
if page:
    url = response.urljoin(link_nextpage)
    yield scrapy.Request(url=url, callback=self.parse, dont_filter=True)
-4.编写pipeline.py
在pipeline中主要是进行将数据存入数据库中以及下载电影封面
连接mysql数据库:
def open_spider(self,spider):
    try:
        # 连接mysql数据库
        self.con = pymysql.connect(host="127.0.0.1", port=3306, user="root",
        password = "hts2953936", database = "mydb", charset = "utf8")
        self.cursor = self.con.cursor(pymysql.cursors.DictCursor)# 设置cursor
        self.cursor.execute("delete from doubanmovie_copy2")
        self.opened = True
    except Exception as err:
    	self.opened = False
process_item函数:
调用urlretrieve函数下载电影封面
    picpath = "E:/imgs/"+ str(item[\'title\']) +".jpg"
    # 调用urlretrieve函数下载图片
    urlretrieve(url=item[\'src\'],filename=picpath)
    print(str(picpath)+" download completed")
mysql语句将数据插入数据库
print("insert into doubanmovie_copy2 (Mrank,Mtitle,Mdirector,Mactor,Mscore,Mcontent,Mposter) values (%s,%s,%s,%s,%s,%s,%s)",
(item["rank"],item["title"], item[\'director\'], item["actors"], item[\'score\'], item[\'content\'],str(picpath)))
if self.opened:
    self.cursor.execute(
    "insert into doubanmovie_copy2 (Mrank,Mtitle,Mdirector,Mactor,Mscore,Mcontent,Mposter) values (%s,%s,%s,%s,%s,%s,%s)",
    (item["rank"],item["title"], item[\'director\'], item["actors"], item[\'score\'], item[\'content\'],str(picpath)))
在插入数据库时遇到了一些困难:
(1)一开始插入时发现多条数据插入报错,原因是建表时varchar()字段设置的不够大,最后将几个较长的属性改为text格式解决
(2)插入Mrank是一开始设置插入%d字段报错,最后发现插入数据库时会自动修正对应的数据类型解决了。
(3)全部插入后发现缺少了第76和第137条数据,检查后发现是actors字段和content字段后含有单引号,最后改变values字段解决了
-4.编写run,运行
from scrapy import cmdline
cmdline.execute("scrapy crawl myspider -s LOG_ENABLED=True".split())
控制台输出如下:

图片爬取到文件夹中:

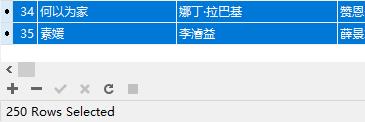
数据存入数据库中,在navicat查看:
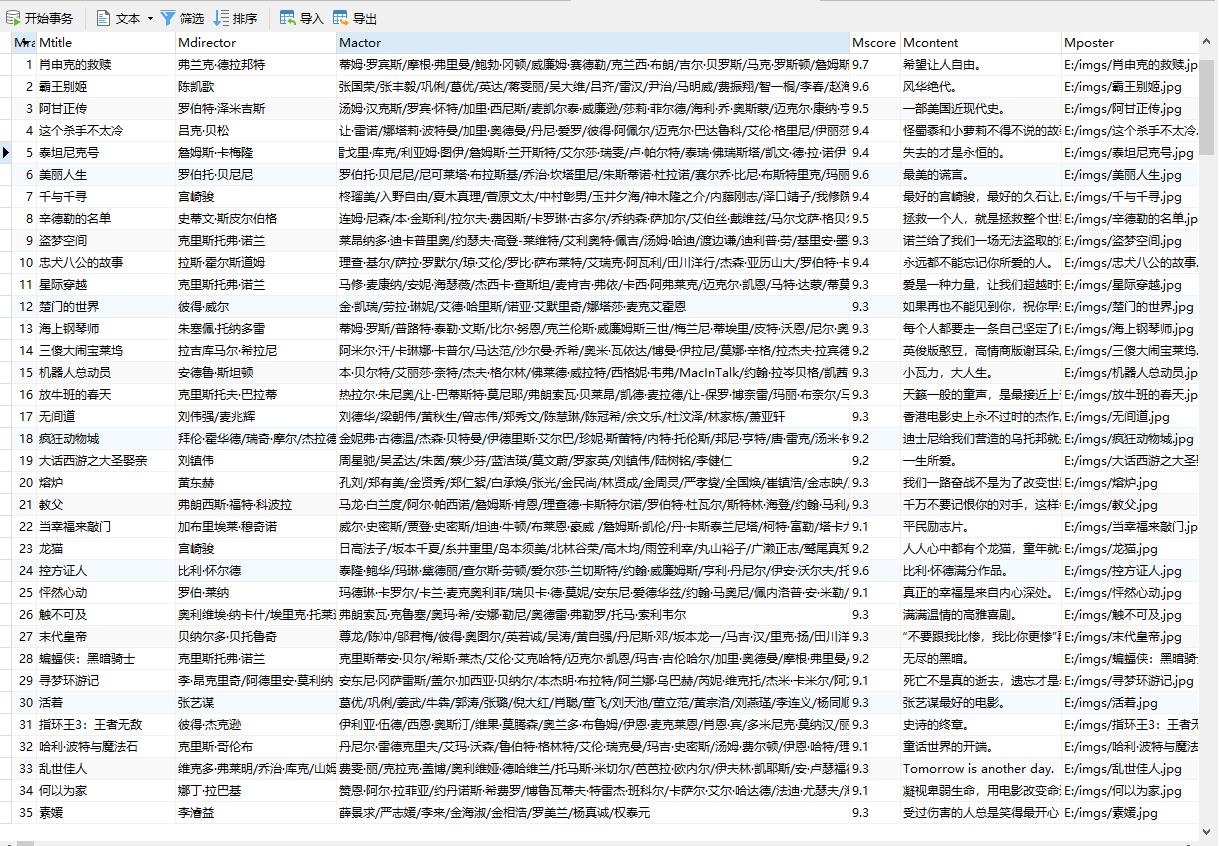
全部数据爬取成功:
2)、心得体会
做作业3时为了爬取到完整的演员信息,需要爬取到每个电影的链接后再对链接进行解析。在解析网页的时候,除了没有指定编码格式爬取到乱码之外,没有遇到很大的困难,主要是卡在插入数据库这一块上,对于数据库的操作还不够熟练。因为需要多次调试,豆瓣经常检测到ip异常行为:

这次作业又比较特殊,需要爬取到页面中的link再进行解析,储存到本地来调试的方法行不通了,所以以后还是要将代码好好完善后再进行调试。
ROS实验笔记之——基于EKF融合Visual-marker localization与IMU
本博文实现了通过EKF融合之前博客《ROS实验笔记之——基于ArUco Marker来估算camera的位姿》实现的odometry数据(实际上为marker定位的结果)以及IMUdata
效果见如下视频
基于扩展卡尔曼滤波的Visual-marker与IMU融合定位
目录
源代码
注意这个包可能与“robot_localization-melodic-devel”相冲突了,故此需要重命名一下或者把原来的删掉~
ekf_node.cpp(详细的注释见代码备注)
#include <iostream>
#include <ros/ros.h>
#include <ros/console.h>
#include <sensor_msgs/Imu.h>
#include <sensor_msgs/Range.h>
#include <nav_msgs/Odometry.h>
#include <Eigen/Eigen>

using namespace std;
using namespace Eigen;
ros::Publisher odom_pub;
MatrixXd Q = MatrixXd::Identity(12, 12);//预测的噪声
MatrixXd Rt = MatrixXd::Identity(6,6);//测量的噪声

//定义状态与协方差
VectorXd X_t=VectorXd::Zero(15);//类似于EKF包,
//x, y, z,
//roll, pitch, yaw,
//vx, vy, vz,
//vroll, vpitch, vyaw,
//ax, ay, az
MatrixXd Var_t = MatrixXd::Identity(15, 15);

//Rotation from the camera frame to the IMU frame
Eigen::Matrix3d Rcam;

//时间
double last_time=-1;
//重力加速度
double g=9.8;

//*********************************************************
//引入 inline 关键字的原因 在 c/c++ 中,为了解决一些频繁调用的小函数大量消耗栈空间(栈内存)的问题,
// 特别的引入了 inline 修饰符,表示为内联函数。
inline Eigen::Vector3d rotationMatrix2EulerVector_zxy(Eigen::Matrix3d R)
{
    Eigen::Vector3d xyz_vector;
    double phi = asinf64(R(2, 1));
    double theta = atan2f64(-R(2, 0), R(2, 2));
    double psi = atan2f64(-R(0, 1), R(1, 1));
    xyz_vector << phi, theta, psi;

    // Eigen::Vector3d zxy_vector = R.eulerAngles(2, 0, 1);
    // Eigen::Vector3d temp;
    // temp << zxy_vector(1), zxy_vector(2), zxy_vector(0);
    // cout << "check eigen euler" << endl;
    // cout << xyz_vector << ";" << temp << endl;
    // xyz_vector <<
    return xyz_vector;
}

inline Eigen::Matrix3d delGinv_delroll(double roll, double pitch)
{
    // \\frac{\\partial G}{\\partial \\phi}
    Eigen::Matrix3d deltaG;
    double theta = pitch;
    double phi = roll;
    double cos2_1 = 1.0 / (cos(phi) * cos(phi) + 1e-8);
    deltaG << 0, 0, 0,
                sin(theta) * cos2_1, 0, -cos(theta) * cos2_1,
                -sin(phi) * sin(theta) * cos2_1, 0, cos(theta) * sin(phi) * cos(phi);
    return deltaG;
}


inline Eigen::Matrix3d delGinv_delpitch(double roll, double pitch)
{
    // \\frac{\\partial G}{\\partial \\theta}
    Eigen::Matrix3d deltaG;
    double theta = pitch;
    double phi = roll;
    double cos_1 = 1.0 / (cos(phi) + 1e-8);
    deltaG << -sin(theta), 0, cos(theta),
        cos(theta) * sin(phi) * cos_1, 0, sin(theta) * sin(phi) * cos_1,
        -cos(theta)* cos_1, 0 , - sin(theta) * cos_1;
    return deltaG;
}

inline Eigen::Matrix3d deltaR_deltaroll(double roll, double pitch, double yaw)
{
    // \\frac{\\partial R}{\\partial \\phi}
    Eigen::Matrix3d deltaR;
    double theta = pitch;
    double phi = roll;
    double psi = yaw;

    deltaR <<
        -cos(phi)*sin(psi)*sin(theta),  sin(phi)*sin(psi), cos(phi)*cos(theta)*sin(psi),
         cos(phi)*cos(psi)*sin(theta), -cos(psi)*sin(phi), -cos(phi)*cos(psi)*cos(theta),
         sin(phi)*sin(theta), cos(phi), -cos(theta)*sin(phi);

    return deltaR;
}

inline Eigen::Matrix3d deltaR_deltapitch(double roll, double pitch, double yaw)
{
    // \\frac{\\partial R}{\\partial \\phi}
    Eigen::Matrix3d deltaR;
    double theta = pitch;
    double phi = roll;
    double psi = yaw;

    deltaR <<
    - cos(psi)*sin(theta) - cos(theta)*sin(phi)*sin(psi), 0, cos(psi)*cos(theta) - sin(phi)*sin(psi)*sin(theta),
         cos(psi)*cos(theta)*sin(phi) - sin(psi)*sin(theta), 0,  cos(theta)*sin(psi) + cos(psi)*sin(theta)*sin(phi),
         -cos(phi)*cos(theta)                               , 0, -cos(phi)*sin(theta);
    return deltaR;
}

inline Eigen::Matrix3d deltaR_deltayaw(double roll, double pitch, double yaw)
{
    // \\frac{\\partial R}{\\partial \\phi}
    Eigen::Matrix3d deltaR;
    double theta = pitch;
    double phi = roll;
    double psi = yaw;

    deltaR << - cos(theta)*sin(psi) - cos(psi)*sin(phi)*sin(theta), -cos(phi)*cos(psi), cos(psi)*cos(theta)*sin(phi) - sin(psi)*sin(theta),
   cos(psi)*cos(theta) - sin(phi)*sin(psi)*sin(theta), -cos(phi)*sin(psi), cos(psi)*sin(theta) + sin(phi)*sin(psi)*cos(theta),
    0, 0, 0;
    return deltaR;
}
//*********************************************************


void publish_ekf_msg(VectorXd X, std_msgs::Header header){

    // Eigen::Vector3d T_c_i;//camera position in the IMU frame
    // T_c_i<<0.05, 0.05, 0;

    // Matrix3d R1;//camera R in the world frame
    // R1=AngleAxisd(X(5),Vector3d::UnitZ())*
    //             AngleAxisd(X(3),Vector3d::UnitX())*
    //             AngleAxisd(X(4),Vector3d::UnitY());
    // //将IMU的结果转到world frame
    // // R1.transposeInPlace();//原地转置
    // Eigen::Matrix3d R_i_w=Rcam*R1;
    // Eigen::Vector3d T_i_w=T_c_i+Rcam*X.head(3);

    // Eigen::Matrix3d R_w_i=R_i_w.transpose();
    // X.segment<3>(3)=rotationMatrix2EulerVector_zxy(R_w_i);
    // X.segment<3>(0)=-R_w_i*T_i_w;

    Eigen::Vector3d T_i_c;
    T_i_c << 0.05, 0.05, 0;

    Matrix3d R_1;
    R_1 = AngleAxisd(X(5), Vector3d::UnitZ()) *
        AngleAxisd(X(3), Vector3d::UnitX()) *
        AngleAxisd(X(4), Vector3d::UnitY());
    R_1.transposeInPlace();
    Matrix3d R_cw = Rcam.transpose() * R_1;
    X.segment<3>(3) = rotationMatrix2EulerVector_zxy(R_cw);
    X.segment<3>(0) = Rcam.transpose() * (-R_1 * X.segment<3>(0) - T_i_c);


    nav_msgs::Odometry new_msg;

    double roll=X(3);
    double pitch=X(4);
    double yaw=X(5);
    Matrix3d R;   //当前状态对应的旋转矩阵   旋转矩阵(3×3) Eigen::Matrix3d
    R=AngleAxisd(yaw,Vector3d::UnitZ())*
      AngleAxisd(roll,Vector3d::UnitX())*
      AngleAxisd(pitch,Vector3d::UnitY());

    Quaternion<double> q;
    q=R;
    new_msg.header=header;
    new_msg.header.frame_id="world";
    new_msg.pose.pose.position.x=X(0);
    new_msg.pose.pose.position.y=X(1);
    new_msg.pose.pose.position.z=X(2);
    new_msg.pose.pose.orientation.w=q.w();
    new_msg.pose.pose.orientation.x=q.x();
    new_msg.pose.pose.orientation.y=q.y();
    new_msg.pose.pose.orientation.z=q.z();
    new_msg.twist.twist.linear.x=X(6);
    new_msg.twist.twist.linear.y=X(7);
    new_msg.twist.twist.linear.z=X(8);
    new_msg.twist.twist.angular.x=X(9);
    new_msg.twist.twist.angular.y=X(10);
    new_msg.twist.twist.angular.z=X(11);

//x, y, z,
//roll, pitch, yaw,
//vx, vy, vz,
//vroll, vpitch, vyaw,
//ax, ay, az
    odom_pub.publish(new_msg);

}


void imu_callback(const sensor_msgs::Imu::ConstPtr &msg)
{
    //your code for propagation
    //400HZ

    //关于sensor message可以参考http://wiki.ros.org/sensor_msgs
    //而其中的IMU在http://docs.ros.org/en/api/sensor_msgs/html/msg/Imu.html
    //对于其中的stamp有注释如下:
    // # Two-integer timestamp that is expressed as:
    // # * stamp.sec: seconds (stamp_secs) since epoch (in Python the variable is called 'secs')
    // # * stamp.nsec: nanoseconds since stamp_secs (in Python the variable is called 'nsecs')
    // # time-handling sugar is provided by the client library
    //那么定义的时间应该为:
    double time=msg->header.stamp.sec+msg->header.stamp.nsec*1e-9; //单位为秒
    double dt=0;
    if (last_time>0){
        dt=time-last_time;
    }
    last_time=time;

    //IMU message:http://docs.ros.org/en/api/sensor_msgs/html/msg/Imu.html
    //定义的消息如下:
    // std_msgs/Header header
    // geometry_msgs/Quaternion orientation
    // float64[9] orientation_covariance
    // geometry_msgs/Vector3 angular_velocity
    // float64[9] angular_velocity_covariance
    // geometry_msgs/Vector3 linear_acceleration
    // float64[9] linear_acceleration_covariance

    Vector3d omega_imu;//角速度
    omega_imu<<msg->angular_velocity.x,msg->angular_velocity.y,msg->angular_velocity.z;
    // omega_m=msg->angular_velocity; (没有这个运算符)

    Vector3d a_imu;//线加速度
    a_imu<<msg->linear_acceleration.x,msg->linear_acceleration.y,msg->linear_acceleration.z;

    double roll=X_t(3);
    double pitch=X_t(4);
    double yaw=X_t(5);
    //Rotation Matrix
    Matrix3d R;   //当前状态对应的旋转矩阵   旋转矩阵(3×3) Eigen::Matrix3d
    //旋转向量(3×1)Eigen::AngleAxisd
    //AngleAxisd(yaw,Vector3d::UnitZ())初始化旋转向量,角度为yaw,旋转轴为Z
    //**********************
    // 欧拉角转到旋转矩阵的做法:
    // Eigen::AngleAxisd rollAngle(AngleAxisd(eulerAngle(2),Vector3d::UnitX()));
    // Eigen::AngleAxisd pitchAngle(AngleAxisd(eulerAngle(1),Vector3d::UnitY()));
    // Eigen::AngleAxisd yawAngle(AngleAxisd(eulerAngle(0),Vector3d::UnitZ()));

    // Eigen::Matrix3d rotation_matrix;
    // rotation_matrix=yawAngle*pitchAngle*rollAngle;
    //**********************
    R=AngleAxisd(yaw,Vector3d::UnitZ())*AngleAxisd(roll,Vector3d::UnitX())*AngleAxisd(pitch,Vector3d::UnitY());

    //状态的变化
    VectorXd dotX_t=VectorXd::Zero(15);
    dotX_t.head(3)=X_t.segment<3>(6);//参考:https://blog.csdn.net/shuzfan/article/details/52367329
    //x.head<n>()// x(1:n)
    // x.segment<n>(i)// x(i+1 : i+n)   X_t(6:9)为//vx, vy, vz,

    //x, y, z,
    //roll, pitch, yaw,
    //vx, vy, vz,
    //vroll, vpitch, vyaw,
    //ax, ay, az

    //angular velocity change (角速度的变化)
    //angular velocity in the body frame (IMU) =matrix (G) * world angular velocity
    // /matrix (G)为:
    Matrix3d G, G_inverse;
    G<<cos(pitch),0,  -cos(roll)*sin(pitch),
        0,        1,   sin(roll),
       sin(pitch),0,   cos(roll)*cos(pitch);

    G_inverse=G.inverse();
    dotX_t.segment<3>(3)=G_inverse*(omega_imu-X_t.segment<3>(9));
    dotX_t.segment<3>(6)=R*(a_imu-X_t.segment<3>(12));
    dotX_t(8)=dotX_t(8)+g;

    //计算状态转移矩阵的雅可比矩阵
    MatrixXd F=MatrixXd::Identity (15,15);

    // Derivatives for G, R
    MatrixXd dGinv_droll    = delGinv_delroll(roll, pitch);
    MatrixXd dGinv_dpitch   = delGinv_delpitch(roll, pitch);
    MatrixXd dR_droll       = deltaR_deltaroll(roll, pitch, yaw);
    MatrixXd dR_dpitch      = deltaR_deltapitch(roll, pitch, yaw);
    MatrixXd dR_dyaw        = deltaR_deltayaw(roll, pitch, yaw);

    F.block<3, 3>(0, 6) = MatrixXd::Identity(3, 3) * dt; // position -> speed

    F.block<3, 3>(3, 9) -= G_inverse * dt; // orientation -> bg
    F.block<3, 1>(3, 3) += dGinv_droll  * (omega_imu - X_t.segment<3>(9)) * dt; // orientation -> roll
    F.block<3, 1>(3, 4) += dGinv_dpitch * (omega_imu - X_t.segment<3>(9)) * dt; // orientation -> pitch

    F.block<3, 1>(6, 3) += dR_droll * (a_imu - X_t.segment<3>(12)) * dt; // velocity -> roll/pitch/yaw
    F.block<3, 1>(6, 4) += dR_dpitch * (a_imu - X_t.segment<3>(12)) * dt;
    F.block<3, 1>(6, 5) += dR_dyaw * (a_imu - X_t.segment<3>(12)) * dt;
    F.block<3, 3>(6, 12) -= R * dt;


    MatrixXd U=MatrixXd::Identity (15,12);
    //P.block<rows, cols>(i, j) // P(i+1 : i+rows, j+1 : j+cols)
    U.block<3,3>(3,0)=G_inverse;  //U(3+1:3+3. 0+1:0+3)
    U.block<3,3>(6,3)=R;
    MatrixXd V=MatrixXd::Identity (15,12);
    V=U*dt;


    //EKF的状态预测
    X_t=X_t+dt*dotX_t;
    Var_t=F*Var_t*F.transpose()+V*Q*V.transpose();
    //需要将当前的预测X_t发布嘛???
    //在此处发布而不在measurement处发布的原因在于此次的频率更高,而measurement会自动更新状态
    publish_ekf_msg(X_t,msg->header);
}


void odom_callback(const nav_msgs::Odometry::ConstPtr &msg)   //marker
{
    //your code for update
    // camera position in the IMU frame = (0.05, 0.05, 0)
    // camera orientaion in the IMU frame = Quaternion(0, 1, 0, 0); w x y z, respectively
    //					   RotationMatrix << 1, 0, 0,
    //							             0, -1, 0,
    //                                       0, 0, -1;

    //20 HZ

    //get measurements
    Eigen::Matrix3d R_c_w;//camera在world frame下的旋转矩阵
    Eigen::Vector3d T_c_w;
    //赋值
    T_c_w<<msg->pose.pose.position.x,msg->pose.pose.position.y,msg->pose.pose.position.z;
    Eigen::Quaterniond q(
        msg->pose.pose.orientation.w,
        msg->pose.pose.orientation.x,
        msg->pose.pose.orientation.y,
        msg->pose.pose.orientation.z
    );
    R_c_w=q;

    //Transform back
    Eigen::Vector3d T_c_i;//camera position in the IMU frame
    T_c_i<<0.05, 0.05, 0;

    //IMU在world frame下的pose
    Eigen::Matrix3d R_i_w=Rcam*R_c_w;
    Eigen::Vector3d T_i_w=T_c_i+Rcam*T_c_w;

    Eigen::Matrix3d R_w_i=R_i_w.transpose();
    Eigen::Vector3d euler_meas=rotationMatrix2EulerVector_zxy(R_w_i);
    Eigen::Vector3d T_w_i=-R_w_i*T_i_w;


    VectorXd measurement_different(6);
    measurement_different.head(3)=T_w_i-X_t.head(3);
    measurement_different.segment<3>(3)=euler_meas-X_t.segment<3>(3);
    //对角度进行归一化到-pi~pi区间
    for (int i=3;i<6;i++){
        if (measurement_different(i)>M_PI){
            measurement_different(i)=measurement_different(i)-2*M_PI;
        }
        else if(measurement_different(i)<-M_PI){
            measurement_different(i)=measurement_different(i)+2*M_PI;
        }
    }

    Eigen::MatrixXd C=Eigen::MatrixXd::Zero(6,15);
    C.block<6,6>(0,0)=Eigen::MatrixXd::Identity(6,6);
    Eigen::MatrixXd W=Eigen::MatrixXd::Identity(6,6);

    Eigen::MatrixXd K=Var_t*C.transpose()*(C*Var_t*C.transpose()+W*Rt*W.transpose()).inverse();

    //measuremnet update
    X_t=X_t+K*measurement_different;
    Var_t=Var_t-K*C*Var_t;

    for (int i=3;i<6;i++){
        if (X_t(i)>M_PI){
            X_t(i)=X_t(i)-2*M_PI;
        }
        else if(X_t(i)<-M_PI){
            X_t(i)=X_t(i)+2*M_PI;
        }
    }


}

int main(int argc, char **argv)
{
    ros::init(argc, argv, "ekf");
    ros::NodeHandle n("~");
    ros::Subscriber s1 = n.subscribe("imu", 1000, imu_callback);//做预测
    ros::Subscriber s2 = n.subscribe("tag_odom", 1000, odom_callback);//做测量更新,虽然称呼为odom,但实际上是基于PNP的3D-2D pose estimation
    odom_pub = n.advertise<nav_msgs::Odometry>("ekf_odom", 100);
    Rcam = Quaterniond(0, 1, 0, 0).toRotationMatrix();//camera orientaion in the IMU frame
    cout << "R_cam" << endl << Rcam << endl;


    // Q imu covariance matrix; Rt visual odomtry covariance matrix
    // You should also tune these parameters
    // Q.topLeftCorner(6, 6) = 0.01 * Q.topLeftCorner(6, 6);
    // Q.bottomRightCorner(6, 6) = 0.01 * Q.bottomRightCorner(6, 6);
    // Rt.topLeftCorner(3, 3) = 0.1 * Rt.topLeftCorner(3, 3);
    // Rt.bottomRightCorner(3, 3) = 0.1 * Rt.bottomRightCorner(3, 3);
    // Rt.bottomRightCorner(1, 1) = 0.1 * Rt.bottomRightCorner(1, 1);

    Var_t.block<6, 6>(9, 9) = MatrixXd::Identity(6, 6) * 0.01;

    Q.topLeftCorner(6, 6) = 0.1 * Q.topLeftCorner(6, 6);
    Q.bottomRightCorner(6, 6) = 0.005 * Q.bottomRightCorner(6, 6);
    Rt.topLeftCorner(3, 3) = 0.1 * Rt.topLeftCorner(3, 3);
    Rt.bottomRightCorner(3, 3) = 0.1 * Rt.bottomRightCorner(3, 3);
    Rt.bottomRightCorner(1, 1) = 0.1 * Rt.bottomRightCorner(1, 1);

    ros::spin();
}
对应的launch文件
<launch>

    <!-- <node name="rosbag" pkg="rosbag" type="play" args=" $(find ekf)/bag/ekf_A3.bag -r 1" /> -->
    <node name="rosbag" pkg="rosbag" type="play" args=" $(find ekf)/bag/ekf_A3.bag -r 0.5" />
    <!-- 更改了视频播放的速率 -->
    <node pkg="ekf" type="ekf" name="ekf" output="screen">
        <remap from="~imu" to="/djiros/imu"/>
        <!-- <remap from="~tag_odom" to="/tag_detector/odom_yourwork"/> -->
        <remap from="~tag_odom" to="/tag_detector/odom_ref"/>
    </node>


    <node pkg="tag_detector" type="tag_detector" name="tag_detector" output="log">
        <remap from="~image_raw" to="/djiros/image"/>
        <param name="cam_cal_file" type="string" value="$(find ekf)/config/TA-camera.yml"/>
        <param name="board_config_file" type="string" value="$(find ekf)/config/tag_1.yml"/>
    </node>

</launch>
测试
运行代码是
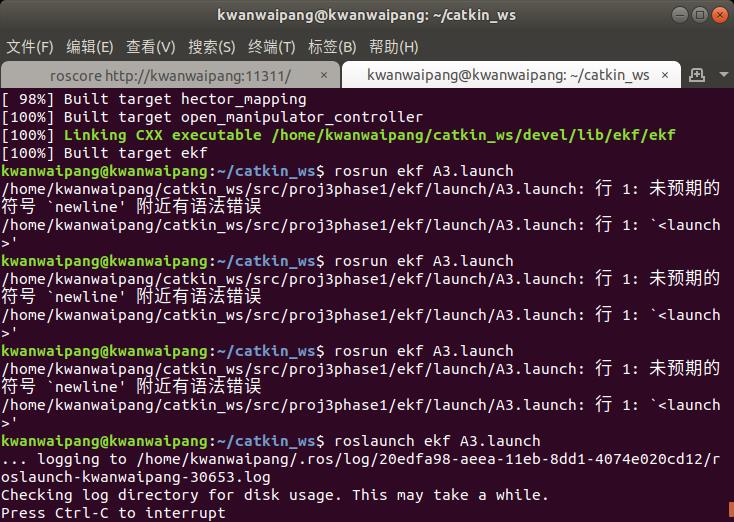
roslaunch ekf A3.launch 注意,对于launch如果不小心用了rosrun运行,会出现下面的错误:
通过rviz与rqt_plot来可视化结果~
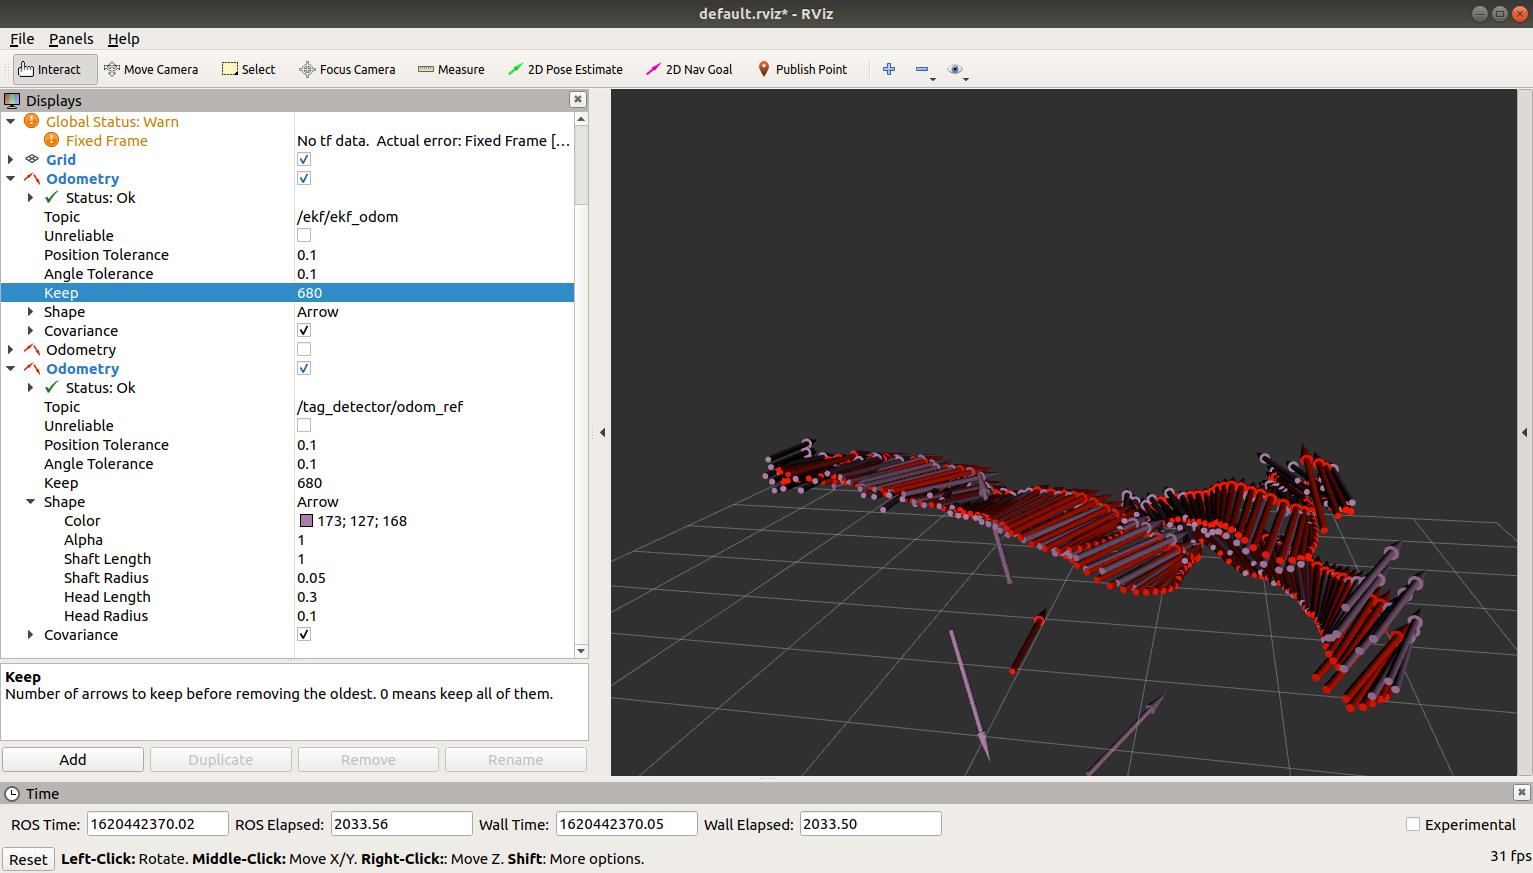
更多实验的效果可见视频~
以上是关于数据采集与融合技术 实验3的主要内容,如果未能解决你的问题,请参考以下文章